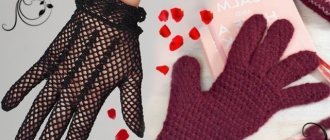
Knitted mitts are a bright and fashionable accessory that is popular today among both teenagers and adult women. Mitts are fingerless gloves or simply sleeves. They can be worn both for warmth and as an openwork decoration. Some clothing styles, such as Boho, include lace mitts to complete your look.
Crochet mitts can be crocheted from thick yarn with crochet size 4-5. Such mittens should be worn not only for beauty, but also for warmth. They are especially popular among female motorists and those who do not like to wear mittens/gloves in winter.
Crochet mitts are a good way to add variety to your wardrobe with minimal effort. After all, you don’t need a lot of thread or time to knit mitts. We have collected many patterns and master classes, viewing which you will learn that even a novice needlewoman can knit mitts. And interesting models are created not only due to complex patterns. Some simple patterns look quite impressive on mitts.
The originality of crocheted mitts can be achieved through interesting details:
- belt loop
- buttons
- borders
- applications.
Mitts are often crocheted for children. It’s interesting for children to wear mittens with an applique in the shape of their favorite character or mittens in the shape of an owl or crocodile. If your child does not like mittens, then funny mittens will help solve this problem.
Crochet different mittens for yourself and your loved ones as gifts, send your works to our editorial office for publication on the website.
Knitting lesson for beginners
In order to knit mitts, you need to learn all the nuances of knitting. Let's look in more detail at the step-by-step instructions for knitting half gloves with wedges for the thumbs, for knitting which five knitting needles are used.
Before starting work, you need to measure the circumference of your thumbs and palms above the thumb. We calculate the tightness of the knitting and the required number of loops for the initial casting around the forearm.
To make the product you need to purchase:
- Yarn
- Set of knitting needles.
Having prepared the necessary material, you should follow these steps:
- Take two knitting needles and fold them together. The required number of loops is cast on them. After casting on the 44th loop, tie the securing “tail” with the main thread in a knot.
- Then knitting occurs in the form of an elastic band, the set is performed in the form of one loop, knit and purl.
- Having cast on eleven loops, take a second knitting needle and cast on the same number of loops in the same way. As a result, after finishing the row, you should end up with four knitting needles. Leave the fifth as a working one.
- We continue knitting according to the elastic pattern until about five centimeters in height. Having knitted five 5 cm, we move on to the main pattern and reduce the number of loops to 40.
- The location of the upper side of the product falls on the first and second knitting needles, the lower side on the third and fourth.
- After we have knitted three rows from the elastic, we proceed to knitting the thumb wedge. For mitts on the left hand, it is done at the end of the fourth knitting needle, on the right hand at the beginning of the third.
- Let's start knitting mitts. Observing the required number of loops.
- For the wedge of the thumbs, we transfer eleven loops to the pins. We cast on six additional loops.
- After you have knitted the required length of the product, knit three rows using the elastic method. After this, the loops should be closed.
- Thumbs are knitted using three needles, the fourth should be a working one. After finishing knitting the thumb, the loops also need to be closed.
In order not to make mistakes and not get confused in the knitting needles and loops, for beginners on the Internet there is a detailed video of knitting mitts, loop calculation schemes and types of patterns.
During the entire process, be sure to try on, this will help you adjust the required number of loops. Using the same principle of action, you can easily knit long mittens.
Two simple options
The simplest option is mitts without a thumb, for which a hole is simply left. They usually start knitting from the bottom, and during the process they try the glove on the hand. You can knit in the round or make one flat piece. The process is as follows:
- The first stage is knitting the cuff. Its width is approximately 5 cm.
- Next, knit the part between the wrist and the lower edge of the finger hole - this is 3-5 cm.
- The hole for the thumb is made by knitting a chain of air loops 2-3 cm long into one of the columns of the finished row.
- Continue knitting the main part. Air loops are knitted in columns according to the chosen pattern.
- The mitt is knitted until it reaches the finger bones or lower phalanges.
- All open edges of the finished glove are tied.
Crochet mitts
You can knit mitts not only with knitting needles, but also with crochet. Many people have a question: how to crochet mitt gloves? To do this you need:
- Yarn
- A hook that matches the thickness of the threads.
When making half gloves using a hook, you should perform the following steps:
- Calculate the arm circumference and length of the product
- We cast on a row of thirty chain stitches. The set should not be done tightly
- We crochet rows of single crochets of the required height
- After knitting the required number of rows, you need to fold the product in half and sew. We sew using a chain stitch, not forgetting to leave a wedge for the finger
- We move on to knitting the finger and fasten it at the end.
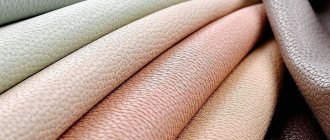
How not to get confused when choosing yarn?
It is also important to choose a good yarn for crocheting mitts. Professional craftsmen advise beginners to pay attention to those made from natural materials. It will not inject itself and will not cause allergies. There can be no recommendations regarding color. In this case, you can rely on your taste. However, for patterned items, it is better to consider a single-color thread rather than a variegated or multi-colored one. In addition, for beginner knitters, it is wiser to work on mitts knitted with regular stitches for the first time. But make them using original yarn. For example, one that itself folds into a certain pattern. As a last resort, you can make the “clothes” for the pens striped. This will also give the product originality. The main thing is to combine colors harmoniously. In this case, you should take into account the season when wearing mittens. For autumn, you can choose yarn from the red-red-yellow color scheme. For winter - white-blue-violet.
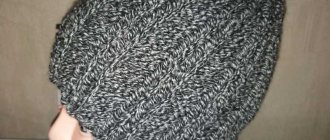
Variety of patterns and types of mitts
There are these types of knitting patterns:
- Stocking
- Shawl pattern made of thick threads
- Narrow diamond pattern
- Rubber
- Cartridge type of knitting
- Honeycomb
- Shell
- Openwork type of knitting
Types of half gloves:
- "Pipes"
- Fingerless gloves
Gloves with thumb wedge
All types of patterns have their own knitting principle, execution technique and more suitable type of yarn.
If you follow the technique, you can easily knit fashionable and practical gloves. Knitted or crocheted mitts will become an indispensable accessory in your wardrobe, which will suit any style of clothing and will warm your hands in cold weather.
What forms can there be?
Shapes of the upper part of the mittens - mittens:
- triangle
- trapezoid
- semicircle or elongated semi-oval.
When choosing elastic bands, beginners choose a regular elastic band; more advanced knitters can knit it with braid.
Whether to knit mitts with fingers or not is a decision you make yourself. For beginner knitters, we recommend knitting 1 finger in a circle with the big one, and by analogy knitting the rest, if desired.
A slight difficulty arises with hiding the thread, because... you tie it at the beginning of each finger, and if the thread is thick, then it will be very noticeable.
Photo instructions on how to knit mitts
NOTE!
- Hangers - what are they?
History of women's dresses.
Lego constructors. Story.
NOTE!
What should you pay attention to when choosing a toy for your child?- Glass beads.
How to crochet a flower to decorate clothes: diagrams with explanations and photo ideas of flowers for clothes (80+ photos)