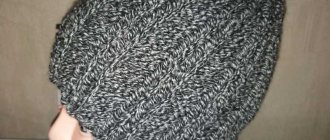
Greetings, dear knitters! Let's get acquainted with a master class on knitting a hat using cross knitting in short rows. For examples, two versions of hats were selected, made in garter stitch with garter stitch (beige) and a hat with a chain pattern (gray).
The second name for this method is called partial knitting. This is an interesting method that is quite common not only for knitting hats, but also scarves, socks and much more. Anyone who wants to be a professional should get acquainted with and master this technique.
Beanie hat - what is it?
In English, beanie means round hat. As a rule, this is a plain, calm headdress, without unnecessary accessories, fittings and fasteners.
Beanies first appeared in the last century in England. Comfortable hats were used by workers - mechanics, assemblers, electricians. Gradually, the fashion for hats spread to children - schoolchildren and students.
Who is the beanie hat for?
Today, the beanie hat has climbed to the top of the fashion Olympus. She has conquered absolutely all categories; now both children and adults are happy to introduce fashionable models of hats into their wardrobes.
Its huge advantage is that its shape suits absolutely all face types, which cannot be said, for example, about berets or caps. It is enough to experiment with changing the volume, color or adding a small lapel.
Do not forget that this is just a headdress and it can not only be a fashionable item of clothing, but also with great success protect from frost and winds.A wide variety of yarn will help you choose exactly what you need.
Algorithm for knitting fabric
The point is that we will tie the entire fabric crosswise. That is, not from the top to the bottom, or from the bottom to the top, as many of us are accustomed to, but by cross knitting. At the end of the work, the panel looks like a cone. If you hold the finished hat in your hands horizontally, on the left there will be a narrow end - the crown, on the right - a straight end (knitted without cuts). It is with this side, knitted in a straight line, that the hat is put on the head (after sewing together the two sides of the fabric).
Consequently, the size (head volume, OG) is calculated by the number of connected rows. That is, if you want the hat to be smaller in volume, not so wide, knit fewer rows than I did.
And the height (depth, length) is determined by the number of stitches cast on. This means that in order to knit, for example, a hat with a height of not 38 cm, but 25 cm, cast on smaller stitches, not 59.
For example, for a height of 30-32 cm, you need to dial 50 stitches
When the hat is knitted, the correct stitching of the fabric remains, because... There is no need to tighten the crown. It is obtained in finished form thanks to knitting in “shortened rows”.
General color trend
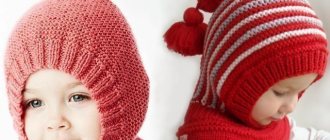
Children's hats look best made from yarn of bright and rich colors - red, yellow, bright blue, green. Contrasting inserts and chic buboes would be appropriate in the children's version.
Men's ones are made in restrained colors - black, gray, dark blue tones.
Women's hats include all color shades, mostly depending on the preferred style of clothing and the age of the beautiful housewife.
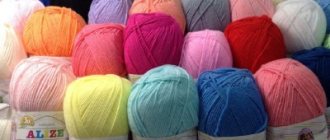
Selection of yarn and tools
Knitting a fashionable beanie hat is possible from any yarn; most often the choice depends on the season in which the headdress will be worn. For the cold season, natural wool (mohair or angora), cashmere, and bamboo fiber are suitable. For early spring or late autumn - wool blend or thin merino yarn, for the warm season - cotton, silk, viscose.
The knitting needle size is usually indicated by the manufacturer on the yarn label. It's best to follow these directions. If the threads do not have accompanying information, a rule will help you decide on the choice of knitting needles: the thickness of the tool should be 1 unit greater than the thickness of the yarn.
If the threads are textured (with pile, sequins), it is better to take a tool 2-3 units thicker.
Beanie hats are knitted on straight and circular needles. The difference is what kind of headgear you want to get as a result - seamless or with a seam.
A knitted beanie hat looks stylish in any color. Men prefer dark shades (black, gray, brown, dark blue), while the female model is distinguished by light, often pastel, tones. The children's room is always bright and rich colors: pink, mint, blue, orange.
Beanie style
Today's fashionable hat fits perfectly into all styles of modern life. Sports, casual and even classic - you can choose your own hat for any style.
Note!
How to crochet a mouse and a rat: video master class on crocheting the 2020 symbol
How to knit a warm hat with ears for a newborn boy and girl - video tutorials with patterns, instructions for beginners
How to crochet a beautiful scarf: video master class on creating unusual, beautiful, simple scarves for boys, girls, men and women
Play with colors and make a wonderful selection of your favorite things. As options, we bring to your attention a small selection that will allow you to imagine what the headdress looks like in different images:
- You have a long coat collecting dust in your wardrobe. Try putting together an outfit with a coat, trainers and a beanie.
- In early spring, when the sun is just starting to get hot, but it’s still quite cold outside, wear a light beanie hat complete with sunglasses. This technique looks really cool!
- Another spring look is a combination of wide leg-length trousers with classic shoes, your favorite light coat and a beanie hat.
- In winter, together with your fur coats and down jackets, a beanie hat with a wide scarf will become a stylish and trendy solution.
So, are you convinced that beanie hats will fit perfectly into your wardrobe and have you learned how to wear this item? Don’t hesitate and quickly learn how to properly knit something new for yourself.
Another option for beginners
This beanie hat is easiest to knit using circular knitting needles. The description and diagram will clearly show how to deal with stockinette stitch - this is the only pattern in the model. The size of this model is 56, and its height is 38 cm. To knit it you need to prepare 50 g of mixed yarn.
Beanie hat in stockinette stitch
- Cast on 64 loops and knit 6 cm of double elastic in the round.
- Then the front stitch begins. In the 1st row you need to add 1 loop after every 4 loops, knitting it behind the back wall.
- Knit a fabric 23 cm long.
- Let's start decreasing. To do this, knit every 3rd and 4th stitch together 20 times.
- 60 loops left. Every 2nd and 3rd stitch should be knitted together.
- Continue knitting 40 stitches without decreasing.
- Then decrease 2 loops at a time, knitting them together to the final 5 loops. They will need to be tied together with thread.
Stockinette stitch pattern with knitting needles
Interesting : Knitted berets - knitting 2019-2019: description, diagrams, photos
Selection of knitting needles and threads for a hat
Once you have decided what time of year you will wear the hat, under what things and in what places, you can come close to choosing the material.
For the winter season, it is recommended to make a hat from angora or cashmere - these are natural materials. If you are planning to knit a hat for an adult, then you can also look towards artificial materials - bamboo fiber, acrylic and polyester.
In the demi-season period, threads made from half-wool, merino and cotton will be relevant. Thin merino threads will allow you to create a warm and fairly thin hat, ideal for the off-season. Cotton hats are ideal in early autumn and late spring, because... They are unlikely to be able to protect your head from the cold.
Note!
- How to knit a hat with a lapel using knitting needles or an elastic band: step-by-step instructions for beginners
- How to crochet a winter hat: 95 photos of new models of warm, fashionable, original knitted hats with a lapel and a beautiful pattern
Light and beautiful crochet shawl: photos of chic openwork scarves with simple patterns
Once you have chosen a yarn, carefully examine its label. The label usually indicates the number of knitting needles that are recommended for this type of yarn. Carefully study the photos of labels and do not hesitate to ask questions to the consultants. If no information is found, then follow the rule - the thickness of the knitting needle should be one unit greater than the thickness of the thread.
To work you will need straight or circular knitting needles. Which ones exactly will depend on the pattern. If the hat requires a seam, then you should take straight ones; for a seamless one, circular ones are ideal.
Transverse shortened rows
The knitting principle is incredibly simple. We take knitting needles that match the thickness of the threads and begin to knit several auxiliary rows. They are needed to sew the finished hat with an invisible knitted seam along open loops.
How to make a knitted stitch Loop to loop can be seen here.
Note: You don’t have to bother with open loops if the yarn is fluffy.
The seam is still not visible. But if the seam is sewn with a knitted seam that imitates a knitting row, you can wear the hat without thinking about where the back is and where the front is. It's almost invisible. Before unraveling the auxiliary rows to free the loops, they need to be steamed. Then the loops will not move and the process of connecting open loops of the fabric will be very easy.
Advice
It is never a bad idea to do a WHT (wet heat treatment) before stitching. Then the loops will be fixed and it will be easy to connect them with a needle. The seam will not be visible at all.
Those who are too lazy to bother with auxiliary rows will have to make the stitching seam as invisible as possible. This is also possible, but it seems justified only when we knit from very fleecy or boucle uneven yarn.
Various hats
The particular popularity of hats entails the appearance of various variations. Check out the new products and decide what suits your head best. Classic solutions or newfangled trends, the choice is yours.
Facial surface
A beanie made with stockinette stitch looks simple and impressive; this model is especially interesting in its seamless version.
For a size 57 hat, take number 4 circular knitting needles with fine yarn (100 grams per 350 m length).
We invite you to familiarize yourself with a short master class:
- 132 stitches are cast into a circular stitch.
- The hat is knitted in stockinette stitch until the height reaches 24 cm.
- All loops are divided into 4 parts. Each part contains 33 loops.
- We perform the formation of the crown - 1 row and the next odd ones at the beginning of the wedge, the first knit stitch, then 2 together, then all knit stitches, leaving the last two wedges on the knitting needles. The penultimate loop must be removed, the last one must be knitted and threaded through the penultimate unknitted one. This is done for each of the 4 parts.
- 2 and subsequent even loops are performed completely with knit stitches without decreasing.
- After 3 loops remain on the knitting needles, you can finish your work, tighten the loops with working thread and carefully hide them on the wrong side.
- To decorate such a rather simple hat, choose the most beautiful crown in a specialized store. You can attach it to the hat using a button or simply sew it on, it all depends on the material of the top and your imagination, because when you use a button you can purchase several tops for one hat!
Manufacturing stages
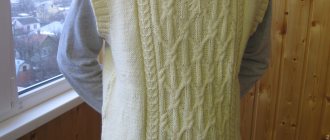
Many girls find knitting difficult. A beanie hat is made simply with knitting needles, without the use of complex patterns or an abundance of shades in one product. It is beautiful in its brevity and consistency in one color. There are many options for knitting; the pattern of the chosen model must be studied and calculated before starting work. This will help achieve the desired result.
Classic beanie
This beanie hat is knitted in short rows using garter stitch. Materials and tools: yarn (110 m per 100 g), straight long knitting needles No. 8, sewing needle.
Knitting pattern:
- Cast on 31 stitches (P). Remove the first one onto a knitting needle without knitting. Next, knit all the stitches except the last three.
- Then comes knitting the hat in short rows with knitting needles. When 3 stitches remain, place the working thread on the wrong side behind them. Remove one loop onto a working knitting needle, throw the thread back to the front side and return the loop to the knitting needle from which it was removed. Unfold the knitting, throw the thread over the knitting needle and knit the entire row (the last loop is purl).
- Knit the next row of the beanie hat with knitting stitches (except for the last 5). When 5 sts remain, knit the shortened row in the same way as described in the first step. Turn the knitting over, knit all the stitches except the edge stitch.
- The next row is all knit rows except the last seven. Before the seventh P - a shortened row, unfold the knitting, knit all the loops.
- The next row is all knit rows except the last one. It is transferred from knitting needle to knitting needle in the same way as in the second step. The first wedge is ready. Short rows in work are needed to form wedges. Their number in the product depends on the circumference of the head. By shortening the loops, you get a neat crown.
- When the required number of wedges is knitted, close the loops and assemble the hat with a knitted seam.
A garter stitch beanie hat will suit both women's and men's wardrobes. Often such heads can be seen on children.
A beanie hat cannot be knitted in the round with short rows of needles. Only straight tools are suitable for the job.
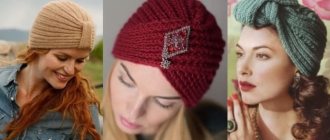
With lapel
The beanie hat with a graceful lapel is knitted on circular needles. Any pattern can be chosen - with an elastic band, plaits, braids. Materials and tools: yarn (100 g per 500 m), knitting needles No. 5. Cap size – 54.
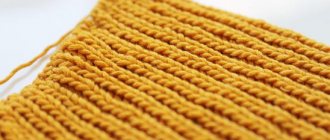
The English elastic pattern is made like this:
- cast on an odd number of stitches;
- first row: the edge loop is removed, 1 loop is removed from the front wall, yarn over, the next loop is removed, the front loop is removed from the front wall, yarn over, the loop is removed, continue until the end of the row;
- second row: remove the edge, yarn over, remove the loop, knit the combination of yarn over and the removed loop.
- repeat the sequence until the end of the row.
Description of the main process:
- Dial and close in a circle 70 P.
- Using an English elastic band, knit about 35 cm (lapel).
- Next, knit with a regular elastic band of 4 cm (1 P - front, 1 P - purl). Be sure to ensure that the pattern is not disturbed.
- Next, the crown is formed. You need to knit 2 loops together and knit the next row like this: throw the working thread over the loops, remove one unknitted, make the next two loops into one. Knit like this until there are 18 pieces left.
Pull the remaining loops together with working thread and secure. Hide the tip on the wrong side. The beautiful hat is ready.
Stockinette stitch
This master class will help you learn how to knit a beanie using stockinette stitch. Materials: yarn (100 g per 350 m), circular knitting needles No. 4. Hat size – 57.
A diagram describing the work process step by step:
- Cast on and close 132 stitches in a circle.
- Knit them using the knitting technique in the round until the height of the cap reaches 23 cm.
- Form the crown - divide all the loops into 4 wedges, mark with markers (each compartment has 33 loops).
- The first row of the crown and the subsequent odd ones (at the beginning of each wedge): 1 p knit, 2 p together behind the back wall, then all knit until the last two loops of the wedge (slip one of them, knit the other and thread through the unknitted one). Make each wedge in this manner.
- The second row of the crown and subsequent even rows are all knit stitches without decreases.
- Pull the last 3 remaining loops with working thread and fasten.
From thick yarn
Knitted from thick yarn, the beanie is voluminous and textured. This model does not require a pattern, so the pattern is suitable for beginner craftswomen. Materials: yarn (100 g per 40 m), circular knitting needles No. 10. Hat size – 52.
Step-by-step description of the process:
- Cast on and join 46 stitches in a circle.
- Rib knit (one knit, one purl) for 35 rows.
- For the next 5-6 rows, decrease evenly (knit 2 loops together). As a result, there should be 14 P left.
- Thread the working thread into the remaining loops, tighten well and secure the crown.
You can knit a voluminous beanie hat in one evening. Thick yarn significantly reduces the amount of work, and the hat turns out beautiful and fits any style.
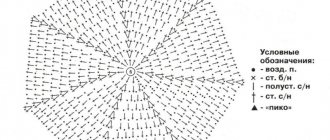
Often in master classes, knitting a beanie hat is depicted schematically - in the form of columns, dots and hooks. Such diagrams and descriptions for them are quite difficult for a novice needlewoman to understand.
The knitting pattern for a fashionable beanie hat is deciphered as follows:
- yarn over - circle or arc;
- two knit stitches together – a square divided diagonally into 2 triangles;
- unknitted loop – 2 dashes one above the other.
- facial loops - vertical column;
- purl loops – dash.
A knitted beanie for a woman, man or child is a universal headdress. Its compatibility with different styles of clothing and wardrobe items will allow the model to be at the peak of popularity for a long time.
Voluminous beanie hat with knitting needles: description and diagram step by step
Large knit beanies are very popular this year. You can knit a hat from thick yarn very quickly; experienced needlewomen can do it in a few hours.
A voluminous and beautiful hat will go perfectly with any style of clothing, and if you add it with a scarf, you will have an excellent set. Bulky threads do not need an additional pattern; stockinette stitch, garter stitch, or simple elastic are suitable.
For example, for a size 52 hat, take threads (100 grams per 40 meters in length) and number ten circular knitting needles. It is proposed to knit a white cap, because... white color will add additional volume and will look good with any things.
- 46 stitches are cast into a circular stitch.
- With a simple elastic band (1 knit alternates with one purl) knit 36 rows.
- In the next 5-6 rows we make a uniform decrease by knitting 2 loops together.
- After 14 loops remain on the knitting needles, you will need to pull the working thread through them and fasten the crown.
- Pull the remaining thread to the wrong side. The hat is ready.
Model features
A beanie hat is a headdress that does not have fasteners or ties, but fits tightly to the head and does not fall off. Sometimes this model is called a bean, since the word comes from the English beans. The visually elongated shape of the hat really resembles a bean. The main distinguishing feature of the beanie is its versatility. It complements looks in casual, sports, hippie, and grunge styles. Looks equally stylish on women, men and children.
A variety of model types allows you to choose a hat for any face shape. Today the most common styles are:
- voluminous - knitted from thick yarn, beanies fit perfectly into oversized looks;
- with lapels – add additional volume, the width of the hem can be adjusted;
- in the shape of a stocking - the free part can be folded at the back of the head;
- hatchet-shaped – the free edge visually resembles an ax;
- with ears or a pompom - it looks cute and even flirty, suitable for teenage or children's looks.
In the form of a hatchet
In the shape of a stocking Voluminous With a lapel With a pompom
Hat with lapel
The lapel will decorate your hat and make it unusual. It is proposed to knit a hat with a lapel on circular knitting needles. Any pattern is suitable for this hat - plaits, braids, elastic bands. It is recommended to take fairly thin yarn (100 grams per 500 meters of length), knitting needle number 5.
Product description size 54:
- 70 loops are cast on in a circular manner.
- A 35 cm lapel is knitted with an English elastic band.
- Knit 4.5 cm with a regular elastic band (1 knit, 1 purl).
- Forming the crown - loops are knitted two together. In the next row, bring the working thread through the loops, remove one without knitting and knit the next 2 loops into one. Do this until there are 16 stitches left on the knitting needles.
- Tighten 16 loops with working thread and secure. Bring the end of the thread to the wrong side.
Sizing
In order for a knitted beanie hat to fit snugly on your head, you must follow the following rules:
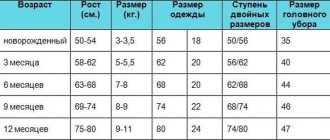
- Take correct measurements. To determine head circumference (HC), the measuring tape should pass over the eyebrows, ears, and along the most convex point on the back of the head. Height is measured by placing a tape from ear to ear across the top of the head. The resulting value must be divided in half.
- Be sure to knit the sample initially. To do this, you need to cast on 20 loops and knit about 10 cm of the desired pattern. Next, the canvas is measured in width (it can be slightly stretched), and a calculation is made. For example, 20 loops, 14 cm width, the hat will be size 56. We multiply 20 by 56 and divide by 14, we get 80. This is the number of loops that you need to cast on for a size 56 hat.
- Calculate the height of the beginning of the decreases. To begin with, the radius is calculated using the formula: OG: 3.14: 2 (56: 3.14: 2 = 9). Next, we determine the height of the beginning of the increases (the distance from ear to ear is 42 cm), it turns out 42: 2 - 9 = 12. This means that after knitting 12 cm you need to start making decreases.
The height of the hat itself is individual in each individual case.
Classic beanie
For the classic model, a popular and simple knitting pattern is initially used - garter stitch. Such a beanie made of threads with such characteristics would look great - 100 grams of thread in 110 meters. As a tool, select straight knitting needles number eight.
Garter stitch will be appropriate not only in women's, but also in men's clothing. Garter stitch is often used in children's products.In order for the hat to better hold its shape, you can use a double thread when knitting.
Beanie for beginners
This binnie hat is knitted using size 5 knitting needles. The description and diagram will help you cope with garter stitch - the main pattern in the product. Also, to knit this pattern, you will need to understand the technique of shortened rows performed with knitting needles. But we are sure that you will cope well with this too.
Garter stitch beanie hat
- Cast on 46 stitches and knit 2 rows in garter stitch. We remind you that this involves knitting only with facial loops.
Garter stitch pattern
- Then knit 40 stitches in a row, and leave the unknitted 6 on the knitting needle.
- In the opposite direction, knit 40 loops, and leave 6 on the knitting needle again.
- Unfold the fabric, knit 41 loops.
- The fourth purl row should consist of 41 garter stitches.
- Having knitted 42 loops, tie the last one and unfold the knitting.
- Repeat step 5, just keep in mind that there will be 42 loops here.
- Knit 43 loops, tie the last one, turn the fabric.
- The eighth purl row requires 43 garter stitch stitches.
- Then 44 loops are knitted, the last one is knitted as usual and the knitting is turned.
- Knit 44 facial loops on the tenth purl row.
- Now knit 45 loops, not forgetting to tie the last one.
- Wrap 1 unknitted loop and turn in the opposite direction.
- The twelfth purl row is 45 loops. This is how you get your first wedge.
- All points from 2 to 14 must be repeated again. This way you will tie the crown ovally.
- To complete the work, knit 2 rows similar to the initial ones and pull off the crown.
https://youtu.be/https://www.youtube.com/watch?v=AOhrncKf9cA
_
Beanie hat knitted description and diagram step by step - photo ideas from the best craftsmen
Please repost
0