With the onset of cold weather, warm clothes become relevant. And here fashionistas are faced with a dilemma: how to combine functionality and uniqueness in one piece of clothing? After all, the purchased hats, scarves, sweaters, cardigans “look the same.” We suggest learning how to knit a “honeycomb” pattern, which makes the knitting not only voluminous, but also warm. Even a beginner can master this knitting, and you will look stunning at the same time.
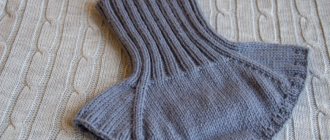
Fine ribbed knit
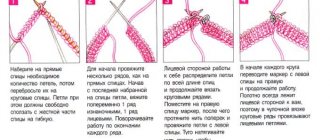
Let's start with the small honeycomb pattern. Those who have already tried knitting will see how simple this knitting method is. Look at the photo to see what the knitted fabric looks like. Before we start knitting, let’s agree on some abbreviations:
- row - r.;
- loop - p.;
- facial - faces;
- purl - purl;
- edge:
- at the beginning of the river -KR.;
- at the end of the river - KR.;
- Yarn over - NK.;
- *…* - repeating fragment until the end of the river.
Description of knitting:
- 0th row: cast on the number of loops so that it is divisible by 4, and add 2 CR;
- 1st r.:╔ KR., * person.p. - whole row *, KR.╗ (knit purlwise);
- 2nd row:╔ KR., * 1 person. p., 1 p. is not knitted, but transferred from the auxiliary (left) to the working knitting needle (right), NK., * edge; Important: make sure that the thread is behind the work when removing the loops;
- 3rd row:╔ KR.p., * NK. transfer from the auxiliary knitting needle to the working knitting needle, without knitting (thread behind the removed loop), k2. p.,* edge╗. Tip: in this pattern there are “honeycomb” faces. knit by the upper segments;
- 4th r.:╔ KR., *1 p. do not knit, remove, NK., 1 p. together with NK. we knit faces. n.,* KR..╗;
- 5th day: ╔ KR. 1 person, * NK. pick up with the right knitting needle, k2. p.,* NK. do not knit, transfer to a working needle, knit 1, KR..╗;
- 6th day: ╔ KR. *1 p. together with NK. knit knit stitch, pick up 1 stitch, do not knit, NK., * edge╗.;
- 7th, 11th, 15th rows, etc. - knit as the 3rd row;
- 8th, 12th, 16th - like 4th row;
- 5th row: chrome. p., 1 person, * NK. we remove from the left knitting needle to the right one, without knitting, 2 knits. p.,* NK. remove, do not knit., 1 knit stitch, edge stitch;
- 6th row: chrome. p., *1 p. together with NK. knit knit stitch, remove 1 stitch without knitting., NK., * chrome. P.; 7th, 11th, 15th rows, etc. - knit like the 3rd row;
- 8th, 12th, 16th - like 4th row;
- all subsequent r. honeycomb pattern - in accordance with the diagrams.
Read
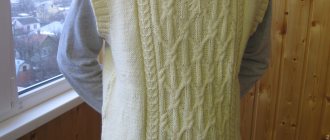
Step-by-step instructions for beginners on knitting a warm shirtfront
The drawing does not convey the beauty of the honeycomb pattern. We recommend knitting at least up to the 15th row to see what kind of voluminous fabric can be created with knitting needles.
If something doesn’t work out for you, try again in parallel with the master who made this video.
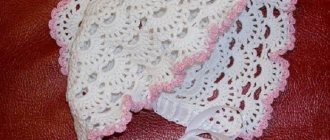
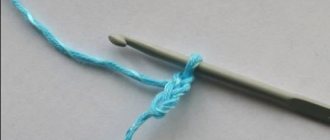
Detailed patterns describing how to crochet a beret
You can knit berets not only with knitting needles. This is easy to do with a crochet hook. Using this tool, summer, openwork models are often created. You can also crochet warm winter variations.
Summer
It’s easy to knit a beautiful summer beret using a circle pattern. You can choose any option you like. An effective model is shown in the diagram below. The base or bottom is knitted according to the pattern. The result is an openwork circle:
- Next, the bottom part of the cap is made. To do this, knit 4 rows with simple sc.
- After this, they begin to decrease the loops evenly across the entire diameter of the circle.
- Reaching the desired head circumference will be a signal to stop decreasing.
- Knit 3 more rows without them, and then stop. It is better to knit such a beret from light threads: cotton, linen.
Volume
A summer voluminous beret will be an excellent accent to an airy look. It can easily serve as a replacement for a Panama hat in combination with a swimsuit or beach tunic. Knitting is done from thin threads with a natural composition. According to the diagram, the bottom of the hat is created.
Knitting according to the pattern is carried out until the part reaches a diameter of 35 cm. After this, 1-2 rows are knitted evenly, then decreases begin. This area is approximately 10 cm.
At the end, several rows are knitted to fit the volume of the head. The finished item can be further decorated as desired.
Openwork pattern
Crochet berets knitted with an openwork pattern are popular. Any suitable scheme is chosen for work. Such summer hats are popular for girls or adult women. Knitting is performed by analogy with the previous methods.
The diameter of the bottom can be adjusted according to your needs. To do this, knitting in a circle pattern is stopped at any level. Next, decreases and landings are performed around the circumference of the head.
Lush column pattern
Using a pattern of lush columns, you can knit a denser, but no less impressive version of the beret. As in the case of openwork, there are different patterns for making the bottom. The choice is made at will.
An interesting product was created by making the borders of the wedges with lush columns. They start by knitting a ring, each loop of which includes voluminous columns.
Gradually, in subsequent rows, simple columns are added between these elements. The result is individual wedges separated by strips of lush columns. Similar to increases, after reaching the required diameter of the bottom, decreases are made.
Irish lace technique
You can even crochet a beret for a woman using the Irish lace technique. To do this, you need to prepare a pattern for the bottom. It will serve as a circle of the required size. Motifs of flowers, leaves and other elements you like are knitted separately.
The finished parts are laid out on the pattern. It is necessary to fill the circle, making an aesthetically pleasing layout.
After achieving the desired result, the parts are carefully connected to each other.
The result is a circle that will serve as the bottom. All that remains is to knit the sides. To do this, tie a rim of sc to the circle.
Ladder pattern
An unusual, openwork crocheted beret is obtained according to the ladder pattern. By analogy with other knitting options, first make the bottom in the form of a circle according to the pattern. The result is a canvas with interesting steps:
- After the base part is formed, they begin to decrease.
- Having completed the circle, make 1-2 rows along the diameter without changing the size of the canvas. Next will be decreases by analogy with the previously made increases.
- The reduction of loops occurs in each step. For a comfortable fit on the head, a strip without a pattern is completed.
Warm option
By analogy with the previous options, it is easy to crochet not only an openwork summer product, but also a warm item. To do this, use threads with the appropriate thickness and composition.
It is better to knit according to a pattern without openwork or to make a lining for the product. It is best to use beret patterns adapted to the winter season.
It’s easy to knit a summer beret or a warm equivalent using crochet or knitting needles. There are many diagrams and descriptions that can guide both a beginner and an experienced master.
You can create a beautiful, unique product with your own hands without any extra effort in just a few hours of work.
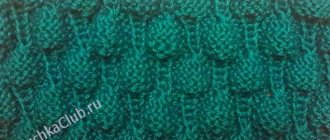
Convex honeycomb cells
It turns out that you can use knitting needles to create a honeycomb from yarn! Look how impressive this pattern looks.
In the first photo, the pattern is made with purl stitches on the stockinette stitch. A step-by-step scheme of work is proposed:
- 0th row: cast on 20 loops for the sample (18 (multiples of six) + 2 stitches), add an additional 2 edges to this number. pet. - together 22 p. And then we knit r. in this order:
- No. 1: KR.,*p. p.,* Kr.p.;
- No. 2: KR., *persons. p.,*KR.p.;
- No. 3: KR., *2 sts transfer from the left knitting needle to the working knitting needle, do not knit. (thread behind the fabric), knit 4 stitches, * pick up 2 stitches without knitting, edge stitch;
- No. 4: KR., * 2 sts, without knitting, remove (thread in front of the loops), 4 purl sts, * remove 2 sts, KR.;
- No. 5.: repeat 3rd;
- No. 6.: knit as 4th;
- No. 7: start from 1st;
- No. 8: like 2nd.
Use this description of the honeycomb pattern and knit a hat, vest, or sweater. They will be warm and comfortable.
Knitting patterns for a beret for beginners
Even a novice craftswoman can knit a simple beret. The task is not considered difficult to understand. The more complex the drawing is used, the more sophisticated the model, the more effort must be made to create a beautiful thing.
Classic beret
Knitting a classic beret pattern is suitable for beginner knitters. Complex patterns and unusual knitting techniques are not used here. Everything is extremely simple:
- cast on the knitting needles the required number of loops for the elastic band or strap, knit the required height of the part;
- after this, they begin knitting with the main pattern, and at the same time begin to make increases evenly throughout the entire volume of the hat;
- after achieving the desired expansion of the product, they abandon the increases and perform about 10 rows of straight fabric;
- the next stage will be a uniform decrease in loops, which is done by analogy with increases, but in the reverse order;
- After the formation of the base circle, the decreases do not stop; it is necessary to achieve a final narrowing of the fabric, allowing the remaining loops to be pulled together onto one thread.
The finished product is subjected to HTO. To give the item a stable shape while drying, the hat can be stuffed with fabric around its maximum circumference. This beret can be knitted using stockinette stitch or any simple pattern.
Leaf pattern
Fitting any complex pattern into a beret can be challenging. It is necessary not only to choose a design that will look beautiful on the hat. It is important to make the correct calculations.
You will have to successfully combine the number of loops required for your size with the number of elements in the pattern. Some schemes are ideal for the role of “beret”. The option with leaves will be an excellent confirmation of this.
Knitting can be done either using the classic method or from the center of the base circle.
Braid pattern
Braids will look great on a beret. You can use simple classic harnesses or complex aranas. The main task will be the correct calculation of the loops. Braids can be placed in any direction.
They can be longitudinal and transverse, run along the boundaries of the wedges or be located along the entire perimeter of the cap. For knitting, it’s easier to take a ready-made beret pattern with braids. It is difficult for beginners to make calculations on their own, come up with and adjust a pattern.
Multicolor
Color has always been considered a great way to add variety to a piece. For knitting, you can choose threads of any shades. Elegant, unusual options can be easily achieved by using several different colors at the same time.
By changing colors it is easy to create different designs. These can be simple stripes or complex jacquard patterns.
The technique is chosen based on your own skills. Don't forget about the secrets of changing colors in different rows when knitting in the round.
Otherwise, the procedure for creating the classic version with knitting needles remains unchanged. The product can be knitted in any way. It is necessary to combine patterns and different colors in one product with caution. There is a risk of getting an overloaded picture.
Garter stitch
Knitting a beret in garter stitch is suitable for beginners. This is a simple way that allows you to get a basic item. It is easy to diversify a beret made with simple knitting using a brooch, or you can introduce an additional color during the knitting process.
Using this simple pattern, you can create the entire thing, or just the bar or main circle of the hat. Garter stitch can be combined with a more interesting pattern. This can be done in stripes or any other way.
Heart pattern
A good combination of garter stitch and pattern is a pattern with hearts. Using a ready-made scheme, you don’t have to make complex calculations or come up with combinations. In the prepared pattern, everything is calculated and successfully combined in advance.
All that remains is to choose your size, take threads with similar characteristics and knit this model. The finished hat looks impressive. Delicate pastel colors and the light fluffiness of the yarn add a special chic to the product.
Knitting using yarn of different colors
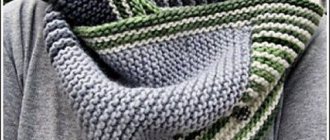
The two-color method of performing the honeycomb pattern looks stylish and elegant. Berets, vests, sweaters made with this knitting will look very original. A two-color wardrobe item is much easier to combine with other things, combining them harmoniously or choosing them based on the principle of contrast. It depends on your mood and preferences.
It will be difficult for a beginner to understand the diagrams of this process, so we suggest stocking up on two shades of yarn and repeating the “honeycomb” pattern exactly with the skilled hands in the video.
Video: Honeycomb pattern with two thread colors
Some tips
If you decide to use the schemes that we discussed above, remember the following points:
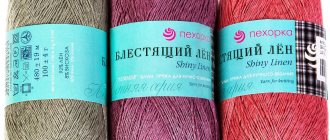
- making voluminous knitting with a honeycomb pattern requires more yarn consumption than for regular satin stitch or openwork;
- choose a straight thread with good twist, without thickening or curls;
- take knitting needles of a smaller diameter than the thickness of the yarn requires;
- things knitted with convex patterns cannot be ironed, otherwise they will stretch, lose their structure and, most likely, become unusable.
Read
Technique for knitting a mohair scarf according to the pattern
And one more thing: things knitted with a honeycomb pattern are more suitable for winter wear. It is difficult to choose something better for a ski run or walks through a snowy forest. If you don’t feel comfortable warmth in your workroom, then relief knitting will definitely warm you up!
Features of the beret
A beret is a hat that evenly expands in the middle part of the product. Simply put, the thing resembles a pancake. The circle is usually formed by equal wedges in the product.
To make a knitted product, unlike a sewn analogue, there is no need to use a pattern when creating it. To knit this type of hat, different methods are used.
The item can be stitched, whole, knitted in the round or with wedges. The appearance of the beret depends not only on the chosen model and its correspondence to the type of the owner, but also on the yarn from which it is knitted. The higher quality and finer the threads, the more elegant the product will look.