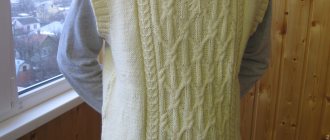
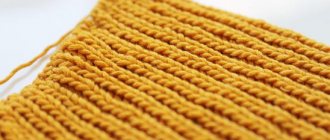
The raspberry pattern with knitting needles is a knitting technique that has been known for a long time. But in the last year it has been rapidly gaining popularity. We can say that it has become a trendy pattern. Previously, it was used for knitting children's clothing: hats, blouses, but now not a single fashion show of knitted fashion takes place without a product knitted with viscous raspberry. They knit women's jackets, coats, and jumpers. The second name of the picture is berry.
Raspberry berry knitting pattern: where to start?
Knitting any product, even the smallest one, always begins with preparing everything necessary, as well as with mandatory calculations.
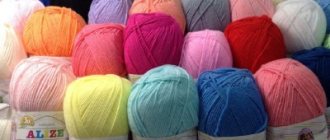
The raspberry pattern, knitted with knitting needles, looks most advantageous when using plain yarn, without any inclusions such as lurex or terry threads. This is explained by the fact that the pattern itself is self-sufficient, and the abundance of details will overload the finished item.
Be sure to keep in mind that raised patterns, such as the raspberry pattern, require more yarn than flat patterns. It follows from this that it is better to purchase a little more skeins of yarn than you usually take, in reserve. This will save you from having to buy additional yarn, or even order it if suddenly the desired color is not in stock.
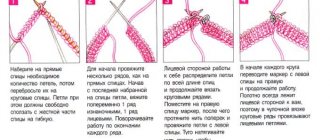
Before starting work, you must knit a sample. This will be needed so that you can understand how many repeats you need to place on the product, as well as correctly calculate the loops.
Please note that in this pattern, each first loop in the row is not knitted, but simply removed. In this case, every last loop is knitted purlwise. When working with this pattern, in some rows you need to knit five from one loop. In this case, all five loops are knitted. All yarn overs in the description of the pattern are performed only straight.
Advice from the experts
In order for the knitted item to bring pleasure and turn out exactly as intended, you should adhere to some rules and recommendations of experienced craftsmen. Needlewomen advise the following:
- The raspberry pattern refers to three-dimensional, relief ornaments. Therefore, before you start knitting a product, you should definitely create a small sample in order to correctly calculate the number of loops needed.
- Products knitted with a similar pattern tend to stretch.
- If the item was knitted with cotton threads, then after washing it may decrease by 1 size.
- It is advisable to tie buttons not with thread, but with a thin elastic band. The product will stretch less.
- Each product must have an elastic band. Otherwise, its edges will begin to curl when worn.
- It is advisable to sew a lining onto cardigans and sweaters. Thus, the knitted product will not stretch and retain its original appearance for as long as possible.
- To prevent the pullover collar from stretching out after washing, make bastings with harsh threads.
- It is advisable to wash all products by hand.
- Knitting needles are selected according to the thickness of the yarn. If the knitting pattern contains many air loops, then the knitting needles are selected one size larger.
- Do not tear off the pellets formed on the surface of the product. There are special devices for this.
By following simple rules, you can preserve an item knitted with a convex pattern with knitting needles for as long as possible. The diagrams and description of this ornament are quite simple and understandable.
Raspberry pattern with knitting needles: description
- The description of the pattern is easy, even a beginner can handle it. There are 18 rows in one repeat. And the number of loops is divided into 6 + 5 loops and + two edge loops. Row 1 – purl 2 loops, knit 1, purl 2, knit 5 from 1 loop (knit, yarn over, knit, yarn over, knit). Row 2 – knit 2,* purl 1, knit 9*, knit 2. From the 3rd to the 6th row inclusive, the loops are knitted according to the pattern. Row 7 – purl 2 loops, knit 5 from 1 loop (similar to the description in row 1), purl 2, knit 5 stitches together. Row 8 – 9 knit stitches, 1 purl stitch. From the 9th row to the 12th inclusive, the loops are knitted according to the pattern. Row 13 – purl 2 loops, knit 5 stitches together, purl 2, knit 5 from 1 loop. Row 14 – knit 2 loops, *purl 1, knit 9*, knit 2. From the 15th row to the 18th row inclusive, the loops are knitted according to the pattern. Row 19 – knitting begins from the first row.
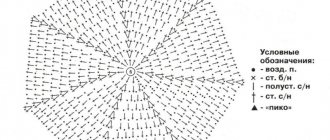
The pattern for this pattern is quite simple:
The report is only 6 loops.
Important! Please read the diagram carefully before starting work.
- Having knitted 4 reports in height according to the pattern, that is, 8 “raspberries” in a checkerboard pattern, we move on to the cuff. You definitely need to close the last row of “raspberries” without making any more increases.
- In order to knit cuffs, it is better to take smaller knitting needles, for example No. 8. We make decreases in this row so that the cuff fits as tightly as possible to the arms. We knit a 1*1 elastic band, as at the very beginning of work, 6–7 centimeters long. Afterwards, we just close the loops of the sleeves with a crochet hook and knit several rows of the strap of the product - this is the part that frames the front shelves and collar.
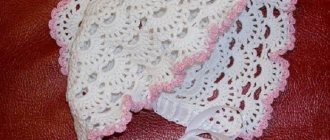
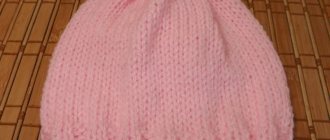
How to knit a baby hat with a raspberry pattern using knitting needles?
The pattern described above is ideal for making a hat for a little fashionista. Below we will look at how this can be done.
To work you will need knitting needles number 2.5 and a crochet hook. We will crochet green leaves, which we will sew to the top of the finished product. The knitting density should be about 20 stitches per 25 rows, and be about 10 cm by 10 cm.
First of all, we cast on 101 loops and start knitting a 1 by 1 elastic band. A larger elastic band will not look particularly appropriate on this product. We continue to knit the elastic in height until it reaches 4 cm. Next we knit 3 cm upward in garter stitch. As soon as the desired height is reached, we switch to the raspberry pattern and knit 12 cm up.
As soon as the desired height of the product has been reached, we begin to knit 1 knit loop, 2 purl loops, and then make 1 out of 5 loops, that is, we knit 5 knit loops together. Through the row we continue to knit 2 loops together. We pull the remaining loops together at the end and sew the fabric at the back.
We knit leaves from green yarn and sew them to the top of the head.
That's it, the girl's hat is ready!
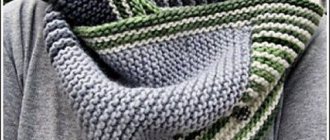
back side
Beautiful honeycombs - this pattern has captivated many craftswomen. But few people know that the reverse side of such a product may well compete with the front. On the reverse side you get no less beautiful and voluminous braids. The honeycombs appear concave, thereby creating a 3D image. The knitting pattern is the same, but the pattern is completely different. No additional calculations are required. The thread consumption is the same. If you want something new, extravagant, but not very voluminous (and raspberries add volume), braids tied with raspberries are a compromise solution to the issue.
Stoles knitted with the reverse side of a raspberry will attract the attention of others with their originality and uniqueness. Short sweaters will look good on thin girls - trapezoidal tops; making elastic cuffs in this model is not necessary, it is better to leave them bell-shaped.
You shouldn’t limit yourself to familiar products; you should experiment and come up with a completely new, unusual, different model that will arouse genuine interest among others. Jacket, jumper, hat - the flight of imagination is limitless!
How to knit a jumper with a raspberry pattern for size 44-46?
To work, you will first need yarn. It is desirable that its composition be made from the same ratio of cotton and acrylic. If the length of the thread in a skein is 200 meters, you should take 5 skeins. In addition, you will need knitting needles number 4 and 4.5.
Knitting back
- First, you should cast on 86 loops, of which 84 are main and 2 edge.
- Using knitting needles number 4, we begin to knit an elastic band 1 by 1, knitting up about 6-7 cm.
- As soon as the desired height has been reached, we replace our knitting needles with number 4.5 and knit the main back fabric in garter stitch 49 cm upward.
- As soon as the required part is knitted, we begin to knit the right half of our product.
- From the wrong side of the fabric we knit 35 loops and turn the product.
- In the next row we knit 32 loops and turn the fabric again.
- Next, we knit 30 loops and turn the product.
- In the next rows we knit 28, 27, 26 loops, turning the fabric over each time.
- As soon as we reach the shoulder seams, bind off all the loops.
- We leave the central 34 loops uncovered for further knitting of the neck.
- The left side of the back is knitted similarly to the right side, symmetrically.
Knitting front
- The front of the future jumper is knitted similarly to the back.
- The neck should begin to be formed with a length of 46 cm in the knitted fabric, and the height of the elastic is not taken into account.
- Once the work is completed, the canvases are stitched together. Don't forget to leave 19 cm unstitched for the armhole.
- The neckline is knitted in the round with an elastic band 1 x 1. For this work, knitting needles number 4 are used.
Knitting sleeves
- For the sleeve you need to cast on 32 loops, and 1 more to close the circle.
- We knit with an elastic band 1 by 1 upwards 4 cm. For work you should use knitting needles number 4.
- Next, we switch to knitting needles number 4.5, and immediately add 15 loops.
- Further knitting should be carried out according to the above description of the raspberry pattern.
- We knit the fabric up until it reaches 51 cm, excluding the elastic, and bind off all the loops.
- The finished sleeve is sewn to the fabric that was knitted earlier.
- After completing all the above steps, you will get a wonderful jumper of size 44-46!
Materials and tools for knitting a cardigan
If you decide to knit a bomber jacket with a raspberry pattern yourself, you will definitely need:
- Yarn Pekhorka “Autumn”.
- Knitting needles on fishing line number 10.
- Knitting needles on line number 8.
- Additional knitting needle pin.
To make the bomber look more interesting, it is better to take bulky yarn. We chose the Pekhorka “Autumn” material, where there are 150 meters in 200 grams. It is also important to consider the composition of the yarn. If you want to knit a warmer product for the cold season, then it is better to take yarn that contains more than 50% wool.
Two sides of the relief
The beautiful honeycombs on the front side of the pattern delight true craftswomen. But the most original thing about the ornament is that the reverse of the product does not look like the reverse at all. It is in no way inferior to the front side of the canvas. On the back, voluminous convex braids are formed, knitted in the same pattern with knitting needles. The honeycombs appear concave, resulting in a three-dimensional image.
It turns out that the same scheme produces a completely different original drawing. No new recalculations are applied. Yarn consumption does not increase. If a knitter wants something new, interesting, a little less voluminous, then braids knitted by Malinka will be the solution to this issue.
Three-dimensional drawings in clothes
The options for convex knitting patterns with descriptions are varied. Among them there are quite a lot of interesting versions, for example, “corn”, “putanka”, or “rice”. But the voluminous relief “Malinka” looks more original and suits children and adults. With this pattern you can knit cute hats for little fashionistas, sweaters, cardigans and other interesting things. Knitted sets with voluminous patterns look very touching on little ones. Moreover, the knitting pattern is very simple, and even novice needlewomen can figure it out without any problems.
To start knitting, you need to choose the right material. For children's hats, it is better to give preference to high-quality yarn with the addition of natural fibers, for example, wool, angora. Volumetric ornaments increase yarn consumption.
For convenience, knitting needles are chosen with a diameter of 3 mm. A beautiful berry hat can be diversified with a knitted sheet of colored threads. Children love everything colorful, so it is better to use yarn in bright, rich colors.