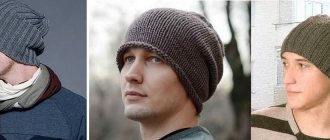
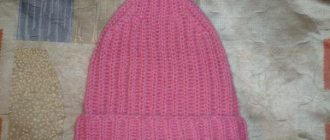
A hand-knitted earflap hat is very popular among both children and adults. Even teenagers in cold winter are not averse to wearing a fashionable hat with earflaps.
Can you knit? Publish your work on knitka.ru
If you approach the knitting process wisely - choose current colors, fashionable styles, then the earflap hat will not only be fashionable, but also warm.
Types of women's hats with earflaps
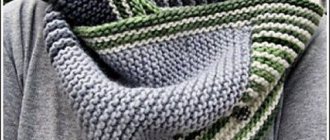
In 2021-2022, earflaps remain in fashion. The trend is in models of hats with both long and short ears, which have ties. Knitted hats with fur trim and pom-poms do not lose popularity. Women's earflaps are decorated with arans, jacquard and openwork patterns.
For decoration, use a 2-color knitting technique or combine more shades. Embroidery is done on the hats, beads are sewn on, and rhinestones are glued on.
History of the headdress
Ushanka appeared many centuries ago. The fur hat has changed appearance many times. The headdress acquired its final form at the beginning of the last century, becoming part of the army paraphernalia. The headphones were held with ties under the chin or attached to the top of the head.
In perestroika times, the earflap hat became the subject of a profitable farce. Foreigners willingly purchased it or exchanged it for the things they brought. This hat has been given the title of traditional Russian headdress.
The hat is very popular among young people, as it provides excellent protection in winter frosts. Headphones allow this fashion accessory to convey the mood of the owner. Wanting to tease others, some do not tie them, leaving them to tremble as they move.
Women's earflaps look very cute
Tourists still buy the headdress as a souvenir to this day. Moreover, modern models are presented not only in the classic version with fur. There are many options for knitted and knitted hats with earflaps.
Selection of yarn for earflaps
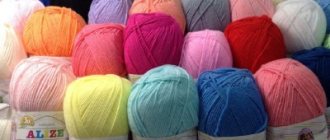
To knit a hat you need warm yarn that does not wear out and can withstand washing well. More often they use natural wool thread or a mixture with acrylic (it is better if the wool content is at least 70% so that the earflaps remain warm). Alpaca and mohair yarns are also used.
Cashmere yarn is an excellent option for a hat with earflaps
You cannot knit hats from itchy yarn, which will irritate the scalp and forehead; for sensitive skin, threads from:
- cashmere;
- wool;
- alpacas;
- merino
Merino threads are the least warm of all, so they are only suitable for knitting hats in calm weather with moderate frost. The thicker the thread, the wider the distance between the loops, which means the headdress will blow in the wind. In this case, it is better to make a double earflap and a fur lining.
Approximate yarn calculation:
| For earflaps without a lapel, knitted with stockinette stitch | About 100 g of threads (density: 250-400 m per 100 g) |
| For a hat with a pattern of braids or arans, knitted with an elastic band | At least 150 g of threads (density: 250-350 m per 100 g) |
| For thick yarn hats | You will need 200-250 g of thread (density: 100 m per 100 g or more) |
| To make a pompom | On average it takes 30-50 g of threads |
Master class on knitting earflaps with an elastic band with long ears
A hat with earflaps for women in this version is knitted with an elastic band pattern. To work, you need to choose a yarn that will consist of acrylic and wool in equal proportions.
The master class describes the algorithm for knitting earflaps using materials and tools:
- Mammola yarn (50% wool, 50% acrylic, 30 m/50 g), total 250 g;
- knitting needles No. 10;
- hook number 10.
The knitting density is 10x10 P = 12 cm2.
Making ears
Knitting a headdress begins with the ears according to the pattern (see below).
Knitted earflap hat for women with long ears
The diagram shows only the front rows, the purl rows are repeated according to the pattern (above the IP - IP, and above the LP - LP).
Knitting algorithm:
- Cast on 6 stitches on the needles.
- Knit the first eye according to the pattern, adding 1 P in each front row after removing the KrP.
- At 13 R you should get 14 R on the knitting needle.
- A second eyelet is made similar to the first one.
Knitting hats
The base of the hat begins to be knitted by connecting the parts:
- Before the first eye, make 2 yarn overs on the knitting needles, knit the eye in accordance with the pattern, perform 26 yarn overs and knit the loops of the second eye. Join the first and last stitch of the row into a ring. The row should be 56 P.
Knitting a hat with earflaps for women with long ears - knitting patterns
- Distribute the loops: knit 2 LP, 14 P according to the pattern, 26 P with a 2x2 elastic band, and again 14 P according to the pattern. Knit a headdress in the round 26 R.
- In 27 R in an elastic band, knit every 2 stitches together, and in the “braid” pattern, make decreases according to the pattern. There should be 42 P left in the row.
- In 28 R in an elastic band, every 2 LPs are knitted together, decreases are made according to the pattern, as well as in 1 UB in 2 LPs between the braids at the back. There should be 28 stitches left on the knitting needles, and there should be a 1x1 elastic band on the front of the headdress.
- 29-30 R knit according to the pattern without changes.
- In 31 R, knit 28 R with decreasing and stretching. To do this, remove 1 P as an LP, perform 1 LP and pull it through the one removed from the knitting needle.
- The resulting 14 P need to be pulled together, the thread secured from the inside of the headdress and cut.
To decorate the hat, you need to crochet a border along the bottom edge using the crab step technique.
The edges of the earflaps are tied with a “crawfish step”
To decorate the ears:
- Cut 12 threads of 35 cm in length.
- Fold 6 pieces in half, tie with a separate thread on the bend line.
- Tie a braid and secure the bottom with a knot.
- Follow the same steps with the other 6 pieces of yarn.
- Sew or tie the braids to the ears of the headdress.
For decoration, you can make a large pompom and sew it to the top of the earflaps.
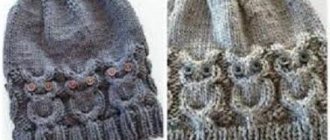
Variety of knitted patterns
Knitted hats with earflaps can look completely different. Their appearance and complexity of execution depend only on the imagination of the craftswoman and her skills.
Knitting patterns for women can vary greatly
Who is the headdress suitable for?
A hat with earflaps made of yarn gives the wearer a mischievous, but at the same time very feminine look. This headdress can be worn when going skiing or going to a social event. The image it creates largely depends on the color and texture of the chosen threads, as well as on the shape of the cap itself.
Brighter and more saturated shades are suitable for very young girls, giving them a playful and funny look. In this case, the model can be complemented with pompoms or tassels to emphasize the character. Decorations made of rhinestones and beads will make the hat glamorous and memorable.
Girls a little older can opt for classic styles and natural colors. In this case, a women's earflap hat made with knitting needles will turn out to be very elegant and will add a special charm. Pure natural colors will allow you to fit such a headdress into any look.
Models for women with a romantic mood can be decorated with flowers or mink pompoms
Methods of execution
There are several basic techniques that can be used to make knitting needles for a woman:
- based on stockinette or satin stitch, suitable for beginners;
- relief, for which a knitting pattern is used with braids, twisted strands or other complex patterns;
- jacquard, in which a patterned fabric is knitted from threads of several colors.
A headdress made by any of the above methods can be supplemented with artificial fur trim. The edge of mink or other natural fur will make the hat even more attractive and warm.
Women's earflaps can be made in Scandinavian style
What to wear with
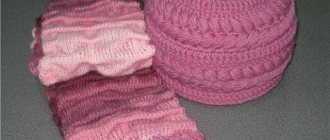
Thanks to this variety, the headdress can be successfully combined with a wide variety of clothing sets. If successfully combined with other wardrobe items, earflaps have every chance of becoming part of your unique style.
A knitted hat with earflaps for a girl will look good with a fur coat or coat, as well as with light raincoats. It can be worn with a short jacket, suede gloves, and a scarf created using the same technique. For shoes, fashionable embroidered felt boots or UGG boots are the most suitable, but you can wear any model with flat soles.
The headdress fits perfectly into a sporty and ethnic style. In the latter case, it can be worn with colorful skirts, leggings and capes with ornaments. For casual, you can use the option with decorative inserts, beads, pompoms, and ribbons. Models of knitted hats made in pastel colors will harmonize with light sweaters, fur vests, and black jeans.
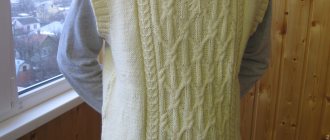
A set knitted with the same pattern looks very advantageous
Ushanka with pompom and braid pattern
To knit this model of earflaps you will need materials and tools:
- Drops Nepal yarn (65% wool, 35% alpaca, 75 m per 50 g);
Yarn Drops Nepal
- knitting needles No. 5;
- hook number 10.
The knitting density is 17 P per 10 cm. The loops are calculated for a head circumference of 52-56 cm.
Patterns used
A hat with earflaps is knitted (for women who are not experienced in knitting, this master class is suitable due to the simplicity of the patterns) is knitted using the following patterns:
- Garter stitch. When knitting in a circle, the rows are alternated: even rows are knitted with all IP rows, odd rows are knitted with LP rows. When knitting with rotary rows, all loops are performed as LP.
- Braids (perform according to the diagram). In the figure, the empty cell is the LV in the front rows, the IP is in the purl rows. Diagonal lines indicate the pattern itself: remove 2 stitches onto an additional needle while working, knit the next 2 stitches, remove 2 stitches from the auxiliary needle back to the working one.
Tip: when making increases, yarn over the thread onto a working needle, and in the next row an empty loop is knitted like a loop behind the back wall so that no hole is visible in the finished fabric.
Step-by-step instructions for knitting ears
Step-by-step description of the work:
- Dial 8 P.
- 1 R (wrong side): all loops as LP. This is how all odd rows are knitted without changes.
- 2 R (front side): perform all LPs. An ND is made on 2 sides of the edge (after the 2nd P from the beginning and before the penultimate loop in the row. Additions are made when knitting in all rows of the front side of the fabric (even), until 16 P are obtained on the knitting needles. Next, start knitting pattern.
- Front side: 2 LP, 2 IP, 1 LP, ND, 1 LP, ND, 4 LP, ND, 1 LP, ND, 1 LP, 2 LP, 2 LP. It should be 20 P.
- Wrong side: 4 LP, 4 IP, 4 LP, 4 IP, 4 LP.
- Front side: 2 LP, 2 PI, pattern according to the pattern (4 P in total), 4 PI, pattern, 2 PI, 2 LP.
Knitted earflap hat for women with a braid pattern
- At a fabric height of 4 cm, after the second and before the penultimate loop in the row, make 1 ND. The increases are knitted as IP on the front side, as LP on the wrong side.
- The increases are repeated at a fabric height of 6 cm. The result should be 24 P. In this row, the first ear of the headdress is finished knitting.
- The second ear is knitted in the same way.
When both parts are knitted, the loops are not closed; the parts are left on separate knitting needles.
Knitting the main part of the hat
When the 2 ears are ready, they need to be connected:
- On circular knitting needles, cast on 2 stitches, knit the loops of the 1st eyelet, cast on another 22 stitches, knit all the loops of the 2nd eyelet, cast on another 2 stitches. You should get 74 stitches in the row.
- Place a marker in the middle of the back of the earflaps. The next row will begin from this mark.
- The next 4 rows on the front and back of the hat are knitted in garter stitch, and in place of the ears the braid pattern is continued.
- Perform increases: 2 IP, ND, 1 LP, ND, 1 LP, 4 IP, braid pattern, 4 IP, braid pattern, 4 IP, 1 LP, ND, 1 LP, ND.
- Next, rapport is performed 4 times: 4 IP, ND, 1 LP, ND, 1 LP.
- Then knit 4 IP, 1 LP, ND, 1 LP, ND, 4 IP, braid pattern, 4 IP, braid pattern, 4 IP, 1 LP, ND, 1 LP, ND, 2 IP. It should be 88 P.
- Continue knitting according to the pattern. The IP is knitted over 4 IPs, with patterns between them according to the pattern. In total there should be 11 repeats in the height of the headdress.
- Upon reaching 15 cm in height from the forehead, cut 1 p in the purl groups of loops. At the end of the row there should be 77 P.
- At a height of 16-17 cm, decreases are repeated, after which 55 P remain in the row.
- At a height of 18 cm, the last IP and adjacent LPs are knitted together. 44 P remain in operation.
- Decreases are performed through a row, knitting 2 LPs together.
- When there are 11 P left in the work, the thread is pulled through them, pulled together and secured at the crown.
For decoration, a pompom is sewn to the earflaps. Its optimal diameter is 5-6 cm.
Stylish and fashionable earflaps model for boys
For a boy, we choose darker threads; various braids can be used as designs.
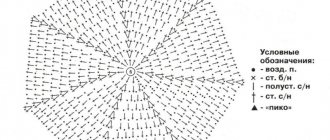
If you don't know how to crochet braids, here's a diagram. These braids are perfect for both boys and girls.
The master class begins with lace ties. You can get two absolutely identical parts only by working with two skeins of yarn. This pattern for boys involves the use of circular knitting needles.
- When the ears are ready, make a set of loops between the threads for the frontal (+ 40 pcs.) and occipital parts (+ 20 pcs.).
- There is no visor in the circuit, so the task is simplified. Continue knitting in the round with an elastic band 2*2 - approximately 5 cm in height.
- After the elastic band, move on to the braid pattern. Depending on the volume of the boy’s head, rapport will have to be repeated 8-9 times. The master can easily navigate the dimensions.
- Decrease according to the general pattern, close the last stitches.
The product for the boy is ready.
Coarse knit earflaps
In the 2021-2022 seasons, rough knit will be in fashion. It is performed in a casual style and is suitable for women under 40 years old. Thanks to its universal style, this headdress can be combined with sports and classic clothing.
To work you will need:
- 250 g of Il Golfone Melange yarn (100% merino wool);
- shuttle and circular knitting needles No. 4.
Since the threads are thick, they will make a dense earflap that will not need to be supplemented with a lining or a second layer.
Knitting ears
A hat with earflaps for women is knitted with ears:
- Dial 6 P.
- 1 R: knit all loops like LP. Turn the work over.
- 2 R: 1 LP, ND, 4 LP, ND, 1 LP. Turn the work over.
- 3 R: perform all loops as LP. Expand the work.
- 4 R: 1 LP, ND, 6 LP, ND, 1 LP. Turn the work over.
- 5 R: perform all loops as LP. Unfold the canvas.
- 6 R: 1 LP, ND, 8 LP, ND, 1 LP. Turn the work over.
Knitted hat with earflaps for women made of thick yarn
- 7 R: perform all loops as LP. Unfold the knitting.
- 8 R: 1 LP, ND, 10 LP, ND, 1 LP. Turn the work over.
- 9 R: all loops are front. Expand the work.
- 10 R: 1 LP, ND, 12 LP, ND, 1 LP. Turn the work over.
- 11 R: knit all LPs, unfold the fabric.
- 12 R: 1 LP, ND, 14 LP, ND, 1 LP. Turn the work over.
- 13-26 R: knit all loops as LP without changes.
- All loops are closed.
The second ear is knitted in the same way. If you need to make the parts longer, you can add the required number of rows without increments.
Knitting the base of a headdress
To knit the base of an earflap, you need:
- Cast on 8 sts on circular needles, transfer from the shuttle needle to the common needle all the loops of the right eye, cast on another 20 sts, remove the loops of the left eye and pick up another 8 sts.
- Knit in a height of 13 cm with a stocking pattern: alternate a row of LP, a row of IP.
- To form the crown, they begin to make decreases. 1 KrP, then rapport to the end of the row * 6 LP, 2 P along with a tilt to the right, 2 LP, 2 P along with a tilt to the left, 6 LP*, 1 KP.
- Continue decreasing until 8 stitches remain on the needles.
- Tighten the loops with thread, secure and hide the tip of the yarn inside the hat.
- Cast on 20 stitches from the free bottom edge of the hat between the ears.
- Without decreasing, knit the lapel of the earflaps in stocking stitch to the desired height.
Decorate ears with braids:
- Cut the yarn into 1 m lengths. A total of 16 segments are made for one side.
- The threads are folded in half.
- The pieces are threaded into the edge of the eyelet with the side folded in half.
- The free edges of the threads are threaded into the formed loop at the base of the eyelet.
- Braid the hair and secure it with an invisible seam.
- The free edges of the yarn are trimmed with scissors.
- Repeat similar steps on the second side of the headdress.
This model of earflaps does not have a pompom, but if the hat is worn by a young girl, you can add decor to add mischief and coquetry to the look.
You can use knitting needles to knit a headdress for winter or autumn. The thickness and density of earflaps can be varied depending on the number of knitting needles and the composition of the yarn. For women, it is better to choose strict models without unnecessary decorative elements. Decorations in the form of a single flower, embroidery on a hat, or several rhinestones are allowed. Young girls can add a pom-pom or make earflaps from bright multi-colored threads.
Tips from needlewomen
As with any type of needlework, knitting has its own little secrets that help beginning knitters in this painstaking work:
- yarn should be taken with a reserve;
- It is always necessary to select the correct knitting needles for the thickness of the thread;
- before knitting, be sure to make a sample and calculate the number of loops per 1 cm, this will help in the calculations;
- some patterns can tighten the fabric or, conversely, make it more stretchy, so it is important to take this into account when calculating loops;
- After completion of work, the product is washed by hand and dried on a horizontal surface.