Do you like mermaids? Agree, the image of these fairy-tale girls is fascinating - it is filled with romance, some tragedy, it contains a mystery and a chance for salvation, which is why mermaids excite the imagination and attract the attention of many, many needlewomen. Wall panels, sofa cushions, blankets and bed linens - these beauties seem ready to live anywhere and they look beautiful, organic and stylish anywhere. A separate topic for creativity is children's accessories, clothes and toys: girls usually squeal with delight when they receive handmade mermaids and everything else associated with them as gifts. In general, today we offer you a selection of ideas on how to make a mermaid with your own hands - it’s beautiful and exciting!
How to make a mermaid with your own hands - 5 master classes:
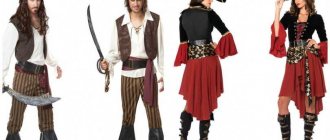
DIY mermaid costume from scrap materials
Since the release of Disney's The Little Mermaid, mysterious, mythical sea creatures have captured the hearts of girls of all ages. It is not surprising that different versions of costumes depicting these characters have appeared on sale.
But what if you have a limited budget and can’t afford the store-bought option? Make your own mermaid costume! Later in the article we will show different options that require minimal sewing skills.
In addition, when making them, they use items from a regular children's wardrobe, which greatly simplifies the task.
Unconventional look
The easiest way to make a mermaid costume with your own hands from scrap materials is to pick up a purple swimsuit on the Internet (the Little Mermaid Ariel theme is very popular, so this will not be difficult) or a T-shirt with a shell print, as well as leggings made of shiny material with a scale pattern .
But this option will be good for everyday life, but for a holiday you will need to try a little more.
For example, this adorable costume is made using paper cupcake liners and crepe paper.
The basis is a blue T-shirt and greenish leggings. Making the costume is extremely simple:
- bend the molds in half, cut the paper into strips;
- glue the elements to the T-shirt and to the bottom edge of the leggings;
- Make a tiara from a regular headband, a shell and another mold.
And from a simple white dress and shiny cardboard scales you can create this beauty:
So you can easily make a beautiful mermaid costume with your own hands from scrap materials.
Convenient and simple
If you want to make a more durable outfit, then this option is for you.
Typically, mermaid costumes include a fish tail, but it restricts movement or makes it impossible to walk in it at all. But the child will want not only to slowly mince around in an unusual outfit, but also to have fun and play along with everyone else. Therefore, you can make such a simple and convenient version of the Disney Ariel outfit, which a little girl will surely like.
To make your own mermaid costume, you will need:
- thick blue fabric;
- organza in several shades of blue, you can have leftovers;
- strip of purple fabric;
- sewing supplies;
- flesh-colored bodysuit;
- leggings or tights in blue or green;
- red wig (preferably).
Preparing for work:
- First of all, you need to take measurements. This way you can accurately determine the required amount of fabric depending on the age and size of the child. To do this, use a measuring tape to measure the circumference of the chest and waist, as well as the height from the waist to the heels plus 25 cm.
- Multiply OT by 2, take the resulting tail length, and you will get the size of the rectangle that needs to be cut out of thick blue fabric.
- Also multiply the bust measurement by 2, take the width sufficient to cover the girl’s chest, and cut a rectangle from purple fabric for a bandeau bodice. From it, make a narrow thin strip for a tie around the neck.
How to sew a mermaid costume for a girl with your own hands
The further process of making the outfit is as follows:
- Fold the blue fabric in half, draw the outline of a fish tail and cut it out. You will get two blanks.
- Cut small squares of organza measuring 10x10 cm. Fold each in half and cut the bottom in a semicircle to create “fish scales”.
- Take 1 ponytail blank and pin semicircles of organza to it, starting from the bottom. Gradually sew rows of scales so that the upper rows cover the lower ones.
- Trim off any excess organza around the edges.
- From the remaining blue fabric, cut out narrow strips that will become ties for the tail. Fold them face inward, stitch them, turn them inside out.
- Take the part of the tail with scales, place it face up, use needles to pin the ties and the second part of the tail (face down). Sew both blanks, be sure to leave about 10 cm at the top unstitched. Turn the tail inside out and sew up the remaining hole.
- All that remains is to tie the bandeau with a knot on the chest and thread a rope into the knot to tie it around the neck.
Now you can put on leggings, a bodysuit, a top, a ponytail, a wig - and you will have a comfortable and beautiful mermaid costume ready. With your own hands (see photo of the little princess in the image below) you can create a real masterpiece! And the costs are not that much.
You can replace the organza with felt in blue tones, and then you won’t have to make a base for the tail.
How to sew a mermaid costume with your own hands?
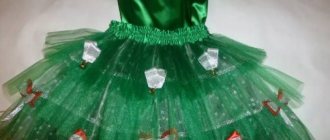
Ready for more advanced outfit options? For an older girl, this solution is suitable - with a long skirt, a comfortable blouse and a crown.
To make this DIY mermaid costume you will need:
- silver fabric with sequins - 1-2 m;
- blue and green organza - 0.5 m each;
- thick cardboard - 5 sheets of A4 format;
- wide elastic band - about 0.6 m;
- tulle - 1-2 m, more possible (optional);
- glue gun;
- sewing supplies;
- blue glitter;
- large silvery stones;
- blue bodysuit;
- silver braid - about 1 m;
- dense silver fabric - 3 small pieces.
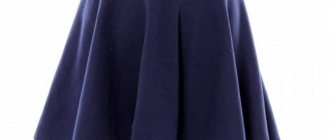
Mermaid skirt
- Before buying fabric, take measurements so as not to make a mistake with its yardage. The easiest way to find out the optimal size of a skirt-tail is this: ask the child to lie down on a large sheet of graph paper and outline the contours of the tail so that it loosely fits the legs. To ensure that both sides are symmetrical, the paper needs to be folded in half and the pattern cut along the most successful lines. Now you will know exactly how much fabric you need.
- Pin the pattern to the sequin fabric and cut out the tail pieces. Don't forget about seam allowances. If the skirt will be worn on a naked body, then it is advisable to make the lining from a soft, pleasant fabric, since the decorative material is itchy. Or wear tights under your suit.
- Now sew one side of the skirt, and along its top make a drawstring and thread an elastic band into it, the length of which will be determined by trying it on the child’s waist in a slightly stretched state. After this, you can sew the second side of the tail.
- Now cut small organza flakes and, starting from the bottom of the skirt, glue them on using a glue gun.
- To keep the fins in shape, take a piece of cardboard and outline them. Then cut out the blanks and glue them to each side of the fabric. The fins should be voluminous and fairly hard.
- After this, cut the tulle into thin strips about 40 cm long, fold them in half, tie the top with a knot and glue just above the beginning of the fins. The skirt is ready.
Top of suit and crown
There is much less work here than with the bottom:
- Freehand draw a shell approximately 12 x 12 cm and cut out 2 blanks from thick silver fabric. Put the bodysuit on your child and use pins to carefully mark the locations for all the decorations.
- Remove the blouse and glue shells to the chest, silver braid around the neckline and on top of the shells, large stones under the chest in the form of chain decorations.
- Print or draw a template for the crown, transfer it to construction paper, and then onto a piece of the same fabric you used for the shells on the bodysuit. Cut out the material and glue it to cardboard. Decorate the crown as desired - with cut-out templates from cardboard and fabric of a different color, shiny pebbles, shells, etc.
Add a blue wig and you have a mermaid costume! With your own hands you have made a wonderful outfit for a matinee or a home party. You can rest assured: your daughter’s joy will know no bounds!
Source: https://FB.ru/article/228336/kostyum-rusalki-svoimi-rukami-iz-podruchnyih-materialov
Crafts for girls: How to make a mermaid tail for a doll
If you want to briefly turn your doll into a little mermaid and try on a mermaid tail on it, then this master class will definitely come in handy. At the beginning there is a video with instructions. Below we have added frames from the video with a detailed description in Russian, since the explanations in the video are given in English. Video master class: how to make a mermaid tail for a doll To create a mermaid tail for your doll you will need: - Sheets of white paper; — A simple pencil; — Decorative porous rubber (if you can’t get it anywhere, use cardboard, just remember not to wet your doll’s tail with water); — Very stretchy fabric in mermaid colors; - A piece of chalk or a dried piece of soap; — Thread and needle; — Thin elastic band; — Sewing machine (optional and depending on availability, if you don’t have one, you can sew everything by hand. 1. Place the doll on a sheet of white paper, as shown in the example.
2. Trace the outside of the doll's legs.
3. Make a mark where the waistband is and add a few millimeters.
4. Add a few more millimeters to the seam allowance.
5. Take a sheet of paper, fold it in half and sketch out the outline of the tail fin.
6. Cut out the fin and attach it to the pattern for the top of the tail, trace and complete the pattern.
7. Around the tail, also add a few millimeters at the edges.
8. Cut out the mermaid tail pattern.
9. Take the fabric and determine in which direction it stretches better. Place the fabric so that it stretches better in the horizontal direction.
10. Attach the pattern to the fabric and trace with chalk or a dried bar of soap.
11. Cut along the marked contours. You can add a few millimeters at the top, which can later be used for a beautifully gathered fabric at the top of the mermaid tail.
12. Cut out another one exactly the same.
13. Place the two pieces together with the good side facing in.
14. Start sewing the pieces together using a sewing machine or thread and needle. 15. Stop at the point where the tip of the tail fin ends.
15. Place the doll on the workpiece. Turn the fabric over so that the tail starts at the doll's waist.
18. Sew in the right places, cut off excess fabric everywhere except the end of the tail, where we have not sewn it yet. 19. Turn the tail inside out. 20. At the top of the tail, you can make a few stitches and tighten the thread, you will get a beautifully pulled fabric.
21. Take your mermaid tail fin pattern, take decorative foam rubber (or a piece of thick cardboard if you don’t plan to play with the doll in the water), trace the pattern on a piece of decorative foam rubber.
22. Cut out this fin blank too, leaving a few millimeters around the edges at the top.
23. If you wish, you can cut out three small pieces of elastic. Glue a semicircle from one at the top of the fin, the other two diagonally on top. This design will help keep the fin on the doll.
25. You can also make a beautiful top for your doll from the same fabric. Take a small rectangle of fabric and fold it in half.
25. Trim the edges lightly.
26. Sew on the side.
27. Turn the fabric inside out. Put the blank top on the doll.
28. Gather the fabric together in the center.
The mermaid outfit for your doll is ready.
Tags: Crafts Crafts for dolls Dolls DIY crafts We sew clothes for dolls Mermaid Little Mermaid Mermaid doll Master class Dolls master class Master Class do it yourself Monster High do it yourself
| tell friends | Information for the news
August 1, 2015 |
How to make a mermaid outfit for a girl for New Year. Costume options
Typically this outfit consists of the following elements:
- blouse;
- tail;
- head adornment;
- accessories.
At home, such a suit can be made based on ready-made elements (top or skirt) or sewn from scratch, showing your imagination.
If you involve your daughter in this activity, you will get an interesting joint activity and a mini-school of sewing skills. For the outfit, materials in light blue, blue, green, pink or purple are best suited.
They should be combined with silver or golden details, because the little mermaid, in fact, is the princess of the underwater kingdom.
Among the materials you may need:
- chiffon, organza and other transparent materials;
- satin fabric;
- elastic;
- coarse mesh.
Mermaid costume: tail. Option #1
Imitating a fish tail in a little mermaid costume is the hardest part. In this matter, the approach and principle of creating a part may differ:
- Decorated floor-length skirt or trousers.
- An independent element instead of a skirt with slits for the legs.
- A decoration on a skirt that has a purely decorative function.
To make a ponytail from jersey, you need to sew a narrow tube skirt with an elastic seam at the back. For this:
- measure the required length;
- add 10 cm to it and cut;
- process the cuts with an overlocker;
- Bend 7 cm of the upper cut outward, gathering the fabric with a roller;
- do a fitting to remove excess in the waist area;
- Insert a zipper or elastic into the top flap. The base of the tail is ready.
The fin can be made from the same jersey. Cut two parts out of it. They should be the same and have a small margin for stitching. After you sew the fins to the skirt, insert a corset bone into them - the element will hold its shape. The scales on the tail can be painted with acrylic paint or embroidered with flat beads.
Advice. Knitwear is good, but knitted compression stockings are better. A ponytail skirt made of this material will be more comfortable due to its greater elasticity.
Mermaid costume: tail. Option No. 2
In this outfit you need to sew an organza ponytail skirt. The conditions are the same - length to the floor and tightness at the waist. Having measured the required parameters on the child, cut off a rectangular piece - it will be the skirt. Fasten it along the seam, which should be located at the back.
Advice. The organza seam can be joined with hot glue. Thread will also work, but you need to sew the edges very tightly.
In this case, the fins can be made from elastic fabric. Not only monochromatic, but also multi-colored material is suitable. The cut fin will look believable if the elastic is repeatedly twisted and compressed.
In this position, secure it with pins, wait a little, then smooth it out with your hands and shake it. Then sew or hot glue the fin to the tail. The scales on it can be painted or sewn on by choosing the appropriate material.
Attach the fin to the skirt, starting from the knees down.
Use glitter fabrics for your little mermaid costume
As an alternative, use satin as a base and multi-colored chiffon for finishing the flounces, which will serve as the tail. A simple pattern will also work for this skirt.
Decorate it, for example, with sequins, sew in an elastic band and only then connect the seam. Cut the chiffon diagonally, sew layers of different lengths together using a zigzag for waviness.
Distribute the ruffles evenly and attach to the skirt (even pins will do).
Other Mermaid Costume Elements
If you want to sew a top for your child with your own hands, satin fabric and a simple pattern will do - a 16x60 cm rectangle. Hem the edges, decorate the element with sequins, beads or something else. To make an imitation bodice, gather the fabric in the center. Sew a small elastic band at the back for convenience.
Advice. If you are short on time, you can even use a blouse or T-shirt for the top of the outfit, decorating its collar. As a tail for such a suit, regular leggings, cut just below the knees, and fabric flounces sewn to them are suitable.
Decorating the head of a mermaid costume allows a lot of flexibility. Use your choice:
- a flower beautifully woven into the hair;
- crown;
- tiara;
- bright colored wig;
- beautiful styling;
- hairpins and elastic bands in the shape of shells, starfish, pearls, etc.
As accessories, bracelets, necklaces or beads will look beautiful on your baby, especially with nautical motifs. Use your imagination to turn costume making into a pleasant experience, and your child’s holiday into an unforgettable experience.
Read how to make a kikimora or red riding hood costume for a girl.
How to sew a mermaid costume: video
Source: https://kakhack.ru/otdyx/prazdniki/na-novyj-god-naryad-rusalki.html
Mermaid doll
Fairy-tale characters have always attracted attention. Especially mythical and folklore ones. Leshy, brownies, kikimoras and many others... And this list can be expanded ad infinitum. But we'll focus on mermaids. Beautiful girls with fish tails and long hair, which, according to many legends, they combed on land. Master class by Natalia Moiseeva on how to sew a mermaid .
In order to sew a little mermaid, we will need:
- Flesh-colored fabric (preferably cotton);
- Pink wool;
- Decorative tape;
- Small shells;
- Artificial eyelashes;
- Acrylic paints;
- Glue;
- Needle;
- Threads;
- Pencil;
- Paper;
- Scissors;
- Sintepon.
First you need to make a pattern for the future little mermaid.
We cut it out of paper and transfer it to fabric using a simple pencil.
After that we sew the parts together. You can sew it on a sewing machine, or you can sew it by hand using a back stitch. Don't forget to leave allowances. About five millimeters on each side.
Turn it inside out. Since the parts are small and thin, you can use a pencil or pen to make it easier to turn them out.
We stuff all the parts with padding polyester. You need to carefully stuff it into small pieces. Then the padding polyester will be distributed evenly. And this is very important so that unnecessary tubercles do not form.
And now we sew the doll’s parts to the body. First the tail, and then the arms and head.
Now we need to paint the mermaid's tail green. For this you can use acrylic paint. Or immediately take green fabric and make a tail pattern on it. But if you don’t have green fabric at hand, then paints will help.
We will make the mermaid's hair from pink wool for felting.
We sew them to the head in the middle. We will have a seam instead of a parting.
I need to make a bra for the doll.
To do this, take a decorative ribbon and tie it tightly in the middle with a thread.
We put the bra on the doll and tie the ends of the ribbon at the back. We cut off the excess.
We glue small shells onto the belt. This will hide the seam and give the mermaid a nautical style.
And all that remains for us to do is to draw the little mermaid’s face.
First we draw with a pencil. Don't rush, otherwise it may turn out uneven. And we need identical eyes.
And then we paint with paints.
The doll's face can be made simple. For example, like the tryapiens.
You can wait until the paint dries, or you can dry it with a hairdryer.
We glue eyelashes onto the upper eyelid.
That's all, we have sewn the Little Mermaid.
You can decorate your interior with it or give it as a small souvenir.
In order not to forget the page address and share with friends, add it to your social network:
More interesting:
Tags: DIY toys, DIY dolls
Attention! It is better to write urgent questions in the comments on the website (form at the bottom of the page) or, better yet, directly by email. There are no notifications about comments from the VKontakte form! This form is more for feedback. 
Discussion: 2 comments
- Wilma:
November 14, 2014 at 01:39 pmYou can make breasts for a mermaid - gather 2 circles of fabric, stuff them and carefully sew them on. The tail can be made immediately colored and decorated with sequins or glitter glue. The hair can be conveniently made from acrylic for embroidery, the eyes can be drawn with a regular black gel pen. The pencil will be too thick to turn out, I use a knitting needle. Overall, the mermaid turned out quite good, but it could use a little shine.
Answer
- Irina Zaitseva:
November 15, 2014 at 8:30 am
What a little mermaid it turned out to be... Everything is cute...
Answer
Your comment Cancel reply
How to make a mermaid costume with your own hands
Coming to a party dressed as a mermaid is a great choice for a girl. You will look unusual and elegant. You can buy a ready-made suit or sew it yourself. In addition, preparing such an outfit is exciting. In this article we will tell you how to make a mermaid costume for a girl or woman that will attract attention at any celebration.
Stage 1: Tail
- First, sew the skirt. Take five to six meters of light green fabric; organza is perfect. The finished skirt should fit the waist and completely cover the legs to the toes.
- Using a centimeter, measure your waist and hips. Cut the fabric, you will get a rectangular pattern.
- The edges of the fabric can be secured with hot glue. You will end up with a tight-fitting skirt.
- The seam needs to be at the back.
- Another option is to sew the edges using thread and needle instead of glue, but this process is longer.
- Making a fin. To do this you will need a couple of pieces of material that stretches well. Choose fabric of any shade of blue; you can use a plain material or with a pattern, but not too colorful.
- Cut out squares with a side of one centimeter.
- Cut out the squares one by one and attach them to the main product.
- Roll the material, checking if there are enough squares.
- Smooth out.
- Straighten and shake well.
- Do this for each of the five squares.
- Create a scale effect. Evenly coat the middle of the skirt (to the knees) with adhesive and attach pieces of fabric. Ideally, they will fall beautifully.
- Glue the pieces until you reach the knee. Can be attached at the same or different heights.
- You can also make your own mermaid costume with a shorter skirt, or purchase a ready-made version.
- We draw scales. Get a brush and special paint. Draw scales measuring five to seven centimeters in a semi-oval shape.
- Wait for it to dry. Gently touch the material with your finger to make sure the design is dry. Making a mermaid costume with your own hands and then accidentally ruining it is very disappointing.
Stage 2: Top of the suit
- Get a top that is the same color as the tail. It should be made of dense fabric and provide good support to the breasts. If you don't find a suitable one, a swimsuit top will do.
- Lay it out in front of you.
- To hold the cups, use disposable glasses or something similar in shape.
- Get milky seashells. You don't need a lot of them, a small bag will be enough. You will need them to decorate the bodice.
- Cover the cups with glue and attach the shells one by one. To make a mermaid costume with your own hands from scrap materials, namely a decorated top, you can use a hot glue gun. Cover the bodice completely.
- Leave it on the table until completely dry.
- Cover the shells with glitter. Your DIY mermaid costume is almost ready!
Stage 3: The finishing touch
- Hairstyle. Curl your hair, create the effect of wet hair, as if not so long ago you swam in the depths of the sea.
- Make a headband and decorate with shells. A nautical-style hair clip would also work.
- A blue mermaid wig will perfectly complement the look.
- Apply makeup. Your look should be natural, so don't overdo it with cosmetics!
- To make up your eyes, use shadows in desaturated shades (lilac, light green, light blue).
- Apply eyelashes. If you have blue or metallic mascara, use it. In the version with black, apply it in one layer.
- You can use false eyelashes that look bright and, at the same time, natural.
- Cover your face with powder or foundation.
- We select shoes: elegant shoes or sandals. Mermaids only have a tail, so shoes should be discreet, preferably flesh-colored or to match the costume.
- You can take regular beach flip-flops or comfortable low-top summer sandals, decorating them with shells and sea pebbles.
- If you are making a mermaid costume for a girl with your own hands, elegant children's shoes are perfect.
- If you are making a mermaid costume for the New Year with your own hands, change your shoes indoors during the celebration.
- Give a neat and discreet pedicure using nude polish.
- We decorate the costume. Add marine-themed details: stars, small pebbles, shells - everything that a little mermaid can get in the waters of the big ocean. And if possible, wear one or more accessories:
- Clutch or small bag with sequins or shells.
- The ring is an indicator of emotional state.
- Bracelet or earrings made of shells.
Recommendations
- When purchasing fabric, take more - in case you have to redo something.
- How to make a DIY mermaid costume if you don't have shells? Ask your friends or buy in a special department.
Cautions
- Be careful when working with glue. Follow safety precautions.
To make a costume you need:
- Skirt and fin fabric
- Adhesive composition
- Hairpins
- Disposable glasses
- Sequins
- Makeup
- Wig (optional)
- False eyelashes (optional)
- Clutch (optional)
- Pendant, earrings, bracelet, ring (optional)
Source: https://www.vkostume.ru/Kak_sdelat_kostyum_rusalki_svoimi_rukami/
We sew a children's New Year's costume "The Little Mermaid" with our own hands
On the eve of matinees and New Year's holidays, parents are faced with the question: “How to dress up a child for a matinee?” I really want the child to look beautiful in a suit, to the delight of everyone and mom and dad. After all, children's holidays are always so exciting and magical. But where can you find a suit that suits you without losing half your budget? Of course, do it yourself!
In this master class I will show and talk about how to sew a little mermaid costume. Let me tell you, I don’t sit at a sewing machine often, and therefore I can be called a beginner. What I mean is that you don’t need to be afraid that it won’t work out, it’s so simple, you’ll be surprised! I ask craftsmen in the sewing business to understand and not throw slippers at me.
So, let's begin!
What we need:
- fabric - I used satin (1.5x1 m), tulle (1x1 m), organza (1.5x1 m);
- spandex or rubber thread (I needed 1.5 skeins);
- wide elastic band, Velcro, decorative lace ribbon for the belt;
- jewelry in the form of shells, beads, or whatever your imagination suggests;
- necessary tools: scissors, thread, needles, meter tape.
For everything it took me 950 rubles and time at the typewriter
The daughter chose the fabric herself, and, as it turned out, she has an unrivaled sense of style. In this matter, you should trust the wishes of the person for whom the outfit will be sewn.
When creating this outfit, I did not use any patterns at all. For the length of the dress itself, we needed 1 m (from the armpits to the girl’s ankles). Considering that the gathering with rubber thread will be shortened twice, I took a width of 1 m (chest and waist circumference 58 cm). To be sure, be sure to test the gathers on a separate piece of fabric, as different fabrics will gather at different densities. Next, we begin assembling the dress. Let me remind you the dimensions: 1 x 1 m.
Some points about setting up the machine:
- We wind the rubber thread onto the bobbin for the lower thread; it should be wound slightly taut, but not too much. This will make the assembly more elastic;
- the tension of the upper thread should be adjusted so that it does not drag the elastic onto the front part and at the same time stretches it well on the wrong side;
- It is better to choose a medium or long needle pitch, this makes the assembly more beautiful.
I started the top row of the assembly, stepping back 2 cm, in order to then sew the top part of the dress there. And so, step by step, line by line, we form the corrugation.
I started the step between rows of assembly with 0.5 cm, then gradually increasing it. In the tail part the step was 2 cm. This is so that the corrugation does not hinder movement. A wide step looks no less beautiful and is easier to stretch.
The last step is again 0.5 cm.
Then we sew the edges of the fabric and - voila! The dress is almost ready!
Then we begin assembling the top of the dress and the neckline. For this, pieces of fabric were used measuring 40x20 cm for the chest and 40x25 cm for the back. The back is taken longer, since the dress on the back will be located slightly lower.
We form the neckline with a gather, similar to a dress. The step between the assembly is 0.5 cm.
We get these two parts (see photo), we sew them together on one side, on the other we will have a fastener (buttons or buttons, as you like).
Next we put the dress together. We sew the chest and back parts, retreating from the edges of the dress by 5 cm (10 cm when stretched), this will serve as openings for the arms. You should sew by stretching the fabric where there is already a gather in the place where we previously left 2 cm, stepping back from the edge.
We sew the hem of the dress without rubber thread. To prevent the fabric from spreading and fraying, I used my grandmother’s old method - fire treatment. That is, I carefully melted the edges of the fabric with a lighter.
Attention! This method is not suitable for all types of fabric!
Next, from the remaining pieces of fabric we make these wonderful “gaiters”. To do this, you needed pieces of fabric measuring 40x25 cm, quantity 2 pieces.
General view of the finished dress.
As you can see, the dress stretches well in width and does not hinder movement.
The next step is to start sewing the train.
For the train you will need dark blue organza, 1.2 m wide, 50 cm high. These sizes are individual and depend on the length of the child’s arm span. After processing with a lighter, organza no longer requires edge processing. We sew the ends to the “gaiters”, and in the center we hook it to the neck of the dress from the back.
It turns out to be such a wonderful train. You can stop at this stage.
You can decorate the dress with shells, starfish, etc.
But my daughter also wanted a skirt to boot
Next we sew the skirt.
We will need: a wide elastic band that will serve as a belt; decorative lace; shells and beads for decoration; Velcro, tulle and organza.
We measure the length of the elastic according to the child’s waist circumference. We sew decorative lace and Velcro onto it, which serve as a fastener for the belt.
We sew the tulle to the elastic, while you need to stretch the elastic well. We measure the height of the tulle according to the length from the child’s waist to the floor, the width corresponds to the length of the stretched elastic band. For me, the size 1x1 m was enough for two layers, one to the floor, the other to the middle of the skirt.
The next step is to sew the organza over the tulle. I took a height of 30 cm. We cut off the edges of the fabrics at the front of the skirt, rounding them. The tulle does not require finishing the edges, but the organza was processed with a lighter.
A skirt with three layers does not seem very fluffy, so we add fluffiness with the help of hooks, which we decorate with beads. After this the skirt seems fuller.
And the outfit is ready!
This is how beautiful my daughter will be for the holiday! I really hope that you enjoyed this master class and will help you create your own costume for the magical New Year holiday!
Happy New Year! And I wish everyone health, inexhaustible imagination and new creative victories!
Thank you for your attention! Best regards, Alfiya.
www.livemaster.ru
How to make a Mermaid costume, Patterns.
The fairy-tale image of a beautiful romantic mermaid princess has always attracted the attention of girls, and many young ladies would like to be like the charming beauty Eriel, the daughter of the king of the seas, Triton, from the Disney cartoon.
You can dress up as a sea princess for any occasion: a costume party, New Year's party, Halloween, birthday or carnival. And you can make a mermaid costume for such a children’s party yourself at home.
Little mermaid outfit: main details of the image
Before you start buying fabric and other materials for sewing, decide on the style of your future product, thinking through all the details down to the smallest detail. To begin with, it’s worth determining what the image of the little mermaid actually consists of:
- the upper part of the costume - a top, a dress bodice, a short blouse with puffed sleeves (for a little girl) or a swimsuit top and other, sexier and more open options - for adult girls (you can even make a bust from coconut halves, but they will have to be sanded first , drill holes for the ribbons and stuff with soft cloth);
- the lower part of the costume is very problematic, since the image of a mermaid suggests the presence of a tail. Since you are not filming a movie about mermaids, the tail should only serve a decorative function, that is, it should be just an imitation. There are many options for making it, so be patient and imaginative;
- jewelry and other accessories - sea princesses can wear a crown, necklaces and tiaras made of pearls, sparkling stones and shells, decorate their long curly hair with lilies and other beautiful flowers, seaweed (you can hold a starfish, coral, a toy in the form of some kind in your hands inhabitant of the ocean depths). As a rule, the little mermaid is not expected to have shoes, but you can choose light sandals with a minimum of buckles.
If you are going to make a children's costume, then consider first of all the comfort and safety of your child: the outfit must be sewn so that it is possible to fully walk, sit down and move in it.
DIY mermaid costume at home
To sew a beautiful and comfortable outfit, choose the right fabric: it should be light and flowing. The main colors of the mermaid image are green, blue, light blue and all their possible shades. You can also use lilac or purple. Shades that imitate the silver or golden sheen of scales look beautiful.
WATCH: How to Make a Spider-Man Costume
This option is possible for a little girl’s costume.
- For the top of the outfit, use a transparent golf shirt, onto which you can sew two pieces of shiny fabric in the bodice area, making them into a kind of swimsuit. It will be very interesting if you replace the bodice of the dress with an elastic skirt (can be knitted).
- To make the bottom, take tulle in several shades (for example, green and blue). Cut out many strips of green tulle, 10-12 cm wide. You will need at least 50-60 of them.
- Now take the top, and fold the tulle strip in half, thread it through the outer loops of the lower part. You will have a loop through which you will need to thread the ends of the strip, thereby securing it. Tighten the knots tightly so that they do not come undone.
- Continue in this manner, gradually working along the entire bottom edge of the top until you have a full, full skirt.
- Next you have to make an imitation of the ponytail. To do this, divide the tulle skirt (all stripes) into three conventional parts: two of them will play the role of a tail in the back, and one in the front. You can temporarily hold them together with rubber bands to make it more convenient to work.
- Take tulle of a different (blue) color and also cut out stripes (in the same number as the green ones), 10 cm long. Tie blue stripes to the ends of the green stripes, but make sure that those that will be located at the back of the skirt are longer than those what's in front.
- You can sew straps for the top from braid or wide ribbon so that it fits better on the girl. If you took a knitted top, then you can also make a beautiful weave along the top using ribbon and tulle strips.
- Complete your outfit with jewelry and themed accessories.
If you chose a blouse, just a short top or a swimsuit top in the form of two shells as the top of your outfit, then you can sew a simple ponytail skirt at home.
- You will need to cut out the front and back of a rectangular skirt from green shiny or iridescent fabric (under the “fish scales”).
- Cut out a belt, a “fin” and “scales” from blue and silver fabric.
- Sew the two halves of the skirt together. Sew “scales” tightly along the entire top and sew on a belt into which you will need to insert an elastic band.
- A piece of fabric representing a “fin” must be gathered and sewn to the bottom of the skirt. That's all.
WATCH: Ideas for creating a Baba Yaga costume
The ideal version of the ponytail is a long, narrow, floor-length skirt, which can be decorated with voluminous flounces made of transparent organza. And if you reinforce the flounces along the edge with thick fishing line, this will give them a flared shape. However, a child in such a costume may be uncomfortable.
For a little girl, you can slightly alter this option and insert the same organza (only densely gathered) into the back seam of the skirt in the form of a wedge. Such a fish fin will not restrict freedom of action and will look beautiful.
You can add a tail in the form of a part that will be attached and removed (make it from thin foam rubber and cover it with fabric).
There is an alternative to a skirt: you can take skinny trousers or leggings and decorate them with organza flounces on the bottom, and use a transparent tunic for the top. Decorate the details of the costume with sequins, sparkles, glass beads, beads, beads, rhinestones and other decorations.
A little girl will not need any special makeup, and young girls can decorate themselves using glitter, sea-colored shadows, soft lipstick and blush. You can dye your hair strands green and blue or wear a wig.
Adult mermaid costumes and makeup
If you want to make a mermaid costume for swimming, adult Halloween or some kind of photo shoot on the ocean, then it is better to prepare as much as possible.
To make the tail look like a real one, special effects, costume and makeup experts advise using whalebone, fishing line, real flippers, flexible plastic, acrylic paints and other specific materials.
Imitation of scales is done in different ways: crystals and beads are tightly sewn across the entire surface of the tail, row by row, scales are cut out of polyethylene, glued and painted, drawn by hand, etc.
Mermaid Halloween Costume
Master class using bodysuits, shells, glue and paints:
Costume patterns
Source: https://www.toysew.ru/karnaval/sdelat-kostyum-rusalki.html
Mermaid vase
It sounds, of course, strange - a mermaid vase. Frankly speaking, it's very strange. But you still follow the link - it’s beautiful and not at all strange, but on the contrary, it’s very clear and logical. So much so that you are almost guaranteed to want to put your current projects aside and make a wonderful vase with your own hands that will remind you of magic, romance, mystery and enchantment.
How to make a mermaid vase with your own hands - master class from natashalh
DIY mermaid costume: for a girl, base and details
1083 Reading time: 1 min.
Every girl loves fairy tales about the adventures of the Little Mermaid.
On the eve of the New Year holidays, parents begin to think about creating a carnival costume for their daughter, and adult girls begin to think about creating an image for a costume party.
A Mermaid outfit for a carnival is the best and brightest option for a girl. You can make one of these at home. We'll tell you how to make a costume with your own hands.
The main attribute of every Mermaid is the tail . You can achieve complete imitation with the help of a long skirt.
The top will be a top or a brightly decorated swimsuit . The top can be replaced with a T-shirt decorated in a marine theme.
Particular attention is paid to accessories . They help make the outfit complete and complete.
In many modern films and fairy tales, the body of mythical creatures is decorated with bright drawings. Therefore, face painting on a marine theme is suitable as an addition .
Let's start making the costume.
Making the top
As a top, you can use a swimsuit bodice, which needs to be slightly transformed .
For finishing, you can use imitation scales, which are easy to make yourself. The work will require organza fabric, scissors and glue .
Cut out small circles from the material. Gradually, starting from the bottom of the cup, glue the mugs onto the swimsuit. The bottom of one circle should slightly overlap the previous one. In this way we cover the entire swimsuit. The top is ready. A flesh-colored long-sleeved bodysuit will fit underneath .
Tip : when choosing shades, it is recommended to focus on turquoise, blue, green, purple and blue tones.
A plain blouse, which is easy to decorate yourself, is also suitable as a base. We cut out shells from silver or red fabric with a shiny texture. Using safety pins, we fix the material on the blouse and carefully sew it on. You can stick rhinestones on the top of the bodice. We also decorate the blouse itself with bright stones or sequins.
Working on the skirt
The skirt performs not only a decorative function. It is the basis for the tail, which is located at the end.
- organza;
- tulle;
- satin fabric;
- rubber;
- scissors;
- sewing meter;
- rubber;
- glue;
- threads;
- needle;
- sewing machine.
Using a sewing meter, measure the length of the product . The best option would be to end the skirt approximately mid-calf. From organza we cut out a narrow skirt that widens just below the knee. We cut the front and back parts. We sew the seams using a machine. We insert an elastic band into the belt and sew the ends together by hand. Sew up the remaining space.
Carefully hem the tail area. It is recommended to treat the incision site with a reinforcer so that the seams do not come apart at the wrong time. To do this, cut out a strip of material, fold it in half and sew it by hand to the base of the cut. We cut off the rest.
Important! The reinforcement must be secured on both sides of the fabric.
Skirt decor
An addition to the skirt is imitation scales . It can be made from satin fabric.
Cut out small circles from the material. Glue the figures onto the surface of the skirt using glue or a glue gun.
The skirt is ready.
Image details
Having prepared the foundation, we move on to important details that will help create your favorite fairy-tale image.
Mermaid tail
A fluffy tail is the main attribute of any Little Mermaid. To achieve greater pomp, you can add small strips of tulle under the base of the organza ponytail.
To do this, cut out ribbons of medium width from the material. When choosing the length, focus on the cuts that protrude as the tail. The tulle should be the same length as the fins.
Carefully sew on the ribbons. For volume, it is recommended to apply several layers of material, the stripes of which will differ in length. When placed on the sides, the tulle can be made slightly longer so that it peeks out from under the fins . The Little Mermaid's tail is ready.
Tip : Use different shades of fabric to make the skirt, scales and tail.
Accessories help complement any ensemble. When choosing a mythical character, the outfit can be varied using several options.
- Tiara or crown on the head. In the cartoon about Ariel, many mermaids appear with cute jewelry. This accessory can be purchased at a specialized store or made independently. The crown needs to be cut out of cardboard and brightly decorated with sequins, rhinestones and satin fabric.
- Earrings in the shape of shells and a small bright necklace made of large beads will be a smart addition. The necklace can also be replaced with a long headband made of artificial flowers.
Makeup
The final stage in creating a costume is makeup. Cartoon and movie characters have colorful hairstyles. For a Little Mermaid costume, a wig of red, blue, turquoise or purple is suitable.
Pay attention to your eyes and collarbones. Shiny shadows can be applied to this area of the body.
Face painting is suitable for little princesses . Decorate your cheeks with a marine-themed pattern using suitable shades.
Useful tips
- It is recommended to wear additional clothing under the bottom of the suit : a T-shirt or a flesh-colored bodysuit, leggings or tights. During use of the suit, some elements may prick unpleasantly or lead to injury. Extra clothing will help avoid this.
- Many girls use a lighter version of the costume. Instead of a skirt, leggings decorated with fins made of satin fabric or organza are suitable.
- To create scales, polyethylene hand-painted with bright colors is suitable.
- When decorating the top, you can use paper cupcake pans.
Big holidays are always accompanied by carnival costumes. The most popular among girls is the costume of their favorite princess, the Little Mermaid.
Using several methods, the costume is easy to make yourself. In this outfit, any holiday for a child will become an unforgettable adventure.
Subscribe to our Social networks
Did you like it?
( +1 points, 1 ratings)
Loading…
Found a mistake? Select it and press Ctrl + Enter. We'll fix everything!
Source: https://tkaner.com/odezhda/kostyum/kostyum-rusalki-svoimi-rukami/