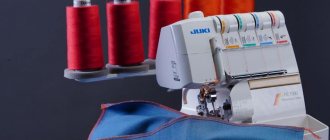
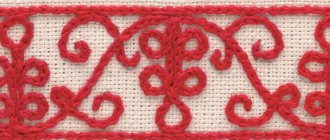
An overlocker is a special device for processing fabrics, used for both factory and home work. A standard overlocker creates seams and finishes edges, cutting off unnecessary material. An overlocker uses from two to twelve threads, which can form not only a functional overlock stitch, but also perform decorative stitches (roller stitch, imitation flat stitch, etc.).
Modern sewing equipment is often supplied from Europe or Taiwan and is simple and multifunctional. If the speed of creating a stitch is not in the first place, then a Chinese overlocker is suitable as an analogue.
Such sewing equipment is much cheaper than standard professional options from Brother, Janome, JUKI, Merrylock. Chinese analogues (BRUCE, Feya, Zoyer Siruba), especially the old model, will require more patience when threading and when sewing.
patlah.ru
The main question of all those who bought equipment from China is how to thread this overlocker. Often this equipment is supplied not only without the threads themselves, but sometimes without instructions for use.
What overlockers exist for use at home and for mass sewing of products?
On the market of sewing devices for overcasting fabric sections, you can find many models. They are produced under the brands “Jack”, “Janome”, “Yamata”, “Agate”, “Brother”, “Juki” "), etc. Class 51 overlocker is one of the most popular industrial devices. It is used in everyday life and in small studios.
Overlock 51 class
Despite the fact that class 51 overlocker is morally outdated, and most modern fabrics cannot be processed efficiently on it, the use of this model is sometimes justified. You can’t do without a class 51 overlocker when processing coarse and thick fabrics. The table provides information on the types of these devices:
| Principles of classification | Types of overlockers | General information |
| Purpose | Domestic | Intended for household use. Withstands light loads. Its duration of operation is several hours a day. |
| Industrial | Designed for the production of garments on an industrial scale. Able to work 8–12 hours per day. It features high operating speed. Most models are equipped with a table. | |
| Number of threads to be threaded | Double thread | The simplest design. Performs a two-thread reinforcement stitch. |
| Three-strand | A universal option. Performs a 3-thread overlock stitch. | |
| Four-strand | Performs three- and four-thread overcasting stitches, as well as a rolled seam, which is used when working with thin materials. | |
| Five-thread | Complex modification. Performs a 5-thread reinforcement stitch and sometimes a cover stitch. Certain models offer automatic fabric cutting. |
Stitch and cut size
Setting the stitch width and length is necessary to improve the quality of the resulting stitch. For each new work session, you must select your own settings. For standard work, this machine has a universal mode that combines parameters suitable for most fabrics. For small seams there is no need to adjust the machine.
The stitch length in this setting is between two and a half to three millimeters, which is great for thin and medium-thick fabrics. Stitches shorter or longer than this value may result in poor-quality seams and puckering of the fabric.
The stitch width, which is selected before starting work, must correspond to the width of the cutting line. The indicator selected on the device controls processes such as:
- distance from the cutting knife to the needles;
- length of fabric left inside the machine;
- speed of the system.
The largest stitch width value is used when working in which it is necessary to place most of the fabric inside the stitch. It is quite difficult to work with the minimum value, since the optimal thread tension requires such force that the threads begin to periodically break.
A narrow seam is convenient to use for rolled stitching or for other specific work.
The width is adjusted using special bolts provided by the design . Turn them to the required position. The operation must be carried out in stages, checking the length of the stitch on the piece each time a slight twist has been made.
In addition to tension regulators for each thread, there is a special toggle switch on the body of the overcasting machine with a scale for selecting stitch size: from 2 to 5 mm. The choice of the desired seam size is dictated by the properties of the fabric to be worked with. Users of the machine must take into account the following standards when setting up.
- The edges of thin delicate materials, such as cambric, muslin, georgette, chiffon, should be ground with a stitch of 2-3 mm. Threads No. 80-90 are recommended.
- For medium-density fabrics (chintz, calico, gabardine, poplin, thin cloth), thread No. 60-80 and stitch size 2.5-3.5 mm are recommended.
- Knitwear and dense fabrics (twill, satin, flannel, jeans, tweed) are overcast with thread No. 50-60, and the stitch should be 3-4 mm.
How to thread an overlocker correctly?
A novice seamstress or craftswoman who has never worked with an overlocker may think that threading this sewing device independently requires special skills and knowledge. However, in reality, you only need to refuel the car once, and subsequently this manipulation can be performed almost blindly. How should I thread a three-, four- and five-thread overlocker?
Three-strand device
If you manage to thread the Chinese three-thread device, this procedure will not become a problem when working with any model. They do it like this:
Three-thread overlock
- Thread the thread through all the thread guide holes on the body of the machine.
- Thread the thread into the tension device located in the right looper, and then pull it out in the lower direction.
- Pass the thread through the eye of the needle, bringing it back through the foot. At the end of the procedure, you need to make sure that the thread is threaded correctly. To do this, they try to sew a line on waste material.
Four-strand device
Threading a four-thread overlocker is carried out according to the same scheme as a three-thread overlocker, with the exception of a few points. The first type of machine differs from the second in that it is equipped with two needles. The thread for the left needle passes through the left tension device, for the right one, through the right one.
Before threading a four-thread device, you need to take into account that the right tensioner corresponds to the first looper located on the left, and the left one corresponds to the first element designed to capture the needle thread when forming a chain stitch, which is located on the right. If this procedure has any special features, the machine manufacturer places a diagram on its body. Some models of such overlockers are equipped with the FAST system. With its help, threading threads into the lower and upper loopers is much easier.
Five-thread or industrial overlock
Unlike older devices, all modern machines are equipped with a needle threading circuit. Usually it is glued to one of the flat surfaces of the product. In any case, a detailed description of this manipulation should be in the manual for using the sewing device.
Many manufacturers of modern industrial overlockers mark indicators for each thread with different colors. If you urgently need to thread the thread and do not have time to study how to perform this procedure, using such colored marks it is much easier to do it. If there are no such indicators, you can make them yourself by marking the desired places with nail polish of different colors. You can also use waterproof markers for this.
When threading a needle thread into a five-thread overlocker, you must follow the following sequence of actions:
- Pull the thread from the spool and insert it into both holes located at the back of the thread guide.
- Pass the thread under the tensioner washer, pulling it towards you.
- Thread the thread into the hole of the second horn and the thread guide, which is located on the needle bar. Lower the thread down and thread it through the eye of the needle.
Installation of coils
Since the overlocker itself, especially the Chinese one, is very demanding to work with, it is worth paying attention to its nuances even when installing the spools.
- Before threading the overlock machine, you need to prepare the place where the bobbins are attached.
- Move the creel and fix it. Install the spool pins.
- If you decide to use cone coils, be sure to insert the springs into the holes of the posts or install other special fasteners - this way the coil will be fixed to the post as firmly as possible. If not fully secured, it may jump off while the overlocker is running. In the best case, after this, other threads will become tangled or torn, in the worst case, the machine will simply break.
sewing-master.ru
How to choose?
There are at least several selection criteria.
- Workmanship. Let's say you need a model that will last at least several years in daily or weekly use. Carefully inspect and compare different models. To get started, read the reviews of at least a dozen models in the lower and middle price ranges. Here, the calculation for long-term and frequent work is important - parts made of high-quality steel, possibly stainless steel, which have greater wear resistance, play a decisive role.
Even if it hides important information, such an overlocker will not last even two years with active work.
- Price. The optimal balance between price and quality is for those who want to get the most productive overlock machine for the same money with at least 10-20 modes, each of which produces its own seam, noticeably different from the others.
- Manufacturer country. If you don’t trust China (sometimes there are good reasons for this), look for American, European and Japanese overlockers, compare different brands and their models. Russian models, such as Agat DonLok, are a cheaper alternative, for example, to American ones from Brother.
- The ability to sew, sew with a flat seam around the perimeter (and not only) any fabric - even wool and felt, from which rugs and blankets are made. A good machine will readily “pierce” even leather and leatherette, drape and other, denser material.
- The ability to place spools and spools of thread as large as possible. They will come in handy when a home craftswoman suddenly retrains as a “home worker” working to order, and quickly acquires hundreds of surrounding clients. The dimensions of the machine, allowing you to run bobbins of upper threads, are an economically more profitable solution than buying a palette (set) of small bobbins “for all occasions.”
- Additional functions. A number of models have, for example, thread trimming - using an auxiliary cutter included in the kit.
Having chosen a high-quality device that meets your requirements, read the instructions for its use and thread the threads into your overlocker.
Installation of overlock knives class 51
Dull knives “tear” the edge of the fabric rather than cutting, which is often the cause of most stitching defects. Unfortunately, you cannot sharpen your knives yourself. But using these instructions, you can remove them and put them back. Knives need to be sharpened on a special machine with a fixed sharpening angle. Contact the masters who make keys; they have such machines, but keep in mind that not everyone will undertake to sharpen overlock knives.
General recommendations for installing knives. The lower knife should be flush with the needle plate. The upper knife should be pressed tightly against the lower knife with its entire cutting edge and fall (go) beyond the edge of the lower knife by 1.0 -1.5 mm, no more. Just in case, we provide fragments of the factory instructions. On the fifth try it will be easier to understand it.
The edges of the fabrics to be sewn are trimmed using two knives: the upper movable knife 4, mounted on the swing arm of the knife 7, and the lower 11, which is fixed in the block 12 on the machine body. The position of the upper knife 4 is set depending on the width of the stitching. The upper knife is fixed in the holder 5, which can be rearranged in the ears of the lever 7. To move the knife, you need to use a screwdriver to unfasten the screw 6 of the clamp 10 on the holder 9 with a screwdriver and move the holder to one side or the other, depending on the width of the stitching. To ensure normal cutting of the material, the upper knife 4 with its plane must fit tightly, without a noticeable gap, to the plane of the lower knife 11. After the upper knife 4 is installed in accordance with the required width of the stitching, the lower knife 11 is brought to it, this movement of the block is carried out 12 by means of the lower screw 14 with a round knurled preparation. The front screw 13 on the body, which secures the block, is first released with a screwdriver. Both the lower and upper blades can also be adjusted in the vertical direction after releasing the fastening screws: 8 for the upper blade and 1 for the lower blade. The lower knife is installed in the block so that its cutting edge is at the level of the overlog needle plate. The upper knife is installed so that its cutting edge overlaps the cutting edge of the lower knife by approximately 1 mm. When changing the width of the overlock on a class 51 overlocker, you also have to adjust the position of plate 2 on the presser foot by first releasing the securing screw 3. See also How to replace and sharpen overlock knives.
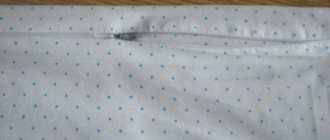
Three-thread overlock
Unlike a sewing machine, whose equipment with threads for the upcoming sewing does not affect the formation of overlock stitches, and the lines do not indicate the presence of defective work, an overlocker behaves differently. Any missed thread fastening in the stitcher will immediately result in skipped stitches or the seam will take on an overcast look.
The general instructions for threading overlockers are as follows.
- Place the spool or mini spool of thread onto the pin that holds it.
- Unwind a little thread from the spool. Pass the end through holes or hooks that give it directions. The axis of the spool lock must coincide with the line of the thread guide - this is one of the keys to a perfect seam.
- Pass the thread through the tensioners - retracting and attracting. There are overlocker models that use one universal tensioner. In any case, do not skip any detail.
- Pass the thread through the bleeder thread guide and thread it into the needle. The directions of movement of the thread and matter must coincide.
- Pull the thread to the side through the slot in the presser foot.
Threading loopers individually
The main difference between this type of filling is that one looper has a tensioner under the working area of the device . To thread the right looper, pass the threads through all the parts. It is useful to use threads of contrasting color - such a difference will quickly allow you to loosen or tighten the desired one . Threading the left looper will require a little more time and effort - it is less accessible. Tweezers will help you, but if the hole for passing the thread is not quite convenient, move the needle gate and pass the thread through the necessary parts.
On a class 51 overlocker , the same sequence of actions is used if there are four threads. The difference between the refueling is as follows:
- The left upper thread tensioner has a left needle, the right one has a right needle;
- For loop tensioners, the opposite is true: the first right-hand tensioner is the first left-sided looper.
However, threading of loopers and tensioners varies from one model to another.
Check this in the instructions for your overlocker. A four-thread overlocker can have an automatic threading mechanism in the lower looper, which simplifies the process of threading the upper threads.
The guideline for setting up the overlocker is the left looper
The main reference point when setting up a class 51 overlocker is the left looper (lower) L. When lowering the needle to the lowest position, it should take the extreme left position. The tip of the looper at this moment should be 4...5 mm away from the needle. When the needle is raised 2.5-3 mm just above the eye of the needle, a loop is formed. The nose of the left looper, moving to the right towards the needle, passing 1.5...2 mm above the eye of the needle, should capture the resulting loop. The gap between the looper blade and the needle should be minimal - 0.05 mm. This gap can be established by loosening the screw securing the left looper B and carefully turning the looper as it approaches the needle. Do not loosen screw B too much; the looper should turn with little force. After achieving the required clearance after several attempts, do not forget to fix the fastener (B).
Having grabbed the needle loop, the left looper pulls it along its blade, and the right looper R is already moving towards it to enter the loop created by the left looper. The nose of the right looper runs along the notch on the back of the left looper, getting as close as possible to its eye and blade at the same time. If you draw a horizontal line at this moment, the nose of the right looper should be lower than the eye of the left looper and the gap between the blades of both loopers should be 0.1...0.15 mm. You can get confused in these terms and provisions, but it can’t be simpler... Now all that’s left for the needle is to remove the loop from the right looper, and the overlocker will work like a clock.
When the needle enters the loop of the right looper, the gap between the needle and the looper blade should also be 0.1...0.15 mm, and the distance between the eye of the right looper and the point of the needle (when they are at the same level) is approximately 0.3..0 .5 mm. The right looper does not have an adjustment screw to move its nose closer or further; it is rigidly fixed to the platform with a screw. Its adjustment occurs in a banal way - by carefully bending it in one direction or another. But the left looper cannot be bent like that.
Chinese 4-thread models
Overlockers ordered from China often come with instructions in Chinese or English. If you have not studied English at the engineer level, use a translator. To set up such an overlocker, you need to go through 2 stages of pulling the thread through the loopers. The first is threading the left looper.
- Pass the thread through the hole in the cover cap using the thread guide itself, then guide it and pass it through the same hole on the left cover cover.
- Pass the same thread through the holes in the flap of the tensioner itself. Pass the thread through the tension adjuster and then through the channel leading to the looper.
- Turn the pulley until the right looper is pulled upward from the plate and needle.
- Pass the thread behind the right looper lever and secure it to the hook.
- Turn the pulley until the left looper moves to its outermost position.
- Pass the thread through its hole and continue turning the pulley until the right looper lifts above the left plate. In this case, the left looper should rise up to its limit.
- Place the thread under the shoulder blade.
If this thread is not threaded correctly, its breakage will prevent you from making perfectly even seams. Now thread the right looper as follows.
- Bring the thread through the hole in the tension device plate and then pass it through the eye of the needle.
- Pass the thread through the hole in the limiting plate of the upper cutter located in the thread tension mechanism passing through the right looper.
- Turn the pulley so that the right looper points upward.
- Thread the same thread into the looper hole located under the hook, giving it the desired direction.
To thread the needle, do the following:
- pass the thread through the tensioner adjuster mechanism;
- go around the adjusting axis and thread it into the hole in the plate;
- pass the thread under the hook and thread it through the end of the needle.
Then the thread is pulled through the cut of the foot to the side. The overlocker is ready to sew. Tuck it under the foot and sew a test patch, check the quality of the seam. The scheme for threading through all external functional units of the overlocker is duplicated under the cover.
If you violate it, then when you try to work on an incorrectly threaded overlocker, you can not only get a fuzzy and twisted seam, but also ruin the item of linen or clothing being repaired.
The subtleties of obtaining a quality stitch
There is an optimal way to set up an overlocker before work. To do this, you will need a piece of test fabric on which to check the quality of the seam. Pass the workpiece through the machine and carefully inspect the resulting stitch.
- The inspection begins with the loop of the left needle. Wrinkled fabric means excessive tension on the needle thread. Loosen it by gradually changing the value on the regulator. After each single change, pass a piece of fabric through the machine, repeat the procedure until the material stops creasing.
- The next stage includes checking the seam for evenness. When the fabric has stopped wrinkling, you can proceed to the next procedure - take the fabric so that the seam is in the middle. Pull the ends in different directions and take a closer look. If instead of tightly fitting halves you see a ladder of threads, you need to increase the thread tension. The procedure, like the previous one, is carried out step by step. Don't rush, setting up a sewing machine is a painstaking task. Pay special attention to the left needle thread, it is what connects the loops to each other. The quality of the stitching depends on the correct tension. Having identified the optimal value for the left thread, set exactly the same for the right one. This rule is relevant for all types of fabrics; the ratio between the right and left threads never changes.
- The final stage is to determine the location of the interlacing of the looper threads - it should be on the outermost section of the piece of fabric. In this case, the seam is laid in an even line, forming a flat pattern between the stitches. Loops protruding beyond the edge of the fabric indicate weak looper thread tension. Pull them a little and test them on a new piece of material. If the loops of one looper creep over the edge, then only its thread needs to be tightened. Watch this carefully, because if you choose incorrectly, you risk creating excessive tension and causing weave on only one side of the fabric. In this case, you will have to loosen the thread step by step until the buttonhole stitch returns to normal. In some cases, it is necessary to simultaneously tighten one looper and loosen another. Experts recommend starting with weakening.
Overlock looper
By setting up the overlocker according to the above diagram, you can avoid many problems. The instructions allow you to adjust the settings to any type of fabric and successfully perform work of any complexity.
Chinese three-thread
Refilling Chinese “three-thread” products is no different from preparing an industrial model of class 51 or from Russian three-thread products of the “Agat” brand. The latter are inferior in design to foreign devices, for example, the Brother brand, but in functionality they are not inferior to them or any other brands.
Documents to help the user
As a rule, the manual for any equipment contains a manual describing the basic operating rules, which help not only to use the device correctly, but also to carry out maintenance measures. But what to do if this document is lost, how to thread a three-thread Chinese overlocker without a user manual? Designations printed directly on the body of the sewing equipment will help here. But if they are missing, you just need to understand the principle of operation of the unit, and then difficulties with refueling will not arise even if it is idle for a long time.
Why do overlockers have three and four threads?
To understand how to thread a Chinese (three-thread) overlocker, the instructions for which have been lost and the marks on the body have been erased, you need to understand why exactly three threads are needed for the job and how it differs from a four-thread unit. So, the difference is in the number of needles. The simplest overlocker threads are used for the upper and lower loopers, as well as for the needle. In more expensive equipment (four-thread), two needles are installed, therefore, the number of coils increases.
The operating principle of this sewing machine lies in the coordinated interaction of the fabric feed regulator under the knife, where the fabric is cut and immediately processed by loopers, the threads of which are intertwined with an even stitch laid by a needle. A three-thread overlocker is intended only for overcasting, while with two needles you can safely sew knitted fabrics without the use of a sewing machine.
It should be noted that threading both cheap and expensive models is almost identical, because they work on the same principle of intertwining loopers with a needle. This means that this description is suitable not only for threading a three-thread overcasting machine, but also for a more advanced four-thread model.
Tips for caring for your overlocker
Like any other technique, an overlocker needs periodic maintenance. Maintenance of the machine consists of the following manipulations.
- After finishing work, you need to sweep away particles of threads, fabrics and dust from accessible working surfaces using a brush.
- After complete cleaning, the moving mechanisms of the overlocker must be periodically lubricated with special oil.
- If you suspect or detect serious malfunctions, you should contact a specialized service center for repairs.
Setting up a sewing machine requires focused attention and full dedication to the process. Get ready to spend an hour adjusting all the settings necessary for work. When carrying out the procedure, you should not rush; if you are not sure that you can handle it on your own, it is better to contact a specialist.
Needle thread path
So, how to thread a Chinese three-thread overlock? The instructions for installing the coil intended for the needle robot of the unit are as follows:
- the skein is placed on the holder and the edge of the thread is raised to thread it into the hole of a special tripod;
- going down to the overlocker, the thread should pass through the fixation hole in front of the tension regulator;
- then it passes through special grooves to the feed lever or a special hook;
- On the way to the needle, the thread must be secured in all hooks so that it does not get tangled during work;
- Lastly, the edge of the thread is threaded into the needle.
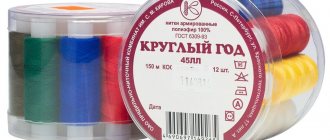
Selection of threads and needles
When preparing an overlocker for work, it is important to consider the following conditions:
- threads for threading needles and loopers must be the same in type and thickness;
- the size and thickness of the needle is selected in accordance with the density of the material being processed and must correspond to the characteristics declared by the manufacturer of the equipment.
If these requirements are not met, the machine will not produce high-quality work, will malfunction and may fail. Also, when changing fabric or thread, the tension mechanisms need to be adjusted.
The manufacturer, in the operating instructions for each device model, recommends the brands and numbers of suitable needles.
What are loopers?
A 3-thread overlocker is a very convenient device for processing product cuts. At the same time, this unit cuts off all the irregularities, making the edge perfect, and neatly overcasts it. It is the loopers that play the role of overcasting elements. To ensure that the stitching is even and the seam does not seem overtightened or twisted, close attention should be paid to laying the thread in the grooves of the unit.
Upper looper thread path
While the thread to ensure the seam is laid with a needle passes through the grooves on the surface of the body, the thread of the upper looper is hidden behind a special overlocker cover. This allows you to work on sewing equipment and not be afraid that the fabric being processed will tangle the thread or break. So, what manipulations should be done for the upper looper and how to thread a Chinese three-thread overlock? The instructions for securing the top stitching element are as follows:
- the thread is placed on the holder, raised to the tripod and lowered to the tension regulator;
- thread the thread into the groove on the body and bring it to the panel with hooks under the overlocker lid;
- Next, fix the thread along all the upper hooks and thread it into the looper hole.
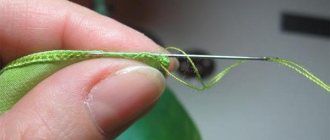
Threading
Threading a serger is a little different than most regular sewing machines. An overlocker can use 3 to 5 spools at a time. In Chinese analogues, the principle of operation remains the same as in European ones. Each thread must pass through a series of loops, hooks and guides before entering the loopers and needles. As a result, the ends of the threads pass between the presser foot and the needle plate, are directed into the needle, and then form a stitch together with the needle.
Overlock from China, characterized by the presence of three threads, often requires special skill in threading. Sometimes the threads are threaded into the overlock not just with your hands, but with tweezers, since it is very difficult to thread it through all the necessary parts with your fingers. Note that each thread has its own individual path, as well as a separate bobbin and walking foot.
Lower looper thread path
In order for the entire system of weaving threads along the edge of the product to work, it is necessary that all three threads be threaded correctly. Otherwise the line will not work. The description of how to thread a three-thread overlocker for the lower looper is almost identical to the upper one. Here you should also install the thread on the holder, pass it along the tripod and voltage regulator, fix it in the hooks so that the threads do not intertwine or get tangled, and lead it out into a special hole.
If you understand the principle of operation, then there will be no problems with the question of how to properly thread a three-thread overlocker. It is enough to understand that for correct weaving along the cut it is necessary that the threads be sufficiently tensioned. It is tension that plays a decisive role here.
How to solve the problem of skipping stitches
When using an overcasting machine, you do not always get a high-quality stitch. Possible missing stitches and other defects. There are several possible reasons for gaps in a line.
The needle may be dull, bent, or incorrectly installed. This problem is indicated by a dull thud when processing the fabric. Skipping stitches can occur when using a needle that does not match the number for a given overlocker model. You need to remove and inspect the needle using a magnifying glass to identify the defect. Install in the correct position. If the needle is damaged or does not match the number, it should be replaced.
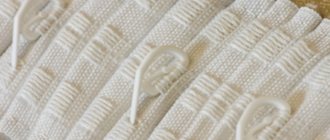
Overlock stitch with skipped stitches
Incorrect threading and thread tension is another reason for poor quality skip seams. You should check the passage of the thread through the fasteners and adjust the tension, and also make sure that the thread does not wrap around the stitch adjustment pin.
A poorly pressed foot is another reason for gaps in the edges of the product. The clamping force should be increased.
After eliminating the cause of poor-quality processing, it is recommended to check the result on a piece of fabric. If everything is in order, you can begin the main work. Otherwise, you will have to contact a service technician to troubleshoot the machine.