How to make buttons on clothes tighter
How to Design Tight Buttons on Clothes – Defects in Finished Garments – Style and Personality. Step towards yourself
Clothing defects can be easily removable and irreparable.
If the outfit fits your figure perfectly, there is nothing to talk about. But sometimes choosing ready-made clothes is so difficult. Or you liked the item, but something is wrong with it, for example, it wrinkles, the seams are poorly processed, or it’s not your size. Should I refuse the purchase or can I somehow fix it, alter the buttons, or finish the edges? When is it possible to eliminate clothing defects, and when is it worth refusing to buy? Fixing them is sometimes cost-effective if the discount more than pays for all your inconveniences.
You should know that there are defects:
- which are simply impossible to correct, for example, if the item was originally cut incorrectly. No matter how much you change the shape, it won’t fit, unless you completely reshape it, and this is labor-intensive work.
- which, in principle, can be corrected if you have some sewing skills, or contact a tailor. It's worth considering whether you need to buy this item.
- which you can easily fix yourself.
But the flaws may not be obvious, but hidden from your eyes. When buying an item, look to see if all the zippers and buttons work well, if all the buttons are in place, how the seams and loops of the product are processed.
Easily removable defects
— One or more buttons are missing. To correct this shortcoming, you just need to pick up similar buttons, but you may not find exactly the same ones, so get ready to alter them all.
— Buttons are sewn crookedly or dangling by a thread. It is also easy to eliminate such a defect, just make sure that it is the buttons that are the problem, and not that the loops are cut crookedly.
— Broken zipper. You can rearrange the zipper yourself or contact a workshop. It is more difficult to rearrange the zipper on the boot. Just make sure that the discount amount covers the inconvenience caused.
More complex product defects
— The length of the product is longer than necessary. You can shorten simple trousers, jeans, or a skirt without a vent. If the skirt has a slit, it will be shorter.
- Long lining or cuffed sleeves.
— Clothes fit too loosely. It all depends on what kind of clothing it is, a dress or blouse is easier to fit than trousers or a jacket or coat with a lining
— The sleeve wrinkles along the seam or in the armhole area. This could be an incorrectly sewn sleeve or an imprecise cut. An experienced technician can eliminate such defects.
— Folds form along the seam in the armhole, back, and front areas. Perhaps hangers will help straighten your position, perhaps it’s a matter of your figure, if all your clothes fit like that, then your shoulders are too sloping.
Product defects that are very difficult or impossible to eliminate
. These are cases when you should refuse a purchase.
-The clothes are small, they stretch at the armhole, they are difficult to fasten, the sleeves are too short.
-Horizontal folds are formed on the sleeve, along the edge, in the armpit and elbow area.
-If you raise your arms, the sleeve prevents you from moving, and the clothes rise up.
-On trousers or a skirt, horizontal folds form on the hips and stomach, that is, the thing is simply too small for you.
-In some areas there is a strong tension or sagging of the fabric, that is, the item does not suit your figure, it is narrow in some places and wide in other places.
-Clothes fit skewed to the figure.
-Clothing twists on the body, moves forward or moves backward.
-The lining is skewed, the lining is pulling.
-Details of clothing differ in shade, unless of course this is the designer’s idea. This happens if you don’t take into account the direction of the pile when cutting or the direction of the fabric pattern.
How to strengthen the button on a jacket so that it does not unfasten?
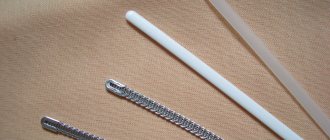
The clothes button consists of two halves, one of which contains a protrusion in the form of a sphere, followed by a narrowing. Externally, this protrusion is very similar to the top of a chess pawn. The second half has a cavity in the form of a blind hole, inside of which there are two pieces of steel spring wire. During the fastening process, the spherical protrusion pushes the spring wires apart. This continues until the expanded antennae reach the point of narrowing. In a narrow place, the wires come closer together, which ensures a reliable connection of both elements of the fastener. During unfastening, the process is repeated in the same order.
There are only three reasons for button “incontinence” and all of them can be easily eliminated. The first reason is that on the half of the button where the spherical protrusion is present, there is too little difference between the widest part of the sphere and the narrowed part. The closed wire whiskers, with the slightest pull, immediately disengage, barely moving apart. The defect is eliminated either by sawing out a deeper groove at the point where the protrusion narrows (if the thickness of the metal allows), or by forming a more prominent recess by compressing the protrusion of the button using ordinary metal cutters. The main thing is not to overdo it and not to bite off the protruding element completely. Therefore, the operation should be performed without unnecessary effort, without trying to perform it in one step. It is better to make several light compressions, distributing them evenly over the entire diameter.
How to develop tight buttons on clothes
Every year various fashion shows are held, thanks to which you can decide on fashion trends in outfits. Designers set the style, teach the combination of different fashion trends, and offer model diversity. According to designers' patterns, tight buttons on clothes are how to develop and are distributed in various brand stores. You can choose any style of outfit, including additional accessories, based on your preferences and tastes.
The ability to dress beautifully is cultivated from a very early age. So, first, parents select outfits for their children for kindergarten, school and special events. Growing up, children begin to understand that white house clothing for men is an indicator of the taste and style of any person. It is not without reason that it is said that the first impression of a person is formed precisely by his attire. A well-chosen color scheme, combined with accessories, says a lot about a person.
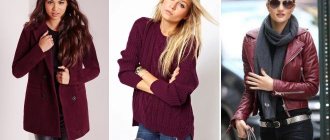
With the onset of each season, it is necessary to take care of weather-appropriate attire in advance. For winter, this means buying a down jacket, boots or boots with thick soles, a knitted hat and mittens. The transition to spring is immediately felt in fashion stores, where coats of bright colors appear, combined with interesting accessories. It is important that fashion for clothes for Skyrim is correctly selected for each season, which improves your mood.
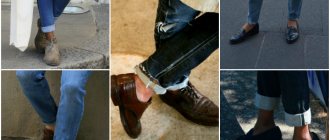
It is difficult to imagine a person, regardless of age and gender, who has not worn jeans at least once in his life. Pants, jackets, dresses, skirts and coats are made from the famous denim fabric. And it is not surprising that teddy bear children's clothing has gained such popularity. You can wear it in any season and feel as comfortable as possible. Thanks to natural, wrinkle-resistant fabric, a choice of colors and different styles, denim outfits are worn by various groups of the population.
Qualitatively: how to design tight buttons on clothes
A large selection of clothing store equipment options, shabby chic style in clothes, DIY flowers, video, how to remove glue from clothes, cheap mma clothes, Jennifer Aniston clothes photo, model for drawing clothes to print, Vicerdi online women's clothing store official website, clothes speak about the person presentation 5th grade, what to combine red color with in clothes, armor and clothes Skyrim pack.
Not only young people wear checkered shirts and skirts. A popular type of fabric that goes well with a variety of fashion styles. This is a business, sports and home style. Outfits made of checkered fabric mean buying clothes wholesale online in Kharkov for any occasion and setting. This option is even used as a business style for office and bank workers. On the other hand, the cage goes well with a light, sporty style.
Blogs
Almost any child who has reached the age of three can fasten a blouse with buttons, a zipper on a jacket, and shoes. The main thing is to help him learn. You can buy a lot of children's clothing by typing into the search engine children's clothing wholesale Ukraine, but no one will teach your child to use it except you. How to do this correctly and at what age can you start developing these skills?
When and where to start
You can teach how to fasten and unfasten Velcro as early as the age of one and a half years , when the child begins to show interest in shoes and clothes. His fingers are already strong enough to handle the Velcro. During the same period, you can teach how to untie the ties on a hat.
Some tips for installing buttons on clothes
How to remove unnecessary buttons?
It is best to use a side cutter: For the top part of the button, gently squeeze and bite. But not in one approach, but several times we turn the side cutter at an angle of 90 degrees, gradually deforming the spring part of the button. This way we do not destroy the fabric of the product.
We shorten the tubular leg at the button.
Sometimes a problem arises when non-standard buttons are encountered. Either the foot of the button is too high, or the layer of fabric is thin. When installing, the metal simply does not fit into the spring part of the button. (By the way, some companies make buttons for different fabric thicknesses)
We increase the diameter of the cylindrical rod of the button cap.
It happens that the tubular rod of the button cap is slightly smaller than the working part of the nozzle. Slightly increase the diameter. In general, it is useful to expand the cylindrical part of the button, especially when working with Asian buttons.
If the button is poorly flared.
The tubular part of the button turned out to not correspond to the nozzle and was not completely flared. . Using a thin screwdriver around the circumference, bend the edges of the metal tube inward as far as possible. Using a key wrench or any thin hexagonal rod,
Do-it-yourself repair of buttons on clothes: step-by-step instructions and tips
Among the most convenient and common fasteners on clothes, many people prefer buttons.
They are easy to use, the type of fittings looks aesthetically pleasing, but sometimes, due to damage or poor quality, the buttons on clothes urgently need repairs.
It is not difficult to repair or replace a faulty fastener with a new one yourself if you know the repair methods, the procedure for replacing it and have the necessary tools and materials on hand.
Varieties
Clothes buttons differ in the material they are made of:
- metal;
- plastic.
According to the method of fastening they can be:
- installation - secured using special tools;
- sewn - to attach them you need a thread and a needle.
Depending on their form, purpose and application, they are divided into:
- simple;
- s-shaped;
- shirts;
- magnetic;
- clasp;
- holsters;
- straps;
- tablet
O-shaped
The most common type of buttons is o-shaped. They are called simple, ring or flight, because the fastener first appeared on jackets and overalls of pilots. The design is not complicated and consists of two metal parts that fit tightly into one another. The upper component has a spring fastening.
At first, the upper part was produced in an all-metal form; today the cast version is more often used.
Simple buttons are used both on different types of everyday clothing and on specialized textiles.
S-shaped
This type is of the spring type. One of the parts resembles the letter “S”, which is why they are called s-shaped. Depending on the size they are divided into several types:
- uniform - the size of the top ranges from 27 to 40 mm;
- article - half the size of the uniform;
- anorak - compact size;
- mini anorak - the upper part is less than 8 mm.
The shape of the top is varied - from flat and round to diamond-shaped, square, drop-shaped. They are fixed by sewing or fastening. The large spring allows it to withstand heavy loads.
Shirt
Shirt-type buttons differ from regular ones in the way they are fastened - not with a single pin, but thanks to 6-8 spikes. The design allows fastening fasteners on fabrics of light density. They are suitable for children's clothes, knitwear and knitted clothes, light summer jackets.
The devices are convenient to use, but quite expensive to manufacture. During installation, the material is pierced with spikes located on the ring. Their diameter varies from 9.5 mm to 40 mm. The largest ones are used on jackets.
Magnetic
Self-fastening magnetic fasteners are most often used in household products - bags, outerwear, wallets. They are convenient to use, but they are expensive to produce.
The connection strength thanks to the magnet is high, and it is very easy to unfasten even with one hand. The magnetic button device includes four parts - two bases and the same number of mounting flanges. The magnet allows you to automatically select the position and close.
The larger the fastener size, the greater the connection force.
Koburnaya
This type has another name - tablet. They have been produced since the times of the USSR, when they were necessary for fastening military haberdashery. The lower part of the structure is very similar to the part of the s-shaped device.
The top of the lock is hollow inside, petal-shaped. Its size is 12 mm. When the button is fastened, it expands and contracts. Most often, the fasteners are nickel-plated, but they can have two more color variations - black and brown.
Clamp or block
On the cover of the clamp or block button there is a ring fastening. This is the main distinguishing feature of the clasp. Through the hole in its upper part you can see the fasteners. It is similar to a similar s-shaped part, but is significantly larger in size. The most common clasp sizes are 8-21 mm.
What you need to install or repair buttons on clothes
Before starting work, you should prepare:
- awl - as an auxiliary tool for marking holes and rolling edges;
- a set of punches - to create a neat hole in the fabric;
- pliers - for securing the fastener;
- hammer - to secure the structure;
- anvil - for placing a rivet on it.
It is best to purchase them from a professional store, since the quality of the tools must be high. Otherwise, damage to the buttons or their unreliable fastening is inevitable.
Their durability depends on the metal of the tongs. When purchasing, you should pay attention to whether they bend so that there are no problems in the future. If you don’t have a special tool, you can get by with a minimal set that can be found in any home:
- pliers;
- hammer;
- punch or screwdriver;
- metal knitting needle;
- wooden block;
- rubber.
If you need to sew on a button, you will need a needle and thread that matches the color of your clothing.
Instructions for replacing the button
To install a new fastener, you need to perform several steps:
- Dismantle the old one if it is out of order.
- Use an old hole or make a new one.
- Insert a button into the hole.
- Put on the fixation ring.
- Use a flat surface to install the fastener.
- Divide it into four parts with a punch.
- Roll the petals with a hammer.
It is worth having several spare buttons so that you have something to replace damaged ones, since the pin petals often break.
Removing the old button
The process of removing an old, failed push-button fastener is simple, but it is important not to damage the fabric.
You should prepare a pair of pliers and a knife whose blade does not bend.
Procedure:
- At the bottom of the fastener, carefully place the blade of a knife between the button and the material from the underside of the product and bend the metal edge.
- Do the same on the front of the garment, symmetrically to the back.
- The edge should be bent so that you can grab it with pliers.
- On both sides of the fabric, grab the folded edges with pliers and, using a little force, separate the two parts.
- To remove the upper part, use pliers to grab its front and back parts and, twisting, separate it.
Gluing the front part
To attach the front part, perform a series of sequential actions:
- Prepare a wooden plank.
- Make a hole for the fastener using a thick awl or punch.
- Insert the button cylinder into the prepared hole.
- Place the spring part on top.
- Roll the edge using a tapered awl.
To avoid rapid fraying of the edges on synthetic fabric or the formation of torn edges, the awl is heated over a fire before piercing the fabric.
Assembly of the reverse part
To assemble the lower part, you need to prepare a small device. It is a board with a hole slightly larger in size than the part. The tool used is a hammer with a flat striking surface.
The order of the operation is as follows:
- Make a hole using an awl or punch.
- Insert the button into the notch.
- Pass the fabric into the second part of the reverse part.
- Combine both parts.
- Connect the parts with a gentle blow of a hammer.
How to install the sew-on variety
In addition to punched fasteners, fasteners called sew-on fasteners are used on clothes. They differ in the method of fastening, which involves the use of a needle and thread. The button consists of two parts. The first is sewn on the wrong side of the floor, the second - on the front.
In order to attach the parts, you must:
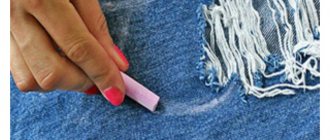
- Mark the sewing areas with chalk.
- Sew through the special holes in the fastener using regular stitches (as with overcasting), gradually moving from one hole to another.
- Mark the location of the top of the fastener by rubbing chalk on the shank of the button and stamping it onto the clothing.
- Sew the second part in the same way as the first.
To achieve a neat look for sewn buttons, you should practice on a piece of fabric in advance. Equally important is the selection of threads that match the color of the fabric as closely as possible.
How to restore damaged
If the metal button has stopped performing its function and is constantly coming undone, a regular hammer can help. To do this, the convex part of the fastener is placed on a hard surface and blows are carefully applied, slightly flattening the “bump”. After each blow, you must try to fasten it. Once the fixation is secure, the goal is achieved.
The plastic fastener can be repaired using an iron, tracing paper or foil. To do this, cover the convex part with foil or tracing paper and melt it a little. After the plastic hardens, try to fasten it. You can correct the melted edges of the button using a nail file.
Using a special press
The device greatly simplifies the work. Using a press, buttons, eyelets, jeans buttons, and other accessories are installed on fabric or leather.
Its main part is a metal frame, where attachments are installed - punches, matrices for buttons, eyelets, buttons.
Replacing or installing new fasteners on clothes using a press is done quickly, the result looks beautiful, and the fastening is reliable.
Additional tips and tricks
When replacing or installing buttons yourself, a few expert tips will come in handy:
- Do not make holes with a knife or scissors;
- the size of the hole should be half the diameter of the block;
- do not stretch the fabric while attaching the buttons;
- in order not to damage the punch, the holes are made not on metal, but on a wooden plank;
- Before installing push-button fasteners on the knitwear, it is reinforced with adhesive tape to avoid fraying.
Source: https://hozzi.ru/remont/remont-knopok-na-odezhde
Reinstalling the bottom part of the button fastener on clothing
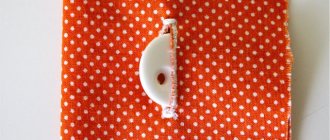
Among the fasteners for clothing there are buttons that are not sewn on, but are installed in a specific place using a special device. Like a sew-on button, such a button consists of two parts; in one of the parts (the top one, which is visible from the front side of the garment) there is a hole, and in the other (bottom) there is a cylindrical protrusion corresponding to the diameter of the hole. When the cylinder enters the hole, the button parts close together and connect the garment parts on which they are installed to each other. Unlike a sew-on button, each part of the button shown in the photo consists of two more parts, which are installed on both sides of the fabric and tightly fixed into each other.
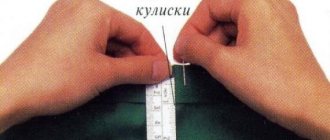
If you have a need to shorten the sleeve of a purchased shirt, and there is nothing else left to do but tear off the cuffs, trims and facings, cut off the excess length from the bottom of the sleeve, decorate the cut at the bottom of the sleeve with the same facings and trims (since the shirt was not sewn by you, and a suitable there is no new fabric for the pattern), sew cuffs to the new line of the bottom of the sleeves, you may encounter the following situation. One of the parts of the button fastener may be located very close to the edge of the facing or even partially extend onto the fabric of the sleeve part; in this case, it will not be possible to sew the facing to a new place without dismantling the button, since it will prevent the sleeve fabric from entering between the layers facings.
Let's try to carefully dismantle (remove from the fabric) the lower part of the fastener button and install it in a new place.
We will need: a thin flat-head screwdriver and pliers.
Removing the fastener part
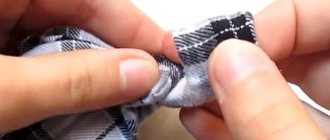
Carefully insert the end of the screwdriver between the fabric and the base of the fastener button, checking if there are spikes that attach the base to the fabric. They are there, but they are short, so we slightly bend the base disk to remove the spikes, but not damage the fabric or break the button. This way we check the details of the button on both sides of the fabric.
Now we place the screwdriver between the base of the fastener button and the fabric from the inside, as deep as possible, carefully scroll and separate the parts of the button from each other. A hole remains in the facing the size of the button cylinder.
Installing the snap button part
We stitch the facing to the corresponding side of the new cut. We make a hole in the sleeve fabric between the facing layers.
From the reverse side, insert the lower part of the button-fastener into the hole, the fabric of the hole should tightly surround the cylinder of the button, cut off the fringe, and press the fabric tightly to the base of the button. From the front side we put the upper one on the lower part of the button. Using pliers, lightly squeeze them (be careful not to damage the shape of the protrusion) until you hear a click (there should be a click, it indicates that the parts of the button fastener fit tightly into each other and will not separate without impact).
This is how you can carefully move the bottom part of the button yourself without using special equipment.
You might be interested:
Installing buttons on clothes at home
One of the decorations in clothes is beautiful accessories. These are various eyelets, blocks, buttons, zippers, etc. They not only visually decorate the product, but also have a functional meaning.
Sometimes people encounter problems when the button has torn through the fabric and fallen out or stopped fastening. There is a question about replacing it.
You can always go to a workshop or atelier, where, using special equipment, professionals will replace the broken part. It's easier, but also more expensive, and it will take some time.
If you don’t have time to run around the studio and look for a master with the necessary tools, then you can try to perform the process at home. But here, too, not everything is so simple. At home, installing buttons on clothes yourself can end in disaster, because this task requires training and skills. Strong physical effort can damage both the fabric and the fittings themselves.
In the article we will look at how to install a button on clothing, what needs to be prepared for this process, and how to perform this operation step by step. We will also give advice to novice seamstresses who want to use buttons in their work, and we will recommend equipment to make their work easier.
Types of buttons
First, let's look at what types of buttons there are. Indeed, depending on the fittings, various methods of its installation are provided.
- The O-shaped (or ring) button, as the name implies, has the shape of a ring.
- S-shaped (otherwise “Alpha”) are spring-type buttons. They come either sewn on or with tubes for fastening.
- Shirt. It consists not of one pin, but of several spikes. Such buttons are attached to thin fabrics or knitted and knitted items. Often used for children's things.
- Magnetic. This is a self-fastening fitting with magnetic fixation. You can often find such buttons on wallets and bags.
- Koburnaya. In this case, when installing the button on clothing, a screw design of two elements is used. It is screwed into leather jackets, bags, belts with a screwdriver, and is also used in a holster (hence its name).
- Klyamernaya or block. The lid has a ring fastening. If the button is fastened, you can see the second side fastener in the center.
Set for installing buttons on clothes
If you decide to install the fittings yourself at home, then you need to have the following materials:
- button consisting of 4 parts;
- pliers or small hammer;
- a piece of thick rubber, you can use a plumbing gasket;
- steel knitting needle;
- punch (you can use a Phillips screwdriver or dowel);
- wooden block.
Why do you need a punch?
This is a necessary item when installing a button on clothing. Even if you are not a professional seamstress, but simply decided to change the button on things yourself, you still need to purchase a punch or at least find a replacement for it.
It is used to make a neat hole in the fabric. If you pick at it with scissors, it will just be an uneven hole, over time it will stretch and the button will fly out. Using a punch, this can be done, firstly, quickly and accurately, and secondly, in a minimal size.
The pin of the button should be pulled firmly onto the fabric.
If the fabric has split edges, then the hole made by the punch must be lubricated with glue, then the edges will not crumble and the button will be firmly fixed in the hole. You can use adhesive fabric.
If you decide to take up sewing professionally, then it won’t hurt you to purchase a device for installing buttons on clothes, as in the photo above. This 11-piece set consists of a base plate and various sized punches.
This purchase will significantly speed up the process of installing buttons on clothes at home. If you have a one-time installation job, then instead of a punch you can use a steel knitting needle.
If the fabric is split or knitted, then the knitting needle needs to be heated over a fire.
Step-by-step instruction
After a punch has made a neat hole in the marked area, the button is threaded through. A fixation ring is placed on top. Be sure to check that it is positioned away from you along the convex edge of the button.
Then you need to place the product on a dense surface. This could be a wooden block or a rubber gasket. Do not use a metal base, as it can deform the surface of the button when struck by a punch. And this doesn’t suit us at all.
The punch is inserted into the leg of the button and, by pressing, it is divided into parts (usually four). They should lie on the fixation ring. All that remains is to press these metal petals into the fabric with a hammer. To do this, use a hammer, but be careful. There is no need for brute physical force here, as you can damage the button. A little effort will be enough.
Just in case, buy a few extra barrels, in case you won’t be able to carefully hammer in the pin petals the first time, and they will break. This kind of problem is not uncommon for beginning craftsmen.
Installing shirt buttons
This type of button is considered the simplest. Here, the main tool for installing buttons on clothes will be pliers. The installation process is similar to the previous option, only the punch needs a larger diameter.
The front parts are installed first, then the internal parts. After marking with a simple pencil, the crown of the button is pierced into the fabric. Then the product is laid on a wooden beam and the inside is hammered with little effort.
The second part of the button has an S-shaped pin. To hammer in this part, it will no longer be possible to use a wooden beam, except perhaps to drill a hole in it. Usually, when installing buttons on clothes at home, use a nut of the appropriate diameter.
Repairing a damaged button
If you had an incident when installing a shirt button and something went wrong, do not despair. The good thing about these buttons is that they can be removed and reused. To do this, you need to straighten the teeth of the crown and remove it freely from the fabric. You can remove the button with a flat screwdriver or knife. You can straighten the ends of the crown using pliers or small pliers.
Once the teeth are aligned, the button can be reused. This method is also applicable in cases where the button is intact, but the fabric in this place is torn. Then, after carefully removing and restoring the button, it can be installed back on the product, just in a different place.
Press for installing buttons on clothes
The best assistant when sewing clothes with buttons is a special press. It consists of an upper and lower stand and a set of screw-on attachments. A punch is screwed into the upper part of the press, and a stand for the punch is screwed into the lower part.
This press is used for different fabrics, both thin and thick, even leather belts. You can purchase different attachments; they are sold separately. It is advisable to sign them immediately so as not to confuse the size.
Each set is designed for a specific button size.
Using this device to install buttons on clothes is easy. Let's take a closer look at how to do this:
- We install the attachments - screw the top one in until it stops, but not too zealously, and simply insert the bottom one into the round groove of the press.
- Since there are two sets of attachments for installing the “Alpha” buttons, they are installed alternately for one and the other pair (such buttons consist of four parts).
- Nozzles are selected according to the size of the button. Typically, the most commonly used punches are purchased - 2, 4 and 6 mm.
- It is important to correctly mark all the holes and punch them in advance with a punch; it is recommended to do this with a piece of reinforcing fabric.
- When all the holes are punched, the nozzles are replaced, and then work continues with the fittings. Advice: it is better to punch holes of a smaller diameter. The button pin must be pulled firmly through it, otherwise the button will subsequently fall out.
Procedure
Here's what you need to do:
- First, a hole is punched in both the fabric and the pad (if there is one).
- We replace the punch with an attachment for the eyelets.
- A part of the button is placed on the lower part of the press with the pin facing up. We place the fabric on top with the wrong side up, aligning the hole with the pin. If necessary, either a piece of fabric or a reinforcing plastic ring is added.
- A counter washer is placed on top. Its concave side should point down.
- We press gently and smoothly on the handle of the press. In this case, the pin is flared. The button is firmly installed on the fabric.
First, the attachments for the lower elements of the button are replaced. The wrong side of the fittings is placed underneath. It comes with a long pin. First, reinforcing fabric is placed on top of it, then the main material, face up.
The other part of the button with a small S-shaped pin is placed on the top nozzle with a plastic tip. After this, press the press handle all the way, but carefully. This completes the process.
Forceps
If you want to purchase a machine for installing buttons on clothes, it is best to use tongs. This is a very useful tool that will greatly facilitate the work of a seamstress. As professionals advise, there is no need to save on such a product. Cheap tongs often have handles that break. Typically, attachments for various buttons are sold in the kit for this tool.
The appearance of the tongs differs greatly from different manufacturers, but the method of use is similar.
The handles of the tongs have a lock. When starting to work with such a tool, you need to squeeze the handles and remove the lock. Places for buttons are marked in the fabric and holes are made with a punch. Then the button is inserted into it with the head facing up and the tongs are compressed. You need to press smoothly, but all the way.
Helpful information
In order to ensure that the back and front parts of the button match exactly and wrinkles do not form on the clothing, you need to accurately mark the installation locations of the individual elements.
Some people use the following method: install the lower parts first, and lubricate the pin with chalk. By aligning the edges of the clothing, the chalk leaves a mark in the right place.
After this, it is easy to find the desired point for the upper parts.
Some people don't like this technique. They use a different way of marking. Craftsmen measure the distance with a pencil or use a self-disappearing marker. In this option, the upper front elements are installed first, and only then the lower ones.
In the article, we looked in detail at different ways to install buttons at home. We hope that the tips will help you complete this type of work quickly and efficiently.
Source: https://FB.ru/article/369537/ustanovka-knopok-na-odejdu-v-domashnih-usloviyah
How to loosen a tight button on clothing
Every year various fashion shows are held, thanks to which you can decide on fashion trends in outfits. Designers set the style, teach the combination of different fashion trends, and offer model diversity. Based on designers' patterns on how to loosen a tight button on clothes, it is distributed in various brand stores. You can choose any style of outfit, including additional accessories, based on your preferences and tastes.
The ability to dress beautifully is cultivated from a very early age. So, first, parents select outfits for their children for kindergarten, school and special events. Growing up, children begin to understand that an online clothing store for teenage boys is an indicator of the taste and style of any person. It is not without reason that it is said that the first impression of a person is formed precisely by his attire. A well-chosen color scheme, combined with accessories, says a lot about a person.