Share on social media networks:
Autumn and winter are cold and at the same time beautiful seasons. But the charming decline of nature is not at all a reason to become despondent, since autumn always pleases us with something new. During this period, many people begin to mobilize new projects, to implement previously planned, but for some reason postponed until a better time. Meanwhile, autumn brings certain difficulties into the lives of women, since they have to radically change their wardrobe. Sundresses and dresses go to the shelves, and warm, cozy things come to the fore. A jacket or sweater can be an excellent alternative. In this article we will tell you how to sew a jumper from knitwear yourself.
Sewing a light knitted cardigan with your own hands
First of all, let's find out how to sew a stylish summer jumper from thin knitwear like a cardigan, because summer has not yet completely receded, but in the evenings it can be quite cool. If you decide to start making clothes yourself, then it is better to use the option without using a pattern. Even without sewing skills, you will get a great item. The work will take literally thirty minutes. It is better to sew from rectangles, because in this case you will get a transforming item.
A cardigan is made according to this pattern:
- On the fabric, draw a rectangle 100 cm long and 140 cm wide, then cut it out.
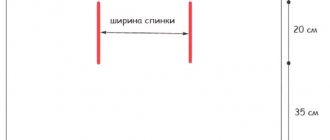
- Measure the width of your back.
- Fold the fabric with the right side inward, set aside half the measurement (back width) from the fold line and draw a straight line, approximately 30 cm long. This will give you the shoulder point.
- Draw the armholes. It is enough to measure 13 cm from the shoulder point and make a cut.
- Make sleeves from two rectangles 30 cm wide and 70 cm long. Just fold the fabric in half, then sew it on the machine. Make all stitches using a zigzag stitch.
- Sew all the details.
Important! This lightweight cardigan can be worn open or pinned with a brooch.
Blouse patterns
The jumper pattern is designed for cutting and sewing stretch fabrics.
In recent years, the term “long sleeve” is often used instead of the name “jumper”, and sometimes even a long-sleeved sweatshirt. Regardless of which name you use, we will sew a jumper. This pattern is one of the few for stretch fabrics where only a simple sewing machine can be used. An overlocker, of course, won't hurt, but you can do without it if you choose thick knitwear. The jumper has long sleeves, so it is possible to cut it from dense and thick knitwear, as they say, with “combing”.
For this kind of material you can do without an overlocker. If you buy silk or thin knitwear for a jumper, then you will need an overlocker. You must understand that this is not some kind of categorical prohibition, but a persistent recommendation; the result can be very unsightly.
Making a knitted pullover
Do you want to diversify your wardrobe with trendy clothes? Then sew a knitted jumper with your own hands. You don't need a finished pattern; we'll build it as we go.
This master class includes the following steps:
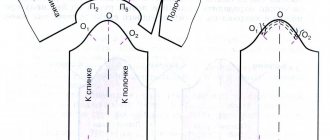
- Use old clothes that fit you perfectly as a basis for creating a pattern. Or take all the necessary measurements, transfer them to the fabric, then cut with regular scissors. As a result, you should have the details of the back, front, sleeves, and collar.
- Next, stitch all the sections of the back, front and sleeves. Fold the back and front parts facing each other, exactly matching the top edges, and pin together. Sew the shoulder seams, leaving a 35 cm long section for the neckline unstitched in the middle. Make bartacks along the edges of all seams. Press seam allowances.
- Sew the side seams, leaving an open area at the top of each side for armholes 25-27 cm long. Not reaching the bottom edge of the back 31 cm, finish each line. Press the seam allowances along the edges of the slits to the wrong side.
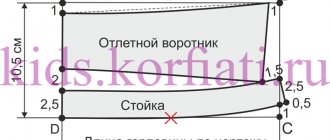
- Fold the collar piece right side inward, stitch the edges along the length of 39 cm. Iron the seam allowances. Fold the collar in half, inside out. Sew open edges together.
- Pin the open edges of the finished collar into the neckline, face to face, aligning the collar seam with the middle of the back. Sew in the collar, interrupting the stitching only at the shoulder seams.
- Fold each sleeve in half lengthwise, facing inward. Sew them along the length of 58 cm. Iron the seam allowances in the same way as the rest of the parts. Pin the sleeve into the armhole with the front part facing the front side, aligning the sleeve seam with the side seam. Sew in the sleeve, starting and ending near the side seam.
- Place allowances on the edges of the cuts. Press the hem allowances to the wrong side, stitching at a distance of 1.2 cm. Turn the seam allowances back to the wrong side and stitch them in the same way, stitching crosswise at the ends of the cuts. Follow the same pattern to process the hem.
Tips for Newbies
Many experienced needlewomen give simple recommendations to novice fashion designers on how to sew a sweater. Thus, they advise abandoning such materials as silk, guipure and chiffon at first, until the sewing technology has been mastered perfectly. They recommend giving preference to wool with the addition of polyester, since it is easiest to hide possible flaws and this model stretches well in case of failure with the size. In addition, they advise making patterns based on old things.
Open up an old piece for advice
We sew our own knitted jumper
Perhaps you've never sewn something out of knitted fabric. In fact, it is a great pleasure to work with such material. In this section we will tell you how to sew a jumper from knitted jersey, using old things that have long been lying around on the shelves in the closet. Every housewife can find knitted items at home that can be transformed in incredible ways. The work is divided into three important stages, we will consider each of them in detail.
The first stage is cutting
There is nothing complicated in drawing up a pattern; it happens according to the following scenario:
- First of all, wash the fabric so that it does not shrink or become deformed during wear. It is better to wash with wool detergent, then dry on a horizontal surface.
- Then you can take up the scissors. To get the job done faster and ensure a perfect fit, use an old jumper that fits well. Lay it out on the double folded fabric and outline the sleeveless one, taking into account the shoulders. Decide for yourself which length you prefer.
- Shape the neckline to your liking.
- There will be a few seams - on the sides and at the bottom of the sleeves, that is, two long seams - from the beginning of the sleeves to the very bottom of the jumper. Therefore, it is recommended to cut the product in such a way that the top line of each sleeve falls on the fold of the material.
- Then measure the length of your arm from the shoulder, put the resulting value on the fabric from the shoulder in two opposite directions.
- Measure the width of the sleeve at the wrist area, placing it perpendicularly down from the sleeve line.
- Draw a line from the tip of the sleeve to the beginning of the waist to create the desired silhouette. Add 1 cm for seam allowances, 4 cm for hem and sleeves.
Second stage - sewing
How to sew, because this peculiar fabric, quite shaggy and holey, will probably crawl out from under the presser foot, be distributed unevenly, and the needle will not be able to grab it? There is a solution - all you have to do is sew by hand.
It is better to do this with an overlock stitch, so that later the edges do not unravel, and everything looks neater from the inside out. The work itself consists of sewing together all the details with matching threads and a needle; there is nothing difficult about it. Fortunately, on such fabric the seams do not stand out.
The third stage - edge processing
First, fold the edges of the sleeves and the bottom of the jumper, carefully press them, then steam them through the fabric. Then carefully sew with an overlock stitch, while picking up a few threads from the main knitted fabric. This will hide the seams as much as possible.
Important! It is better to process the neck with a crochet hook and sewing thread. You need to tie it with three rows of single crochets, then everything will turn out beautifully.
How to sew a jacket without a base
You can sew a sweater even without a fleece sweater pattern for a woman. In this case, you will need to take the old product and cut it at the seams into separate pieces. These canvases will serve as a template for creating a new thing. This simple life hack will be especially useful for those masters who are just learning how to model. In the future, you can redraw the prepared templates and create sweaters without any measurements.
Sewing the product yourself without a pattern
Story
The classic look of a cardigan is a knitted long vest without a collar. There is a front button closure that touches it, several pockets and a V-neck at the neck. At the beginning of its invention, it was worn only by the military as insulation for a uniform. It received its name from Count Cardigan, who came up with the idea of wearing this type of attire.
Cardigan then and now
It began to be actively used in civilian clothing only in the 50th year of the 20th century. From that moment on, the popularity of the cardigan only grew, and they began to wear it always and for any occasion. Modern cardigans, in addition to the main distinguishing features, have a fitted hem and a button closure.
Important! In Russia, this item of clothing has become popular relatively recently and is just getting its rightful place in the wardrobe of every man who wants to look stylish.
Long knitwear
How to sew a knitted sweater
It’s easy to sew a knitted sweater by making some kind of darts. You can try not sewing anything up, but simply wash it in a washing machine on high. Another interesting option for sewing a knitted sweater is cutting off the parts and replacing them with others. This non-standard method is used by many beginning needlewomen.
Note! There is also the option of sewing up a knitted sweater, cutting it into halves and turning it into a product with buttons or a zipper.
You might be interested in: Rules for hemming curtains with your own hands on a typewriter
Sewing a knitted sweater
In general, sewing a sweater with your own hands is not difficult, if you have knowledge in the field of creating patterns and ready-made step-by-step instructions. It is important to understand that the main task will be the selection of material. For beginner craftswomen, fleece or synthetics are better until they get the hang of it and learn how to take measurements correctly and move away from the edges. It is best to first try to reshape an old product and decorate it, turning it into a new one.
Uncover
Before making patterns for blouses from knitwear, you need to check the main indicators of the fabric: defects, decating, direction of loops. All this determines the quality of the future product.
Checking fabric for defects
Cutting cannot begin without carefully checking the fabric of the future cardigan for defects: knots, holes, textile quality, defects. If at least one of these defects is present, then you need to either choose another material, or if it has already been purchased, then circle it with chalk.
Decatation of fabric
This process is very important at the very first stage of cutting. If you do not decate the fabric, then during the sewing process it and its individual parts will become wrinkled and deformed. All this will ultimately cause the asymmetry of the finished product.
Determining the direction of the loops
In order to determine the direction, you need to fold the canvas “face” inward along the edge, and turn the edges of the edge towards you. Knitted fabric has some special features - machine knitting, loops that can be unraveled. That is why when making a cardigan from knitwear, it is important to ensure that the loops unravel from top to bottom. To check this, carefully pull the thread across. If the canvas begins to unravel easily, then this is its upper part.
You may be interested in this: Constructing a pattern and sewing an alphabet from felt
Important! After determining the top, you need to level the bottom and, using a ruler or centimeter, draw an even line with chalk or soap. Set aside an allowance of 3-4 cm from it and again draw a line - the future hem of the product.
Knitted men's cardigan