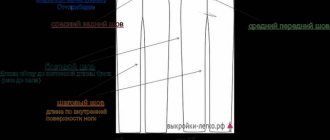
Good afternoon, dear visitors of my blog. Today we will talk about creating a pattern for the base of a dress, which can easily be used to sew any outfit that will fit perfectly on your figure.
It's no secret that women want to dress fashionably and beautifully. And it’s no secret that even a dress made to order in a fashion studio may not fit your figure perfectly. It turns out that they paid good money and the thing was not entirely successful.
And many women try to sew their perfect outfit with their own hands. And this, let me tell you, is not an activity for the faint of heart. Firstly, you need to have at least minimal sewing skills. Secondly, have the tools to accomplish your plans. And thirdly, find a good pattern for your future outfit.
A lot depends on the pattern in sewing. If the pattern is correct, the outfit will fit your figure perfectly. And if the pattern is unsuccessful, it is difficult to ensure that everything is in order. There is a pull, there is a crease in the wrong place.
I want to share with you a basic pattern that can easily be used to sew any outfit for your wardrobe.
Actually, I’m not a seamstress, but a math teacher.)) But I’ve been sewing practically since childhood. I even sewed my own dresses for proms. This is not my merit. My mother also sewed everything herself, although she is also not a dressmaker. I sewed my first outfits under her guidance. And, by the way, we sewed without special patterns.
I learned the first basics of pattern making at school in a cutting and sewing club. We had a very good leader, she explained everything very interestingly and clearly. The only pity is that the circle only worked for one year. Well, then I went on my own. And now I even sew costumes for performances in our club.
But today is not about that. Today I want to teach you how to build yourself a pattern for the base of a dress, using which you can easily sew yourself any outfit, be it a blouse, skirt or dress.
So let's begin.
One day, a long time ago, I came across a small book called “I Sew Myself” (I don’t know who the author is). In it I found such a pattern. I tried it on all my relatives. Then the book was lost, but the method of constructing the pattern remained. And today I want to share this knowledge with you.
Let's take measurements!
40-48 size (length up to 96 cm) price indicated 50-54 size (length from 96 to 108 cm) +10% to the cost. 56-58 size (from 108 to 116 cm) +20% to the cost.
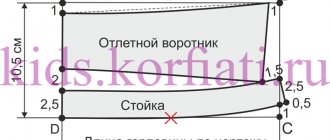
Basic diagrams of how to take measurements.
SO, LET'S BEGIN!!!!!
I’ll say right away that don’t worry too much if when taking measurements you make some errors of +- 1-2 cm.
BASIC RULES
The person being measured should stand straight, without tension, maintaining his characteristic posture. The figure should be wearing thin clothing that does not add excessive weight.
Before taking measurements, you should girdle your figure along the waist line with a slightly stretched braid located strictly horizontally.
1) ОШ (neck girth). A centimeter tape is applied above the seventh cervical vertebra, from the side and in front it passes along the base of the neck and closes in front above the jugular cavity.
2) OG (chest girth). In industry and retail chains, this measure determines the size of the product. The tape is applied horizontally around the body through the protruding points of the mammary glands and closes on the right side of the chest.
3) OT (waist circumference). The tape is applied horizontally around the body along the waist line. When sewing some products, you may need to measure the full waist circumference (from).
4) ABOUT (hip circumference). The tape is applied to the buttock points, it runs horizontally around the torso, in front along the protrusion of the abdomen and closes on the right side of the torso. Sometimes you also need to measure the full circumference of your hips (Ob).
5) Chest width. The tape goes along the protruding points of the bust to the verticals, mentally drawn from the front corners of the armpits down.
6) ShS (back width). The tape is applied horizontally over the convexities of the shoulder blades to the posterior corners of the armpits.
7) Length of the front to the waist (Dtp). This measurement is taken directly after the Bg measurement. The tape, applied to the base of the neck at the shoulder, passes through the protruding point of the chest gland parallel to the middle of the front to the tape at the waist line.
 Back length to waist (Lts). The tape is applied from the back from the waist line to the base of the neck at the shoulder; it runs parallel to the spine through the convexity of the shoulder blades.
9) Oblique shoulder height (Hpc). Determine the position of the shoulder point in relation to the waist line. Measurements are taken in two directions: along the shortest distance from the intersection of the waist line with the spine through the shoulder blade to the shoulder point (oblique shoulder height) and from the waist line to the shoulder point parallel to the spine (straight shoulder height).
10) DI (product length) - from the base of the neck to the crotch along the back.
11) DI along the shelf - from the shoulder to the bottom. The same as the front length, only to the bottom of the product.
See the main diagram at the beginning of the block.
12) Chest height (Вг). Measure from the highest point of the shoulder seam to the waistline through the protruding point of the chest gland.
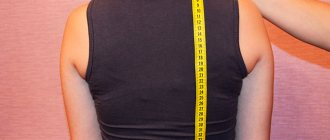
13) Armhole . How to measure a sleeve armhole - a sleeve armhole is a cutout on clothing for the arm, the place where the sleeve is sewn in, you need to measure the volume (in a circle) from the armpit through the shoulder (where the shoulder ends and the arm begins) to the same armpit.
Also See the main diagram at the beginning of the block.
14) Shoulder length. Measure from the base of the neck to the shoulder joint.
15) Shoulder width. Measure from shoulder to shoulder across the back.
16) Sleeve length. Measure from the shoulder joint to the required length. ATTENTION: It is better to measure the sleeve of your favorite jacket.
See the main diagram at the beginning of the block. Also diagram point 14.
17) Upper arm circumference. Measure around the arm at the armpit.
See the main diagram at the beginning of the block. Also diagram point 14.
18) (OZ) Wrist circumference. Measure at the base of the hand.
See the main diagram at the beginning of the block. Also diagram point 14.
19) The depth of the armhole (armpit) is measured from the shoulder, a point near the neck, vertically down to a horizontal line mentally drawn from one armpit to the other along the back. Next, an allowance is added for freedom of fit of the armhole in depth.
LiveInternetLiveInternet
Many dressmakers find constructing the base pattern of a dress very difficult. In fact, if you figure out what the dress pattern consists of, everything will become extremely simple.
So, Bust Circumference is the main measurement we focus on when creating a dress pattern. What does it consist of?
1. From the Back Width (BW). Formula for calculation: 1/8 OG +5.5cm (for OG >80cm)
2. From the Armhole Width (SHW). Formula for calculation: 1/8 OG -1.5 cm (for OG >80cm)
3. From Chest Width (CH). Formula for calculation: 1/4OG -4cm (for OG >80cm). All!
If you correctly calculate these basic values and add allowance for the fit according to the chosen silhouette (very close-fitting, semi-fitting or loose), consider that you have created a pattern.
EXAMPLE: Let's calculate the values of ShS, ShPr and ShG for a chest circumference of 92 cm :
ShS=92/8+5.5= 17cm; ШП=92/8-1.5=10cm; WH=92/4-4cm=19cm
So, let’s check the calculated values: 17+10+19=46x2=92cm (Multiply by 2, since the calculation when constructing a pattern is done only by half the Chest Circumference).
If your OG matches when checking, then you have calculated everything correctly and you can proceed to constructing the base pattern.
Armhole depth. Yes, there is still armhole depth. We measure it or, to check the measurements, calculate it using the formula GPr = 1/10OG + (10.5-12 cm) . If the calculated value does not match the measured value, take the average between them.
The remaining constructions - shoulder lines, front and back sprouts, darts - should be done according to the instructions for constructing the base pattern.
TABLE 1. INCREASES FOR FREEDOM OF FITTING
In order to sew a dress, jacket, blouse or coat according to your figure, when constructing a pattern, you need to add an increase in the freedom of fit to the calculated values of ШС, ШПр, ШГ, according to the desired model.
The table of increases for women's outerwear describes in detail what increases need to be made when constructing a drawing of a dress, blouse, jacket and coat.
To enlarge the table, click on the image.
Before sewing a dress, blouse, jacket or coat, decide on the desired freedom of fit of the product. Remember that the main value for women's outerwear is the chest circumference.
It is the chest circumference that is the control value when constructing a drawing of a dress, blouse, jacket and coat.
Next, build a pattern using the selected value in your calculations.
HOW TO USE THE TABLE?
Example. How to sew a dress with a fitted silhouette:
If you want to sew a dress with a fitted silhouette, then you need to take the top “Dresses and Blouses” from two tables, and select the “Very Tight Silhouette” column from the “Dresses and Blouses” table.
The increase in the freedom of fit of the dress to the value of the chest semicircumference according to the measurement here is from 1.5 to 3 cm. If you are sewing a dress from elastic fabrics, then it will be enough to add 1.5 cm.
And if you are sewing a dress from non-elastic fabrics, the increase in the freedom of fit of the dress should be maximum - 3 cm.
When creating a dress pattern, use the allowance values that are given in the “Very Tight Silhouette” column (increase to the depth of the dress armhole – 0.5cm, Addition to the back width of the dress – 0.5cm, to the armhole width of the dress – 0.5-1cm, to dress chest width – 1-1.5 cm).
In a similar way, you can create a pattern for a dress with a semi-fitting silhouette or a dress with a straight silhouette with sleeves.
To make it easier to work with allowances, in the “Jackets and Coats” table the allowances are highlighted in red and green. The value highlighted in blue is the same for red and green increments.
from here: https://www.korfiati.ru/2010/02/kak-sshit-odezhdu-po-figure/
Methods for calculating sleeve cutout parameters
The required opening size is determined using several methods. Some of them are based on the size of the hand - these are the methods described above. To calculate the opening width, you can use a special formula.
infourok.ru
Calculations using the formula
According to generally accepted formulaic calculations, the armhole measurement is equal to the sum of the other two measurements. The first measurement is the diametric value of the front and back measurements of the hand. You can find out these numbers after measuring the horizontal line at the level of the posterior edge of the armpit. The second dimension is the allowance allowed for cutting the width of the armhole.
You can also find out what the width of the sleeve neckline will be by constructing the main mesh drawing of the shoulder piece (for example, a basic dress pattern).
Constructing a drawing grid
If the master does not trust preliminary calculations, you can find out the desired cut parameter by constructing a mesh of the base product.
- Decide on the overall width of the drawing.
- From the starting point of construction to the right side, set aside the back width measurement.
- From the second point of the dress shoulder construction, set aside the width of the front part.
- The resulting segment will indicate the armhole width.
Both methods for calculating the width of the neckline of the future sleeve should be checked during fitting. The sleeve parameter should not be less than the required value. There is a standard table of approximate values for the width of a dress armhole, calculated for the main body types. The tabular calculation was made for tight-fitting models at chest and shoulder girth levels.
autobar24.ru
Sleeve options
- Armhole width. Abbreviation – Shpr. It is determined under the hand, which must be freely lowered at the moment of taking the measurement.
The width of the armhole begins to be measured from the back fold, which is formed by the armpit, to a similar fold in the front. The width of the sleeve neckline is considered to be a segment limited by two folds and parallel to the floor.
kupivip.ru
You can find out the required armhole size using a ruler. To make it easier to measure the width of the sleeve neckline, mentally draw vertical lines down from the armpits, front and back.
- Armhole length (height). This is what they call measuring across the back. It starts from the outside, at the edge of the shoulder slope - at the base of the arm. When you palpate in this place, you can feel a bone invisible to the eye. The measurement continues to the lower edge of the armpit.
For convenience, you need to take a vertical line that starts at the base of the neck and continues to a horizontal line at the level of the top of the armpits. The horizontal line is drawn using a measuring tape or ruler at the level of the upper points of the armpits.
Set-in sleeve pattern
Armhole measurements are necessary to create a sleeve cut that must match exactly with the previously completed sleeve cutout.
sewingschool.ru
Required measurements
On the finished drawing of the shoulder product, measure the length of the armhole (this parameter will be the control one).
- On the drawing, measure the vertical opening diameter. To do this, connect the top of the back armhole with a similar parameter of the shelf. Draw a straight line between the two marks.
- Find the middle of the drawn segment. From the resulting point, lower the perpendicular to the line indicating the depth of the sleeve cutout.
- The segment from the center of the upper construction line to the lower apex of the perpendicular will become the diametrical contour of the armhole. The circuit will not be closed.
- To calculate the sleeve width at the level of the armhole depth, you need to have a measurement of the shoulder circumference, not forgetting about the additional centimeters of fabric for freedom of fit.
Constructing a pattern
Key steps in creating the basic cut of a set-in sleeve with two seams. Pattern modeling allows you to get other options for the part.
konspekta.net
- Draw two perpendiculars that must intersect at a certain point (this will become the beginning of the construction).
- From the same mark, derive the length of the sleeve.
- From the starting point of the cut, set aside the sleeve width to the right and left sides.
- Calculate the level along which the elbow line will pass. Set aside the resulting value from the extreme point of the segment marking the edge of the sleeve.
- Decorate the upper part of the sleeve casing with a smooth line, marking control points that will correspond to the marks on the drawings of the back and shelf.
- Smoothly shape the bottom of the sleeve cap with control points.
- Draw a straight line for the front hose roll. If there is only one seam on the sleeve, there will be no need for a front roll.
- Set aside the lower sleeve width.
- Draw the bottom bevel vertically downwards.
- Use a smooth line to outline the elbow lower sleeve roll.
Features of the construction of the sleeve cap
- Dividing the hose roll into upper and lower parts is necessary to set control points between which the landing is located.
- After the sleeve is sewn into the armhole, you should check that the armhole matches the arm circumference measurement.
- The length of the sleeve is greater than the armhole length by an amount equal to the landing parameters.
- The fit of the sleeve is distributed along the top of the collar. In the lower rim part, the landing is kept minimal, since in this area there is no need to form a rim and give it volume.
- The sleeve part must lie in the armhole without additional tension.
Rules for taking basic measurements
Measurements for cutting shoulder, as well as other basic products, are taken taking into account the fulfillment of a number of conditions.
dveri-ferum.ru
- The person being measured must maintain his or her usual posture while in a free position.
- The model's arms are down.
- Heels together, the gap between the toes is from 15 to 20 cm.
- While taking measurements, the model can watch herself in a full-length mirror image to check the accuracy of the results.
- During measurements, the model is left wearing underwear or bulky sleeveless clothing.
- Particular importance is attached to measuring the waist line, which delimits the upper and lower parts of the product. For accurate measurements, the model is girded, the clothes are pulled horizontally over the figure and the horizontal position of the elastic is checked.
- For accuracy of measurements, control points are marked on the figure. The central points of the chest are marked on clothing with pins.
- Using a measuring tape, measure the chest level, starting with measurements from the floor. The resulting line is transferred to the back. The chest line runs parallel to the floor line.
- The base of the neck is marked with a dot using a pencil. The mark can be made with a simple soft pencil directly on the model’s body.
- The shoulder direction is indicated in the same way and the shoulder point is placed.
- A pencil mark of the cervical point is made on the back (it falls on the 7th cervical vertebra).
- Mark the protruding points of both shoulder blades (they are located at the level of the upper edges of the armpits).
How to take measurements to create a shoulder pattern
Taking measurements is a very important moment. If mistakes are made and the product is sewn according to inaccurate measurements, it will never fit well on the figure. To prevent this from happening, you must follow some rules:
- All measurements should be made without large layers of fabric interfering with the measurement.
- The person being measured should stand without tension, without changing his usual posture.
- We take all measurements without excessive tension or loosening of the measuring tape.
Before you start measuring, secure an elastic cord (elastic band) around the waist of the person being measured so that it is positioned strictly horizontally. The waist line is the main reference line that is connected to any point on the figure.
Using these measurements, as well as allowances, you can design patterns for any shoulder item: dress, blouse, jacket, coat...
R – height. Measure from the top of the head to the floor.
Ssh – semi-circumference of the neck. The centimeter tape passes from behind over the spinous process of the cervical vertebra, from the side, and in front along the base of the neck and closes above the jugular notch. When measuring, pay attention to the shape and position of the neck. The length of the neck is taken into account when choosing a collar style. Shape and fat deposits are taken into account when determining neck width and depth.
Сг1 – half-chest girth 1. The tape runs along the back taking into account the protrusion of the shoulder blades . Then along the armpits. In front, above the base of the mammary glands.
Сг2 – half-chest girth 2. The tape runs along the back, taking into account the protrusion of the shoulder blades , then along the armpits, and in front through the protruding points of the mammary glands . Measurements Cr1 and Cr2 are taken simultaneously.
Сг3 – half-chest girth 3. The tape passes horizontally around the body, through the protruding points of the mammary glands .
St – half waist circumference. The tape runs horizontally around the body at waist level.
Sb – semi-hip circumference. The tape runs horizontally around the torso. From the back through the protruding points of the buttocks, from the front - taking into account the protrusion of the abdomen. When measuring, the shape of the hips and the places of the largest fat deposits are noted.
Lts – back length to waist. We measure from the highest point of the shoulder seam to the waist line, from the back parallel to the spine.
Vpk – oblique shoulder height. Measure from the point of intersection of the waist line with the spine to the end point of the shoulder seam. The tape is kept taut.
Acc – front length to waist. It is measured from the highest point of the shoulder seam to the waist line through the protruding point of the mammary glands, while simultaneously noting its position.
Vg - chest height is measured in the same way as Dtp, but only to the protruding point of the chest.
Vpkp – shoulder height oblique front. Measure from the center of the chest to the end point of the shoulder seam. The tape is kept taut. Usually this measurement is 1-3 cm smaller than the Bg measurement.
Vprz - rear armhole height (armhole depth) Measured from the highest point of the shoulder seam to the horizontal line passing at the level of the rear corners of the armpits.
Shg – Chest width. It is measured horizontally above the base of the mammary glands, between the verticals, mentally drawn from the front corners of the armpits. When measuring, pay attention to the shape of the chest and the rotation of the shoulder girdle. Write down the measurement in half size.
Shs – back width. Measured horizontally between the back corners of the armpits. When measuring, you need to pay attention to the curvature of your back. Write down the measurement in half size.
CG - center of the chest. We measure the distance between the protruding points of the chest. Write down the measurement in half size.
Шп – shoulder width. Measured from the highest point of the shoulder seam at the base of the neck to the junction of the shoulder and arm.
Dr - sleeve length. We measure from the end shoulder point along the outer surface of the arm to the level of the desired sleeve length.
Op – shoulder circumference. Measure horizontally around the arm at the widest part of the arm.
Ozap - wrist circumference. We measure horizontally around the arm at the narrowest point.
Di is the length of the product. Measured from the back from the highest point of the shoulder seam to the desired length.
Measurements such as Ssh, Sg, St, Sb indicate half-circumference (neck, chest, waist, hips), i.e. the resulting girth measurement is immediately divided by 2. The measurements Shg, Shs, Cg are also recorded in half size.
Attention! I recommend comparing your measurements or the customer’s measurements with the measurements for a typical figure of the appropriate size and height. Why this is needed and how to do it, I described in the article Measuring typical female figures. Follow the link, download the tables and compare measurements for control.
Now, based on the basic measurements, you can create a pattern for the base of the shoulder product.
Subscribe to new blog articles and stay up to date with all the news from the Dressmaker's Workshop!
© Olga Marizina
All articles
Men's clothing. Sewing technology
Taking measurements
1. Half neck circumference - Ssh.
The measurement is taken at the base of the neck. The centimeter tape passes over the cervical point from the back, along the base of the neck from the side and closes in front above the jugular notch.
2. The second half chest circumference is Cr2.
The measurement is taken along the back in the same way as when measuring Cr1, only in front the centimeter tape passes through the mammary glands and closes on the right side of the chest. The first and second half-chest girths are measured directly one after the other, without allowing the measuring tape to move along the back.
3. Half chest girth third - Cr3.
The measurement is made horizontally around the torso through the protruding points of the mammary glands, the measuring tape is closed on the right side of the chest.
4. Half waist circumference - St.
The measurement is taken horizontally along the thinnest part of the body at the level of the waist line. For trousers, the half-waist circumference is removed in the same way as for shoulder products, but taking into account where the trouser belt will be located on the body, that is, clearly at the waist or slightly below. If the belt is too low, then the measurement is taken exactly at the place where the belt will “sit”
5. Half hip circumference - Sat.
The measurement is made in the horizontal plane along the most protruding parts of the buttocks, closing the measuring tape on the side, taking into account the protrusion of the abdomen.
6. Back width - Shs.
The measurement is taken in the horizontal plane along the shoulder blades, between the rear corners of the armpits.
7. Chest width - Shg.
The measurement is taken in a horizontal plane above the bases of the mammary glands between the anterior corners of the armpits. The measurement is necessary as a control and for calculating other measurements.
8. Shoulder circumference at the top - Opv.
The measurement is taken with the arm freely lowered perpendicular to the axis of the shoulder so that the upper edge of the measuring tape touches the posterior corner of the armpit. The measurement is necessary to determine the width of the armhole and the width of the sleeve at the top.
9. The width of the shoulder slope is Sh.
The measurement is taken from the point of the base of the neck in the middle of the shoulder slope to the shoulder point.
10. Sleeve length - Dr.
The measurement is taken from the shoulder point or from the base of the neck with the arm freely lowered to the desired length, depending on the type of product.
11. Back length to waist line - Lts.
The measurement is taken from the cervical point along the spine to the waist line, taking into account the protrusion of the shoulder blades.
12. Length of front to waistline - Acc.
Measured from the highest point of the shoulder at the base of the neck, through the protruding point of the chest to the cord at the waist.
13. Shoulder height oblique back - Vpk.
The measurement is taken along the shortest distance from the point of intersection of the waist line with the spine to the shoulder point. If the person being measured has different shoulder heights, then the measurement is made on the higher shoulder or the height of both shoulders is measured.
14. Product length - Di.
For products that are close-fitting and semi-fitting at the waist, measurement is carried out by continuing to measure the Dts to the desired length; for products with straight and extended silhouettes, the measurement is made from the cervical point, taking into account the protrusion of the shoulder blades, and below the centimeter tape runs in a straight line to the desired length, depending on the type of product.
15. The height of the armhole at the back is Vprz.
It is measured from the highest shoulder point from the base of the neck along the shoulder blades, spine to the horizontal line drawn from under the back corner of the armpits.
16. Seat height - Sun.
It is removed from the side from the waist line (or the line where the belt will be) to the horizontal line drawn from under the buttock. On average it is from 22 to 30 cm. The higher the trousers are worn on the waist, the larger the measurement.
17. Pants width at knee level - Shk.
Measured around the knee and determined according to the fashion direction.
18. Bottom width - Shn.
The width of the bottom is taken arbitrarily and is also determined in accordance with the direction of fashion.
19. Leg length along the inner surface - Day.
Measured from a horizontal line drawn from the groin to the floor.
Taking measurements of a woman's figure
In this section, we decided to introduce you to the basics of taking measurements on a female figure. We are sure many people know how to do this, but due to numerous requests from our clients, we will post it again. We would like to draw your attention to the fact that this section does not describe all figure measurements, but only those that our clients need to order the product.
We understand that taking measurements of your figure yourself is not so easy, but there will always be a friend who will help you with this, the main thing is to instruct her correctly. And our section will help you with this.
So, let's get started :) First, the general provisions.
The person being measured should be wearing the underwear that you intend to wear under this product, since modern tights can have a “tightening” effect and remove from 1 to 3 cm in volume, while bras, on the contrary, can add volume. It is necessary to ensure that the person being measured stands without tension, without changing his own posture. The measuring tape should fit against the body without deforming the soft tissue with tension.
At the waist - the thinnest place on the body, you can put your hands on your sides to determine the horizontal position, and use an elastic band (a thick elastic band) to fix the waist.
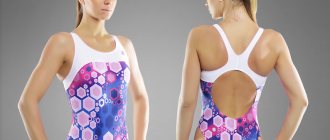
Then we immediately note to ourselves what kind of figure it is:
1. Normal posture corresponds to the uniform development of all curves of the spine.
2. Slouching posture is characterized by a sharp increase in cervical lordosis (the red line in the picture shows the distance from the wall to the neck), a slightly tilted neck forward and reduced lumbar lordosis.
3. Straightened posture corresponds to weakly expressed bends of all parts of the spine.
Letters are used to designate measurements. Dimensions are divided into main, additional and auxiliary. We just need the basic measurements, and we have 18 of them.
1. Height, P - measure the vertical distance from the floor to the apex of the head.
2. Half neck circumference, Ssh - Measure the full circumference of the neck. The lower edge of the tape runs from behind slightly above the cervical point, from the side and in front along the base of the neck, and ends above the jugular cavity.
3. Half-chest girth first, Cr I. The tape should run horizontally along the back, touching the rear corners of the armpits with the upper edge, then along the armpits and in front above the base of the mammary glands.
4. Half chest girth second, Cr II. The tape should run horizontally along the back, touching the rear corners of the armpits with its upper edge, then in the plane of the oblique section along the armpits and in front through the protruding points of the mammary glands. If you need this measurement, then Cr I and Cr II should be measured one after the other, without allowing the measuring tape to move on the back.
5. Half chest circumference, Cr III. The tape should pass horizontally around the body through the protruding points of the mammary glands and close on the right side of the chest. When measuring figures with a low bust, the centimeter tape is placed near the armpits (at a distance of 3-4 cm) horizontally, at the back along the back, at the front, taking into account the allowance mammary glands.
6. Half waist circumference, Art. The tape should run horizontally around the torso at the level of the waistline.
7.Half hip circumference, Sat. The tape should run horizontally around the torso, at the back along the most protruding points of the buttocks, and at the front along the abdomen (taking into account the protrusion of the abdomen). For convenience and accuracy of taking into account the protrusion of the abdomen, you can use a ruler, applying it vertically to the abdomen.
8. Chest width, Shg. Measure horizontally above the base of the mammary glands between the verticals, mentally drawn upward from the front corners of the armpits. Recorded in half size.
9. Distance from the back waistline to the highest point of the designed shoulder seam at the base of the neck, DtsII. Measure from the highest point of the shoulder seam to the back waistline. The measurement is taken parallel to the spine, taking into account the convexity of the shoulder blades.
10. Distance from the highest point of the designed shoulder seam at the base of the neck to the waist line, Road II. Measure from the highest point of the shoulder seam at the base of the neck through the protruding point of the chest and then parallel to the midline of the figure to the waist line.
11. Chest height, Bg II. Measure simultaneously with the measurement of Dtp II as the distance from the highest point of the shoulder seam at the base of the neck to the protruding point of the chest gland.
12. Distance from the highest point of the designed seam at the base of the neck to the level of the posterior corners of the armpits, Vprz II. Measure from the highest point of the shoulder seam at the base of the neck parallel to the spine, taking into account the convexity of the shoulder blades, to the horizontal line passing at the level of the posterior corners of the armpits. The horizontal line is set either with a measuring tape or with an elastic band.
13. Shoulder height oblique, Vpk II. Measure along the shortest distance from the point of intersection of the waist line with the spine to the end point of the designed shoulder seam.
14. Back width, Shs. Measure horizontally along the shoulder blades between the corners of the armpits. The measurement is recorded in half size.
15.Product length, Di. Measure in the middle of the back from the neckline, conventionally taken at the base of the neck, to the level of the desired length. For products with a straight silhouette, the tape below the shoulder blades is kept taut, and for products with semi-fitting and fitted silhouettes, it is fixed according to the figure at waist level.
16.Width of the shoulder slope, Sh. Measure from the highest point of the designed shoulder seam to its end point.
17. Sleeve length, dr. Measure with the arm freely lowered from the end point of the designed shoulder seam along the outer surface of the shoulder and forearm to the level of the desired length. Dr. It is recommended to measure simultaneously with Shp.
18. Shoulder circumference, Op. Measure with the arm freely lowered perpendicular to the axis of the shoulder and so that the upper edge of the tape touches the armpit. The tape should close on the outer surface of the hand.
We wish everyone good luck and inspiration for new images.