The snood is a versatile scarf that can be used as an accessory or item to keep warm. There are many options for creating such products, but the simplest and most accessible for many is sewing. The basis for such snoods is mainly knitwear, and for more “winter” options, fleece.
The pattern of a fabric snood and the manufacturing principle are quite simple. In addition, you can sew an interesting hat, forming a complete set. Such sets can be made for both children and adults - it all depends on the model and color of the material.
How to sew a snood from knitwear with your own hands
How to sew a hat and snood from knitwear: pattern for women
Typically, such products are made from soft knitwear that stretches well. A knitted hat can be of different shapes. For warm autumn and spring, unlined products are sewn in one layer of fabric. If the hat is designed for winter, then fleece and fur are used as insulation.
The most popular models of knitted hats:
- With ears
- Stocking
- Tight-fitting
A stocking cap can be sewn from soft knitwear. In this case, a pipe is sewn off and tied at the end. A scarf-collar is very easy to sew. It is necessary to fold the fabric in half lengthwise and sew. After this, the resulting pipe is sewn together to form a ring. The diameter of the ring is adjustable depending on desire and the number of folds.
Hat pattern for women
Hat pattern for women Hat pattern for women
Material
To make an exclusive snood, any material is suitable, it all depends on what its role is in the wardrobe ensemble.
Linen, cotton - the texture of the fabric is light, the product is intended for warm weather or indoors. For sophistication, summer snoods are tied or trimmed with lace.
When combined with retail variations and fabric textures, you get a scarf with a twist.
The item is made from knitted fabric to be worn in the off-season or on cool summer days.
Stocking cap, knitted sock for a girl, child: patterns
This hat is very easy to sew. It is necessary to create a pattern on paper and transfer it to the fabric. It turns out two parts that resemble the letter “M”. They need to be sewn. The result will be something similar to an ellipse. It needs to be turned out and folded in half. Then this product is put on the head. There are several options for patterns, they can be seen in the diagram.
Stocking hat pattern Stocking hat pattern
Let's start making the hat
From the same fabric, we cut out two parts of the future hat according to our measurements. The photo shows approximate sizes for a child 1-3 years old
We sew the finished cut parts on the wrong side. After stitching, the cap must be ironed along the seams, while slightly stretching it.
On two parts along the top of the cap, you need to sew up the undercuts. To do this, mark with chalk a depth of 5 cm, a width of 3 cm (see photo). Leaving 1.5 cm from the fold.
Sew both parts together along the wrong side. At the same time, leave 5-6 cm on the seam to turn the finished product inside out.
Turn the cap inside out through the hole.
Carefully close the hole with a hidden stitch. The hat from the kit is ready.
Use the pieces of fabric that remain after making the set to sew doll clothes, and the baby will be happy.
DIY fleece hat patterns
Fleece is a very soft and pleasant to the touch fabric. It is used for sewing hats and scarves for children. When making adult accessories, fleece is used as lining fabric.
Fleece hat options:
- With bubo
- Hooded hat
- With lapel
- Straight with ears
- With long hem
Fleece is mainly used for sewing children's clothes. This is due to the low cost of the fabric. Similar accessories are decorated with flowers and buboes. You can sew on the ears. Nowadays, the cat hat with one-piece ears is at the peak of popularity.
DIY fleece hat patterns DIY fleece hat patterns DIY fleece hat patterns DIY fleece hat patterns
Other options for hats and scarves
see also
Hat and snood/scarf with clasp Autumn. It's time to warm up. Today I will show you how to sew a hat and snood/scarf. Snood with a clasp (I installed a button.
Set of hat and snood for a child in 15 minutes Spring is approaching. Many people are starting to prepare for the warm weather, first of all thinking about a new wardrobe. I suggest ssh.
Children's hat for spring or autumn (2 ways) With the onset of warm weather, you want to dress in something light and bright. I suggest sewing bright colors for our kids too.
Knitted baby hat (for beginners) I recently knitted this set of a hat and scarf for my little daughter. This is probably the most le.
Children's reversible hat with ties Autumn. It's getting colder every day. I suggest sewing double-sided insulated hats with ties for children.
Shawl hats
The Pavlograd shawl is very popular. It is used for sewing hats, snoods and finishing collars of outerwear. You can sew a cute demi-season folder from a scrap of fabric from a Pavlograd scarf. Fleece or thin fur is used as insulation, because the main fabric is quite thin.
Features of a shawl hat:
- All seams and allowances are processed using an overlocker.
- The fabric does not stretch, so the hat sits loosely on the head
- Use beautiful accessories for decoration
Please note that you can sew the simplest version of a stocking cap, which then needs to be pinned in different ways.
Hats made of scarf fabric Hats made of scarf fabric Hats made of scarf fabric
Preparing the site
Before you start making a structure with your own hands, you need to decide on its purpose and model. The materials and tools that will be needed in the work depend on this.
Types of tents
Despite the fact that making tents and tents yourself involves an endless variety of shapes, there are four main types that you can focus on even with an individual approach.
- Tourist model. The tent is characterized by compact dimensions, it is mobile and takes up little space when disassembled. The frame and braces are stable and highly resistant to dynamic loads.
- Folding canopy. The simple design, which acts as a visor, has no side walls. Made of uprights, top crossbar and tension material. The most popular option is to use on picnics.
- Gazebo tent. Stationary models include not only a roof, but also walls made of textiles or mosquito nets. You can even spend the night in such a tent in calm, calm weather.
- Tent-pavilion. A spacious mobile model designed for special events - weddings, anniversaries, corporate events. The pavilions are decorated with floral, textile and other decor.
After choosing a model, if it is a stationary type, choose a suitable location for placing the future structure. The reliability and comfort of the structure depends on the correct choice and quality of execution. The area for the tent must meet certain parameters:
- perfectly flat surface;
- dense soil, free approach;
- a fairly comfortable distance between the installation point and the nearest stationary objects.
The main task is ease of use, while one must remember the design and ergonomics of the structure.
A stationary tent should not block the view from the windows or block access to sunlight to them and to nearby plantings.
The selected area is cleared of debris, weeds, stones, and branches. If the tent is collapsible, then in this place you can lay a rolled lawn and mark support points. To manufacture stationary awnings, more thorough measures will be required:
- determine and mark the perimeter;
- then remove a layer of soil 15 cm deep;
- sand is poured into the resulting “pool”, and a layer of gravel is placed on top.
The foundation cushion can be made in a more solid version - concrete is poured with simultaneous installation of supports. In this case, the depth of the excavation is increased to half a meter, and the final result is a solid platform on which you can lay decking boards, wood cuts, and paving slabs. Upon completion of the intermediate stages, you will have to wait until the layers dry well and settle.
Tools and materials
To make an awning or tent from scrap materials, you will need not only tools, but also suitable fabrics that are highly resistant to abrasion, tearing, and heavy loads. It can be:
- nylon;
- Oxford;
- polyester;
- taffeta;
- cordura;
- tarpaulin;
- lavsan;
- tarpaulin;
- tent, awning film.
In addition, you will need nylon cords and a frame made of polypropylene pipes. Working tool to perform:
Bags are needed for garbage and construction waste to make it more convenient to remove them from the site.
Pattern of a knitted hat for a boy
These hats are very popular and are usually worn in early autumn or spring. This fabric stretches well and fits your head. The cost of the product is small, and it is very easy to sew.
Pattern of a knitted hat for a boy Pattern of a knitted hat for a boy
Step-by-step sewing of a hat
And now the fun part, we’re sewing a hat.
- Now you need to stitch along the darts.
- Fold them in half. It is important that the stitch ends at the point marked with chalk.
- We hide the tail from the overlog inside using a needle with a large eye and cut off the end. We do the same with the second side.
- Now you need to iron the edges.
- We smooth the seam in different directions (one allowance in one direction, the other in the other).
- The same goes for the grooves (one to the left, the other to the right).
- On the one hand, it is necessary to transfer the marks to the front side.
- Fold the hat in half, straighten the seam allowances in different directions, combine and pin with a needle.
- We do the same work with the slices: combine and chop.
- We will sew the line, focusing on the side marks. In order for the marks not to move, but to turn out symmetrically, they can be captured in this place with 1-2 stitches.
- We start the line on the overlog from this mark. When we reach a place where there are many layers and grooves, we need to manually turn the wheel. Just be careful not to break the needle.
- We hide the tails inside the line. Iron it well and turn the hat inside out.
- Straighten everything, iron it and make a lapel.
The knitted hat is ready. It is recommended to carry out wet-heat treatment so that it does not lose its shape.
Knitted hat pattern for girls
The easiest way to sew a hat is in ten minutes. This is an ordinary sock hat, which is sewn from thin knitwear. You don't have to use paper to create a pattern. The markings are made directly on the fabric. This helps save a lot of time. It is necessary to measure the depth of the cap, width and allowance for allowances. Cutouts are made at the top so that the accessory follows the shape of the head.
Pattern of a knitted hat for a girl Pattern of a knitted hat for a girl
Beanie hat - a fashionable option for headwear
For girls, a hat called a “beanie” will be an excellent alternative to knitted hats.
It will only take you a couple of hours to make it.
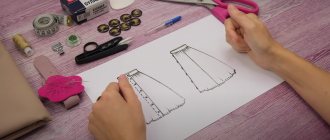
Beanie pattern
Pattern construction diagram.
- Take 2 pieces of material, lay out the pattern on them, outline with chalk, leaving seam allowances.
- Cut with scissors.
- Sew the darts and iron them.
- Then, placing the 2 pieces facing each other, sew the side seams and top.
- Gently fold at the bottom.
DIY knitted hat with ears for a girl, girls: pattern
There are two options for sewing a hat with ears. The easiest way is to sew a regular sock hat and then attach the ears. But you can do it differently and take into account the ears on the pattern. Below are several options for patterns for a girl's hat. If you are sewing a hat for late autumn, you can make elongated ears at the bottom. They cover the baby's cheeks and prevent the entry of wind.
DIY knitted hat with ears for a girl, girls: pattern DIY knitted hat with ears for a girl, girls: pattern DIY knitted hat with ears for a girl, girls: pattern
Tips from needlewomen
If a novice needlewoman doesn’t know how to sew at all or doesn’t have a sewing machine yet, but really wants to create a voluminous fabric scarf with her own hands, there are two options. Both of them allow you to get an exclusive item.
Flannel scarf
Quite a fashionable wardrobe item that can be beautifully placed on the neck. And there is no need to sew such a snood scarf at all.
What you need: a square meter of flannel and scissors.
Work algorithm:
- Lay out the fabric, measure out a square with sides of 1*1 m and carefully cut.
- Pull the threads along the edges to make the fringe the desired length.
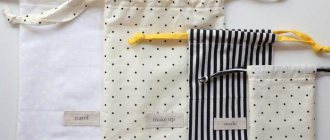
Snood from a scarf
You can create such an interesting scarf with your own hands from an ordinary checkered scarf and yarn of two colors, if the basics of crochet are familiar to a novice craftswoman.
You will need: a scarf, yarn of two colors, a hook, scissors.
Get to work:
- Take a scarf and cut it diagonally into 4 pieces.
- Sew the sides of the triangles and tie them with single crochets, as in the photo.
- Connect the parts according to the diagram in the photo.
- You don’t have to sew it into a ring and leave it as a stole.
- Or sew it and get a full-fledged snood.
DIY reversible knitted hat
This is a great option for kids who have a lot of clothes. It is necessary to combine two fabrics of different colors and with different patterns. To do this, two parts are built and sewn together. For this, elastic threads are used, which allow the product to stretch perfectly.
Features of sewing a double-sided knitted hat:
- Use knitted fabric of the same texture
- Pay attention to the density and stretchability of the fabric
- Before sewing, be sure to determine whether the fabric is fading.
- The fabric should not be see through and be very thin
Do-it-yourself double-sided knitted hat Do-it-yourself double-sided knitted hat
What is snood and why is it so loved?
A snood is an “endless” version of a scarf, which also has other synonymous names - pipe, clamp. Directly translated from English, the word “snood” means “hair net”, “head strip”. The product can be knitted (large, small pattern) or made of fabric.
Various elements made of leather, metal, buttons, ribbons, rivets, lace, and other types of fabrics are used for decoration. The density and type of material determines in what season the snood will be used. In general, the product can be worn at any time of the year - this item will complete any look.
Principle of using a clamp
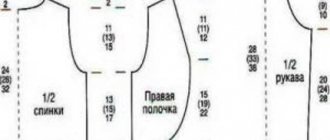
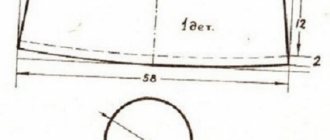
How to sew a turban hat from knitwear
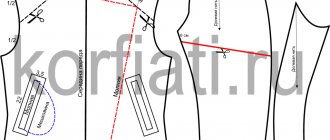
The pattern of such a hat is quite complicated, since there are a lot of cutouts and seams when sewing. This significantly complicates the sewing of the product.
But if you are an excellent sewer, you can sew a turban without much difficulty. The whole difficulty lies in the presence of a large number of darts.
Usually the entire fabric of the product is pulled forward. If necessary, the junction of all pieces of fabric is decorated with a brooch or flower.
How to sew a turban hat from knitwear How to sew a turban hat from knitwear How to sew a turban hat from knitwear
As you can see, sewing a knitted hat is quite simple. In addition, you can earn a little extra money from such a hobby. After all, in autumn and spring these accessories sell with a bang.
Types of scarves
Today, there is an unimaginable variety of snood scarves, each of which is a continuous fabric or knitted ring. Such an accessory can warm you up in winter frosts by tightly wrapping a woman’s neck. Lighter scarves, for example, made of chiffon, will provide translucent protection from the spring wind.
Model with hood
An accessory with a hood has an advantageous design and maximum comfort for the owner. In this case, in addition to the pattern of the main part, you will need a template for sewing the hood. Most often, this is not a traditional detail, but an interesting addition to the model.
Fur trimmed scarf
Also in practice you can find an interesting model, the outer side of which is lined with a fur strip. Such accessories are used both for winter scarves and during strong spring winds. If you wish and have the proper dexterity (cutting and sewing skills), you can make the fur part completely removable: with Velcro, snaps, buttons, hooks. But the cutting principle remains the same: the scarf tightly wraps the neck of its owner in the form of a single piece.
Stylish transformable scarf
These types of neck accessories are sewn in the form of a double or even triple ring. One of the strips of fabric, which when assembled are just folds, opens as needed. The use of such a scarf is relevant in the off-season, when cold winds give way to warm spring weather.
Step-by-step construction of a tent
To build a collapsible or stationary tent for relaxation with your own hands using a frame made of plastic pipes, you will need the necessary tools and materials. A homemade frame for a tent is made not only from PVC pipes, it can be made from wooden blanks, timber, or profile metal. The tent itself also has a variety of shapes:
- dome;
- spherical;
- star tent;
- rectangular or polygonal geometry;
- with solid walls made of fabric or mesh;
- with and without windows;
- with a swinging entrance panel or with a zipper, wooden elongated buttons and so on.
Despite the apparent complexity of making a stationary tent, in fact, all the steps can be completed independently, without resorting to hiring professionals, which can significantly save money.
Ordinary
It has already been said above what type of frame can be used to build a tent, as well as the types of fabrics listed. It also wouldn’t hurt to draw up an estimate in advance, taking into account the consumption and cost of required materials, as well as draw a detailed drawing. Such measures make it much easier to complete work, since even with excellent memory, something can be overlooked. Afterwards you will have to redo it or go to the store again for the missing material.
The assembly of the tent begins after the site is prepared and the awning is sewn. If the supports are not previously concreted into the foundation, then proceed to installing them and assembling the frame. This will require traditional tools:
- ruler, tape measure, pencil;
- level, hammer, hacksaw, motor drill and screwdriver.
To build factory products, you will need different configurations of screwdrivers and wrenches; for wooden structures, you need various kinds of hardware.
Before installing the racks, you will have to drill holes in the ground, and for steel products a depth of 50 cm is sufficient, and for wood - from 70 to 100 cm. In this case, the wood should be treated with antiseptic impregnation to protect it from rotting.
The number of supports depends entirely on the shape of the tent - for a classic rectangle you will need 4 posts and 1 central one, for a fancy octagon, 9 posts, respectively. If the tent has a rounded shape, then the quantity depends on the area - the larger it is, the more supports are required.
Do not forget about the slopes on the roof so that rainwater does not collect on the canvas. If the canopy has the shape of a tent, then the central support is made higher than the side ones by at least 30 cm. If the shape is square, then the posts of one side are made higher than the other, resulting in a pitched roof. All parts are joined using adapters and other devices. After completing all stages of assembling the frame and organizing the roof, the structure can be considered ready - all that remains is to throw on and secure the canvas, and arrange the floor.