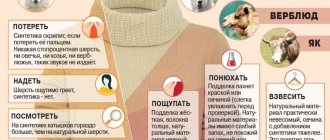
Pay attention to the lightning
Truly high-quality clothing will most likely be equipped with a metal zipper, because a plastic one may well stretch over time. Its use is allowed only when joining fabric edges that do not bear significant load. For example, on shirt pockets. Pay attention to the edges of the zipper. They must be on the same level. If this is not the case, then the zipper was sewn in in a hurry. The quality of work is clear.
Where are hand stitches used?
There are more than 20 types of hand stitches. Their names and areas of application depend on the direction of the stitch on the fabric. Stitches can run in a straight line, diagonally, crosswise and in the form of loops.
The following table shows the classification of the main hand stitches:
| Stitch type | The seam |
| Straight |
|
| Oblique |
|
| Cross-shaped |
|
| Loop-shaped |
|
| Looped |
|
| Special |
|
The use of all the variety of stitches comes down to several areas of application:
- temporary hemming and stitching of parts, copying of stitching lines;
- decorative finishing;
- processing the edges of products using overcasting or hemming;
- connecting parts with permanent stitching using invisible and decorative seams.
Label
Read what it says there. Many people brush it off, saying that everyone there is lying. No, the manufacturer understands that making mistakes on such an easily verifiable detail is costly. Clothes made from 100% cotton are, of course, environmentally friendly, but they have one very unpleasant property - they shrink after the first wash. Therefore, choose things where the cotton composition includes at least 5 percent of other components that neutralize the compression of cotton threads.
Rare shot: Viktoria Isakova showed her grown-up daughter from Yuri Moroz (new photo)
“We are still friends”: Derevianko commented on the breakup with his wife
If there is little snow, there will be no harvest: December 16 is Ivan the Silent Day
How to make a knot?
Some needlewomen secure the thread to the fabric using 2 small crosswise stitches.
Another way is to secure the beginning of the thread with a knot.
To create a knot you need to perform simple manipulations:
- Pinch the end of the thread between the pads of your thumb and index finger;
- Wrap the thread once around your index finger, making a loop on it.
- Use your thumb to twist the crossed threads, moving it to the end of your index finger.
- Hold the twisted loop between your fingers, pull the working thread, and tighten the knot.
Straight stitch
This stitch is made by repeating the two steps used for the first stitch. In this case, it is necessary to ensure that the stitches are of the same length and located close to each other.
The last stitch should be finished by piercing the fabric with a needle from the right side and tying a securing knot as close to the fabric as possible so that the stitching does not move or stretch.
How to sew a backstitch on thin denim
For beginners, let's look at an example of how to make such a connection.
Options for sewing seams:
- with equal allowances on both parts - 15 mm;
- with different allowances - on one part it is 15 mm, on the second - 5 mm.
For example, we provide equal allowances of 15 mm in both parts.
Place the pieces right sides inward and mark a connecting stitch line.
We sew together the parts, cut off one of the allowances to 4-5 mm.
We wrap the remaining cut around the cut edge and secure it with a basting stitch.
We wrap and iron the edges so that the raw cut is inside. Baste the hem to the main fabric.
We machine stitch at a distance of 1.5-2 mm from the fold.
Controlling the speed!
When starting to sew, control the start with your hand. Hold the wheel on the right side of the machine with your right hand, and hold the fabric with your left. You will feel at some point that the wheel begins to rotate, you can hold it slightly at the beginning of sewing and release it when the stitching speed is uniform.
Another very simple and effective tip is to take off your shoes. It will be easier for you to feel the machine with your bare foot and not press too hard on the pedal, so that the machine sews at a sewing speed that is comfortable for you.
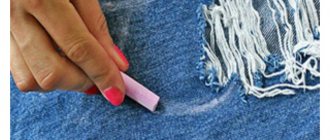
Cut it straight, sew straight!
Use thin, sharpened chalk to trace the contours of the part. Mark the allowances strictly along the ruler. Draw the lines in one motion, without strokes. A fabric marker is perfect; its mark can be removed with steam or water, depending on the type. Just be sure to test the marker on a similar piece of fabric before using it!
An even stitch also depends on how even the cut is along the contour of the parts. When sewing, we often focus on cuts, folding and pinning different parts together. For an even cut you need sharp tailor's scissors. We try to cut without lifting the lower part of the scissors from the table; we hold the fabric with our left hand, making sure that the parts do not move. We look at the tips of the scissors and at the line along which we are going to cut.
Cardboard will help you create beautiful stitches
Another method can be used to go through thickened areas if you use a cardboard pad under the foot. This spacer is very convenient to use at the beginning of sewing. Sometimes the paw simply cannot cope with a thick “crossing” of fabric, cannot jump over an obstacle and “treads water” in place. In order for her to pass it, she needs to align the position of her paw. A piece of thick cardboard is perfect for this purpose. Place a cardboard spacer under the lowered edge of the foot, as shown in the photo, the foot will be leveled, and continue stitching. Now the foot will easily pass any obstacle, and the sewing stitch will be smooth.
The pad under the foot is also convenient to use for passing thick seams inside the product, especially when they intersect. When going over a rough, thick seam, place the spacer at the back of the foot as the foot begins to lift. The cardboard spacer will level the foot, and the sewing stitch will be even and neat. Move along the thick seam until the foot begins to fall. To align the foot, place a spacer in front of it. Continue moving until the foot is completely on the pad. Remove the gasket and continue working. A fabric or cardboard spacer will help line up the direction of the presser foot when you're stitching to the edge or when sewing thick criss-cross seams. You can use one or more layers of fabric or cardboard.
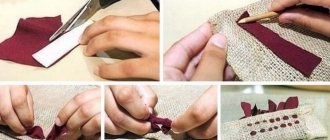
Beautiful seams and manual needle technique
The techniques for making hand stitches are simple and accessible to beginners. Below are step-by-step instructions and recommendations for performing different types of stitches.
Back the needle
The back stitch is a very popular stitch stitch. On the front side it resembles machine stitching. From the reverse side, the stitching does not look so neat; the stitches are longer.
This type of stitch is used for hand-stitching garment pieces and securing them firmly in hard-to-reach places.
Stitch order:
- Pierce the fabric from the inside out and bring the thread to the top.
- Make a stitch 2-3 mm long to the right side.
- Bring the needle back to the front side on the left, 2-3 mm from where the needle enters.
- Stitch to the right again, inserting the needle into the fabric where the last puncture was.
- Continue the sequence until the seam is completed.
- Fasten the thread.
Looped option
This seam can be decorative and functional. With it you can beautifully process the edges of felt, fleece, embroider loops and belt loops. You can also overcast the cut of the fabric to prevent it from fraying and give it a neat, finished look.
Sequence of stitching:
- Start the seam on the left side. Place the fabric cut side down.
- Insert the needle from the bottom and secure the thread at the edge of the cut with a loop.
- Insert the needle at a distance of 5 mm from the edge of the cut and approximately 4 mm from the first puncture of the needle. Bring the thread to the front side, passing the working thread from below. Lightly tighten the loop
- Repeat the sequence until the edge is finished.
Beautiful seams with a needle by hand: loop stitch - The width of the stitch pitch depends on the desired density of the edge finishing. So, when sewing buttonholes, each next stitch is located close to the previous one.
Goat or Christmas tree
Beautiful seams with a needle by hand are also used for the semi-movable connection of 2 pieces of fabric. These seams include the goat seam. It is used for stitching the lining to the main product or for hemming knitted fabric.
For hidden and hem stitches, it is recommended to use thin and strong threads.
The order of the seam:
- Place the fabric in front of you with the sections folded to the wrong side. Start working on the left side.
- Insert the needle from the wrong side into the bottom piece and insert it into the top fabric, making an oblique stitch to the right at an angle of 45 degrees.
- Pick up 2 threads to the left side directly at the junction of the 2 fabrics and remove the needle.
- Insert the needle into the lower tissue to the right at an angle of 45 degrees from the line of tissue connection and withdraw it to the left after 1-2 mm.
- Continue stitching until the seam is completed. Fasten the thread.
French setting
In this way, the hem of the lining is attached to the hem of the main product.
This creates a small thread bridge that prevents the lining from moving away from the bottom of the product.
Execution sequence:
- Sew 2-3 long stitches (approximately 3 cm) between the lining and the hem of the product.
- Combine the threads of the stitches with a buttonhole stitch laid over the top. Lay the seam loops close to each other.
Hemming stitch
A hem stitch is also called a blind or invisible stitch. It is used to discreetly stitch together two parts or hem the bottom of a product. Method of execution: needle forward. The difference from a simple seam is the passage of stitches inside the fabric of the parts being connected.
To make a hemming seam, use thin, strong threads very close in color to the color of the fabric. The needle should be short, thin and sharp.
How to do it:
- Work on the right side.
- Insert the needle into the edge of the hem and bring it out to the working side.
- Pull back 3-4 mm diagonally, pick up 1-2 threads of the front fabric, and pull the thread through.
- Again take a step to the left by 3-4 mm and pass the needle through the edge of the hem. Pull the thread slightly.
- Continue the sequence of stitches. Fasten the thread.
Whipping
Easy to sew seam. Can be used by sewing beginners. This stitch is used to finish the edge of the fabric to prevent it from fraying. The thread for work is matched to the tone of the fabric. The needle should be a comfortable size (not too thick or long) with a sharp end.
It is more convenient to lay the seam on the left side, holding the fabric with the cut side up.
Execution order:
- Insert the needle 5 mm from the edge of the fabric and bring it to the front side.
- Throw the thread over the edge of the fabric and reinsert the needle from the wrong side.
- Stitches are done at the same distance.
- Finish the row and secure the thread.
Dotted line
A variation of the “back needle” seam. Used for sewing zippers and other elements on velvet and velor fabric. The thread should be the color of the fabric, and the needle should be sharp and thin.
How to do it:
- Start work on the right side. Insert the needle from the wrong side and make a stitch, picking up 1-2 threads to the right side.
- Pass the thread from the wrong side and bring it to the front side at a distance of 5 mm from the first needle puncture. Make a small stitch to the right again.
- Repeat the sequence of stitches until the fabric is finished. Fasten the thread.
Hide it
Beautiful seams with a needle can be made by hand, not only decorative, but also invisible. The beauty is that such a seam is invisible, and the product looks neat.
This seam is often used to sew parts together on the front side. For example, in this way you can disguise a hole in clothing or sew up a seam on a soft toy.
Sequence of making a blind seam:
- Fold the edges of the stitched parts inside out.
- In order for the seam to be smooth and invisible, the edges must have clear fold edges. To do this, you can iron them with an iron.
- Insert the needle from the inside under the fold and bring it to the front side. Along a line perpendicular to the edge of the fold, insert the needle into the edge of the second fabric and pass the needle inside the fold. Pull the thread out after 2-4 mm.
- Lay the thread perpendicularly again and insert it into the opposite fabric to be sewn.
- The more firmly the parts need to be sewn, the smaller the stitch steps should be.
- At the end of the work, secure the thread with a knot.
Macrame
Macrame seams are used when working with leather, leather substitute and other dense materials whose edges do not unravel. This type of stitch is used to firmly connect the edges of two parts. This type of seam is often used for upholstery of furniture or car interiors.
Initially, a machine stitch or a “back with a needle” seam is laid along the edges. The stitches of these seams serve as the basis for further work. When working with thick materials, choose a strong needle with a blunt end and a synthetic thread.
Sequence of seam:
- Secure the thread at the beginning of the work with several stitches across both edges. Use the first holes made when machine stitching.
- Next, work only on the front side, using machine stitches.
- Pass the thread alternately through the stitches, lacing through 1 stitch.
- After lacing is completed, begin to tighten the working thread, forming a beautiful, strong seam.
Sports seams
Sports stitching is used in the manufacture of sports equipment from leather materials. These seams help secure the edges and provide tension to the leather.
The seam is made similarly to the macrame seam. The difference is that the lacing goes through every machine stitch.
Pigtail
One of the types of sports seams that is used for working with leather. It is performed using ready-made holes, which are made along the edges of the cuts with an awl or a thick needle.
The parts to be sewn must be stretched, then the seam will be raised and neat.
How to do it:
- Secure the thread with several stitches in the starting holes.
- Following the drawing, start stitching. Do not tighten the thread.
- After stitching is completed, begin to tighten the working thread, forming a relief seam.
- Secure the thread with several stitches and bring it to the wrong side.
Sooner or later, every person has to pick up a needle and thread. Beautiful hand stitches do not require experience or skill; just study the diagrams and follow the advice on choosing materials and tools.
Author: Maria Andryukova
Reduce speed!
You've probably heard about such a miracle of technology as a computerized sewing machine?! These sewing machines can sew at the speed you set. Perhaps your car has such a button or slider. Set the speed, press the button, sew smoothly and evenly.
Make sure your sewing machine is unplugged before trying the next tip.
You can reduce the pedal pressure, but this does not work with all cars. Carefully open the pedal. Find the regulator and turn it in different directions to reduce the speed. Each car has its own side of the turn to reduce speed.
Let's train!
To begin with, a regular notebook sheet with a square or ruler will suit us. We lay even lines exactly along the squares or rulers. Then we thread the machine with contrasting threads, take a piece of striped fabric or line a piece of white calico. Let's lay a series of parallel lines. We start with the bartack, we sew, we finish
Another version of the practice sheet, draw a piece of white calico with zigzag and rounded lines. We start the stitching from the bartack, reach the corner, stop with the needle down, raise the presser foot and change the sewing direction. Having reached the next corner, we repeat the operation.
Let's finish the line with a bartack. Now smooth rounded lines - go through the roundings at low speed, stopping the sewing if necessary, adjusting the direction. Such stitches are useful for sewing facings or sewing sleeves into the armhole.