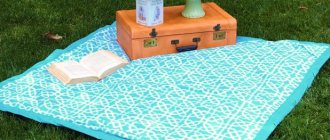
A rug is a practical and useful thing in every home. It gives a feeling of comfort, warmth and coziness. If you need such a thing, do not rush to the store. Try making a rug with your own hands. There are many benefits to this process. Firstly, a rug made by yourself will be unique; it can have any shape, size and design. Secondly, it will help you save money. Thirdly, you will get rid of old unnecessary things. In this article we will look at how to make a rug from scraps of fabric with your own hands.
Rug making techniques
Knitting - narrow strips of fabric are tied together according to the classical pattern.
Patchwork – scraps of fabric are sewn together to create a mosaic.
Weaving - a special base is used on which scraps of fabric are woven or applied.
Stitching - parts of the rug are created, for example balls with padding polyester or braids from scraps of fabric, then all the parts are sewn together to form a rug.
Fabric-based products
You can use fabric as a backing: burlap. Prepare 2 by 10 scraps and get to work. Thread each piece into the cell evenly across the entire width of the base, the tighter the better. This way the rug will be fluffy and soft.
Before creating a rug from old T-shirts turned into yarn, trim the ends of the fabric and select the shape.
This rug is perfect for both the hallway and the bathroom.
Knitted rug made from scraps of fabric
You will need: old T-shirts, T-shirts or fabric, scissors, a crochet hook or knitting needles (it is more convenient to crochet a rug).
Master Class
- Cut the bottom seams off the T-shirts.
- Cut the T-shirts into long, narrow strips, or cut the item to create a continuous strip.
- To create a rectangular rug, take simple chain stitches in single crochets.
- To create a round rug, take 5 loops, close them into a ring and add loops on each row.
The knitted rug made from scraps of fabric is ready! I recommend watching the video master class!
How to crochet a rug from rags with your own hands
Illuminated rug
Sometimes at night you want to go to the toilet, go to the kitchen to eat, drink a glass of water or prepare a bottle of formula for the baby, so you have to get up and leave the bedroom. In the dark, and even in a half-asleep state, there is a risk of bumping into something, and turning on the overhead light is not always possible so as not to wake up other family members. For such cases, LED floor lighting in a rug will be an interesting and useful solution.
Craftswoman Johanna Hyrkas came up with the great idea of using an LED strip as a lighting sign for the way out of the bedroom. The ribbon is twisted in a spiral, located inside a round rug woven from ordinary rope, and a long tail leads further from the room. Soft, cozy light spreads across the floor without disturbing sleep.
Such a rug with LED lighting can serve as a night light in a child’s room. In addition, a strip of rug can be laid along the walls and lead to the toilet or kitchen. For such purposes, it is better to use a sealed closed LED strip. You can make a rug with your own hands, using a large crochet hook or using your fingers to braid a ribbon with thick yarn or rope. Of course, there are expensive models of LED floor lighting with a light power control. But often the homemade option is an excellent budget solution, as in this case.
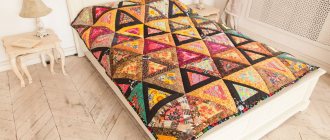
Rug made from patchwork fabric scraps
You will need: thick fabric (for example: drape, gabardine, tweed), lining (for example: batting, foam rubber, padding polyester, carpet backing), scissors, thread, needle, sewing machine (if you don’t have one, don’t despair, the work can be done manually), iron.
Master Class
- Iron the fabric.
- Cut the fabric into strips of the same size.
- Take the lining and pre-place strips of fabric on them. They can be arranged horizontally, vertically, in a chaotic order, creating a pattern according to a certain pattern.
- Sew strips of fabric onto the lining or sew them on by hand.
A rug made from patchwork fabric scraps is ready!
Master Class.
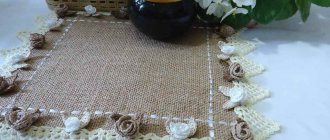
To make a round rug using this technique, you need to have fabric for the base. Better white, because... In the dark your eyes will get very tired. And at first it is better to take threads that contrast with the base, because the seam that you make when sewing on a number of corners will be visible on the wrong side. This way you can control yourself whether you are placing the seam correctly. If this is not done, the seam may turn into a cucumber. And the drawing you plan to get will be disrupted.
In addition, at first it is better to make corners from cotton fabric, because it is easier to work with. When your hands get used to it and folding the corners becomes automatic, then you can use any fabric. Silk, wool, even thin corduroy.
Cut the fabric into small squares. Their size depends on how big you want the corners to be. The side of the square can vary from 3 to 8 centimeters.
Next, cut the squares diagonally and fold the corners from the resulting triangles.
Take a triangle with the diagonal up, the wrong side facing you, and wrap a 0.5 cm strip along the diagonal
and fold it into thirds first,
then another third. It turns out to be a corner.
We begin the work by sewing a small circle on the base of the same color as the first row. We mark the center on it. In the first row, the corners are placed tightly next to each other with their noses in the center.
In the second row, the corners are laid more often, so that their noses deviate from the center by 0.5 cm or 1 cm. Moreover, the detachable part of the corner should always be placed in one direction.
The corners are sewn with a basting stitch, with the needle inserted from one edge of the corner and removed from the other edge of the corner. That's all.
The next corner overlaps the first one slightly and is sewn in exactly the same way. The threads need to be strong enough so that they do not break easily. When working, you need to use a thimble, because you will have to sew up to 8-10 rows of fabric. And this is not easy to do. We sew this way to the required sizes.
You can also sew these roundels using a sewing machine. In this case, the corners are first fixed with pins and then stitched on a machine.
If the fabric slips, the corners can be made from squares. First, fold the square diagonally and then fold the resulting triangle into three parts, as in the previous case.
The first rugs should be made from concentric circles. And after you have fully mastered this technique, you can start posting drawings. The drawing is done at the discretion of the needlewoman. As they say, I came up with it myself - I did it myself. But the result will please you in any case.
When the product is sewn to the size you need, its edge should be processed. For this purpose, we cut the edge of the rug about a centimeter from the last seam. We cut a strip of fabric along a bias line 4 - 5 cm wide. Instead of a strip of fabric, you can use bias tape of a suitable color. Sew to the edge of the rug from the wrong side. If we sew on a machine, be sure to ensure that the corners do not bend in the opposite direction. Then we turn everything right side out, bend it and stitch it.
It turns out to be such a beautiful rug. It is dense and soft at the same time. And it can decorate the interior of any apartment.
Woven rug made from scraps of fabric
You will need: old T-shirts, T-shirts or fabric (it is better to use knitted fabric), scissors, a large wooden frame, a ruler, nails, a hammer.
Master Class
- Take a wooden frame for future weaving.
- Drive nails 2.5 cm apart on two opposite sides of the frame.
- Cut the fabric into strips.
- Stretch the strips horizontally and secure them to the nails. This will be the base of the rug.
- Weave the first strip this way: pass it under the base of the rug, and then over it. The strip should be positioned vertically in relation to the horizontal base and should be in contact with all strips of the base of the future rug.
- Weave the required number of strips, creating a good density of the rug. Don't forget to pull the woven strips towards the first strip.
- Secure the weave with knots on the wrong side.
- Remove the finished product from the wooden structure.
The woven rug made from scraps of fabric is ready! I recommend watching the video master class!
Rug made of shreds woven on a frame (with comments)
Round foot mat made with a hoop
Old knitted T-shirts are actively used by craftswomen for a variety of crafts; in particular, the idea of making rugs out of them is very popular.
Necessary materials:
- 3-4 T-shirts (other things, ribbons or ropes)
- children's gymnastic hoop or hula hoop for adults scissors
It is recommended to take items made of fabric with a minimal admixture of elastane, tape or just rope.
The size of the mat depends on the size of the chosen hoop; you can take either your daughter’s gymnastics hoop or a large weight loss hoop. The weaving technology is very simple; even a child can do it by making a round rug on a hoop for their room.
Cut T-shirts or other old outerwear into strips of equal width, from one side seam to the other, to form rings. Place each strip on the hoop: first a vertical line, then a horizontal one, and then divide each sector into equal parts with a strip of a T-shirt.
Important! The strips of fabric should not be very stretched, otherwise the finished rug will wrinkle and will not hold its shape. Ideally, the T-shirt strip should fit almost loosely over the hoop, with minimal stretching of the fabric.
It's likely that if the diameter of your hoop is larger than the t-shirt strip, it's too tight or you're using ropes at all. In this case, simply wrap the hoop in fabric or rope and tie a knot.
Try to have all the base lines intersect at the center point. We start weaving the rug from the center. Take a strip of T-shirt, fasten it with a loop to one of the warp lines and pass it under and over the longitudinal lines.
When the strip ends, tie another T-shirt ring to it, hiding the knot under the previous row. Continue weaving in the same way, alternating between pulling the strip under and over the longitudinal lines. Try to keep each circle pressed tightly against the previous one, avoiding large spaces or holes between them. Once you have finished weaving, cut off the ends of the loops with scissors and tie them with a knot.
Rug made of pompoms
This rug is made using the patchwork technique. It is very warm and soft and children really like it.
You will need: old T-shirts, T-shirts or fabric (it is better to use knitted fabric), scissors, padding polyester or foam rubber, thread, needle.
Master Class
- Cut the fabric into squares of the same size.
- Form balls from padding polyester or foam rubber.
- Make pom poms by combining squares with fillings.
- Sew the pompoms together or sew them to the fabric base tightly to each other.
The pompom rug is ready! I recommend watching the video master class!
PATCHWORK ✨✨ WE SEW a voluminous rug #with our own hands!!! Patchwork technique
How to prepare threads
Cut all sleeve-shaped products in a circle.
To make the process easier, cut the folded “sleeve” within 1.5 cm of the edge. Then unfold and cut each bottom row followed by the top - you will have a solid ribbon.
To connect short pieces together, make small cuts, 1.5 cm from the edge of each strip. Join them by aligning the holes. Pass the end of the upper segment through the double loop and tighten - the connection is ready!
The width of the strips depends on the thickness of the fabric; the thinner the wider, but not less than 3 cm. Stretch the threads and wind them into balls.
For all types of handmade rug production, when the thread runs out, cut the fabric additionally and connect the scraps as described above.
Grandmother's rug made from scraps of fabric
You will need: old T-shirts, T-shirts or fabric, scissors, ruler, thick thread, needle.
Master Class
- Cut the fabric into strips 5 cm wide.
- Weave a long braid of stripes. As you weave, increase the length of the strips by adding other strips, securing them with a needle and thread.
- Twist the braid in a spiral and do not forget to periodically secure it with thread on the wrong side of the product.
Grandma's spiral rug is ready! I recommend watching the video master class!
How to make a round rug from old T-shirts
Chair circle
The technology of knitting rugs is also suitable for making small circles, which are well suited as a bedding on a chair or stool. Since fabric yarn of small diameter is required, the central part can be knitted from ordinary yarn - this is exactly what our grandmothers and great-grandmothers often did in Soviet times.
In fact, it is already a rare thing - the circle was created more than 40 years ago. When knitting the central part, ordinary yarn was used, then twisted threads from old things, and the edging was again made from ordinary yarn.
Rug in the shape of grass made from scraps of fabric
You will need: a rigid mesh with large cells for the hook to pass through (it can be purchased at a hardware store), knitted or cotton fabric, scissors.
Master Class
- Cut the fabric into strips.
- Use a rigid mesh as a base.
- Start weaving from the center in this way: place the fabric strip under the mesh, hook both ends of the strip to the front surface, then pull it a little and tie a tight knot on the cell wall.
- Fill all grid cells in the same way.
A rug in the shape of grass made from scraps of fabric is ready! I recommend watching the video master class!
FLUFFY RUG WITH YOUR HANDS
Rugs made from scraps of fabric will last a long time. They are very practical and easy to use. Before creating a rug from scraps of fabric, think about its design, color, shape, size and manufacturing technique. Remember, the rug should harmoniously fit into the interior of your home, elegantly decorate it, and emphasize the decor style. Create an exquisite masterpiece with your own hands!
Preparation of flaps
Depending on the chosen technique for making the rug, scraps of fabric of different sizes and shapes may be required. It is better to select and cut the required amount in advance so as not to be distracted while working.
Preparing long strips of fabric for knitting or weaving a product can cause some difficulties: sewing them together is a long and tedious job. And if you tie them in knots, the rug will turn out rough and sloppy. But there are ways to avoid this.
Cutting continuous tape
This method is used when preparing fabric strips from old clothes: T-shirts, turtlenecks, T-shirts and even tights.
Step 1.
We cut off the rough bottom seam, the cuff of the sleeve or the toe part of the tights. For a T-shirt or turtleneck, cut off the top part right below the armholes.
Trimming seams
Step 2.
Place the product on a flat surface with the side seam facing you and cut it into strips of the required width, without cutting a couple of centimeters to the opposite seam.
Cutting strips
Step 3.
Thus, we cut the entire workpiece into fringe.
Workpiece cutting
Step 4.
We straighten the workpiece so that we can see the entire uncut part, and cut it not in a straight line, but at an angle, directing the scissors from one slot to the adjacent one on the other side of the product.
Cutting fabric
As a result, we get a closed ring, which to obtain a tape you just need to cut across one of the seams.
Blank for making a rug
Blanks can be wound into balls
Connection without node
If the length of the tape is not enough or you need to connect many short pieces with each other, the simple technique shown below will help you do this.
| Image | Description |
Step 1 | We cut small holes at the ends of adjacent strips that need to be connected. |
Step 2 | Place the strips on top of each other, aligning the slots. |
Step 3 | Pass the second end of the top strip through the slot from below and pull the entire strip through it. |
Step 4 | Tighten the connection. If necessary, repeat these steps to further lengthen the tape. |
Advice. If scraps of fabrics of different thicknesses and densities are used, then thinner ones should be cut into strips of greater width to even out the thickness of the weaving.
Patchwork in a modern interior – 50 photos:
PreviousTextilesCreating pompoms from designer napkins
Next
Textiles How to wash fluffy terry towels to keep them soft?