Gorgeous Santa Claus
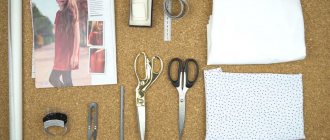
You will need: a foam ball with a diameter of 6 cm, faux fur, chabrak, bias tape, holofiber, hemispheres for the eyes, a pattern, snowflake sequins, a sewing machine, an iron with a sleeve block, scissors, textile glue, blue crepe satin, white fleece , flesh and blue, staff wand, silver braid.
Master Class
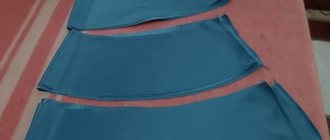
- Cut out 2 pieces of the body from chabrak, glue on crepe satin, then finish the long sections with bias tape.
- Place the pieces of crepe satin next to each other and sew long sections with a seam over the edge.
- Form into a round shape using an iron and a sleeve block.
- Cut out the details of the fur coat and handles from blue fleece.
- Sew, turn right side out, and leave holes in the handles for stuffing.
- Cover the ball with flesh-colored fleece and create a neck by wrapping excess fabric with thread.
- Make and attach a nose, then attach hemispheres for eyes.
- Place the fur coat on the chabrak piece, insert the head into the hole in the body, then sew it on.
- Make a hat this way: cut out a rectangle to fit your head from blue fleece, sew the short side and wrap the top with thread.
- Prepare strips of fur for the lapel of the hat and the trim of the fur coat.
- Attach the blue hat with a basting stitch to the head, then sew the fur strip butt to the blue fleece and turn the fur up.
- Stuff the handles with holofiber, sew up the holes, decorate the wrists with fur and sew on the hands.
- Make a beard this way: cut out several rectangles of flesh-colored fleece with a difference in length of 1.5 cm. It is worth noting that the rectangles need to be cut so that the fleece stretches along the long side of the rectangle. Cut the fringe.
- Sew the beard pieces to the head, starting with long pieces and gradually working your way up to the nose.
- Stretch and curl your beard into curls.
- Decorate your fur coat by attaching snowflake sequins.
- Wrap silver braid around the stick to make a staff.
Gorgeous Santa Claus is ready!
DIY felt Christmas toy Gnome
A gnome made of felt and fabric is made voluminous. To do this, the necessary parts are cut out of felt (two parts each, for the front and back of the figure). First of all, the body parts are sewn together to place cotton wool or other soft material in the middle. Before final assembly, the gnome's head is decorated with eyes, a mouth and a nose, as well as a cap.
Only after this are all the details of the figure sewn or glued together. To create this craft, it is recommended to use felt in bright colors to make the gnome look cheerful.
Santa Claus from a napkin
You will need: red napkin, template, marker, glue, scissors, paper, printer, hole punch, twine.
Master Class
- Print and cut out the template.
- Fold the napkin as shown in the photo instructions.
- Attach the template.
- Fold the top corner of the napkin over to create a cap, then attach a circle of paper as a pompom.
- Punch a hole in the cap with a hole punch and attach twine.
- Color and label as desired.
Santa Claus from a napkin is ready!
DIY felt Christmas tree toy Star with templates and step-by-step instructions
In an apartment, house or office, felt stars look original and will definitely fill the room with a New Year's atmosphere. To create such toys, felt of any color is suitable.
Typically, felt star shapes are cut into patterns. The fake can be decorated with embroidery along the edges and convex places.
And also decorate with beads, beads or sequins.
Felt star patterns
Santa Claus made of cotton wool
You will need: cotton wool, ice cream sticks, red felt, decorative eyes, red pompom, glue gun, flesh-colored paint, brush, scissors.
Master Class
- Place 2 sticks horizontally - parallel, as shown in the image.
- Glue the remaining 7 sticks.
- Paint the workpiece in flesh color and wait until it dries.
- Glue the eyes and nose in the center of the workpiece.
- Roll cotton wool balls and glue them on as a beard.
- Cut out the hat from red felt, then glue it on.
- Glue a strip of cotton wool to the bottom of the hat as a edging.
- Roll a ball of cotton wool and glue it as a pompom.
Santa Claus made from cotton wool is ready!
Felt Christmas balls step by step with photos and patterns
Most people decorate their home and Christmas tree with balls, both glass and plastic. They are often replaced by balls made from felt. Such fakes are created independently using templates. The main idea is to cut out a flat circle, which will be the New Year's ball. With this blank, work begins in the future. If desired, the toy is decorated, for example, with embroidery.
Pattern
Or applique.
You need to hang Christmas balls on a branch using a loop.
You can also make a three-dimensional Christmas ball from felt. To do this, the workpiece is stuffed with any filler, for example, holofiber or padding polyester.
Felt Christmas ball patterns
Santa Claus made of felt
You will need: felt 1 mm thick in beige, white and black, white felt 3 mm thick, thick beige cotton fabric, white felting wool, padding polyester, wire, template, black beads for eyes, black and beige threads, scissors , pencil, glue gun, small bell and other decorations.
Master Class
- Print the template.
- Cut out the body of Santa Claus and transfer it to thick white felt.
- Cut out the body of Santa Claus from felt.
- Cut out the same body part, only from thin white felt.
- Cut the boots from thick white felt, then the same boots from thin black felt.
- Cut out the boot cuffs from thin white felt.
- Draw the mittens and cut them out of thick white felt.
- Cut out parts from thin beige felt - the trim of the fur coat and hat.
- Cut 2 circles according to the template from beige cotton fabric.
- Make a spout from a small circle: pull the thread, stuff it with padding polyester and sew the spout to the large circle.
- Sew black beads for eyes.
- Sew the face to the body from thin felt. It is worth noting that during sewing you need to add a little padding polyester for volume.
- Make the eyebrows and beard from felting wool, then attach with a glue gun.
- Glue the trim of the hat and fur coat.
- Prepare 4 pieces of wire, twist them onto a pencil, giving them the shape as in the photo.
- Glue the parts of Frost's body from thin and dense felt, gluing wire between them in place of the arms and legs.
- Glue the mittens and boots to the twisted pieces of wire.
- Twist a wire bell holder and glue it to the mitten.
- Stitch the Santa Claus figurine with beige thread.
Felt Santa Claus is ready! I recommend watching the video master class!
DIY felt Santa Claus. Master classes on Podarki.ru
Master classes and patterns
A traditional selection of the best master classes and patterns for sewing New Year's toys from craftsmen from all over the world. Mostly English-language authors - after all, Russian ones are so easy to find if you want.
What Santa Claus will be like depends only on your imagination. You can make just the head, or the entire torso in any desired shape. Make it completely sketchy or draw even the smallest elements 
Santa Claus and Father Frost
These two characters are very similar, fans of the classic Santa Claus can easily remake Santa's patterns =)
Napkin holder
Master class from the magnificent Betz White, on whose blog you can find many wonderful works.
A red napkin and a felt Santa holder are a great combination! Embroider names on the holders and you will get a wonderful accessory for accommodating guests =) You can download the master class and pattern from the link below. Download MK
Cute Santa with glasses by Fernanda Lacerda
On the author's blog (Spanish) you will find many wonderful toys.
It’s not at all difficult to repeat them thanks to the detailed photo instructions. It is not at all necessary to know the language. This Santa is the cutest toy in my opinion. Consists of many elements, but the result is worth it =) Download MK
White beard made of felt
For a children's carnival or New Year's party, you can sew such a cute beard, a master class on how to create it can be found on the While Wearing Heels blog.
Download the pattern
Colored Santas with springs
These Mamma Mia handmade characters will definitely help create a festive mood!
Just imagine how merrily their arms and legs dangle on the springs =) Download the pattern
Another napkin holder
This time from the blog Simple Simon and Co.
A cheerful grandfather with shifty eyes and a red nose will be fun to make with children) Download the pattern
gift sock
Traditional gift sock decorated with Santa from everyone's favorite Erika Katarina =) It's adorable, isn't it?)
Download the pattern
Santa suit on hangers
A funny idea, it seems that the guardian of winter has just left and will return soon) Source: womansday.com
Clothes pattern
Christmas tree decoration
You can find a master class on sewing such a charming Santa Claus on the gingermelondolls blog, where there are a lot of other interesting crafts.
I’ll probably make one for myself too =) Download the pattern
Santa with a list of children
This is a voluminous toy on a stand from HollyC.
Have you behaved well this year?? Download the pattern
The fastest Christmas tree toy
These are the multi-colored Santa Clauses (or Santas) in the form of droplets.
They consist of only a couple of parts, so they can quickly be made in the required quantity. Source: revoluzzza Download pattern
Hat and beard - details
A wonderful idea for New Year's photos =) Sewing a beard and a hat from felt is not at all difficult.
Author: Jessica Peck Download pattern
Santa Claus in the form of a cone
Children can also be entrusted with making such a simple toy from Rhinestone Beagle. It is quite stable, so it can easily stand on any surface or take pride of place under the Christmas tree.
Santa Claus on a frame
A cute toy for the Christmas tree.
A little alteration of the costume - and there will be our Santa Claus =) I like the perky look and stability, and thanks to the chenille wire, you can give the toy any position. Author - Elizabeth Andrus Download pattern
Curly beard
I know, I already showed two beards above, this one is characterized by increased “curliness” =) You can find a master class on sewing it on the Bugga Bugs blog
Download the pattern
Christmas tree decoration
Cute teardrop-shaped Santas from Vanessa Biali also wouldn’t mind taking pride of place on the Christmas tree =)
Download the pattern
Well, now let's move on to Russian-language master classes
Funny Santa Claus made of felt and foam
An interesting idea for a three-dimensional application from the site. Find out how to make Santa Claus from felt on girlsschool.ru. Feel like sculptors)
Grandfather Frost in green
Interesting toy with embroidery on a bag from MillaHM
Pattern
Walking Santa Claus made of felt for finger games
A useful educational themed toy for children.
Helps develop fine motor skills =) Source: esilija.ru Download pattern
Another Christmas tree toy
A detailed description of the manufacturing stages can be found on the website masterclassy.ru
Pattern
Felt Snow Maiden
Unfortunately, there are not so many patterns and master classes on sewing Snow Maidens. I would be grateful if you share your findings =)
Simple Christmas tree toy
This Snow Maiden consists of only a couple of parts and is great for children's creativity.
You can check out the master class from Antonina Mazur here Pattern
Snow Maiden under the Christmas tree
This toy is very cute, decorated with sequins and beads, but quite complicated to make.
You can find a master class on sewing it on the Country of Mothers from the author Felt Thing Pattern
Snow Maiden for the New Year
Another interesting and simple Christmas tree toy. Source: namenu.ru
A selection of various patterns
Here you will find patterns for New Year's characters from various authors. You can use them to sew great felt toys!
Knitted Santa Claus
You will need: a bottle of champagne, a hook, yarn, a centimeter, edge, filler, regular threads, a needle, doll strands, glue, jewelry.
Master Class
- Knit the head with single crochets using beige yarn, according to the principle of knitting a ball. It is worth noting that the number of rows without increases and decreases should be two rows less than for the ball.
- Make the base of the doll from red yarn: double crochet a circle, fold it in half and make knots at a distance, as shown in the photo.
- Knit your arms and torso in circular rows that taper towards the bottom.
- Tie the nozzle onto the bottle from beige yarn and don’t forget to constantly try it on so that it doesn’t fit too tightly.
- Connect the bottom of the nozzle and the workpiece with your hands on the bottle.
- Fill the handles of the red blank and the empty space with filler.
- Dimensions: head circumference 30 cm; arm length 18 cm; body width 30 cm; body height 16 cm.
- Knit and decorate clothes.
- Clothes dimensions: hat blank diameter 10 cm; sleeve length 12 cm; fur coat length 28 cm; sleeve volume 18 cm; fur coat volume 47 cm; The circumference of the finished hat is 32 cm.
- Sew the clothes with regular threads, the sewing lines are indicated in the photo.
- Attach the doll strands to the yarn and secure with glue. Make a beard from long strands, and use shorter strands for your hairstyle.
- Glue the hat to your head.
Knitted Santa Claus is ready! I recommend watching this video!
Decorating champagne for the New Year./ Santa Claus / MK from Nata Liana
Christmas tree toy Felt Christmas tree – 5 step-by-step instructions + diagrams
A live or artificial forest beauty appears in every home on New Year's Eve. It is customary to hang not only balls on it, but also animal figures and small Christmas trees made of felt. Such souvenirs will be a wonderful gift for family and friends.
The easiest way to make jewelry is to cut out a flat piece, which is then decorated with beads, seed beads, and sparkles. An applique is often made from pieces of green felt on a contrasting background, decorating such a Christmas tree with sequins.
You can make a three-dimensional Christmas tree from felt squares or circles, which will be an excellent decoration for a forest guest. They need to be strung on a thread in a chaotic order, then you will get a three-dimensional figurine that is hung on a New Year's tree or on a window.
And here is a Christmas tree made from felt circles using the same principle.
People who know how to handle a thread, a needle and a sewing machine are recommended to sew a Christmas tree from felt, filling it with padding polyester or cotton wool.
Sample
Felt Christmas tree patterns
And a few more patterns
We have even more ideas and master classes for felt Christmas trees!
Santa Claus from an openwork napkin
You will need: red cardboard, flesh-colored paper, 2 openwork napkins, scissors, marker, pencil, glue.
Master Class
- Fold the red cardstock into a triangle as shown in the image.
- Cut out a face from tissue paper, then glue it to the triangle.
- Make a mustache, beard, pom-pom and cap edge from an openwork napkin, then glue them on.
- Cut out a flesh circle and glue it on as a nose.
- Draw eyes with a black marker.
Santa Claus from an openwork napkin is ready!
Felt house for a Christmas tree - step-by-step MK with photos and templates for winter houses
Toys that are made in the shape of New Year's houses always look cozy and homely. Such decorations are hung on windows and given to friends. The craft is made either flat or three-dimensional.
In the latter case, the house is stuffed with foam rubber and all its parts are sewn together. The method of decoration depends on your imagination. The house must have doors, windows and a roof. These elements are highlighted with acrylic paints, a marker or a different color of felt.
More step-by-step master classes on felt winter houses here.
Felt house patterns
Fleece Santa Claus
You will need: bright and flesh-colored cotton fabric, white and red fleece, felt, padding polyester or holofiber, combed tape (wool for felting), foam rubber, felting needle, thick and thin wire, glue gun, Moment-Crystal glue, dense cardboard, acrylic paints and brushes, wire cutters, pliers, stationery knife, buttons, beads, seed beads, floss threads.
Master Class
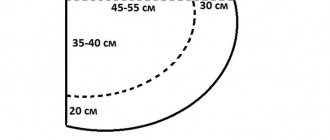
- Make a pattern from cardboard: cone with sides 13 cm; circle with a diameter of 6 cm and handles (optional).
- Draw a line through the center of the circle and divide it into 3 equal segments, then make holes for the wire at their joints.
- Place a padding polyester circle and a slightly larger diameter cotton circle on the cardboard circle, then pull the fabric around the cardboard using thread and a needle as shown in the image.
- Bend a thick wire into the letter P, then insert it through the holes in the cardboard, padding polyester and fabric.
- Bend the ends of the wire so that you get feet.
- Prepare a piece of thin wire 25 cm long and screw it to a thick wire, then glue it with hot glue. At this stage, make sure that the structure is stable.
- Prepare 2 pieces of cotton fabric 22 cm long and 4 cm wide. Fold in half lengthwise, sew, turn out, pull over the legs and sew with a blind seam to the bottom.
- Make a cone pattern from flesh-colored fabric, fold it in half, sew, leaving 2 mm of the tops unsewn, fold the edge around the circumference, baste and turn the cone out.
- Place the cone on a thin wire, leading its end through the hole in the top. Stuff the cone with holofiber so that the wire is in the center of the body, then sew the folded edge to the body around the circumference with a blind seam.
- Cut out large feet from cardboard, then hot glue them to the wire feet.
- Cut the boots out of foam and make a recess in the back for the ankle wire, then attach them.
- Cut 2 ovals from red fleece, cut a triangle at the top, cover the foam boots, sew the heel with a blind stitch and pull the fleece around the cardboard sole.
- Cut 2 felt ovals slightly larger than the cardboard sole, hot glue them to the sole, trim off the excess and sew the felt to the fleece with a blind stitch.
- Mark the lines for the top of the jacket and the bottom of the cap on the cone, then roll a padding polyester ball, cut a circle from the fabric, pull it along the edge and sew the nose in place.
- Draw a face to your liking.
- Cut the red fleece jacket into a truncated cone shape, fold it in half, sew along the edge, then turn it inside out.
- Sew handles and gloves from red fleece and cotton fabric as shown in the image.
- Pull the jacket over the body-cone and sew at the bottom and along the neck with a hidden seam.
- Cut out figures from felt - Christmas trees, houses, then glue them with Crystal glue and only then sew them on as desired.
- Sew a white fleece snowdrift ribbon with a hidden seam and decorate the composition with beads and buttons.
- Cut boot cuffs and cuffs from white fleece, fold in half, sew along the edges, stretch over the arms and legs, then hand sew. Make a wavy collar in the same way.
- Sew the arms to the body using a button fastening: pull the thread a little, tie a knot and glue it with Moment.
- Tear 10 cm of wool from the combed strip, gather it into a bun and felt the beard with a felting needle.
- Tear off a bunch 2 times thinner and 2 times longer, then roll it in place of the mustache.
- Tear off 2 more bunches as for the beard, then roll on both sides of the face.
- Felt the hair on the sides and back of the head in the same way.
- Cut out an elongated and narrowed cap from cotton fabric based on half a cone, sew it together, leaving a hole at the top.
- Turn it inside out and put the cap on, bringing the wire through the hole and sew it along the edge to the head. Bend the end of the wire into a loop.
- Make a pom pom and flap out of white fleece, then sew them on.
- Make a small felt Christmas tree and glue it to the hat as a decoration.
Fleece Santa Claus is ready! I recommend watching this video!
DIY Santa Claus from CUPS | Christmas decor
Felt snowman – 4 step-by-step master classes + patterns
The favorite New Year's character among adults and children is the snowman. It can be cut from regular white felt material, and then sew on additional parts, including a bucket, handles, scarf, nose and legs.
Both the complete snowman figurine and individual parts are cut out of the material, which are then joined during the manufacturing process using hot glue or thread and a needle.
Even the simplest decoration can have a voluminous detail. In this case we are talking about carrots. This piece is made from orange felt, rolled into a cone and carefully sewn into place.
To make a funny snowman, you need to sew the bucket on his head a little to one side and add some blush to his face.
Patterns of felt snowmen
Paper Santa
You will need: red and white colored paper, scissors, glue, marker, pencil, wooden bead.
Master Class
- Make a cone out of red paper and secure with glue.
- Trim off any excess paper at the base.
- Draw a beard on white paper, then cut it out.
- Fold the beard in half and cut a hole as shown in the photo instructions.
- Make a flat cone shape where the beard is attached.
- Place the beard onto the cone, then glue on the nose and mustache.
- Attach a wooden bead to the top of the cone as a pom pom.
- Draw Santa's eyes and mouth.
Paper Santa is ready! I recommend watching the video master class!
DIY Santa Claus of paper ❄ Christmas Ideas
Christmas tree toy Felt mitten - how to sew it yourself
The mitten is sewn according to the same principle as the boot. The product can be voluminous or flat; a loop must be made for it. The finished mitten is sprinkled with glitter and powder to create an imitation of snow. White felt is sewn along the edge.
Santa Claus from a plate
You will need: paper plate, colored paper, scissors, glue, marker, printer, eyes, hole punch, rope.
Master Class
- Print the template and cut out the pieces.
- Fold the plate in half.
- Fold the cap and glue the parts as shown in the photo.
- Punch a hole in the top of the hat and attach string for hanging.
Santa Claus from the plate is ready! I recommend watching this video!
Crafts for Xmas decoration DIY, how to make Santa Claus elves- Christmas ornaments DIY
The Snow Maiden is a shy girl
To make it you need:
- felt in white, beige, yellow, gray and blue colors;
- threads matching the color of the felt;
- transparent threads, as well as golden and silver threads;
- filler;
- decorative elements for decoration - beads, sequins.
Master Class
We draw the pattern of the toy according to our wishes or use the one suggested.
Cut out all the parts from felt of the corresponding color.
We embroider the hair and braid with golden thread. We shape the face by sewing on the eyes, nose and mouth.
We embroider the edge, cuffs, mittens, and crown with beads and sequins.
We trim the dress with white felt with nylon threads.
We put the filler only in the head of the toy (not very tightly) and in the body. There is no need to fill out the arms, legs, or crown.
Whether or not to sew up the body of the toy after filling it with filler is up to you. You can leave it open, which will make it possible to remove the filler.
Mailbox "Santa Claus"
You will need: box, colored paper, scissors, glue, marker, pencil, button, eraser, envelope.
Master Class
- Cover the box with red paper.
- Cut a hole for letters.
- Cut out the beard, mustache and face, then glue them on.
- Make a cap and glue it to the top of the box.
- Glue the envelope and write on it as shown in the photo.
- Attach the button and elastic band to the lock location on the side of the drawer.
The Santa Claus mailbox is ready! I recommend watching this video!
DIY Cardboard Santa | Christmas Crafts For Kids on Box Yourself
Boots and felt boots made of felt - do-it-yourself patterns for New Year's toys made of felt
Felt fabric is a fairly warm and cozy material, so it is great for making toys in the form of felt boots and felt boots. Such New Year's decor is hung on a Christmas tree, decorated at home, or used as a bag where gifts for relatives are placed.
Before manufacturing, you need to select a felt boot template, redraw it onto the material and carefully cut it out. If a three-dimensional figure is not planned, then decorative elements must be applied to it, including snowflakes, artificial snow, snowmen with handles, and deer. They must be sewn to boots or felt boots with threads or glued with a glue gun.
It's easy to make boots where children and adults will hide gifts for their loved ones. You will need two blanks, made according to the pattern and which are sewn with threads from the wrong side. After the craft is turned inside out, then a loop of ribbon or twine is attached to it. The edges are edged with silver or gold thread. The boot is decorated with embroidery in the shape of snowflakes or appliques of fairy-tale characters. The figures are hung on the Christmas tree, on the window, or above the front door.
Felt socks patterns
Santa Claus from a bottle
You will need: plastic bottle, paints, colored paper, pompom, scissors, buttons, 2 sleeves, glue, cotton wool, white and black lace.
Master Class
- Paint the bottle red.
- Draw the face and beard using white and beige paint.
- Make feet from sleeves and red paper, as shown in the photo instructions.
- Prepare strips of red paper, fold them like a large accordion, cover them with colored squares and glue them onto the sleeves as legs.
- Cut out the mittens from white paper and attach red accordion stripes to them as hands.
- Glue the pompom to the lid.
- Glue the arms and legs.
- Roll a ball of cotton wool and glue it as a nose.
- Glue buttons as eyes.
- Wrap a white cord around the edge of the cap.
- Make a belt from a button and black lace.
- Decorate the mittens to suit your taste.
Santa Claus from a bottle is ready!
How to make a pig from DVDs and felt - Second option
We have already said that you can make any animals from disks. Especially if these animals resemble a circle in shape. And what animals are round, pot-bellied and have no waist? Yes, of course, these are pigs and hippos! Today, I propose that together with us, we will make a funny pig, the symbol of 2021, from DVDs and felt.
For this craft we will prepare the following materials and tools:
- Disk
- Felt pink and red
- Paper and pencils
- Ribbons
- Glue and scissors.
First we need to close the hole in the disk. To do this, cut out a large circle from the pink wind: it will close the hole and at the same time become a muzzle for the piggy. We will also cut out two identical circles for the ears and a small oval patch, outline it with a pencil or felt-tip pen and decorate it with sequins.
We also need legs with hooves - these are rectangles with a sector cut out and the edge tinted. We sequentially attach all this to the disk using ordinary pencil glue. Moreover, we give the ears a shape like this: we combine the two edges and glue them to the head from the inside out.
We will make the eyes for the piggy out of paper. Just cut out two small circles, outline them with a black pencil and draw the pupils. Glue it over the patch. Let's also cut out a mouth from a small piece of red felt. We attach it to the side.
To make the piggy look elegant, we will make two bright bows for it. From grosgrain (any) ribbon, tie two bows.
You need to fasten a loop on the back side, then the pig can be hung on a wall or on a Christmas tree. Secure with tape.
Glue the finished bows near the ears. You can use hot glue, or instant glue, or you can use pencil glue again, just press it harder.
Such a mischievous pig, the symbol of the year 2021 made of disks and felt, is in a hurry for the holiday!
What kind of pig will you get?
The author of the works is Anastasia Obolentseva, correctional teacher, Novosibirsk.
Friends, if you liked this page, share it with your friends!
Creative grandpa
You will need: white and red paper, scissors, template, printer, pencils or markers.
Master Class
- Print the template.
- Color and cut it out.
- Fold Santa Claus as shown in the photo instructions.
- Twist the legs, arms and beard.
Creative grandpa is ready!
Felt Angel Christmas tree toy – 2 step-by-step instructions and patterns
Angels are the embodiment of the spirit of Christmas and New Year, so such crafts will be an excellent decoration for the Christmas tree and a wonderful gift for family, friends, and children. It is better to cut the angel out of white felt and assemble it using the applique technique, gluing the parts to the base.
Angels are often made on felt Christmas balls. Sewing the parts one by one and filling the angel with soft material will help you get a three-dimensional figurine.
By the way, we have more than 10 step-by-step master classes of felt angels and many patterns.
Felt angel patterns
Santa Claus made from cotton pads
You will need: cotton pads, plastic spoon, glue, red yarn, buttons for eyes, ribbon or thread for hanging, red felt-tip pen, scissors.
Master Class
- Take a cotton pad.
- Bend its side to class=”aligncenter” width=”700″ height=”812″[/img]
- Make cuts along the edge of the circle.
- Draw a smile with a felt-tip pen.
- Take a plastic spoon.
- Apply glue to the spoon, leaving the tip without glue.
- Wind the yarn tightly.
- Apply glue on both sides to the tip of the spoon and glue the face of Santa Claus to the convex part.
- Glue a clean cotton pad onto the concave part of the spoon.
- Cut a circle out of a cotton pad and glue it onto the tip of a spoon handle.
- Cut a circle from a cotton pad, color it with a felt-tip pen and glue it as a nose.
- Glue buttons as eyes.
- Attach ribbon or thread to form a loop for further hanging.
Santa Claus made from cotton pads is ready!
Do-it-yourself felt deer for a Christmas tree - patterns and diagrams
The deer is made using a pattern or a ready-made template, which is printed and then transferred to felt material. You can make a flat figurine, to which a loop is attached in the middle of the body. Such a deer needs to be decorated, highlighting the tips of its hooves, horns and nose. The eyes are sewn on from small buttons or beads.
A more complex option involves sewing the figurine according to the pattern, cutting out all the necessary parts. They are sewn from the wrong side, and then turned inside out and filled with cotton wool. At the very end, the parts are stitched or glued.
Felt reindeer patterns.
Santa Claus from a sleeve
You will need: toilet paper roll, red velvet paper, twine, white paper, glue, ruler, bead, scissors, black felt-tip pen.
Master Class
- Cut a rectangle of velvet paper so that one side is equal to the height of the sleeve, and the other is equal to the circumference with a margin of half a centimeter.
- Cover the sleeve with velvet paper.
- Bend the edges of the sleeve as shown in the photo instructions.
- Bend the edges on the other side of the sleeve in the same way, only at a right angle to the opposite side.
- Bend the corners outward on one side, forming legs.
- Prepare a piece of string 40 cm long, fold it in half, step back 7 cm from the fold and tie a knot. Pass the bead through the 2 ends of the twine, tie a knot, step back a couple of centimeters and tie the knot again.
- Apply glue to the bottom knot of twine and insert it into the hole between the folded edges of the sleeve. Apply glue between the corners and glue them together.
- Cut an isosceles triangle of white paper with a hypotenuse of 7 cm, then draw the face of Santa Claus and glue it to the sleeve.
- Draw arms, legs and a belt for Santa Claus.
Santa Claus from the sleeve is ready! I recommend watching the video master class!
Santa Claus made from a toilet paper roll. Master classes on Podarki.ru
Felt cone - 2 step-by-step master classes with photos
To make a cone you need to take two sheets of felt fabric. These can be brown and white or cream and coffee colors, from which petals of the same shape and diameter are cut out. All elements are pricked in turn onto a skewer, which is used to pierce each petal in the middle. First put on the large ones, then the smaller ones. At the very end, miniature petals are strung. The thread must be tightened tightly and a knot must be tied at the end. The cone will be ready!
If you don’t want to bother with cutting, then just cut out an oval, which will become the basis for creating a cone. Using a marker, you need to make semicircles from the base to the end of the cone to indicate individual petals. A loop is attached to the base of the cone.
Did you like the felt cones? We have more than 10 step-by-step master classes of felt cones!
Santa Claus made of cotton wool
You will need: a sheet of white cardboard, colored felt, a glue gun, copper wire, cotton wool, a pencil, scissors, small pliers, eyes.
Master Class
- Fold a piece of cardboard in half and glue a 7cm wide strip of red felt to the bottom.
- Cut a strip of black felt 1 cm thinner than the red one, then glue it on.
- Cut a buckle out of yellow felt, then glue it to the center of the belt.
- Glue the eyes just above the center of the sheet.
- Glue a circle of red felt where Santa Claus's nose should be.
- Roll cotton wool balls and glue them on as a beard.
- Form glasses from wire, then attach them.
- Cut out the red felt hat, then glue it on.
- Decorate the hat by gluing cotton balls, and glue a pompom ball to the tip of the hat.
- Write your wish on the back.
Santa Claus made from cotton wool is ready!
DIY felt snowflakes – 5 step-by-step master classes + templates
Felt decorations such as snowflakes are made either flat or voluminous when cotton wool or foam rubber is added to the middle of the sewn toy.
The first option involves transferring the template to the material and carefully cutting out the contours of the image. Making voluminous snowflakes takes more time and requires children and parents to have sewing and appliqué skills, so for the first time or when there is no time, flat snowflakes are made. Decorative elements are then placed on them.
Sample
To the finished products you need to sew a loop of braid or twine to hang the snowflake on the Christmas tree.
A snowflake can be made not only from patterns. Here, for example, is a snowflake made from felt strips. A great option for those who don’t like to sew, but really want to make a felt snowflake.
And another master class on felt snowflakes for decorating a Christmas tree.
Felt snowflake patterns:
Santa Claus made of polymer clay
You will need: cones, polymer clay, PVA glue, brush, superglue, hairspray, glitter, thin wire, ribbon.
Master Class
- Make a Santa Claus hat in this way: roll a ball out of polymer clay, then make a cone, bend the tip and attach it to the pine cone.
- Make 4 balls of polymer clay: one ball should be large - make a beard from it. Make two medium-sized balls - form a mustache out of them, and use one small ball for the nose.
- Attach the pieces to the pine cone.
- Brush over mustache and beard to create realistic stripes.
- Thread a piece of wire through Santa's hat and twist a loop.
- Place the craft in the oven for 15 minutes (135 degrees) to allow the clay to harden.
- Remove the craft from the oven. Polymer clay may peel off due to high temperature. If this happens to you, don’t despair - just glue the fallen parts back on.
- Tie the ribbon to the wire.
- Spray the hat with hairspray.
- Sprinkle with glitter.
Santa Claus made from pine cones and polymer clay is ready! I recommend watching this video!
Master class: Santa Claus made of polymer clay
Festive New Year's applications by the hands of a child
Bright pictures neatly framed will create a joyful mood in anticipation of the holiday. Applications imitating Grandfather Frost and his granddaughter Snow Maiden, as well as Christmas trees and snowmen, are a good gift option for a loved one and interior decoration. The article offers photos with examples of applications, as well as instructions for their implementation.
It is recommended that children create simple crafts in kindergarten and at home. Such needlework is a means for developing fine motor skills, developing horizons and creative abilities.
Invite your child to decorate the Christmas tree with colored paper items. He must independently make bright paper parts of various geometric shapes and decorate the Christmas tree with their help.
For older children, Christmas tree decorations such as mother-of-pearl buttons, beads, and self-cut shapes of objects and animals are suitable. Invite the little ones to draw templates of children's hands and cut them out of colored paper.
Ded Moroz and Snegurochka
For children, not a single New Year's holiday is complete without gifts. Children bring great joy to crafts that they make themselves. New Year's applications made in kindergarten will be a wonderful surprise for parents. Materials required for the master class:
- colored cardboard;
- colored paper;
- album sheet;
- glue, scissors, ruler and pencil.
Step-by-step instructions for performing MK:
- Fold the cardboard in half.
- Draw the outlines of the fur coats on it by hand or using a stencil.
- Edges for fur coats, heads (the faces of both characters), mustaches and beards are cut out of a white sheet.
- Braids are made from yellow paper.
- Make blue eyes, mittens and a crown.
- From red make a hat, nose, mittens for Santa Claus and bows for braids.
- A snow-white edge is glued onto the fur coats of the heroes of the New Year's applique.
- Faces and all other details are glued according to the appropriate pattern.
The original New Year's applications Snow Maiden and Father Frost are ready.
This craft is used as a postcard. It is advisable to write congratulatory words inside and place it under the Christmas tree. Children from the preparatory group will follow the instructions, or create variations on the theme. Due to their age, they are able to complicate the shapes of workpieces and add volume to parts using small cuts.
Winter patterns on windows
Every child will be interested in making applications for windows. It is better to make them from large landscape or color sheets of A3 and A2 format.
- The paper pattern must first be copied or printed from a picture.
- Then carefully cut out using a utility knife.
- You can stick it with plain water, the drawing will stay on it for quite some time.
- Window applications can be attached well using soap solution, PVA glue or a special pencil. They can be removed with any window cleaner.
Options for curly contours for window New Year's applications:
- snowflakes;
- team with reindeer;
- Christmas tree, Christmas balls and toys;
- beautifully carved Christmas tree branch;
- animals that symbolize the coming New Year according to the Eastern calendar;
- candles, gingerbread cookies, snowmen, gift boxes, stars and much more.
It is better to use thin paper for window patterns so that the applications are light. Immediately before gluing, cut large-scale appliqués and glue them in stages in parts.
Making New Year's snowflakes for windows, step-by-step description of the process (for beginners):
- make a square out of a sheet, fold it diagonally;
- fold the triangle in half;
- reconnect the opposite sides, clarify the fold line;
- round the bottom edge;
- cut out the desired pattern;
- unfold and stick!
Santa Claus made of paper
You will need: colored paper in red, white and beige, scissors, black marker, glue.
Master Class
- Glue together a red and white piece of paper.
- Fold the red sheet cap as shown in the photo instructions.
- Cut the white sheet into strips and twist the fringe to create a beard.
- Cut out a face from beige paper, then glue it on.
- Glue and curl a white strip of paper in place of the mustache.
- Draw eyebrows, eyes, nose and mouth with a marker.
- Glue the white circle onto the cap as a pompom.
- Glue a white stripe to the bottom of the hat as a edging.
Paper Santa Claus is ready!
Pig symbol of 2021 from DVDs, master class step by step with photos
Today we propose to make a symbol of 2021 from a disk - a pig in a Santa Claus hat. Believe me, in 20-30 minutes you and your child will make a wonderful Frosty pig!
Materials needed for the craft:
- Disk
- Felt pink and orange
- Scissors
- Glue
- Buttons for eyes
- Narrow ribbon for eyelet
1. Let's start with the pig. We trace the disk with a pencil on a piece of felt and immediately draw protruding ears. Cut out the part.
2. Prepare the remaining details. Cut out one oval from pink felt (piglet) and two orange circles (cheeks). The inner elements of the ears and a small mouth are also needed. We also cut out rectangular legs.
3. We begin to design the face of the symbol of 2021 - a pig. Glue the pink circle. Next we glue orange cheeks, a mouth and a snout onto it. We attach the paws from the inside out.
4. Instead of eyes, I chose buttons with a shiny blue finish. And our nostrils will be replaced by black sequins. Don't forget about the bright earpieces.
5. We make a loop from a narrow ribbon and fasten it on the wrong side.
6. Select a Santa Claus cap from the holiday set. Also, it can be quickly made from red and white paper (cardboard) or felt. To do this, just cut out the red cap and the white fur edge. Glue the cap onto the piglet's head.
7. What a positive pig Santa Claus turned out to be!
8. It can also be used as a Christmas tree decoration, secured to the tree using a loop.
9. The cap can be rotated: for a mischievous one, move it to one side, for a serious one, place it straight.
Now each of you knows how to make the symbol of 2019 - a pig - out of DVDs, with your own hands. This craft is very simple, it will take a little time, and even a child can handle it.
Advent calendar "Santa"
You will need: paper, printer, template, markers or paints, scissors, hole punch, soft wire, glue.
Master Class
- Print the template.
- Cut and connect them with glue.
- Color it to your liking.
- Punch holes with a hole punch and attach soft wire for further hanging.
Christmas calendar "Santa" is ready! I recommend watching this video!
❄ DIY: Santa Claus from cotton wool❄ by SJ ❄
Symbol of the year – Bull made of felt for a Christmas tree – MK + patterns
The symbol of the coming New Year will be a white bull. It's easy to make from a sheet of white felt. After cutting, you need to highlight the tips of the hooves and tail using acrylic paints or a marker. You can attach flowers or bows to the horns.
The eyes are made of black beads, and the mouth and blush are made of pieces of red and pink felt. The nostrils can also be made from beads.
Craft “Santa Claus's Mitten” for the competition: ideas, photos
- We suggest you do some crafts with your children - make Santa Claus mittens or just mittens to decorate the New Year tree.
- Why mittens? Because this is the most indispensable winter accessory: we don’t even go outside in extreme cold without it. For us, warm mittens are a symbol of Christmas.
- Abroad, such a symbol is considered to be socks hanging by the fireplace, in which gifts from Santa Claus are usually found in the morning.
- Beautiful holiday mittens can be sewn from felt or fabric (for example, a sweater), and if you are interested in such an activity, you can make a card with a mitten, applique or other interesting things. Join us!
How to make a postcard: mitten
- Nowadays you can find a wide variety of New Year-themed cards in stores. But if you want to surprise your family, then give them a truly memorable gift - put a little creativity and your own soul into colored cardboard, which will serve as the basis for your craft, and turn it into an interesting holiday card.
- You can cut the mitten itself from fabric or scrap paper with a New Year's print, and puffs or beads will serve as decoration for the mitten.
Felt mitten: craft for a Christmas tree
Felt mitten with flowers
Felt mitten decorated with large beads
Felt mitten with snowflake
Pattern for making felt mittens
Other options for crafts with the image of a mitten:
The mitten can be cut out of colored paper folded in half. Write a congratulation inside the card, which will appear as if in two “palms”.
Paper mittens using quilling technique
New Year's crafts - mittens
DIY postcard “Mitten”
A postcard with a hiding place is two halves of a mitten glued together, cut out of cardboard or felt. A hole is left between the parts where the “elastic band” attaches to the wrist. Inside such a craft you can hide a small souvenir, a gift that never loses its relevance - a banknote, or another gift - a ticket to a movie, theater, or circus.
Mitten in kindergarten
Young children enjoy making the New Year's craft Mittens during their kindergarten classes.
Needed:
- stencils mittens;
- double-sided paper (blue, red);
- cotton wool;
- glue;
- scissors;
- pencil;
- tassels;
- white paint (gouache).
For kids, you can immediately offer a ready-made colored mitten, on which they draw a pattern with white paint and make a rim from cotton wool, gluing it with glue.
Children of older groups perform the work in stages:
- using a stencil, transfer the mitten onto paper;
- cut it out;
- draw a white pattern (you can decorate it with snowflakes);
- trim the edge of the mitten with cotton using a brush and glue.
Felt crafts New Year: stars
- beads or seed beads
1. Draw a star about 8 cm across on paper. You don't have to draw a perfect star, it can be a little sloppy drawn. This will be your template.
2. Place the template on a sheet of felt and trace it with chalk or marker. Draw as many stars as possible - close to each other.
3. Cut out all the stars.
4. Take two stars, place one on top of the other, secure with a pin and connect with a thread and a needle. Leave some space for filling.
5. Fill the star with stuffing and sew up the hole.
6. Start sewing beads or seed beads onto the stars. Make any patterns that come to mind.
7. Thread a wool thread through one end of the star and make a loop so that the craft can be hung.
* You can wrap a woolen thread around part of the star's ray.
Volumetric toy
To make a three-dimensional toy you need:
- felt in blue, white, beige, yellow colors;
- filler;
- blue grosgrain ribbon with white polka dots;
- narrow satin ribbon for hanging;
- beads, sequins for decoration;
- threads, sewing tools.
Description
The pattern for making the Snow Maiden from felt needs to be redrawn to scale and cut out.
From blue felt we cut out parts of the body and hat in duplicate.
To finish the outfit, we still need to prepare several diamonds from white felt, details of the cuffs, collar and cap lapel.
To make the face, cut out one piece from beige felt.
Cut out two braids from yellow felt.
Sew the head to one part of the body using small stitches.
Using white threads we will sew the parts of the collar below the face.
Decorate the bottom and middle part of the coat with diamonds.
We sew the parts of the toy's body using a blanket stitch. In this case, we will leave an open area on one side. Through it we will fill the toy with filler. First we compact the head and arms, then the torso.
We sew up the left area with blue threads. We sew strips onto the handles - cuffs made of white felt.
We decorate the doll's clothes with sequins and beads, sewing them in the center between the rhombuses.
Attach the braids with a few stitches.
Sew down the details of the cap along the top edge.
Sew a strip of white felt along the bottom edge. We decorate it with sequins or beads.
We put on the hat and sew it on with several small stitches.
We embroider the eyes with black threads, the mouth with pink threads.
Cut a piece 19 cm long from the grosgrain ribbon and tie it in the form of a scarf. We burn the sections of the tape so that they do not fray.
For the loop, cut a piece of narrow ribbon 29 cm long, fold it in half and sew it to the back of the hat.
"The Snowman Goes to the Masquerade"
My name is Olga Shevtsova, I am from the city of Kramatorsk. For the “Year of Creative Fleece” competition, I want to show you the work of my youngest son Dima (he is 3.5 years old) in the “Learning to be a Wizard” category. This is a New Year's card "The Snowman Goes to the Masquerade Party" .
Materials: • sheet of colored cardboard, • small blanks, • PVA glue.
The work was done using applique technique. So that the child can master most of it on his own.
We take a sheet of blue cardboard, and mom cuts out a white snowman.
Then, using curly scissors, we make a postcard from a simple sheet. It just makes beautiful edges.
Our snowman put on a mask - Mickey Mouse ears.
Mom helped with the eyes and mouth, as well as the carrot nose.
It's winter now, so you need to dress warmly. Let's make a scarf and buttons from a yellow napkin.
And there is also snow. From semolina. Like this:
When it dried, we shook off the cereal and this is what we got:
Another cute children's craft with surprises on video from YouTube:
Happy New Year!
Even more interesting: Crafts for the New Year
View this post on Instagram
Have you decorated the house? Look for a new post in your feed