Rectangular Billet Vest
To sew a vest we need:
- knitted material containing elastane – 0.7 x 1.4 m;
- threads to match the color of the material;
- sewing tool.
Clue
If you want to increase the smell of the vest, use fabric with a larger width for sewing. It is this that determines the magnitude of the smell.
For this model, it is advisable to use soft knitted fabrics that provide good drape.
Another important property of the material that is worth considering is that knitwear should fray minimally on cuts.
Description
Let's cut a knitted vest directly onto the fabric without using a pattern with our own hands.
For marking, we need one measurement - back width (BW).
Lay the material face down on a horizontal surface.
Find and mark the line of the middle of the cut. From it in both directions we set aside 1⁄2 ШС + 2 cm.
We put marks.
Along the right edge, measure 15 cm from the top, then another 20 cm.
We draw horizontal straight lines through these levels until they intersect with the vertical lines that limit the width of the back. Between the intersection points we select the segments that define the slots for the hands.
We make cuts for the armholes.
We sew fastenings along the edges of the armholes using a sewing machine or by hand.
If desired, the shape of the vest can be changed by rounding the corners.
We process the cuts around the perimeter with an overlocker or decorative tape. You can simply limit yourself to a reinforcing stitch 1 cm from the edge.
Sew on the buttons and make one loop. Don't forget to process the cuts on it. Buttons can be replaced with a brooch or decorative pin.
How to quickly sew a vest with your own hands without a pattern
A vest is a type of clothing that anyone can make with their own hands, even if they have never tried to sew before. In this case, it is recommended to choose models, the implementation of which does not require the creation of complex patterns and careful processing of individual components - sewing in a collar or hood, sewing in the lining, hems, fasteners. This allows you to sew a vest, even without using a sewing machine. The simplest but most effective vest is made from a rectangular piece of fabric with non-fraying edges:
- fleece;
- polar fleece;
- neoprene;
- loden;
- knitwear;
- cloth;
- leather or leatherette;
- natural or artificial sheepskin coat.
In addition to fabric, to sew a vest you will need scissors, a ruler and chalk.
- Draw a rectangle 75×115-140 cm on the fabric.
- Fold it in half.
- Along the upper edge, at a distance of 21 cm from the fold of the fabric, mark a point from which to set 15 cm down.
- Mark armholes 20-25 cm deep.
- Make cuts for the armholes.
The vest is ready! This model can be worn unbuttoned. In addition, it looks good when wrapped and tied with a belt or fastened with buttons, hooks, snaps, or a zipper. To do this, you will need to place a fastener on the vest's shelves.
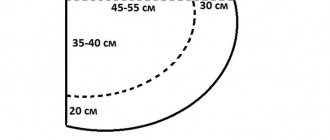
A beautiful vest with softly draping round tails is made from a circle with a diameter of 110 cm.
- Draw a circle and mark its center.
- Stepping 25 cm apart from the center of the circle, mark the lower points of the future armholes.
- From these points, draw perpendicular segments 25 cm long and make cuts along them.
Like the previous model, a wrap-around vest with round tails can be worn unbuttoned or tied with a belt. If you have a machine, all sections can be treated with decorative trim, narrow strips of leather or fur.
The original vest is made from a large Pavloposad scarf or lace scarf. Using the diagram below, sewing it will be easy.
Using scarves with bright prints, you can sew a beautiful vest, as in the photo.
You can make a cute vest with your own hands, even without a pattern, if you use a ready-made jacket as a basis. This video demonstrates how to make a fashionable vest out of an old jacket.
Vest without side seams
Sewing a sleeveless vest without side seams is especially justified if the knitwear pattern is difficult to match at the seams and this will significantly affect the overall appearance of the product.
However, keep in mind that such a cut is only possible if the chest and waist volumes are equal, taking into account the allowance for a loose fit.
How to sew a knitted vest
To mark on the fabric, you can use the following pattern or use any T-shirt that fits your size as a template.
If the vest is supposed to be worn as a wrap, then take this into account when cutting in the form of a large allowance in width.
We provide allowances for cuts depending on the thickness of the material and the planned technology for processing the cuts. We make an allowance according to the selection, taking into account the laying of the interlining.
We start by processing the bottom cut. We use a roller for this or use an overlocker. As a facing, you can use ready-made tape or strips of artificial leather.
We strengthen the lining with non-woven fabric, turn it to the front side, and sew horizontally 3 cm from the bottom. Turn the hem inside out and baste.
We sew a seam on the shoulders, ironing the allowances. Using a basting stitch, we sew the facing to the armhole sections, folding the parts right sides together. Then we machine stitch. We fold the facing inside out, wrapping the edges, and stitch.
We process the roll-out in the same way.
Fold the bottom edge under and sew it with blind stitches. If the pattern of the material allows, you can machine stitch it instead of a blind seam.
How to sew a vest from an old fur coat with your own hands, master class
A fur vest is a recent fashion trend that is worn with pleasure by men, women and children. Not a single autumn-winter collection is complete without such models. They are worn in combination with clothing in sports, folk, business and casual styles.
The style of the vest can be any - short or long, straight, trapezoidal or fitted. Particularly popular, due to their practicality, are elongated vests made from natural and artificial fur, sheepskin, as well as combinations of leather, suede, cashmere, wool, jacquard, knitwear with fur.
You can sew a fur vest yourself using:
- artificial fur;
- natural skins;
- old fur products, for example, a fur coat;
- scraps of fur.
The length of the pile also does not matter - the vest will turn out beautiful from astrakhan or mink, as well as from silver fox or scribe. To avoid damaging the pile when cutting the vest, the vest should be cut with a sharp stationery knife, after first transferring the contours of the parts to the wrong side of the fur. If the parts are assembled in separate pieces, be sure to take into account the direction of the pile when cutting.
You can sew the cut parts by hand or on a furrier's machine. Separately, using the same patterns, you should assemble the lining and sew it to the already assembled vest. Make a fastener by sewing hooks, ties or making loops and sewing on buttons.
You can see in detail how to sew a new fashionable vest from an old fur coat in the video below.
You can sew a fashionable vest from natural fur even without a machine, using only a crochet hook, thread, a gypsy needle and a punch. How to do this is shown step by step in the photo.
Sleeveless vests made of scarves
The defining moment for cutting is the size of the scarf and its structure. Please note that the scarf must be large enough.
The only necessary measurement you need to take is the width of the backrest.
Description and step-by-step master class
We tuck the edges of the scarf, forming hems, and secure with pins. The width of the borders is 15 cm.
Then we fold the top edge of the scarf. The size of the fold is about 30 cm.
We sew the hems to the edge.
Cut out holes for the arms. We place them symmetrically relative to the center of the product.
We process the edges of the armhole with a facing. It can be made from a pre-cut strip from a scarf or you can choose a ready-made ribbon by color.
Along the lower edge of the vest we attach kitits at equal intervals, making them from threads in several folds.
Features of the figure and design solution
Vests can be shortened and long, classic fitted and oversized - there is no limit to this variety. They are suitable for both very young girls and adult women. Thanks to the variety of fabrics and styles, you can choose a vest that will visually slim and hide figure imperfections, or, on the contrary, will add volume where needed. It is worn with dresses, skirts, trousers, jeans, and even shorts.
Now almost all well-known brands offer a wide range of vests, which are called for every taste and color. Price category - from minimum to maximum. But why not take advantage of the moment, make yourself and your loved ones happy, and sew a vest with your own hands without a pattern quickly and easily, while simultaneously gaining invaluable experience in mastering the sewing business.
Warm vest made of two scarves
If you have two boring scarves of approximately the same size and material composition, then we suggest giving them a second life. You can use scarves to make a warm and cozy wrap vest.
To work you need:
- scarves, size 0.45 x 2 m – 2 pcs.;
- drawstring cord – 1.5 m;
- bias tape for processing armholes and necklines - about 5 m;
- some adhesive tape;
- threads, sewing tools.
Description
We prepare the scarves - wash them and iron them through gauze.
The pattern of the product is modeled on the basis of a straight dress. All constructions are shown in the drawing below. As a base, you can use any dress or other item that fits in size.
We fold the scarf intended for making the front panels of the vest in half and mark the pattern. We cut out the parts according to the markings with 1 cm allowances around the perimeter.
From the second scarf we cut out the back parts and stitch them together.
From the first scarf we cut out a yoke for the back. For decoration, cut off the fringe with a 1 cm strip of fabric. Pin the fringe to the yoke, folding the parts right sides together.
We attach the fringe.
Iron the fringe through the gauze, tucking the cuts inside the yoke. Place the yoke on the back of the vest and secure it with pins. We sew a machine seam.
Next, let's move on to the details of the front. We cut out parts for the collar from the second scarf. We sew them overlapping, machine stitching at a distance of 5 mm from the edge.
We cut out two parts of the stand-up collar for the back. Height – 4 cm, length is determined by measuring the length of the rollout.
We alternately attach the parts of the stand to the main part of the back and to the yoke.
We connect the yoke with the main part.
We try on and mark the waist level on the product.
We reinforce the cord entry points with adhesive tape. We make loops as for buttons.
We cut out the blank for the drawstring of the required length (determined by measurement) and 3 cm wide. We process the sections with an overlocker or sew them with a zigzag stitch. We pin the drawstring along the markings, overlapping the completed loops.
We attach the drawstring with an indentation of 2 mm from the cut.
We cut the cord to the required length = FROM + 0.5 cm. We tuck the cord into the drawstring.
If we use ready-made binding to process the armholes and roll-out, then it needs to be smoothed on one side. We attach a straight edge from the inside out. Then we wrap the edges and sew along the front side.
In this case, the corners need to be trimmed.
The vest is ready! It turned out to be warm and functional.
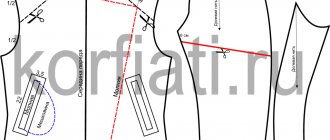
How to sew a men's vest with your own hands, master class
Every woman who knows how to sew a little and has chosen a suitable pattern can independently make a vest for her beloved man. Sewing a vest begins with cutting. To do this, you need to re-shoot or print the details of the vest. Lay them out on the fabric lengthwise, outline them with chalk, mark the seam allowances - 1.5 cm each. Cut out the parts, baste them and try them on, make adjustments. Then assemble the vest - first stitching the darts, then the shoulder and side seams, ironing them. After this, it is necessary to process the sections of the armhole, neck, sides and bottom with tape, knitted elastic or facing. The assembly is completed by the design of the fastener - it can be with buttons, buttons, hooks or a zipper. When using fabrics with non-fraying edges, the section processing step can be skipped, leaving them open. This casual design looks great on casual jeans and linen. If thin and soft fabrics are used to sew a vest, in order for them to keep their shape, the parts of the shelves can be glued with non-woven fabric. In this case, it is recommended to place the vest on a lining. It is cut out of lightweight fabric in bright colors, using the same pattern as for the top details. The lining is assembled in the same way as the top parts, sewing down the shoulder and side seams and ironing them. Then, fold the lining and top face to face, join them with one stitch, leaving a small gap to turn the vest facing. Carefully sew up the remaining open area and iron all seams. Use a single stitch to connect the lining to the top at the armholes, and iron the seams. Features of the stages of sewing a vest can be seen in the video below.
Rectangle vest
To work you need:
- double-sided knitted fabric 0.66x140 cm.
Description
Cut the product directly on the material according to the pattern.
Turn the collar and armholes with the wrong side facing out and make an overlap seam.
Vest - bolero
You can make such an interesting new thing with your own hands just as well as in a studio.
Moreover, the vest is made without seams; it is simply cut out from a piece of double-sided fabric. The only important point is that the fabric should not fray, otherwise the cuts will have to be processed.
The width of the vest is 1 m. This size is determined by the OB.
The pattern for marking is shown below. The dimensions on it are in inches.
1″ = 2.54 cm.
For cutting we need 1.25 m of canvas.
Let's draw a pattern on paper. You can use improvised objects for marking.
We cut out a vest.
If necessary, we process the edges.
The vest can be worn with trousers or a dress with a belt. In this case, there is a narrow part on the neck; we thread the arms into a circle.
The second way is like a bolero. With this method, the widest part of the product ends up on the neck.
How to sew a vest from jeans with your own hands, step by step with photos
The return of 90s fashion to the catwalks has made denim vests popular again. This allowed needlewomen to take a closer look at the old denim items in their wardrobes and use them to create a new fashionable item of clothing.
1. The easiest way to make a fashionable vest is from an old denim jacket or shirt, while its style and color do not really matter. Simply cut off the sleeves and the vest is ready.
2. Very interesting models of vests are obtained if you use old jeans and skirts to sew them.
An original vest model can be sewn by purchasing a piece of denim specifically for this purpose. For sewing you will need up to 1 m of fabric.
Denim vest pattern
When cutting a vest, it is recommended to use a paper pattern. You can build it yourself based on your measurements, or use your favorite T-shirt for this purpose, folding it in half and transferring the contours onto paper.
Assembling parts cut from fabric is not difficult. To do this, you need to machine sew the shoulder and side seams. The processing features of the neckline, armhole, hem and fastener depend on the intended design. If desired, they can be deliberately left untreated, since the resulting fringe is back in fashion.
A denim vest can be decorated with lace, ribbons, fur, patterns applied with special acrylic paints, stripes, stones or metal rivets, spikes, eyelets, zippers, add scuffs and holes. Such decor will add uniqueness to a hand-sewn denim model.
The master class, presented in the video below, demonstrates in detail how to sew an original vest from old jeans.
An example of the decor of a DIY denim vest is shown in the video below.
T-shirt vest
For this alteration you need two things - a T-shirt and scissors. The T-shirt must be new or in good condition, not stretched.
Cut off the excess as shown in the picture. We only have seams on the shoulders.
All! The transformable vest is ready! In addition, the resulting product can be worn as an original scarf.
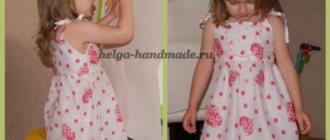
Vest for girls
Girls, like boys, enjoy wearing vests. A significant difference between girls' vests and boys' vests is the presence of decor in the form of decorative stitching, embroidery, appliqué, fur trim, etc.
By copying adult styles and transferring them to children's sizes, you can sew beautiful vests in which the girl will look stylish and fashionable. To sew a vest for a girl, you can use the same pattern as for a boy’s vest, moving only the fastener to the other side. The video below demonstrates the features of sewing a girl's vest.
Any young fashionista will appreciate the comfort and functionality of a fur vest, which can be sewn according to the recommendations presented in this video.
Straight or fitted, short or long, vests remain a universal wardrobe element that will be appropriate to wear on weekdays and holidays. Sewn with your own hands and put on, it will add exclusivity and elegance to your outfit, and will make you feel cozy on a cool evening. Since the vest, in addition to its unitary function, is also decorative in nature, when sewing it, the use of unusual styles, combinations of materials and finishes is encouraged.