DIY king costume
To create a king’s New Year’s costume for your boy with your own hands, you need to know what main and additional parts it consists of.
This is what we will consider in our article. The king's carnival costume usually consists of:
- mantles;
- crowns;
- short pants;
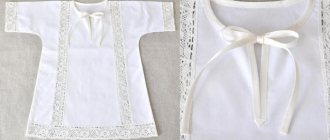
- white shirt;
- short jacket;
- shoes or boots.
But the most necessary parts of this costume are the robe and the crown, and underneath you can wear a white shirt and black trousers.
Master class: how to sew a robe for a king’s costume for a child
- fabric measuring 1m by 2m;
- sewing tools: threads, pins, needles, scissors.
- To make a regular semicircle, attach a marker to a thread with a length equal to the width of the material exactly in the middle of the fabric.
That's it, the cape is ready.
Once the robe is sewn, you can embroider any royal sign on the back.
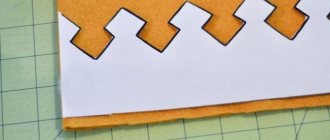
Of course, for a king’s costume, it is better to make such a cloak from red fabric and sew white fur with black dots along the edge so that it looks like this:
For the convenience of sewing a robe for a king’s costume, you can use the following pattern:
- R1 is the length of the mantle, it depends only on you;
- R2 – neck circumference x 3.14.
Master class: how to make a crown for a king's costume
- crocheted lace, the length we need;
- gelatin;
- bijouterie;
- silver or gold acrylic paint;
- a piece of cardboard or a small tube of hard paper;
- microwave;
- tools: brushes, plastic gloves, scissors, pencil, bowls, tape.
- We cut the lace to the length we need, sew the ends together to make a ring and give it rigidity. To do this, pour 1-1.5 teaspoons of gelatin with warm water and leave to swell for 40-50 minutes. Then we heat this mass in a water bath and pour this solution into the lace for 20-30 minutes.
- We make a blank to stretch the lace: we cut a strip of cardboard 10 cm wide and the same length as the lace, and use tape to secure the ends to form a cylinder.
You can complement the main elements of the costume by sewing wide lace, which is worn over the robe.
And decorating the child’s ordinary shoes with a bow to match the color of the main outfit.
When choosing the main fabric for making a suit for the king, you can take not only red fabric, but also gold, blue, and white. But for the crown and for additional elements (belts, ropes, lace, braid) you need to take gold color.
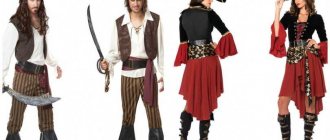
You can make other costumes with your own hands, for example, a knight or a pirate.
DIY carnival costumes for teenagers and adults
We continue our review of nostalgic carnival costumes from the 1958 Housekeeping Encyclopedia.
This article is devoted to how to make carnival costumes for teenagers and adults with your own hands. As you will see later, there are no restrictions on creativity and you can literally build an original costume in an evening from materials available in every home. We wrote how to do this here.
Karabas Barabas
A hat made of cardboard or thick paper. A beard made of red, yellow or orange paper, cut into fringes, is attached to it with an elastic band (under the neck). Bunches of the same fringe can be attached to boots. Attach a feather to the hat.
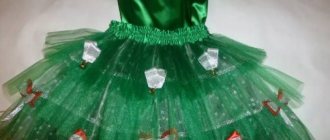
Suit of Snow Maiden
Sew small cotton wool balls (snowflakes) onto the dress. Decorate the round white collar with white ribbons, silver Christmas tree thread and beads of different colors (from Christmas tree beads), sew the beads along the ribbons.
How to sew a finished white ribbon along the front of the dress. Trim white cuffs with Christmas tree trim. Attach a fringe to a kokoshnik made of white paper, along the bottom and top, and embroider it with silver Christmas tree thread, stars and Christmas tree beads of different colors. Sew linings cut out of white paper onto the stockings.
Santa Claus costume
A hat made of thick white paper is trimmed along the top and bottom edges with curled fringe. The top of the hat is made of colored bright paper. Attach a beard made from white paper washcloth or made according to Fig. to a hat with an elastic band, worn under the chin. 1.
Sew small cotton balls (snowflakes) onto a ski suit (preferably red or crimson). Make cuffs from paper with fringe and sew them to the sleeves of the jacket. Sew a collar of white paper with fringe to the collar of the jacket. In addition to the suit, you can make overlays for boots (under morocco boots).
Chess king
The suit can be yellow and black or black and yellow. Sweater, leggings and trousers of the same color (leggings can be replaced with long stockings). Sew black shiny ribbons onto yellow bloomers (if the bloomers are black, then the ribbons should be yellow).
Additionally, in the color of the suit, make shoulder pads, a peplum and a collar from thick paper or from double fabric, which should be stitched several times so that it sticks out. The peplum is poured onto the belt and worn with it. The cloak depicts a chessboard.
The headdress consists of 2 parts: a jagged crown and a pointed top. Attach a beard of m3 black paper to a hat with an elastic band (worn under the chin) (you can take paper from photographic envelopes). If the whole suit is black, then make the beard yellow. Cut the beard paper into narrow strips and curl it over a pencil.
Puss in Boots
Make stripes with gray paint on the forehead and sides of the mask (the cat’s face) and attach whiskers; in front, the mustache should lag behind the muzzle. Paint the nose drawn on the mask with pink paint or make it out of pink paper and glue it like an applique. Make the tail from white thick paper, glued in 2 layers.
A collar made of white corrugated paper, folded in half; thread a double thread along the top of the collar and pull it off.
Cut out the leggings that go with the boots from cardboard or thick paper, and cover them with paper in the color of the boots or red or yellow. Green colour; Trim the upper edge of the gaiter with paper lace.
Important
Attach a cardboard buckle with a bow to the front of the boot. Spurs are made from cardboard covered with foil.
Also attach gaiters made of thick white paper to the white gloves. The basis of the costume is a bright-colored ski jacket (red, blue or green), and decorate the trousers with ribbons attached along them (you can use ski pants, lifting them above the knees). The cloak is short - made from a piece of bright fabric.
Carnival costume of the devil
On black, dark gray or brown sweaters and leggings (leggings can be replaced with thick black tights) you need to sew tufts of “wool” from thick threads of gray, marsh green or reddish color.
Cover the wire tail with fabric in the color of the suit or stocking; attach a bun in the form of a large brush at the end (the tail is strengthened around the waist). The hooves and headdress are made in the same way as in a goat costume, but you can add a downward nose to the headdress. Cover the horns with silver foil. Eyes can be made from shiny foil.
Firebird
The main part of this costume is a headdress (made of thick yellow, pink or red paper) depicting a firebird.
The main details of the image in the king’s outfit
If you remember Russian fairy tales where such a character appears, you can try to recreate a similar image yourself. But first, let’s remember what characteristic details are present in the king’s costume:
- mantle;
- crown;
- shortened trousers;
- scepter;
- shoes with buckles.
Based on this, you can begin making a suit for the royal person.
How to sew a king's robe
In fact, despite the apparent complexity of the image, everything is quite simple. In order to make the king's robe yourself, you need to stock up on red or burgundy satin and faux white fur for finishing. Then follow the instructions:
1. Using special chalk or soap, draw a large circle on the fabric. Its diameter depends on the height of the child and how long you are going to make the cape.
2. For the neckline, draw a smaller circle in the middle of the large circle. Calculate the size in advance for ease of wearing.
3. First cut out a large circle, then a small one. And finish the edges with a sewing machine.
4. Sew white fur to the hem of the robe. Cut out a fur collar and decorate the collar with it. At the junction of the collar you can sew a large gold button.
5. Also, using fabric paint and a stencil cut out of paper, you can draw a royal sign on the back. Just attach the stencil and apply paint with a brush in 2 layers alternately. The robe for the New Year's costume is ready!
Choice of fabric and lining material
The choice of the main fabric for the mantle depends on the practical purposes of its use. Satin and velvet look very formal, silk is light and flowing, gabardine is dense, easy to sew, does not wrinkle in use, wool, viscose, and knitwear are also used. For sewing warm clothes, tweed, cashmere, footer or fabric that imitates hand knitting are suitable. The base can be fur, fleece or brushed.
Important! The lining fabric is selected in accordance with the main fabric and the purpose of using the raincoat.
For lining, use silk, viscose, chiffon, satin, cotton for a thin raincoat or fleece, flannel and woolen knitwear for a warm product.
Second version of the mantle
You can take an even simpler route and sew a rectangular cape. To do this, cut a rectangle out of fabric. Choose the length based on your child’s height, and the width based on his size. After cutting out a large rectangle, wrap it around your child to see exactly whether the size fits or not. If it is suitable, sew a loop to one of the corners. And to the other - a large metal button. Decorate the edges of the cape with faux fur. Along its entire length it can be decorated with an ornament of sequins, beads or other decorative elements. Another decoration idea is braid. Sew bright painted braid along the center of the mantle or in any other places.
Hood
The next question is how to sew a robe with a hood? The hood is formed according to the same pattern as the entire mantle. The measurements of the head are taken from the right collarbone to the crown and to the left collarbone, adding 4-5 cm so that the hood falls freely. The fabric is folded in half and two rectangles are cut out according to the pattern. Next, the hood is formed:
The mantle is ready for a walk on a cool evening or for a fun event. You can trim it with braid and fur trim, decorate it with beautiful buttons or pins and enjoy an item created with love with your own hands.
Source
Making a royal crown
In addition to the robe, the king’s costume has another equally important accessory - the crown. Without it, the image will be unrecognizable.
There are many ways to make your own crown. Of course, you can buy a ready-made one, but you can also whip it up from cardboard. But we offer you another option. For it you will need:
- plastic bottle (5 liters);
- baking foil;
- scissors.
1. Cut off the top of the bottle. Select the cutting location where the narrowing towards the neck begins. That is approximately in half.
2. Since the bottle is usually shaped by wedges, choose a flat part and cut off the bottom and a little of the top. Then cut the cloves along the top.
3. Measure a piece from the foil, the length of which will be equal to the circumference of the cut bottle. It's better to cut off a few centimeters more, just in case.
4. Carefully, trying not to spoil the thin foil, begin wrapping the bottle blank. The teeth of the crown should sort of hide under the foil; we’ll decorate them later.
5. Feeling each clove with your hand, make cuts on both sides of each one.
6. Fold the edges of the foil over to form each tooth. They should turn out neat.
7. Using glue, decorate the crown with rhinestones or artificial stones. You can use bright confetti, they stick well and are inexpensive.
How to sew a queen costume - master class
What woman doesn’t dream of feeling like royalty, at least for a little while? Having sewn an Empress costume, you will be able to shine in it at a themed party, at a corporate event, in front of guests or family.
Appliqués with adhesive backs will help you create such a brilliant outfit. It will be enough to apply one to the fabric, iron it with an iron, and these two materials will adhere well to each other.
If you wish, use other patterns. In this case, the upper part of the robe is a corset; the next master class explains how to make it. Then you will sew a skirt to the corset, decorate it with large flounces, which will need to be sewn on the right and left. All that remains is to sew the puffy sleeves to the product.
Of course, the highlight of this outfit is the embellished details. Here's how to make them.
Glue the applique to the center of the bodice. Choose a monogram design to match the theme. Sew beads or other decorations here.
Decorate the skirt wedges in the same way. Use sequins and beads for decoration.
Around this design, sew braid and ribbons made of guipure or lace of a suitable color.
See how to decorate the central part of the skirt. To the right and left of it you will sew the prepared wedges.
There can be various bows, as well as beautiful amber stones, so that such decorations look like real precious stones and gold braid.
To create a brilliant flower, cut out its petals from lace and sew sequins on the outside. An artificial glitter stone will be placed in the center of the flower.
Sew the frill to the center wedge. This is what the skirt blank will look like in this case.
Now you need to sew on the right and left in two rows of prepared frills. Then the skirt blank will look like this.
Sew on the guipure fabric, which will become the ruffles of the sleeves and the bottom of the dress. Decorate this product with pearls and stones.
See what ready-made decorative bows look like, created from gold braid, lace, sequins, and other decoration elements.
The sleeve should also be very beautiful. A guipure frill should also be hemmed to the bottom of the sleeve flounce. Decode these elements in the same style.
All that remains is to make a necklace from pearls, beads of artificial stones, and string them on a fishing line. Attach the clasp and you can wear a necklace and dress to shine in this queenly outfit.
As you probably understand, the dress is based on a corset. The following master class with step-by-step photos will tell you how to make such a thing that will be useful to any woman.
How to sew a corset for a queen costume?
Take a pattern specifically for your size and shape. You can use the one presented, making adjustments.
If this is necessary, it is better to first cut the corset from some simple unnecessary fabric, then check the product for yourself and understand whether anything needs to be changed.
You can buy boning for a corset at a haberdashery sewing store. It is better to take spiral bones, which are shown in the photo on the right.
And on the left here is a picture of a plastic bone located in a case. In the center is the regilin bone. It is better not to use these, as they twist and bend, which changes the shape of the corset.
You will need to cut out two identical parts. To make it easier, fold the fabric right sides together and place the pattern pieces on the wrong side. Cut, remembering to add allowance on all sides.
You will also need to make parts from lining fabric using this pattern. You can cut them using a rotary knife, but you need to place the canvas on a special surface, on a mat.
For the back of the corset, where the lacing will be, you need to cut out two parts from dublerin and glue them to the blanks from the lining fabric. Now you need to glue these paired elements by ironing them with a hot iron.
Now sew the main fabric pieces on the sides. In the same way, connect the parts from the lining fabric.
Here's how to sew a corset with your own hands next. To prevent folds on the curves, you need to cut the seams on the front of the corset with scissors. Now press the seams and steam them with an iron.
King's Scepter
An important attribute of a king's costume for a boy is a scepter decorated with stones and gold. For this you will need a small stick, some foil and a lot of decorations.
First you need to make a small ball of paper. Roll the paper into a ball and wrap it in foil. Then do the same with the stick. Then secure the ball to one end of the stick and carefully wrap them together with several more layers of foil. Wrap until you are sure of the strength of the structure. Then there’s the small matter – decorations. Using a glue gun, glue lots of decorative rhinestones onto the scepter and its top. Lay out a pattern of beads and sequins. You can glue a small cross cut from silver or gold cardboard into the middle of the ball.
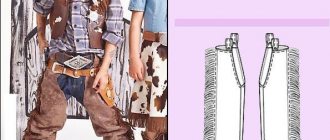
Shoes with buckles
When making the king's New Year's costume, do not forget about each of the elements. This rule also applies to shoes. Since buying special shoes for a carnival is quite expensive, we suggest decorating the existing ones with your own hands.
For this you will need black ballet flats or soft slippers, satin ribbons, cardboard, and glue.
1. From gold cardstock, cut out two square “donuts” with slightly rounded edges.
2. Cut about 12 cm in length from the red satin ribbon, fold it in half and sew along the edge. Then thread it through the cardboard “buckle.” It should look like a bow.
3. Decorate the buckle with rhinestones or beads, gluing them to both blanks.
4. Use glue to secure the buckles to the shoes.
5. As a decoration, you can use a thin braid that is sewn to the shoe in the heel area. The handmade shoes for the king's costume are ready! At a minimum cost, you will receive another bright accessory, which can later be used for other performances.
Making a king's costume for a boy with your own hands
A royal outfit for a child should be made in bright burgundy or red colors.
Its main components are the mantle and the crown. Underneath, it is better to wear a white shirt or shirt, which can be found in the child’s wardrobe. Pants can also be taken from existing ones or sewn. The pattern is easy to make by tracing any trousers or shorts of a suitable size. White knee socks and interesting shoes are also worn on the feet. The crown should be truly royal and made in golden color. The robe in a children's costume is most often made knee-length or slightly higher. Let's consider the process of making the main attributes of a king's costume for a boy.
King's Robe
To sew a mantle, you should buy burgundy satin for the front part and blue satin for the inside of the product. Other suitable fabrics can be used. Also prepare all the necessary sewing supplies in advance. There are many different options for tailoring the product. Let's consider the simplest type of rectangular cape. Follow a certain sequence of actions:
- First you need to take some measurements with which you can build a pattern. The width of the product is selected depending on the boy’s build. The length of the part will depend on the height of the child and his personal preferences.
- Next, you can draw a rectangle on the wrong side of the fabric using a piece of soap. We cut out exactly the same detail on a material of a different color.
- If you are in doubt about the size of the mantle, it is better to cut the rectangle a little larger. In the future, after trying it on, it can always be adjusted.
- We place the two parts right sides together and sew all sides on the machine, leaving a small notch for turning the product inside out. In the future, it can be sewn up manually.
- Then a loop is sewn to one of the corners of the rectangle, and a button to the other.
- It is better to decorate the edges of the cape with a bright ribbon.
ATTENTION! For quick-made items, you don’t have to sew on the lining. On the reverse side, the satin also looks bright and beautiful. In addition, the inside of the cape is often not visible, especially if it is long.
Making a crown
You can make your own crown from various materials, such as cardboard, paper or felt. In this example, you will need a large plastic bottle and baking foil. Manufacturing recommendations:
- The top is cut off from the bottle. It is better to remove the part where the narrowing towards the neck begins.
- Also cut off the bottom of the bottle and make teeth on top.
- Next, measure out a piece of foil equal to the circumference of the cut bottle.
- Then we wrap the bottle blank in foil.
- Finding each point with your hand, you need to make cuts on both sides.
- Next, fold the edges of the foil and form each clove separately.
IMPORTANT! The crown can be decorated with bright rhinestones or confetti. They are easy to stick to the surface using glue.
How to sew a raincoat with your own hands
The cloak is one of the oldest forms of clothing. Universal outerwear, often made of waterproof material in the style of a light coat.
The clothing of the officers of the English army of the 20th century was transformed into a modern raincoat. The idea of a raincoat was invented by Thomas Burberry after he invented a lightweight but water-repellent fabric, gabardine, in 1879.
Typically the raincoat is completed with several large (plastic or wooden) buttons and is made as a double-breasted coat in traditional camouflage military colors: khaki, brown, beige and black. Bright colors and prints are also appropriate and are often found in large cities.
Raglan is the standard cut for raincoat sleeves, but other models exist.
Nowadays it is customary to wear raincoats in rainy or windy weather. At the same time, models are created for warm seasons. It has many types - for example, a sleeveless raincoat or a poncho raincoat, which can be worn saddled.
It is quite difficult to create a raincoat with your own hands. The instructions will not only teach you how to sew a raincoat, but also how to reinforce the fabric with a special waterproof lining.
Materials and tools
You can use samples as a pattern.
You should start sewing by processing the main fabric using interfacing, which helps keep the parts firm after frequent washing, and is also an excellent insulating material.
Progress
Repost so you don't lose
DIY king costume for an adult
An adult's costume will differ from a child's costume by the presence of a larger number of decorative elements. In general, depending on the event, more expensive and refined materials are selected to create the image. The finishing of the mantle and crown is done more carefully. So, it is necessary to prepare white faux fur for decoration, as well as sequins, golden braid, lace, rhinestones, beads, jewelry and other elements.
Just like in a suit for a boy, the main elements will be a mantle and a crown. The robe should be long, weighty and have a presentable appearance. The difference is that you can wear almost any clothing underneath, since a massive robe will hide it in any case. The crown must be worked out in the smallest detail, and more labor-intensive techniques are used to make it.
Making a robe
To sew a mantle, a thick burgundy-colored fabric such as velvet, velor or satin is suitable. Let's look at the sewing process step by step:
- It’s better to start work by creating a pattern. Many craftswomen note that its shape resembles a pattern for a half-sun skirt. You need to draw a semicircle. In this case, the radius should be equal to the desired length of the cape.
- Next, find the center of the resulting semicircle and from this point draw a second semicircle or notch for the neck. The radius is found by dividing the circumference of the neck by twice the number pi.
- You can cut out the mantle directly on the fabric. You should add up to 2 cm per treatment on all sides.
- A chic collar is cut out of white fur. To do this, a piece of fur can be attached to the already cut out main part and traced around its top. The length of the cape is determined independently. Two strips are also cut out to be sewn along the edge of the mantle.
- Next, the side sections of the mantle are processed. Fur and decorative elements are sewn on.
- Next, the top of the mantle and the webbing are connected to each other using a typewriter.
- Then a button and eyelet are sewn to the upper edges of the products.
REFERENCE! The button can be either invisible or large metal. A button can play the role of not only fastening parts together, but also be a beautiful decorative element .
Crown for the king
To make a more complex crown you will need acrylic paints, lace, cardboard, gelatin and large interesting jewelry. Let's look at the process of creating an accessory step by step:
- We cut off a strip of lace, focusing on the volume of the head. Next we sew the opposite ends together.
- Prepare a solution from a glass of cold water and two tablespoons of gelatin. The mixture should stand for about 40 minutes.
- Next, the solution is heated and the workpiece is immersed in it for 20 minutes.
- At this time, a strip of cardboard is fastened into a ring equal to the volume of the head, and a lace blank is put on it.
- The structure is placed in the microwave for a couple of minutes.
- Next, the product is treated with gelatin and dried again. It is necessary to ensure that it becomes rigid.
- The finished product is coated with golden acrylic paint and decorated with braid and jewelry.
What patterns are needed
To sew any clothing, you need a pattern; it is drawn according to the measurements taken from the person. To draw the pattern you will need paper, preferably graph paper, or tracing paper and a pencil. When the base pattern is ready, it is transferred to the fabric using chalk, a bar of soap or a special erasable marker.
Modern women's robes are presented in the form of cardigans, cape coats, jackets and even dresses. A woman can also use an academic robe, a judge’s robe, or a carnival robe (witch or princess costume). Depending on the model, the presence of hoods, sleeves, pockets, trims and other details, the complexity of sewing changes. The simplest one is the pattern of a medieval cloak. It doesn't have a lot of details, just the back, front and ties.
Pattern for women's academic gown
In many universities, during the presentation of diplomas, it is customary to dress students in graduation academic capes.
After finishing studies
For a woman's robe (master or professor), wool, viscose, gabardine are suitable.
Important! The length of the coat of scientists or undergraduates should be up to the middle of the calf.
The outfit has sleeves, but no hood; it is replaced by a confederate shirt. Below is a pattern for a height of approximately 180 cm.
Pattern for women's academic gown
Pattern for women's sleeveless product
A loose, comfortable, sleeveless robe made of warm fabric is called a cape coat. The coat can be any length; instead of sleeves there are slits, a fastener from the neck to the waist or a tie.
A women's cape with a hood (without a pattern) looks very elegant, and if you use fur or a fur trim to sew a coat, you will get a rich women's fur coat.
Cape coat pattern 1
Cape coat pattern 2
Pattern of a man's robe
Bat Norton “nomadic” is a unisex cape popular among young people. She is very cozy and warm.
“Nomad” is the trend of the season, and by sewing it yourself, you can save several thousand rubles.
Robe with a hood - the pattern is very simple.
Modern robe pattern
Pattern for the King's Robe
The male king is a very eccentric image, for him it is enough to sew a king’s robe.
To do this, you will need dense, heavy scarlet fabric, white fur, a large shiny clasp, and white lining fabric. A medieval cloak pattern would be suitable.
Harry Potter Robe Pattern
Harry Potter is the most famous wizard in the world, his image is often used at costume parties and school holidays. One of the important details of the image is the mantle.
Harry Potter's Cloak
Harry Potter's cape is long, floor-length, with sleeves and a hood, made of silk or satin fabric in black and burgundy colors. Harry Potter cloak, the pattern of which is presented below.
Harry Potter Robe Pattern
How to make a king's costume from improvised materials
In most cases, the basis of the outfit is made up of things that are already in the wardrobe of both adults and children. This could be a white shirt, short pants and a jacket. You can also always pick up shoes or boots for further decoration . Available materials that are easy to find in every home include paper, cardboard, paint, foil and other items.
With their help, you can quickly make the main attribute of a royal person - a crown. The king's scepter is easy to make from a stick and foil. First, make a small ball out of paper or newspaper and then wrap it in foil. The ball is fixed on one end of the stick and also wrapped in foil. You can effectively arrange patterns of beads and sequins on it.
Thus, the royal outfit is easy to make with your own hands. The basis of the outfit is the crown and mantle. We hope that this article will be useful in preparing an interesting costume and an unforgettable holiday.
Do-it-yourself king costume: step-by-step execution of a king costume for a boy and an adult
Today I am the Russian Tsar, the Almighty Sovereign. It’s important that I sit on a throne In sables, silks, and a crown. On the glorious New Year's holiday, I am the most important one at the tree!
CARNIVAL COSTUME “RUSSIAN TSAR”
consists of elements:
1. Platno (chasuble) 2. Monomakh's hat 3. Barm (patch collar decorated with precious stones) 4. Boots 5. Scepter and orb - signs of royal dignity
Job Description
Paid.
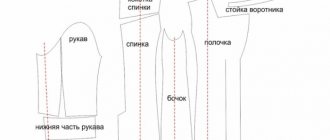
From fabric with a working pattern (for example, jacquard fabric, brocade), cut and sew the plaid according to a universal pattern (since this is outerwear, you need to add a few centimeters to the measurements taken for a loose fit).
Richly decorate with expensive braid and rhinestones along the fastener, along the bottom of the shirt, along the bottom of the sleeves. The recommended dress length is ankle length, sleeve length is wrist length.
The front seam has a Velcro fastener. A cap.
Cut and sew the hat according to the universal pattern. Sew a strip of faux mink fur to the band. Embroider the hat with rhinestones.
Barm.
Cut and sew the patch collar (see pattern).
Richly decorate with expensive braid and rhinestones. The front part is 1 piece with a fold, the back part is 2 pieces + a 3 cm allowance for the fastener. Sew the shoulder seams, finish the neckline and hem line, and sew a Velcro fastener to the back seam allowance.
Boots.
Cover finished boots with red fabric.
Scepter.
Wrap a thick wire in gold or silver foil. Cut out a double-headed eagle from cardboard and attach it to the staff.
Power.
Make it from papier-mâché or a small ball. Cover with fabric or wrap in foil.
Description, sketch: Lyudmila Orlova, costume design for the Russian Tsar: Elena Krampets, coordination and layout: Tatyana Evtyukova
The material was prepared specifically for the children's portal "Sun" and published on December 9, 2008.
For personal use only! Republication in other publications is prohibited!
General recommendations for making a costume
To make a New Year's costume for the king, you need to know its main components. This is what you need to build on when working. Most often, carnival costumes consist of:
- white shirt;
- short pants;
- jacket;
- shoes or boots;
- mantles;
- crowns
The main details that distinguish the king from other characters are the crown and the robe, under which you can wear any trousers and a white shirt. To make the look more impressive, a bright-colored shirt is worn untucked and belted with a wide belt.
Tsar costume: how to sew a cape
Cutting out a mantle is quite simple. Based on the color of the material, the product can become a princely cloak or a royal robe. When making a king’s costume with your own hands, choose red, gold or blue fabric with ornaments and decorate it with white fur.
To create a mantle, you need to prepare thick red fabric, white faux fur, a brooch or shiny button, and lining fabric.
Work begins with constructing a pattern. You need to draw a semicircle, the radius of which should be equal to the desired length of the product. A second semicircle is drawn from the same center, the radius of which is calculated by dividing the neck circumference by twice 3.14.
The mantle is cut out of red fabric, adding 1.5 cm to allowances on all sides. Separately, a cape is cut out on white fur. Next, the parts need to be sewn together. In the neck area you need to make a fastener: make a loop and sew on a bright button or a beautiful brooch. Now the king’s costume is almost ready, all that remains is to make the headdress.
Materials and tools needed for sewing at home
A robe is a long cloak that may have sleeves, a hood, a collar, or it may simply be a cape with ties. The length of the cloak depends on the purpose of use; it can cover only the shoulders or stretch with a long train.
This clothing has been known since ancient times
Today, the modern model of the Bat Norton mantle has become very popular, which young people like for its loose fit, comfort and warmth.
To sew a cape with your own hands at home, you will need the following materials and tools:
Making a crown
At a children's party, a boy's tsar costume cannot be imagined without a crown. The easiest way is to buy a ready-made one, but it will be much more interesting and useful for the child to make it himself (with the help of dad or mom). A crown can be made not only from cardboard or paper; felt is also suitable for these purposes. A beautiful product will complement the overall look and give the boy individuality and sophistication.
It is best to use cardboard for your work. It is denser and will hold its shape better. A great idea is to use a template or example of a beautiful product. The crown is decorated with artificial stones, which can be found in jewelry stores.
An excellent alternative to a crown can be a red hat, studded with the same artificial stones purchased at a sewing store.