Coat patterns - down jacket with a large collar and reliefs
$2.50 (212.5 rub., 80 UAH.)
The down jacket is slightly expanded towards the bottom along the side and raised seams. Classic two-seam sleeve. Cowl collar. Reliefs are present on the back and shelf. The back relief combines the shoulder and waist darts, the front relief combines the chest and waist darts. All sizes from 40 to 52 and from 52 to 64 in one PDF file. The down jacket pattern is printed on a home printer or plotter in full size.
Read how to sew this pattern yourself and how to download it!
This is interesting: Pattern Coat Sizes 86-140
How to alter a sheepskin coat yourself: tips, ideas
- Be sure to make a visual inspection, where there may be abrasions, changes in color and other signs of wear. They are the ones that need to be masked or removed altogether . Sleeve cuffs and pocket areas are most often affected.
Particular attention to cuffs and collar
- Sometimes it may even be necessary to paint the entire product. You can do this yourself and even without much skill. Or you can simply make a beautiful painting using a hand-made pattern or stencil. By the way, with this method you will cover unnecessary scuffs, and the new fur will give the product real luxury.
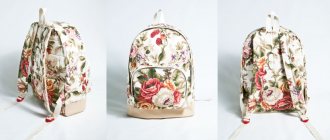
- Or maybe you want to turn the entire model or part of the sheepskin coat inside out, getting a chic sheepskin coat. After all, most often the fur remains the most untouched from wear. Just remember to back it up to cover any unsightly stains and further extend its lifespan. And keep in mind that the best colors for winter clothes are dark shades. Even for light-colored items, choose non-white or beige tones.
Turned into a stylish sheepskin coat
- Measure the length of the product to know your volume of the object . Older models used to be quite long and bulky. And this is very good! Firstly, it’s easy to make a short model this way, and secondly, the extra trimmed parts will help replace unattractive places. By the way, you can easily remake the model for your daughter or niece. Even more, you can still make a whole set. For example, a handbag or indoor felt boots. In general, we don’t limit our imagination.
They removed the length, turned the fur inside out in places, replaced the fittings and changed the collar to a stand-up collar!
- Look at the collar, hood and cuffs! You can replace them with another fur, make a leather stand-up collar, sew on pockets, replace cuffs. Or, as an option, make an applique from the same old pockets from strips of fur that will hide the scuffs.
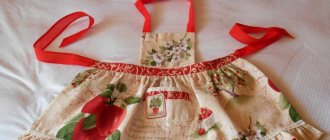
Pocket up! And after restoration!
Important: You can glue the skin with Moment glue.
We get some more inspiration on how to alter a sheepskin coat
- Sometimes it is appropriate to replace fur cuffs with leather inserts and make a strict collar. Strips of leather were also used for decoration.
Simplicity and sophistication
- Another example when a massive model was turned into a short, comfortable and attractive sheepskin coat.
A clear example is that length and bulkiness play a role not only in convenience
- Fur is good, but when it is not in abundance. Otherwise, a sticky effect is created. Although this is a matter of bygone fashion, so let’s remove it!
Everything ingenious is simple!
- Another model when the fur is used outwards. And again, cut off the sloppy collar.
We get a sheepskin coat
- And, of course, those who need to enlarge their sheepskin coat should not be upset - there is always a way out! But we remove the length. We will make inserts from the same fabric. By the way, they can be placed across, lengthening the silhouette.
Made a larger size
- And we offer a case where style plays a role. Again, they removed the bulk and length, made a cutout and decorated everything with a belt. But the main secret is fox fur!
Incredible result!
Is it possible to sew a faux fur sheepskin coat with your own hands?
Certainly. To do this, you need to have a sufficient amount of free time, have basic sewing skills and be able, at an elementary (simple) level, to handle fabrics and fur.
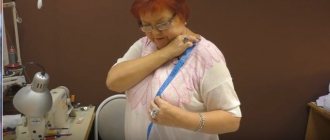
Taking measurements
The first thing the process of making a women's sheepskin coat by hand begins is taking measurements for future clothing.
If you have an old sheepskin coat that “fits” you comfortably, then instead of the sizes and pattern, you can use it, but if there is no such thing, then you need to:
- measure chest circumference;
- measure hip circumference;
- find out your waist circumference;
- specify the length of the sleeve (from the edge of the shoulder to the hands);
- - check your height.
All measurements can be taken using a regular (soft) sewing tape measure. It is recommended to record the results obtained in a separate notebook or draft, where they can be easily obtained as needed.
Coat patterns - down jacket with a hood
$3.00 (255 rub., 96 UAH.)
Sizes 40 - 64. The pattern is made on a base with a relief on the shelf. Classic two-seam sleeve. The silhouette is straight. The length is maximum, so it may require correction before cutting. Printed in full size on sheets of paper from A0 to A4.
Read how to sew this pattern yourself and how to download it!
This is interesting: Coat-robe pattern (size 36-44 euros)
Sew a women's sheepskin coat: a step-by-step guide
To sew a women's sheepskin coat you need:
- Apply the projection of future elements from the pattern onto pre-prepared fabric.
To do this, you can use crayons or a sewing pencil (it washes off easily the first time you wash it). Tip: the pattern can be printed on sheets of A3 or A4 format, and then carry out the procedure for transferring the markings.
- Cut out all the elements and mark their joints.
- Manufacturing will begin with large elements of clothing: sew the base of the sheepskin coat, then proceed to the sleeves.
- The sleeves can be sewn into the finished product, after which they can be combined into one overall composition.
If the sleeves allow you to apply decorative elements after completing the above steps, feel free to leave this for later. Decorative elements may become dirty during sewing or damaged.
- This step is the final one and includes adding minor elements (pockets, space for a belt, etc.).
After this, you can add decorative seams, elements and fasteners, buttons.
The sheepskin coat is ready!
Women's coat patterns with one-piece sleeves and half-relief
$3.00 (255 rub., 96 UAH.)
Sizes 40 - 64. The pattern of a coat with a one-piece sleeve and a pocket in semi-relief is intended for sewing with your own hands. The difficulty level ranges from intermediate to professional, depending on the fabric. The pattern is made on a base with a one-piece sleeve and a chest dart. The pocket is located in the half-relief line. The silhouette is straight and will look good on a girl or woman with broad shoulders. To get an oversized coat, you should choose a size that is larger than necessary.
Read how to sew this pattern yourself and how to download it!
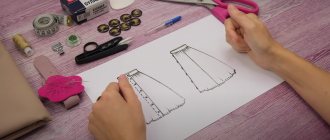
Modeling a sheepskin coat pattern
The sheepskin coat pattern is modeled using the Coat Base Pattern and the Two-Seam Sleeve Pattern
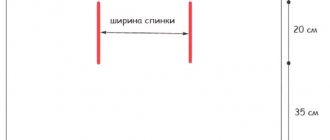
Rice. 4. Pattern of a sheepskin coat - modeling the front and back
On the front and back from the waist line, put 22 cm down on the sides. Along the middle line of the front, put 23 cm down. Draw new lines for the bottom of the front and back. Remove the waist darts on the front and back, narrow the back along the middle line at the waist by 1.5 cm, smoothly bringing the line to the neckline and bottom of the back.
Draw a dotted line to the armhole, cut along the line and one of the sides of the chest dart.
Draw a horizontal line along the back, at 1/2 of the armhole. Cut the back along the line and spread it apart as shown in Fig. 4 - by 1.5 cm. Lengthen the back shoulder by 1.5-2 cm and raise it by 0.8 cm. Draw a new armhole line.
Rice. 5. Pattern of a sheepskin coat - modeling the front and back yoke
Reduce the chest dart by moving the part (Fig. 5). Raise the front shoulder by 0.5 cm, draw a new armhole line.
ADVICE! If the armhole turns out to be too deep, it can be reduced by raising it on the side by 1.5 cm (see Fig. 5. - if necessary). You can change the back armhole in the same way.
Rice. 6. Pattern of a sheepskin coat - modeling the approach to the fastener of the front and sleeves
Model the yoke of the front and the approach to the fastener (see Fig. 6). Mark the pocket on the shelf.
Extend the sleeve by 8 cm - a lapel at the bottom of the sleeve. Cut the upper part of the sleeve, leaving 6 cm along the edge and drawing an inclined line. Make the angle of inclination as you wish.
Rice. 7. Pattern of a sheepskin coat - modeling a turn-down collar
Modeling a sheepskin coat collar
Determine the angle of the front lapel lapel (attach the pattern to the figure and bend the lapel). From the resulting point, draw a tangent to the neckline of the shelf - point L, let's denote the point of intersection with the shoulder as L1.
Measure 1/2 of the back neck according to the pattern and set aside the resulting value minus 0.5 cm in a straight line - you get segment L1L2.
From point L with radius LL2 draw an arc to the left. From point L2 to the left along an arc, lay L2 L3, 3 cm long.
Connect points L and L3 with a straight line. On the perpendicular from point L3 to straight line LL3, consistently set aside 3 cm and a departure width of 7 cm – point L4.
IMPORTANT! The width of the rise and the configuration of the collar can be changed based on your own preferences.
From point L4, draw a perpendicular to the segment L3L4 and set aside a segment 6 cm long. Set aside a segment equal to the width of the collar at the ends, approximately equal to or slightly less than the segment MM1 (usually M1M2 = MM1). The width of the collar at the ends and the shape of the collar as a whole should correspond to the chosen model.
Draw the line for sewing in the collar with a deflection from the middle of straight line LL3 by 0.2 cm. Draw the outer cut of the collar with a deflection from the middle of straight line L5M2 by 0.3 - 0.5 cm.
Re-cut the collar and cut it separately.
Sheepskin coat pattern - cut details
Rice. 8. Pattern of a sheepskin coat - cut details
To sew a sheepskin coat you will need:
Artificial sheepskin in 2 colors, 1.45 m wide and long:
- milk sheepskin - about 1.5 m (length of sheepskin coat according to measurement + sleeve length + collar width),
- beige sheepskin - about 0.5 m.
(!) To accurately calculate the required amount of fabric, lay the pattern out on the table and measure the required length of fabric.
You will also need one detachable zipper about 40 cm long and 2 permanent zippers 20 cm long, threads to match.
Cut out all the parts with a seam allowance of 1.5 cm, do not process the allowances(!). Additionally, cut out the facing of the bottom of the sheepskin coat with a width of 15 cm (in finished form 7.5 cm and a length equal to: back length + front length according to the pattern), 2 strips 2 cm wide in finished form for finishing the zipper.
How to sew a short sheepskin coat
On the yokes, cut off the fur according to the allowances, tuck the allowances of the front and back yokes, place them on the parts of the shelves and back, baste and stitch the yokes along the edge and at a distance of 0.75 cm from the first seam.
Make pockets with zippers on the shelves, having previously stitched rectangular parts from beige sheepskin (first cut off the fur on the parts completely).
On both sides of the shelf, carefully cut off the allowances along the fastener. Place the detachable zipper on the left shelf from the front side according to the markings and baste. On top of the braid, baste a finishing strip of beige color 2 cm wide, after first cutting off the sheepskin from it and folding the sections. Stitch the finishing strip to the front while stitching the zipper.
On the left shelf, baste the zipper in the same way, but stitch along the edge.
Sew side and shoulder seams. Sew all the details on the sleeves and topstitch. Sew the sleeve into the armholes.
Sew the collar into the neck according to the markings.
Stitch the flap along the bottom of the sheepskin coat, turn it to the front side and stitch along the front side - along the long and short sides.
From the remaining fabric, sew short belts about 4 cm wide and about 10 cm long - 2 for the bottom of the sheepskin coat and 1 for the collar, bevel the corners at 45 degrees. Punch blocks on the belts, sew along the markings (see Fig. 7) belts and buckles of suitable size.
Your sheepskin coat is ready! Wear it with pleasure and always be healthy!
What do you need to sew a fur coat?
First of all, you need to buy materials for work:
But artificial raw materials are quite accessible. In any fabric store you can find a variety of “natural” fur in a wide range of colors and types. The ready-made patterns presented below can be used for both natural and artificial raw materials.
The lining is simple satin , as the most classic option. But, you can use a quilted lining made of combined fabrics. This material is characterized by strength and acts as additional insulation. But satin looks more beautiful.
In addition to the material, you need to stock up on tools for work: