A vest is a favorite wardrobe item that is loved by both adults and children. The vest can be worn to school in cool weather for warmth or made an effective addition to an outfit for a celebration.
A huge advantage of the vest is that you can make it yourself. The vest pattern is so simple that even a novice needlewoman who has no special skills can handle it.
Today we invite you to make a vest for your child yourself.
Beautiful, fashionable children's vest for a girl, white with a hood: diagram, pattern, description
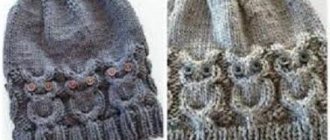
White color adorns not only women, but also little girls. It symbolizes purity and freshness. Therefore, mothers often buy or knit clothes for their daughters in this color. Below is a diagram, pattern and description of a beautiful, fashionable children's vest for a girl. The product is white with a hood and knitted with knitting needles. Spend some free time and create a soft and warm masterpiece for your princess with your own hands.
Beautiful, fashionable children's vest for a girl, white with a hood: diagram, pattern, description
Beautiful, fashionable children's vest for a girl, white with a hood, knitted: diagram, pattern
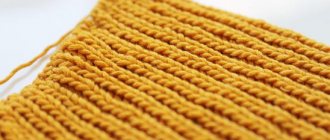
- To knit such a cute vest you will need 250 grams of white wool blend thread and knitting needles No. 3.
- Cast on 200 stitches on the needles. First, knit 10 loops - this is a bar. It can be knitted in any way you like: “honeycombs”, “bumps” and so on.
- Then work 180 stitches in garter stitch: all knit stitches behind the back wall.
- Knit the remaining 10 stitches again in the placket pattern.
- So perform exactly 60 rows.
- Now let's start knitting the yoke. Below is shown how to make braids “with holes” - on every fifth row, 2 loops through one, and then adding 2 loops again according to the pattern.
- The sleeves should be knitted separately and then sewn or tied to the yoke.
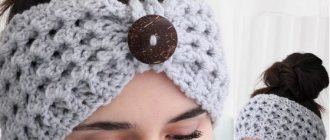
- Knit the hood separately: cast on 100 stitches, knit 30 rows in garter stitch and finish.
- Sew the hood to the yoke, insert the thread with pom-poms - the vest is ready.
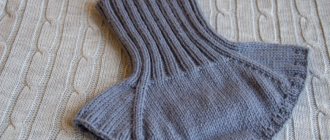
Beautiful, fashionable children's vest for a girl, white with a hood with knitting needles: diagram
A beautiful children's vest for a girl, white with a hood, knitted: diagram
Here are a few more models of white vests that can be knitted for a girl:
The entire vest is made in braids. On one side there is an elastic band with buttons. The neckline is also knitted with 1x1 elastic.
Beautiful and fashionable vest for a girl, white
A cute sundress vest made with garter stitch and thin “flagella”. The straps are 2x2 elastic, like the shuttlecock.
Beautiful vest for a girl, white, knitted
Children's vest pattern
| Some parents are very mistaken in the fact that their growing fashionistas don’t care what they look like or what they wear. As long as the clothes are comfortable and convenient. But in any case, parents always remain role models for children. And if a child often sees his father or older brother in stylish jeans, ironed, well-fitting trousers and a vest, he will certainly want to look exactly like that. Our pattern for a children's vest will help you maintain the image of a young dandy in your baby by wearing the vest over a T-shirt or turtleneck, or as a participant in a social formal event, when completing the children's vest with a jacket and formal trousers. You will also no longer face the problem of complying with the school dress code. A children's vest looks natural on both a thin, slender baby and a thick, pumped-up athlete. In addition, during the cold period, when everyone recommends dressing in layers, it will serve as additional insulation, preventing the child from freezing. | |||||
| You can download the vest pattern for free using the following links: Russian size (height) | Bust | Waist circumference | Hip girth | Age appropriate | direct link |
| size 128 | 61-65 | 57-59 | 66-70 | 8 years | download the pattern |
| size 134 | 64-68 | 58-61 | 69-73 | 9 years | download the pattern |
Paid sizes
| Size (height) | Bust | Waist circumference | Hip girth | Age appropriate | The price of the pattern is 65 rubles How to buy here?* |
| size 80 | 51-53 | 48-50 | 51-53 | 1 year | |
| size 92 | 53-55 | 50-52 | 53-56 | 2 years | |
| size 98 | 54-56 | 51-53 | 55-58 | 3 years | |
| size 104 | 55-57 | 52-54 | 57-60 | 4 years | |
| size 110 | 56-58 | 53-55 | 59-62 | 5 years | |
| size 116 | 57-59 | 54-56 | 61-64 | 6 years | |
| size 122 | 58-62 | 55-58 | 63-67 | 7 years | |
| size 140 | 67-71 | 59-62 | 72-76 | 10 years | |
| size 146 | 70-74 | 62-64 | 75-80 | 11 years | |
| size 152 | 74-76 | 64-65 | 79-83 | 12 years | |
| size 158 | 76-82 | 65-66 | 82-84 | 13 years | |
| size 164 | 82-86 | 66-67 | 84-85 | 14 years | |
| size 170 | 86-87 | 70-74 | 86-90 | 15 or more years |
* As a result of payment, a file with a pattern is automatically sent to your specified email. If the file has not arrived within 30 minutes, then you need to send a request to search for a pattern. No need to pay again!
Patterns are given without seam allowances
OPEN:
From the main fabric:
- The central part of the shelf – 1 piece
- Central part of the back – 1 piece
- Side part of the back – 2 pcs.
- Side part of the shelf – 2 pcs.
- Pick-up – 2 pcs.
- Pocket facing – 2 pcs.
- Valance – 1 piece
From lining fabric:
- Back lining – 1 piece
- Shelf lining – 2 pcs.
- Burlap pocket - 2 pieces (squares 10 cm side)
Stages of work
Duplicate the adhesive frame of the pocket and border.
Sew raised seams on the front and back. Iron them towards the middle.
Make a pocket into a frame. We recommend taking advantage of this master class
Sew the side and shoulder seams of the vest. Iron it out.
Sew the seams of the lining, leaving an opening in one side seam. Sew the lining to the collar and back neckline.
Fold the vest with the lining right sides inward, stitch along the edges without touching the armholes. Turn it inside out.
Perform armhole treatment. Sew up the hole in the side seam.
Overcast the loops and sew on the buttons.
Master class on this pattern:
Sewn using this pattern (thanks to the guests of the site!):
Children's clothing patterns:
materials.tell4all.ru
How to knit a simple children's vest for beginners: diagram
It is difficult for novice craftswomen to complete a complex vest model on their own. If you are just learning the basics of knitting, do not try to make a complex pattern right away. Try using garter stitch and create your own vest model without intricate patterns. So, a diagram and description of knitting a simple children's vest for beginners:
How to knit a simple children's vest for beginners: diagram
This red vest is knitted in stockinette stitch: knit the front rows with knit stitches, and the purl rows with purl stitches. This thing can be done in a couple of hours even with the hands of a novice craftswoman.
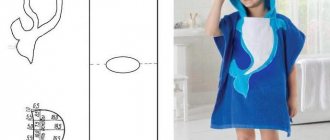
Building a template from a T-shirt
How to make a vest pattern for a girl in the easiest way? This technique is used by a huge number of craftswomen. To create the template, you will need a children's T-shirt that fits in size. It is placed on paper and traced along the contour, excluding the sleeve. Afterwards, it remains to determine the depth of the cutout and the middle section of the front shelves. This option is perfect for a sports model with insulation. You just need to add an allowance for padding polyester and start cutting the fabric. For the classic model, adjustment will be required, which is carried out during fitting.
Children's vest for girls with buttons: knitting pattern
Clothes with buttons are convenient to wear, especially for children. This item is easy to knit. You can choose any sleeveless sweater pattern and knit it in a reduced size. Make a placket using 2x2 rib and sew buttons to it.
The knitting pattern for a children's vest for a girl with buttons will help you complete all the rows correctly and assemble the product together. Stock up on threads and knitting needles and get to work.
Children's vest for girls with buttons: knitting pattern
If your child is older than the baby in the photo, then you should cast on 10, 20 or 30 more stitches, depending on the size.
Children's vest: choosing fabric
Before buying fabric, decide on the length of the vest, and then add 5 cm to it - this will be the amount of fabric you need for the front side and the same amount you need for the lining. Choose medium-density fabric for the vest: cotton, denim or corduroy, suit fabrics , fine wool. You can make a traditional lining from silk, viscose or satin, but you can also use the same type of fabric as the facing. Our example uses denim for the front and thick striped cotton for the lining.
Match the threads and buttons to the fabric you have already purchased. You can also sew a completely reversible vest - buy twice as many buttons (with holes, not on the leg!) and sew them in pairs from the front and back at the same time.
We used a T-shirt for the sample, but it can also be a shirt, as long as the item is the right size.
So, let's sew a children's vest!
Constructing a pattern
Lay out a sheet of paper on a flat surface. Place a T-shirt folded in half on it.
Trace the line of the armhole and neckline with a pencil, and also mark the vertical lines of the middle of the part and the side seam.
Take off your T-shirt. Measure the desired depth of the cutout and move the mark to the line of the middle of the part and connect it to the left extreme point of the shoulder. Draw the desired silhouette of the bottom of the vest at the required distance from the shoulder. Cut out the pattern, notching it so that it is convenient to mark the fabric for cutting out both the front and back.
Uncover
The sewing technology used in this master class requires a seam in the middle of the back in the lining fabric. A seam along the back on the front is optional, and you can cut out the back in one solid piece.
From the main fabric (for the front side):
- 2 back pieces; to cut out the second pattern, turn it over and mirror it.
- 2 front pieces (vest panels), to cut out the second pattern, turn it over and mirror it.
From lining fabric:
- 2 back pieces; to cut out the second pattern, turn it over and mirror it.
- 2 front pieces (vest panels), to cut out the second pattern, turn it over and mirror it.
Progress
- vest details
- buttons
- thread, pins and scissors
Sew the back pieces from the main fabric in the center. Sew the back pieces from the lining fabric - leave part of the seam open in the middle, about 10cm. Press seam allowances to the sides.
Fold the parts of the back and shelves from the main and lining fabric in pairs with the right side inward. Pin and stitch around the perimeter, leaving the side and shoulder seams open.
Cut the allowances at the armholes with scissors, 2-3mm short of the seam, cut the allowances at the corners at an angle.
Turn out the sides of the vest and iron them.
Insert the fronts into the open side seams of the back and match the shoulder and side seams.
Pin all layers together and sew shoulder and side seams.
Turn the vest inside out through the open area in the center seam of the back lining.
Iron the vest well.
Mark the location for the loops and sew them by hand or by machine. Sew buttons.
The children's vest is ready!
This is interesting: Pattern for children's vests
How to knit an openwork vest for a girl?
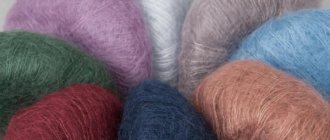
A knitted openwork sleeveless vest is made from cotton threads, as well as linen or viscose yarn. Such a product will not protect against the cold, but will be an excellent decoration for the image of a little fashionista. The vest will be useful for a cool summer evening when you need to warm yourself up a little.
How to knit an openwork vest for a girl? Below is a diagram and descriptions of a beautiful and fashionable sleeveless vest. This model is advantageous with its thin threads and simple but interesting openwork pattern. You need to buy yarn, knitting needles No. 3 and you can get to work.
How to knit an openwork vest for a girl?
When the sleeveless vest is finished, sew 3 hidden hooks on the top of the yoke from the inside out. You can buy them at any craft store. If you can’t find such hooks, sew regular small buttons.
Children's fur vests made of natural merino wool
In our online store you can purchase children's Magicwool fur vests made of natural wool directly from the manufacturer (Moscow).
- The products are hypoallergenic and do not irritate even very sensitive skin. Because they are made from fine-wool Italian sheep wool, merino wool, camel wool, llama wool, and cashmere.
- Protects against overheating and hypothermia by removing excess moisture from the body.
- Keeps the body dry and warm.
- Massage with wool fibers increases the body's defenses.
The Magicwool vest can be worn both at home and outside to protect your child from cold and drafts. You get a universal and healthy element of a children's wardrobe, which you can take a little as you grow.
Magicwool children's clothing and accessories are made from high-quality Italian fabrics with 100% wool pile.
Production is located in the Moscow region. The items are not subject to additional chemical treatment, which makes them environmentally friendly. They are easy to care for (see product instructions) and retain their beautiful appearance for a long time.
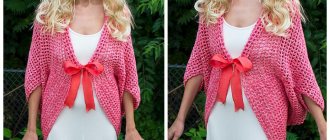
Knitted pink vest for girls
Knitted pink vest for girls
All pink shades are girly colors. If future parents know that they are having a girl, they buy pink clothes in advance and also decorate the baby’s room with accessories and toys of this shade. Every girl has a lot of pink clothes: tights, dresses, blouses, coats and hats.
Knit a pink vest for a girl with your own hands and give it to your daughter for any occasion. She will be delighted, as girls have liked this color since childhood.
Knit a pink vest for a girl according to the pattern
You can try to make such a vest - a regular model, simple knitting. Decorate the finished product with a belt made of thin satin ribbon and crocheted flowers, but you can do without decoration.
Knitted pink vest for girls - diagram
What vest to knit for a girl for school?
With the onset of spring or autumn, the school becomes cool. The heating has already been turned off or has not yet been turned on, and the child has to stay at school for 6 or more hours. Knit a vest for your daughter, and she can put it on when she feels cool. Such clothes can be worn with blouses and shirts, skirts of various models and trousers.
What vest to knit for a girl for school? Here are a few models with descriptions:
School colors are brown, gray, black, blue, green. Therefore, buy yarn in these colors and get to work.
What vest to knit for a girl for school?
Knitting pattern for a girl's vest for school
This short bolero vest is perfect for the spring season. It is better to wear it with a black sundress and a white blouse.
Scheme of a vest for a girl for school, knitted with knitting needles
If you are worried that the lilac shade of your clothes may not be approved by your school teachers, then knit a blue or brown vest. This model is suitable for every day - simple and uncomplicated.
A simple knitting pattern for a girl's vest for school
If your daughter is in the 10th or 11th grade, you can knit such an elongated vest for her. Blue or brown yarn is also suitable for it.
Scheme of a vest for a girl for school, made with knitting needles
This green vest is suitable for a girl who studies from 5th to 11th grade. This model can be worn open or fastened with hand-knitted buttons.
Knitting pattern for a green vest for a girl for school
Building a pattern for a school vest
The vest pattern for girls was developed based on numerous requests from readers, especially for young schoolgirls. We publish a developed pattern for size 32, but using this technology it is very easy to model a vest for any size.
Building a basic pattern
To create a pattern, you need to take children's measurements
in our case we use a model with the following measures:
- Back length to waist – 28 cm
- Length of back to hips – about 38 cm
- Shoulder length – 10 cm
- Half neck circumference – 14 cm
- Half chest circumference – 32 cm
- Half waist circumference – 30 cm
- Armhole depth – 16.5 cm (How to measure the armhole depth, see paragraph 8)
Meshing
When constructing the pattern for the base of the vest, we will use the measurements that we took. From point A, set the length down to the hips according to the measurement, to the right - 1/2 of the chest circumference + 3 cm for a loose fit - point A1. From point A down, measure the length of your back to your waist, and draw a horizontal waist line.
From point A downwards, set the depth of the armhole according to the measurement, draw a horizontal line for the armhole. Divide AA1 in half and draw a vertical line from the division point (point G2) up and down.
Armhole width. Calculate the width of the armhole using the formula: 1/4 of the half-circumference of the chest according to the measurement plus 1 cm for all sizes = 32/4 + 1 = 9 cm. Set aside 4.5 cm to the right and left of point G2 - points G and G1 are obtained. From these points, raise perpendiculars upward - points P and P1 are obtained.
Back neckline. From point A to the right, set aside 5.2 cm (1/3 of the half-circumference of the neck according to the measurement + 0.5 cm) = 14/3 + 0.5 = 5.2 cm. Set aside 1.5 cm upward for all sizes. Using the pattern, draw the back neckline.
Shoulder line. From point P, set aside 1.5 cm downwards, and through this point draw a shoulder line as long as measured.
Back armhole cutout. Divide the PG into 3 equal parts, draw an armhole line along the pattern as shown in Fig. 1.
Front neckline. From point A1, set aside 2 cm upward - lifting the shelf. From point 2 down and to the left, set aside 5.2 cm (1/3 of the half-circumference of the neck according to the measurement +0.5 cm) = 14/3+0.5=5.2 cm. Draw the front neckline according to the pattern.
Front shoulder tilt. From point P1, put 1 cm down. Through point 1, draw a front shoulder line of length according to measurement.
Front armhole cutout. Divide P1G1 in half, draw the armhole line along the pattern as shown in Fig. 1.
The side line of the vest. Along the waistline to the right and left, set aside 1.5 cm - side darts. Draw new lines: front and back sides.
IMPORTANT! Check your waist circumference according to the drawing and measurements. According to the drawing, the waist circumference should be 1-2 cm larger.
Fig.1. Pattern-basis of a vest for a girl
Vest style modeling
Modeling of a vest style for a girl is given in Fig. 2. Pattern of a vest for a girl - modeling. If the difference between the chest and waist circumference is insignificant, do not make darts in raised seams(!).
Rice. 2. Pattern modeling
A vest for a girl is modeled according to the same principles as a vest for a boy. For a detailed description, see Pattern of a vest for a boy.
See also:
- School uniform pattern for a boy
- School uniform pattern for girls
- Boy's trouser pattern
- Pattern of a shirt for a boy
- Pattern for the base of a dress for a girl
Related materials:
Knitted grass vest for girls
A grass vest for a girl with knitting needles.
You can knit a grass vest for a girl with knitting needles, like the girl in the photo, or you can come up with your own model. Knitting with these threads is a simple process: stockinette stitch. Below is a knitting pattern for a more voluminous vest. It will be warm and cozy.
Knitted grass vest
Knit one of these sleeveless vests for your daughter, and this item will definitely become her favorite, which she will never want to part with.
Fleece vest
To sew a sleeveless vest with your own hands you need to take:
- thick fleece;
- knitted strips for facings;
- lightning;
- threads, sewing accessories.
How to sew a vest
To sew such a vest, a one-piece vest pattern without side seams is used. You can use a ready-made pattern, having found it on the Internet, or make a vest pattern for a girl with your own hands, using a child’s T-shirt as a basic pattern. For children aged 2-4 years, the front and back patterns will differ slightly in the width and depth of the neckline.
In the second case, we outline 1⁄2 of the back and 1⁄2 of the front, slightly deepen and widen the armholes. We get half of the pattern for a children's vest.
We place the pattern on the fabric folded in half lengthwise. The middle of the back should coincide with the fold of the fabric. Cut out the piece with seam allowance. To process the collar, we cut out the bar.
From knitwear we cut out facings for armholes.
We attach the facings, folding them right sides together with the main fabric. At the same time, slightly stretch the facings.
View of the product at this stage – see photo below.
We wrap the edges with a facing and sew a strip on the wrong side with a stitcher.
Then trim off the excess allowance.
Next we sew the shoulder seams.
Trim off the excess allowance.
To process the shoulder seam sections, we cut out a strip of knitted fabric. We bend the sections on it inward, as shown in the photo. We attach the bar along the front side at the edge of the armhole facing.
We turn it to the inside.
On both sides we perform machine stitching from the wrong side of the product.
On the front side you get a neat facing.
We cut the collar facing with the main part right sides together.
Let's sew.
Turn it away.
We fix one side of the zipper with pins on the shelf.
We do machine stitching.
Then we attach the second side of the zipper. Fold in the seam allowance along the bottom edges.
On the front side we get neatly processed corners.
Use a basting stitch to secure the hem along the bottom of the product.
Let's stitch it.
Fold and stitch the top edges in the same way. If the zipper is too long, fold it in and stitch it.
We turn the corner.
When performing a similar operation on the second corner of the upper cut, pay attention that the height of the parts is the same.
We first make a basting seam, then sew on a machine.
Finally, we perform one more machine stitch along the zipper. This way we will completely hide the cuts and securely fasten the zipper.
The vest is ready! The photo below shows the front and back side halves.
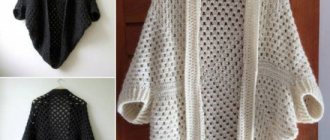
Knitted cape vest for girls
When it’s a little cool outside, but you don’t want to wear a warm jacket, you can throw a vest-coat over your shoulders. This sleeveless vest is easy to knit yourself. If you also make a hat, then you will get an original set.
A beautiful knitted cape vest for a girl. We can say that this is already a real coat, but this product looks very beautiful and stylish.
Knitted cape vest for girls
This cape is easy to knit. Even a novice needlewoman can do this. Buy some yarn and knitting needles and you'll have a fashionable set in one day.
Knitted cape vest for girls - diagram
Knitted poncho vest for girls
Previously, only sophisticated ladies wore ponchos. Now such a cape can often be found on women in the park, on the embankment, in the cinema, theater and other places. A little girl wants to be as fashionable as her mother, sister or aunt. Therefore, many little girls demand that they knit a poncho.
A poncho vest for a girl is knitted according to the following pattern:
Knitted poncho vest for girls
Knitted vest for teenage girls
A teenage girl already feels like an adult, despite the fact that she is still small. Therefore, it is unacceptable for her to wear children's clothes, and her mother should buy her clothes as if for herself. If you know how to knit beautifully, then please your princess with a stylish and fashionable new thing.
Knitted vest for teenage girls:
A beautiful model with a knitting needle - stylish, fashionable and youthful.
Important: In this photo the model is already an adult girl. She has a vest with a knitting needle, and the children are very active, so instead of a knitting needle it is better to make an original button.
Knitted vest for teenage girls
Knitted vest for a teenage girl - diagram
This model is comfortable and stylish. It can be made in any color. Knitting is easy and quick.
Knitted vest for teenager
This vest looks impressive with trousers or jeans. You can wear it to school or for a walk with your friends.
Knitted vest for teenage girl
Features of constructing a fur vest pattern for a girl
Over the past few years, fur vests have been very popular. There is absolutely no need to spend a lot of money to buy a new thing for your daughter, because you can make it yourself.
A vest made from fur with your own hands is, of course, an outfit that will be in a single copy. She will not leave anyone indifferent!
An old fur coat is suitable for making a fur product, but you can also purchase a piece of faux fur in a store . On store shelves there is a large amount of multi-colored faux fur at an affordable price. Such a vest will cost several times less than buying it ready-made in a store.
This fabric is easy to wash and there are no difficulties during sewing.
Buy the material with a reserve, because the fabric is voluminous and you will need a little more of it than to make a vest from ordinary fabric. Using this pattern you can also make a quilted vest for your child.
- Please note that the shelves do not have a calculated distance for the fastener. vest is fastened with hooks, a lock, or simply tied to a belt . If you want to sew on buttons, then allow an allowance of 2 cm on both sides for the fastener.
- When cutting out a fur vest, allow a 1.5 cm seam allowance .
- When cutting out the lining, allow a 1 cm seam allowance..
- You should not put too thick a lining in a fur vest . Maintain the plasticity and lightness of the product, and then it will look much more impressive.
Even a novice needlewoman can make a vest for a girl if she follows the recommendations and is patient. I wish you creative success!
Knitting a long vest for girls
In the extended vest model, your daughter will never freeze. This sleeveless vest looks like an adult. Knit an openwork pattern according to the pattern. A belt is required here, otherwise the model will not look so beautiful and impressive.
Knitting a long vest for a girl:
Knitting a long vest for girls
Knitted vest for a newborn girl “raglan”
Have you had a daughter or granddaughter? So you want to knit a lot of beautiful things for her? Take some time and create a beautiful sleeveless blouse. Clothes should be warm and comfortable, and who can knit things together better than your own mother or grandmother. You will spend 1-2 hours knitting, and everyone who looks at your baby will admire his new clothes.
Knitted vest for a newborn girl “raglan”:
This model can be made in pink, red, lilac or other colors at your discretion. You will need 50 grams of white and colored yarn. Buy soft threads so that the baby feels comfortable in the knitted product.
Knitted vest for a newborn girl “raglan”
How to knit a vest for a 2-3 year old girl: diagram, description
For small children there is no need to come up with sophisticated patterns of knitted items. Keep it simple so that your daughter is comfortable but warm. How to knit a vest for a 2-3 year old girl with knitting needles? Schemes and description:
This vest serves more of a decorative function, decorating the image. It can be worn with blouses of different colors or plain T-shirts.
How to knit a vest for a 2-3 year old girl: diagram, description
If you don’t like the previous model, it seems that it is too open and your daughter will be cool, then tie a vest with a hood. It can be worn in any bad weather in spring or autumn.
How to knit a vest for a 2-3 year old girl with knitting needles: diagram
A beautiful sleeveless vest model with an original yoke. Button fasteners are located on the front yoke panel. Convenient and original.
How to knit a vest for a 2-3 year old girl: description
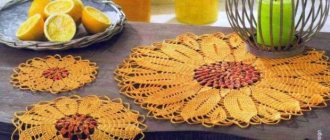
Children's crochet vest for girls
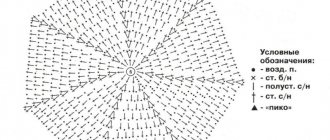
You don't know how to knit, but you're great at crocheting? Crochet a baby vest for a girl. The result will be such beauty - a cute and delicate product.
Children's crochet vest for girls
Crochet children's vest for girls - diagram
You can make this model. This vest is perfect for summer when it gets cool.
Pattern of a children's vest crochet for a girl
Knitting is easy. You just need to not be afraid and buy yarn and knitting needles. Try it, knit simple patterns first, and then move on to more complex patterns, and you will succeed!