A headband is a universal thing. In cool weather, it will warm your ears, preventing your head from sweating, and in hot weather, it will support your hair and get rid of excess moisture. Plus, a crochet headband is always in fashion, and its appearance will decorate every girl.
Can you crochet? Publish your work on kru4ok.ru
The choice of yarn depends on the seasonality of the model. If this is a summer openwork headband, then it is recommended to choose cotton, linen thread or worsted yarn; a product made from knitted yarn will look ultra-modern and unusual. For a warm demi-season headband, wool yarn with the addition of acrylic is well suited. It is important that the scalp does not give an allergic reaction to contact with the thread.
Rubber
To crochet a headband as quickly as possible, it is enough to use simple and accessible knitting techniques. Consider a pattern that resembles an elastic band.
This embossed pattern is great for adding warmth to your wardrobe. This pattern is used to make stylish sweaters, scarves, head caps and even mittens. The main advantageous difference between elastic and figured knitting is good elasticity and preservation of the shape, length and structure of the product.
Basic principles of this knitting technique:
- alternating columns with and without double crochets, forming a beautiful relief pattern;
- grip on the back half loop, providing elasticity;
- change of convex and concave rows in variations: 1 x 1, 2 x 2, 3 x 3, as well as 1 x 2, 1 x 3.
The easiest way to crochet a headband is to create a strip of the required width with a 1:1 elastic band. In this case, each row is performed with single crochets behind the back wall of the loop.
Depending on the required shape, the strip can be narrowed towards the ends by decreasing one loop on both sides.
The decoration on the frontal part looks very stylish if it is placed on an elastic band fastened across the main fabric.
Popular patterns for women's headbands for autumn and winter
Despite the fact that English crocheted elastic is often called false, this pattern is still popular among ladies who decide to insulate their ears with a beautiful bandage:
The headband, decorated with an English elastic band, fits the head well. But this happens not because the elastic band stretches, but because the pattern is quite dense. English pattern scheme:
Description of the technique for creating a traditional English crochet rib:
- 1 row is knitted in half columns;
- 2 – relief art. b/n;
- then the vertical pattern is repeated.
The English elastic band for headbands is considered a classic. But the new product this season is Bavarian technology. Having mastered a simple scheme, you can create any product:
According to this pattern, the central element of the Bavarian pattern is knitted first:
It consists of air loops and st. s/n.
In Bavarian motifs, the petals of the central flower are necessarily tied:
After this, a thread of a different color is added to the element:
Colors are added until the canvas grows to the desired size.
Another common pattern for headbands and headbands is “Pineapple”:
“Pineapple” is an openwork motif. It is created strictly according to the scheme. The headband requires repeating the motif five times:
Another fashionable and at the same time incredibly popular pattern is “Braids:
Many needlewomen knit braids exclusively with knitting needles. But this does not mean that this pattern cannot be crocheted:
The main feature of bias bindings is the presence of convex stitches. s/n. They are formed due to the fact that the hook is lowered, not inside the loop of the previous row, but under the column itself.
For summer headbands, instead of traditional braids, openwork braids are used:
In addition to braids to create stripes and ribbons for hair decoration, you can also use diagonal motifs:
Wavy bandage
It is advisable to knit this accessory from yarn of two colors. They can alternate one or more times.
- With a crochet hook you need to pick up 72 (84) chain stitches of yarn of the same color.
- We knit the first row with a single crochet.
- We perform the second row as follows:
- *1 half double crochet, 1 strong double crochet, 1 single crochet, 5 double crochets, 1 single crochet, 1 strong double crochet*. Repeat from * to *.
- Next we knit 1 row with single crochets. We perform the next two rows in the same way, but in a different color.
- The sixth row is performed asymmetrically to the second. The seventh row is single crochet.
To make it easier to learn how to crochet a headband with the “Wave” pattern, you need to use the diagram and description of each type of loop. Let's look at the progress of the work in more detail.
Video lesson:
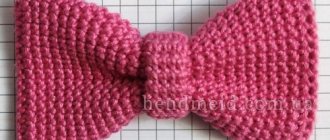
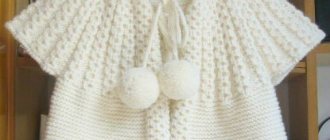
Baby headband with flower and bow
The headband has a dense middle part, with small holes in the center, quilted with a ribbon from which a beautiful bow is tied. A pattern of arches is formed on both edges, turning into one another, leaving voids underneath. This warm headband is both very beautiful and unusual.
As an additional decoration, a complex three-tiered flower of a contrasting color (preferably red) is used, which is sewn onto the headband next to the bow on the ribbon and located slightly away from the center. You can additionally sew a leaf of green yarn under the flower.
Basic Crochet Elements
- An air loop is created by pulling the thread from the previous element.
- A single crochet stitch is knitted by pulling a loop from the previous one, which is passed a second time through two links on the hook.
- A strong double crochet is called a half double crochet. A yarn over is made, then a loop is pulled out from the chain link, then the thread is grabbed again and passed through all three loops that have formed on the hook.
- Half single crochet. This is the simplest element. It is knitted without a crochet. The thread is grabbed through a chain link and passed directly through the loop on the hook.
- Single crochet stitch. We do it as follows. We make a yarn over, then pull the thread through the chain link, and then pull it through the resulting loop and yarn over. There will be two loops on the hook. Grab the thread again and pull it through.
- A double crochet stitch is knitted in exactly the same way, only we cast on two yarn overs at once, and pull the thread out three times, first through the first yarn over, then through the second and then through the starting loop.
As a result, the row gains height.
After five double crochets, we begin the decrease (see diagram above). The result is a wave.
Video lesson:
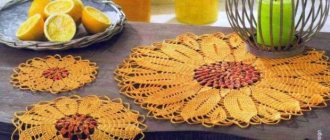
Summer headband
This knitted headband is made in openwork. It is knitted in transverse rows so that the elements of the pattern alternate with gaps, and as a result, when the number of rows reaches such a number that the headband reaches the size of the head circumference, all that remains is to connect its ends together with a thread so that the seam line is invisible.
You can attach a knitted flower to the front of the headband, which will greatly decorate it. This headband will not be hot; it can be used not so much for insulation as for decoration, and also in the summer to simply keep your hair in order.
Model with openwork strapping
We crochet a headband. This allows you to experiment and add new details during the knitting process without returning to the beginning of the work. Let's consider the simplest model to implement.
We crochet a headband as follows:
1) Cast on 18-28 air loops depending on the thickness of the yarn and hook.
2) We knit all rows with single crochets, gaining height with the help of an additional air loop.
3) If desired, you can include columns with one or two crochets in the pattern.
4) The length of the headband can be easily determined by trying it on your head from time to time.
5) If you crochet the finished strip, it will become much more attractive. We carry out this series in accordance with the diagram presented below, which is used for design.
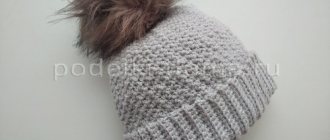
When the bandage is knitted, you need to close the loops and sew the edges. The finished product can be complemented with any decoration, for example, a hairpin or a piece of fur of the same shade as the yarn.
Knitted with your own hands, the accessory will warm you up during the cold season, and you can create it even without experience.
Headband-crown for a New Year's party for a boy
Not only girls dream of becoming real princesses on New Year's Eve, boys are also not averse to turning into fairy-tale princes! To make this dream come true, caring mothers need to knit a crown-bandage:
Most often, headband crowns are made in white. Crystal white, light milky or pearl white go perfectly with any color.
Openwork crowns are unique. Each one, like the frosty pattern that decorates the windows in winter, has its own unique design.
In order for the crown-bandage to “keep” its shape well, it is better to choose stiff yarn for its manufacture. Thread thickness may vary.
If the yarn is thin, the product will come out airier and lighter. If thick threads are used for knitting, the crown-bandage will be denser:
The finished headband crown must be decorated with rhinestones or beads. If desired, the lower part of the product can be decorated with white fur.
Crochet headband with ears
Let's start knitting.
Drawing "Spiders":
- you need to dial 20 air loops (hereinafter VP);
- We knit the first row with half double crochets (hereinafter PStN) in each loop of the chain.
- Second row: 2 VP, put 6 loops on the hook as follows: one is already there, then make a yarn over, pull the next one from the second VP, the third from the first VP, then two links need to be pulled out from the main row. Then we knit the working thread through all six loops and create one VP.
- Next, the entire row is performed in the same way. We cast on the following 6 loops: one is already on the hook, we make a yarn over, we pull the third from the outermost link of the previous element, the fourth from the base of the previous column and we create two loops from the main row. Then we knit all six loops together and perform one VP.
- We perform the third row like this: 2 VP for lifting, skip one loop, knit two half double crochets in the next (hereinafter PStN), then skip again and again 2 PStN and so on until the end of the row.
- Continue knitting, alternating the second and third row.
After the knitted strip has reached the required length, the work should be completed, the thread should be secured and the ends of the bandage should be sewn.
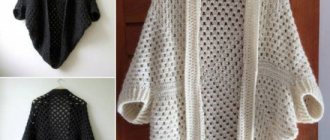
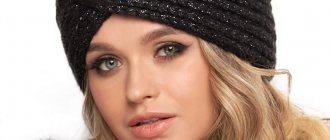
Turban style
In this version, the original shape adds charm, and the bright color charges with positive emotions. It is very easy to knit it with your own hands.
The size is designed for a head circumference of 56 cm.
Materials
You will need 1 skein of Fibranatura wool yarn, hooks numbers 5 and 4.5.
Description
Knitting begins with crochet number 5 by knitting a chain of air loops along the length of the head circumference. At the beginning of the next row, one lifting loop is performed, the row continues with single crochets. In this way, a bandage of the required width is knitted; in the last two rows, a hook No. 4.5 is used.
The same crochet is used to crochet a 5x4 cm rectangle needed for the center of the headband. It is in the center that a seam is formed that connects the knitting into a ring, and to close it and decorate the product itself, a knitted rectangle is used.
Stages of working on ears
- We cast on 4 VPs and knit a loop into the first link of the chain, resulting in a circle.
- Second row: knit 8 half double crochets, pulling the loops out of the ring.
- Third row: 1 VP, 2 single crochets must be knitted from the 2nd loop. We knit two loops with stbn.
- From the fifth loop we make three: 1 sc, 1 pst, 1 sc.
- We knit the sixth and seventh stitches with single crochets and work 2 sc in the last loop.
- We perform the third row in the same way.
- Next row we tie the product with single crochets.
- Next, you should knit a row with a contrasting thread.
Thus, we got one piece of the ear. The second is done in the same way.
At the end of the work, you should sew the finished ears to the main product.
As you can see, you can crochet a warm headband for a girl very quickly. This will take you a maximum of 2-3 hours, depending on your experience and length of service.
There are other options. The main thing is that the crocheted headband is bright and original.
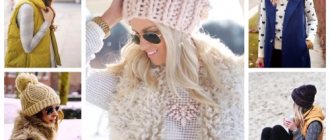
Funny children's headband with bow or Mickey Mouse
The hoop can be decorated not only with flowers or snowflakes, but also with a large bow. You can tie it using a video tutorial: This bow is easy to handle, so even beginners will be able to do it. And more experienced craftswomen can try their hand at creating a headband or headband with Mickey Mouse. You can learn how to knit it with the help of an instructional video: Funny headbands and hoops are liked not only by children, but also by some adults. With a little imagination, you can knit a headband with ears like Mickey Mouse, even for a girl:
Of course, such an unusual model is not suitable for every girl. But, if you have a gentle character and a cheerful disposition, you will definitely like it!
Children's version
If you want to knit a headband for a girl, you can knit crosswise, from one side seam to the opposite seam. First, we knit a chain of air loops with a length corresponding to the desired width of the bandage. Then we make the 1st row, then turn the product over and do the same. Repeat until we reach a length that matches the circumference of the head.
The finished product is often tied with a hair elastic, which is inserted in advance at the beginning of knitting, or you can simply sew the short sides together.
Now all that remains is to decorate the headband as desired, for example, with crocheted roses, knitted using the following master class. First, we cast on thirty chain stitches and turn the chain back. We knit three volume loops, then we knit a double crochet into the fourth hole from the hook. Then another air loop, and a double crochet into the same hole. We do this until the end of the chain. We turn the fabric over and knit three air lifting loops; we knit eight double crochets into all V-shaped holes. Between the details of the pattern we knit one double crochet. It turns out to be a strip, twist it into a spiral and attach a large bead in the middle. All that remains is to sew the flower onto the seam of the bandage.
Simple openwork
This headband will look great on a young girl’s head. You can also make it white and decorate it a little, and you will get a delicate wreath for a wedding celebration.
We will need yarn and a hook. The width of the product was six centimeters, and the circumference was fourteen repeats.
We assemble a chain of 126 air loops. We knit first up and then down. When the product is finished, it needs to be steamed with an iron, only then can it be worn.
Symbols on the diagram:
- circle - air loop;
- plus - single crochet;
- minus - double crochet;
- 8 - double crochets, knitted from the 1st loop;
- a triangle is a knot made of three loops.
Interesting option
We assemble a chain of air loops, calculate their number using a test sample, multiply the number of loops in one centimeter by the size of the head circumference. Then we knit the first row and turn the knitting in the other direction. Now we knit the second row and so on. We sew the finished fabric from the short ends. It turns out to be a ring, now you need to tie it with a nice pattern on both sides, for example, you can use fans from columns with 1 or 2 yarn overs.
To decorate according to the schematic image, you can knit a flower and insert a ribbon into the slots of the columns, as in the picture below.