Most often, bows are made from satin ribbons, organza and tulle. It’s not surprising, because these materials make really elegant and lush accessories. However, don't underestimate crocheted bows. They can be a wonderful decoration for clothes, bags or hairpins. You can easily crochet a bow with your own hands; step-by-step diagrams for making this accessory clearly explain the entire work process.
This article presents several master classes that tell you how to crochet different types of bows.
Master class on how to crochet a bow
A simple knitted bow is what needlewomen who are just starting to knit need. Without much time or labor, you can create a cute decor for your favorite clothes with your own hands.
We prepare, traditionally, the remains of yarn and a suitable hook. We make a ring from the thread, and then we collect 6 air loops
We make 6 double crochets into the ring, then knit 5 chain stitches and connect the chain to the ring.
Next, we again cast on 5 air loops, perform 6 stitches with 3 double crochets, after which we finish the work with 5 chain loops with a connecting stitch in a ring.
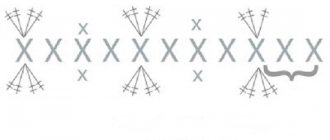
Scheme of decorative decoration
We cut off the thread, but leave the end longer. Carefully wrap it around the middle and hide the tip inside. The bow is ready.
Knitting “Miracle bows”
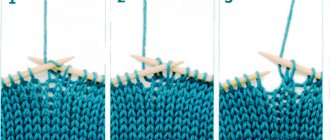
Another interesting pattern that is best knitted on stockinette stitch.
First comes the smooth surface. Then we begin to knit bows, numbering starts from 1p.
1R.: This should be a person. side. All loops are IP.
2R. (Wrong side): edge, (Rp) 5 LP, throwing 2Hk after each of them (Rp), LP, Edge.
3R.: Edge, (Rp) before 5p it is necessary to lower the yarn overs, and pull out the loops themselves due to them. It is better to use an additional knitting needle. We wrap the double-stretched loops around the main needle (counterclockwise) and move them in a bunch to the other needle. No need to knit. Between the formed “spiders” perform IP, (Рп).
4R.: (wrong side) we knit the loops, even those that are wound.
5R.: for the volume of the pattern and its edging - the entire strip of IP. If this is the end of the product, close it. If not, continue knitting in satin stitch.
Knit and experiment. You can always come up with your own bows and decorate blouses, sweaters or hats with them.
Video: Two-color bows
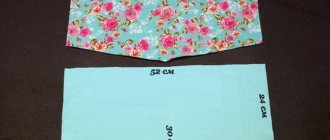
Flat crochet bow with contrasting border
This master class will show how easy it is to knit bright flat decor. They are convenient for decorating absolutely all knitted items.
What we need to prepare:
- leftover yarn of 2 any colors, preferably contrasting ones (for example, light green and lilac);
- hook with the corresponding number;
- needle for sewing knitted items;
- scissors.
Using a light green thread, we cast on a chain of 16 chain stitches, after which, starting from the second loop, we knit 15 single crochets. Next, we make 1 lifting loop, unfold the knitting and perform another 15 single crochets. Thus, you need to knit 8 more rows.
We cut the lime thread and hide the tip. Now we attach the lilac thread and perform the tying with single crochets. It should look like this.
Let's move on to knitting the jumper. We take a lilac thread, cast on 5 air loops and knit with single crochets by analogy with the main fabric. After the 8th row we finish the work. Leave small tails on both sides (beginning and end of knitting).
We tighten the center of the bow with thread to make it easier to attach the jumper
We wrap the middle of the bow with a jumper and, using the left tails, sew it on the back side of the product.
Methodology of the work
- Two skeins of yarn in different shades;
- Hook;
- Needle for fastening knitted items;
- Scissors.
The main material can be yarn of a certain color, depending on your preference. As a contrast, you can use a thread of a different color. You can also use a single accent color to replicate the decoration.
- Start knitting the base of the bow with green yarn. To do this you will need to knit a chain of 16 chain stitches.
- From the second loop, knit 15 sc.
- Then make 1 ch and unfold the knitting.
- On the reverse side, also knit 15 sc.
- Next, repeat the process in 8 rows.
At the end, you need to secure the knitting and trim the ends of the thread. If desired, tie the product in a sc circle with yarn of a different shade.
Next, you need to make a jumper for the bow according to the following pattern: 4 sc – lifting loop – on the reverse side, knit 4 sc in each row, ending with 8 rows. To make it easier to attach the jumper, tighten the middle of the bow with thread and straighten the product.
Wrap the knitting with a jumper and sew its edges on the back side, using the remaining ends.
Related article: Keychains with names in the shape of a heart: master class with photos and videos
The accessory is ready. By experimenting with the colors and texture of the yarn, you can knit a bow to suit every taste.
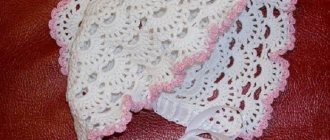
Master class crochet bow with a flower in the center
A delicate openwork bow that will make any openwork item elegant.
To make it we will need:
- Yam Art Lily cotton yarn in white and pink colors;
- hook No. 1.5
Take a white thread and cast on 80 air loops. We close the chain into a ring and then knit it with arches according to the diagram
We perform the last arch differently - instead of four, there are two chain loops and a double crochet. We continue to knit the second row, as the diagram above shows.
We tie the product with pink thread according to the following diagram
Let's move on to knitting the jumper. To do this, use a white thread to cast on 4 chain stitches and knit with double crochets.
We connect it into a ring and place it in the middle of the canvas so that it turns out to be a bow.
Flower. The middle is done in white. We collect a chain of 5 air loops, close it into a ring, after which we knit 3 double crochets with one vertex, two air loops, etc. according to the diagram drawing
We make the petals with pink thread using this pattern
Sew the finished flower to the middle of the bow.
Knitted bows
Good afternoon, dear readers!
Today I wanted to talk about how to crochet bows.
Bows are different. We are used to them being made from organza and nylon, satin ribbons and braid. But knitted bows will also be a wonderful decoration for clothes, bags, and accessories.
Especially now in the spring, knitted bows on hats, coat collars, scarves tied with a bow, and hairbands with bows are relevant.
Bows will wonderfully decorate decorative pillows, frames, panels, and other items for the home, as well as various Easter crafts, for example, an Easter basket, which it’s time to start making. We'll talk about them next time, but now I want to talk about the different options for crocheted bows.
Knitted bows
Option 1.
A very simple easy way.
We assemble a chain of air loops with any yarn (preferably thicker) with a length twice the required width of the bow. The hook should be a number smaller than what is usually recommended so that the knitting is tight and the bow does not curl later.
We knit 4 rows of single crochet yarn of one or more colors as desired.
Sew the two short sides together.
In the middle part of the bow we wind the threads tightly - the same ones that were used to knit the bow. We do it carefully, winding thread to thread.
We cut the thread, leaving a long end, thread it into a needle and secure the wound threads to the bow.
A beautiful crocheted bow is ready!
A similar bow can be made in one layer. That is, tie a rectangle the width of a bow and wrap the middle with threads. Simple, isn't it? And very cute.
Let's get creative and tie beautiful bows not with simple columns, but with openwork patterns or a popcorn pattern.
It is better to knit a bow with a popcorn pattern from very thick yarn. You can take thinner yarn and knit it in two threads, but this is not very convenient, and it seems to me that the result is not very high quality.
For beautiful knitted bows - butterflies, you need to fold a long strip, the ends of which are connected in short rows.
The middle part of the bows can be decorated not only with threads, but also with a specially knitted transverse strip.
Option 2.
This way of tying a bow is even faster and no less interesting.
We collect a chain of five air loops and close them into a ring.
Next, we knit 4 chain stitches for lifting and 5 double crochets, inserting the hook into the ring. We received one petal.
Then we knit 4 chain loops, insert the hook into the ring, pull out the loop and knit it together with the loop on the hook.
We knit the second petal similarly to the first on the other side of the ring (4VP, 5S2N).
We wrap the middle with threads.
It turned out to be a cute little knitted bow.
Option 3.
Making a bow like this is even easier.
We knit a long chain of air loops and on it one row of single crochets. Fold it into a bow and wrap threads around the middle.
Even the description of knitting fits into two lines.
Option 4.
A chic crocodile bow, the knitting of which may seem difficult at first glance, but is actually quite easy to do.
By
we knit two parts of the bow separately, then sew them together and wrap the middle with threads.
You can watch the knitting process in more detail in the video.
Source
Despite the Spanish, if I'm not mistaken, everything is quite clear there.
In addition, the video shows how to properly secure wound threads to knitted bows.
Decorative pillow ideas with bows.
The first thing that comes to my mind is the use of bows to decorate pillows. After all, this is my favorite topic, I have already spoken out several times.
By the way, I added some very beautiful pillow ideas to two previously published articles here>> and here>>. For those who like to sew pillows, they may come in handy.
Among the new ideas: a pillow - an owl with pigtailed ears with bows.
And now I want to highlight a few pillows as an example of how to decorate with bows, both made of fabric and knitted ones can be used.
This is my work:
And these are ideas from the Internet:
Did you like knitted bows?
Next week we will talk about crafts for Easter. Don't miss new publications!
If you have interesting Easter ideas, send them, we will consider everything and publish it. You can also have photos of your past works.
Olga Smirnova
ALL BLOG ARTICLES
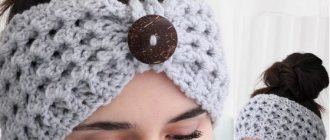
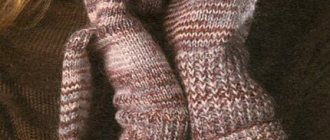
Volumetric crochet bow
This master class shows how you can crochet a non-flat bow. A voluminous product looks more impressive. They can be used to decorate clothes or an accessory over which nothing else will be worn. For example, a hat, headband, mittens, bag or jacket in the warm season.
For work we will need:
- a total of about 20g of fine cotton yarn in two colors,
- as well as a hook suitable for this thread.
We cast on 45 air loops of the main color and knit 9 rows with single crochets.
Using a thread of a different color, we tie the fabric around the perimeter. On the sides we make 1 stitch from each loop, and in the corners - 3 stitches from each loop. We do not cut the thread.
We connect the beginning and end of the ribbon, and then tie it with a half-column. We hide the seam in the middle.
We knit the jumper in the same way as the main part
We wrap it around the first part and get a bow like this
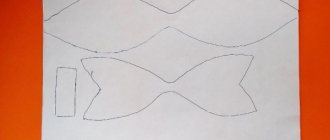
Let's move on to making the tails. We knit a ribbon exactly the same as the first part
We bend it, spreading the ends a little, and then sew it to the main product.
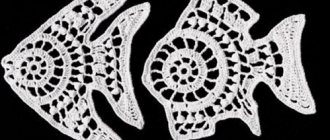
Another master class on crocheted bow
This model is slightly larger in size than the previous ones. Ideal for decorating hairstyles.
The size of the finished product is 6.5 cm by 18 cm.
For work we will need:
- white yarn remnants;
- remains of pink yarn;
- hook;
- fastening (elastic band, hairpin or clothes pin).
The product consists of three parts. For the first part, we cast on 72 air loops with pink yarn, and then close the chain into a ring. Next, we knit in circular rows along that part of pattern 1, which is highlighted with a gray background. At a height of 4.5 cm, cut the pink thread, attach a white one and continue knitting, but according to part of pattern 1 with a white background. After 1 cm of white fabric, cut off the thread and repeat all the knitting for the bottom side.
For the second part, we cast on 58 air loops with pink yarn and knit according to pattern 2, where it is highlighted with a gray background. At a height of 4.5 cm, change the color of the thread and knit another 1 cm, according to pattern 1 with a white background. We perform the lower part in the same way.
The third part. We cast on 25 air loops with pink thread and knit according to pattern 3 with a gray background to a height of 1.5 cm. Change the color of the yarn to white and knit another 1 cm according to the same pattern, but with a white background. Repeat knitting for the bottom.
We assemble according to the diagram below, and then glue it to a hairpin, elastic band or pin.
The master class explains in detail how to easily create a cute decoration for your favorite clothes or accessory. Openwork bows are a symbol of femininity that will always be in fashion.
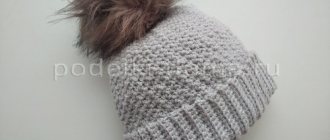
Master class on making a knitted hat with a bow
This work is already for craftswomen who have some crocheting skills. The diagram and description of the work process presented below will help you make a stylish hat decorated with bows.
You will need:
1) Thick acrylic white yarn;
2) Black yarn
3) Hook.
Scheme:
Stages of work:
1) We start knitting from the top of the hat, knitting the bottom. To do this, we make a circle with a diameter of 10 cm in 7 rows of single crochets. Next, we repeat the rows without increases 3 times and make 1 row with increases, continuing to knit the circle.
2) Move on to the flat part of the hat. We knit 1 row evenly, then we start knitting decorative stripes, alternating 2 rows of black yarn with 2 rows of white. We finish with a black stripe and tie the edge with a “crawfish step”.
3) We knit bows from black yarn. To do this, we make strips of five single crochets, the length of which is 10 cm. We sew the resulting strip into a ring and wrap the bow in the center with the end of the thread, making a seam on the wrong side.
4) Sew bows to the hat.
This is the final result of this warm and beautiful headdress.
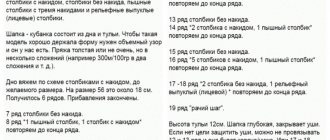
Description of the process of crocheting a bow:
If you can navigate the diagram, we present it to you below.
Crochet bow pattern:
We start with KA, knit in the center:
SBN, 4VP, 2S2N,4VP, SBN,
we knit the second half in the same way - RLS, 4VP, 2S2N, 4VP, RLS. We are finishing the joint venture.
Leave a long end of the thread and cut it off.
We wrap the thread around the middle of the bow, secure it and cut it.
To watch online, click on the video ⤵
T-yarn bow (master class) More details
Bow made of knitted yarn (mini MK) More details
Master class on crocheting a bow. More details
We crochet a cute bow for amigurumi toys Read more
Crochet bow from knitted yarn. Crochet bow from T-shirt yarn More details
We knit a beautiful bow Read more
Crochet bow. Mk. How to knit a bow Read more
Crochet for beginners. How to crochet a bow. More details
Crochet bow from plush yarn MK More details
Crochet bow | Bow crochet pattern More details
THE PERFECT TASSEL FROM ANY YARN. HOW TO MAKE A TASSEL FROM ANY YARN? METHOD No. 2 More details
Master class on crocheting a small butterfly. How to crochet a little butterfly Read more
We crochet a cute bow ☼Crochet bow☼ Read more
How to knit a bow-bow More details
Crochet bow How to knit easily and quickly More details
★ Crochet basket ★ Star pattern ★ More details
Crochet bow in 5 minutes/Crochet lessons [DIY] More details
Knitting a simple FLOWER - knitting lesson for beginners - Lesson crochet flowers More details
Knitting a hat
You can crochet a lot of beautiful and useful things. For example, a cute children's hat in the shape of an animal like an owl. These products are funny, pleasant and delightful, which is why they are dear not only to mothers, but also to children.
A colorful outfit will certainly improve your mood and make your baby stand out from other children. The knitting pattern and description will be offered below.
Not only is it quite simple to make a hat, but it also doesn’t take much time to knit it.
To work you will need:
- Threads. It is advisable to choose soft yarn that will not prick;
- Crochet hook;
- Buttons in the amount of 2 pcs.;
- Needle.
Let's get started
The knitting technique will work from bottom to top. To begin, make 9 columns, forming a ring.
Then follow the diagram:
The image shows the top of the header you should get:
Continue knitting, swapping colors: from 9 to 16 row 2 instep stitches in a circle with double crochet.
Next you need to knit the ears for the hat.
Count 11 loops from the seam at the back of the head, starting from the 12th loop, make 15 DC.
Turn around and do 2 lifting loops (2 dc, decrease). Do these manipulations 3 times. Decrease until the last stitch. Finally, secure the thread.
Using the same principle, continue knitting the second eyelet.
At the end, tie the base of the cap with an RLS.
Now start creating the image of an owl by knitting the ears, eyes and beak.
Owl eyes.
Type 9 PSN into the ring, then close it with a blind loop. Continue working on the product according to the suggested scheme below: make 2 rows with light green threads, the next 2 rows with white ones.
In the last row, continuing to knit the eye, change the white color to blue and tie it with half double crochets.
Related article: DIY master class on a candy bowl made from threads and toothpicks
Make the second eye for the hat in the same way.
We knit an owl's beak.
Knit 6 sc into an amigurami ring. Next are 2 lifting loops and 9СН. Unfold the knitting and work 2 half double crochets into each loop. The last row is tied with single crochets, forming a triangle-shaped piece.
Ears.
When making ears, place 7 sc into the ring, then close it. Then follow the diagram: 2 lifting loops - 1 sc - increase from double crochets - 3 double crochets in one loop - increase from 2 dc - 1 sc.
Next, unfold the knitting and continue: 2 PP – 4 increases from hdc in each loop – 3dc in one loop – 4 increases from hdc in each loop – 3 dc in one loop – 4 increases from hdc in each loop. Further steps: 8 sc – 1 hdc – 1 increase from 2 dc – increase of 2 double crochets – increase from 2 dc – 1 hdc – 8 sc.
The final row should be tied with single crochets in each loop.
To make ear tassels, take pieces of yarn of all colors about 20 cm long and use a needle to thread them into the corner of the ear.
Assembly of all parts.
Use a needle to sew the ears on the top of the hat.
Having chosen the place where the eyes will be, sew them to the hat with a hidden seam.
Next, you should sew buttons in the center of the eyes.
Now you can attach the beak.
To make ties, you will need pieces of yarn of three to four colors of different palettes about 40 cm long, thread them through the hole in the corner of the ears and tighten the knot. Weave braids from the threads and tie a strong knot at the end.
Now you can decorate the hat with a bow, the description diagram of which was above, or with a neat knitted flower.
Related article: 97 cross stitch patterns for towels
As a result of your work you should have a hat:
How to crochet a small bow: diagram
It often happens that you need to knit small decorative elements to decorate a Panama hat, a children's dress or clothes for a doll. Today I will show you how to crochet a small bow. Its dimensions vary from 0.5 to 3 cm, depending on what yarn you use when knitting.
- ss – connecting post
- VP - air loop
- s2n – double crochet stitch.
Scheme
Twist the yarn into an amigurumi ring or a tight knot (whichever is most convenient for you).
Next we knit according to the pattern, inserting the hook into the amigurumi ring.
Cast on 3 ch, then knit 5 s2n in sequence into the ring, cast on 3 ch and tie the connecting stitch into a ring. One half of the bow is ready.
The second part of the bow is knitted in a mirror image, i.e. immediately after the ss we cast on 3 ch, knit 5 s2n, 3 ch and ss into the ring.
Fasten the thread, tighten the amigurumi ring.
Using the tail of yarn left over from knitting, wrap the middle of the bow, forming its middle in this way. Fasten the thread, cut.