A snood is called a tube scarf or ring scarf. This scarf has no ends and is not tied around the neck: its edges are neatly sewn together to form a wide ring. This design allows you to effectively drape the snood around your neck without fear of something accidentally getting knocked out or unraveling. Another convenience will be the ability to use the snood as a scarf and hat at the same time. The flexibility of the ring allows you to make a kind of hood out of it. No wonder that Snoods, having come into fashion several years ago, are not losing ground from season to season. Today, from a trendy novelty, they have become familiar classics that many women have in their wardrobes. By the way, not only women, the versatility of such a scarf allows you to create models for men and, of course, for children.
Interesting! In foreign online stores, snoods can be found as infinity scarf.
It deserves this poetic name due to its shape. When folded, it may resemble a figure eight - an infinity sign . And when unfolded, the ring has neither beginning nor end.
Snoods can be either knitted or sewn. Thanks to their simple and universal shape, they can be made quite quickly with your own hands. Just as your imagination tells you. We recommend sewing a snood from fleece.
Material
To make an exclusive snood, any material is suitable, it all depends on what its role is in the wardrobe ensemble.
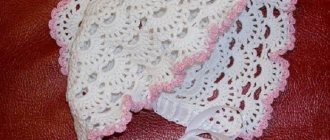
Linen, cotton - the texture of the fabric is light, the product is intended for warm weather or indoors. For sophistication, summer snoods are tied or trimmed with lace.
When combined with retail variations and fabric textures, you get a scarf with a twist.
The item is made from knitted fabric to be worn in the off-season or on cool summer days.
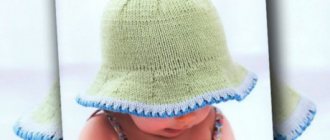
How to sew a snood and a hat from knitwear for a child
For little fashionistas who love to dress up beautifully and fashionably, we suggest sewing a hat + scarf-snood set. The kit consists of two parts: external and internal.
The upper part needs to be made more colorful and bright; a fleece footer is suitable for it.
We will make the lining from a plain fabric that stretches well, ribana is suitable here. The fabric has a dense structure and stretches well in all directions, ideal for an inner cap. When cutting a product, you must keep in mind that the properties of the fabrics are different and the approach to cutting it must be individual.
Dickey pattern – Fair of Masters
Hello, dear needlewomen! I wanted to share with you my experience of creating a shirt front pattern. I sewed a long-awaited jacket for my daughter on thin thinsulate, but it suggests an open neck. I thought, I thought, I thought that we urgently needed a shirtfront to go along with it, so that it would cover the neck, and the insidious spring wind would not bring us orz and others like them. I searched through a bunch of online resources and didn’t find a single pattern I liked. I decided to build it myself. Let me make a reservation right away: don’t throw slippers, I DO NOT have any training as a seamstress or cutter. I’m only offering you a method for constructing a shirt-front; I don’t claim to be unique, so I guess I reinvented the wheel for myself. Well, in other matters, to our sheep, that is, the shirtfront.
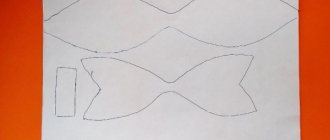
How to sew a hat and snood for a child 1-3 years old
Take measurements from the child's head. Calculate and make a pattern as shown in the photo. If the sizes do not match, then do according to your calculations. We cut out one solid piece from each type of prepared fabric.
Fold each piece in half so that the right side is on the inside. We sewed it on both sides, top and bottom. See photo.
Sew the snood along the sides to make a ring. Leave 5-6 cm unexpired on the side to turn the finished product inside out.
Turn the finished product right side out and sew up the hole with a hidden seam.
The double-sided snood for the baby is ready. See also how to knit a children's snood.
Choosing fabrics for a bib
Before you learn how to sew your own bib for a baby, you need to decide what it should be like. Choosing fabric for a product is a very important moment. Things to consider before sewing:
For newborns, terry is considered the ideal choice. And for older children, water-repellent bibs are often chosen, but in this case they should be long and wide.
You might be interested in Sewing a linen dress using a pattern with your own hands
Important! It is recommended to make a life-size bib pattern for feeding a child of any age from cardboard.
The right material for the bib
Let's start making the hat
From the same fabric, we cut out two parts of the future hat according to our measurements. The photo shows approximate sizes for a child 1-3 years old
We sew the finished cut parts on the wrong side. After stitching, the cap must be ironed along the seams, while slightly stretching it.
On two parts along the top of the cap, you need to sew up the undercuts. To do this, mark with chalk a depth of 5 cm, a width of 3 cm (see photo). Leaving 1.5 cm from the fold.
Sew both parts together along the wrong side. At the same time, leave 5-6 cm on the seam to turn the finished product inside out.
Turn the cap inside out through the hole.
Carefully close the hole with a hidden stitch. The hat from the kit is ready.
Use the pieces of fabric that remain after making the set to sew doll clothes, and the baby will be happy.
What types of bibs are there for children?
Baby bibs come in different shapes and types. What types of products can be found in stores:
You might be interested in this: Features of Tilda doll patterns and sewing
Bandana bib Fasteners also come in a variety of varieties, but most often they use Velcro or buttons. The buttons hold together well, but are awkward to fasten. Available in large and small sizes and various shapes. In addition to fabric products, there are bibs made of oilcloth. They are recommended for children who are starting to actively get dirty. But babies under one year old should purchase only soft, high-quality fabric.
There are companies that make bibs from hypoallergenic, soft and at the same time repulsive materials that wash well and do not lose color. When choosing things for your baby, you need to carefully and thoughtfully choose a manufacturer who will take into account all the requirements of the parents.
In the form of a cloak
How to sew a snood from knitwear with your own hands
Making a snood with your own hands is not difficult. You need to use the pattern given below. To make it you will need knitted fabric: its length is 1 meter, width is at least 50 cm.
Fold the prepared fabric in half with the front part facing inward and stitch it on a machine. Leave a 5cm hole in the seam to turn the snood right side out.
Make a figure eight out of the finished product and carefully sew the edges with a hidden seam.
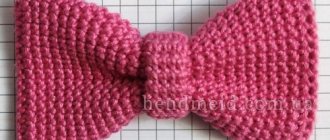
Decorate the finished snood scarf as you wish. For plain fabrics, pompom ribbon works well.
Scarf from an old scarf
Recently, taking out my old hats, scarves, gloves and mittens from the closet, I came across my old scarf, knitted from leftover wool on a machine using a semi-patent knitting method.
It had become matted a long time ago, became very small in size and lay idle. It’s almost impossible to dissolve it, and you can’t even raise your hand to throw it away. I turned it over in my hands, tried it on my shoulders and decided that I could make a kind of shirtfront out of it. Immediately I took out some threads, picked out the matching colors and began tying the scarf around the perimeter. First I knitted an openwork border along the bottom. The primary source was the “Autumn” napkin (author), which I saw on “Osinka”. The author (Svetlana) is my fellow countrywoman, she is also from Dnepropetrovsk. Photos in the album “Scarf-front (from an old scarf)”, by Santana on Yandex.Photos I knitted from memory from a picture that was stored in the brain, so there is no complete similarity.
Then I tied the long sides. When tying a scarf, along its outer side, at the beginning and at the end, you need to “sit it down” slightly (do not pull it out), and when tying the middle part, on the contrary, pull the scarf out so that it fits well on your figure.
Then a clasp was invented. A lace is a tightly knitted chain of thick yarn, which was immediately formed in the form of a “trefoil” (secured in the right places with connecting loops), and then sewn to the base.
When tying the long side of the scarf, on the inside, I made buttonholes
View on a mannequin and on a plane, as well as close-up fragments
How to sew a fleece snood for a child
A fleece snood is a tube that has a rectangular shape. In this case, all seams are completed and sealed inside the product.
The finished product is put on over the head. The length is calculated so that it is comfortable to wear.
Fleece fabric does not fray or fray, so it does not require special treatment.
Sew all edges together using a sewing machine. Along the seam on one side, leave 5-7 cm for turning the finished product inside out. Then it must be sewn up with a hidden seam.
If you insert a cord with a lock into a fleece snood model, using a pre-designed stitch, it can easily be transformed into a hat. See photo
Double-sided fleece snood scarf, cozy, soft and very warm.
Fashionable styles and models
Scarf collar
In everyday life, such a scarf is called a shirtfront. Very functional item! This accessory does not get lost when moving, fits snugly to the neck and covers part of the chest and shoulders. Pay attention to the edge of the shirtfront: it can be rounded or square. Usually boys prefer the square version, while girls prefer the softer, rounded one.
The shirtfront can be worn over the head, or it can have a clasp at the back. Clasp types:
If the hooks and Velcro remain inside, then the buttons can be a decorative element and be in the most visible place.
When choosing a collar scarf, it is worth considering that it is worn under outerwear. Accordingly, it does not necessarily have to be combined with a jacket or coat. But there should be harmony with what is worn underneath - a blouse, a jumper, a bodysuit. You can have several similar scarves in different colors, or you can get by with one universal one.
With pom-poms
Fluffy wool balls add fun and lightness to knitted clothes! You can no longer hide such a scarf inside; its place is on the neck of the coat. Most often, pompoms are located at the ends of the scarf - one at a time or several at a time.
The absolute hit of recent seasons is large fur pom-poms. They can be purchased at sewing supply stores or online. The accessory, decorated with a pompom made of natural fur, looks expensive and stylish.
Pom-poms sewn along the entire length look very elegant on a children's scarf. They can be strengthened randomly, or you can lay out some kind of pattern with them.
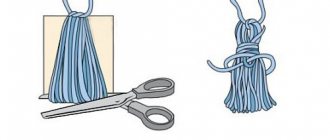
With the help of pompoms you can diversify any banal scarf that you have. Choose a suitable color combination and make pompoms with your own hands, as shown in the picture:
By the way, tassels look no less original on children's scarves. This option is good for both boys and girls.
Knitted sets
(and maybe also gloves or mittens) is the culmination of the look. A harmonious combination of a headdress and a scarf with each other and with outerwear always attracts the attention of others.
Scarf tie
An unusual scarf model that is suitable for both adults and children. At one end of such a product a loop is knitted into which the opposite end is threaded. The accessory ends up crossed on the neck, like a tied tie. At the same time, no knots, which children don’t like so much!
At first glance, this is more of a girlish scarf, although you can also find a “boyish” version: it’s all about the color, length and possible design of the ends. For kids, you can knit an animal face or any other decoration on the loop. This accessory is quite appropriate to wear not only outdoors, but also indoors.
Making an original snood with your own hands
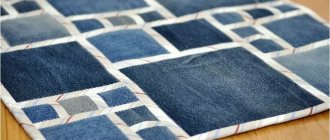
An unusual, original and very cute snood scarf, can be made from an old jacket with a button fastener.
What is needed to make it:
- Unnecessary jacket;
- Tailor's scissors;
- Needle with a large eye;
- Threads are the same color as the jacket;
- Sewing machine.
Begin:
Lay out the jacket on the table. Fasten all the buttons. Carefully cut into two halves, below the armhole (see photo)
Finish the cut with an overlocker.
Fold the finished edge over and stitch to the wrong side.
The original and unique snood is ready.
How to sew a knitted snood
In order to sew the edges of the snood with an invisible seam, you need to take the appropriate threads. To prevent the thread from breaking during stitching, its length should not exceed 40-45 cm. The seam is applied with even ties, and there is no need to tighten the thread too much to prevent wrinkles from forming.
The order of sewing knitted parts:
- The edges of the finished knitted product must be steamed with an iron and pinned together.
- Run a basting stitch before proceeding with the final stitching.
- Try the product on.
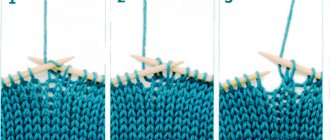
After successful fitting, sew the product with the seam shown in the figure. For a master class on knitting knitted items, watch the video below.