Sometimes in life a situation arises when you urgently need to shorten the sleeves of a jacket, shirt, dress or coat. If a person has at least a slight understanding of sewing, it will not be difficult for him to cope with the work. The main thing is to correctly determine the new length and carefully carry out the work according to the instructions. For those who do not rely on their own strength, it is better to contact a studio.
How much does it cost to shorten the sleeves of a coat?
Prices for repairs and tailoring in the studio
| Coat, raincoat, insulated jacket | ||
| 1.1 | Shorten a short coat with a straight silhouette without a vent | from 800 rub. |
| 1.11 | Shorten sleeves without transferring loops or loops | from 700 rub. |
| 1.12 | Shorten sleeves with transfer of stalemate, belt loops | from 1000 rub. |
| 1.13 | Shorten sleeves in coats with vents and buttons | from 1000 rub. |
Shortening the sleeves of a windbreaker: a step-by-step guide
Shortening takes place in several stages. First of all, in order to feel comfortable at work, you need to prepare all the tools in advance.
After the instruments are prepared, it is necessary to take measurements. To determine how much to shorten the product, put on a windbreaker, button it up and stand straight. Measure the required length and mark with pins. Then raise your arm, bend it at the elbow and in front of you. If you feel comfortable in any position, then the length is measured correctly and you can proceed directly to sewing.
The work proceeds as follows:
- Before you start working, you need to turn the windbreaker inside out and straighten it out. Use chalk to mark how much you need to shorten the sleeve.
- Cut off excess material. Finally, machine stitch the bottom of the sleeve.
This is how you can easily and quickly remove unnecessary length. It is worth noting that this method is suitable for windbreakers without cuffs or lining.
IMPORTANT! Don't forget to take seam allowances into account. Usually it is 1-1.5 cm.
How to shorten the sleeves of a windbreaker without cutting off excess material
This method is more suitable for parents who buy clothes for their children to grow into. After all, they change quickly, and children's clothes are not cheap. Therefore, mothers often have to roll up their sleeves, taking a couple of sizes larger than jackets. This is not always convenient and aesthetically pleasing.
The best option in such a situation would be to “take away” the lining with the ability to return the old length if necessary. It's easy to do:
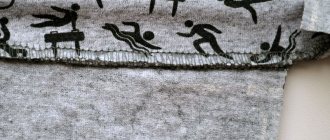
- Turn the windbreaker inside out. From the cuff, measure the desired length and mark with chalk.
- Draw a chalk line around the entire perimeter of the sleeve. Make a fold and align the cuff seam with the line. Sew carefully with thread.
Ready. This seam is not visible from the front side, and if desired, you can easily return it to its original length.
Video material
So you got the answer to the question of how to trim a coat at home. Even the most inexperienced craftswoman can do such minor repairs. There is nothing easier than cutting, tucking, and then stitching. Of course, you will have to work a little with the lining so that the alteration of the product is unnoticeable. But the result is worth it!
A coat made of high-quality material can last for many years without losing its appearance. However, sometimes a situation arises when you are tired of your old coat, and it’s a pity to throw away a good thing. In this case, you can spend a little time and update the product yourself. For example, shorten it.
A short coat will be especially appreciated by female drivers. Driving a car in a short coat is much more convenient than in a classic long one. To shorten a coat with your own hands
, you will need a good sewing machine that can handle thick fabric, matching thread, contrasting color thread for winding, a fairly thick needle, a few pins, a measuring tape, a piece of soap or chalk, and a mannequin. You can ask someone close to you to act as a mannequin.
What will you need for this?
In order to sew a down jacket yourself, you need the following tools and materials:
- sewing machine;
- threads in color;
- scissors;
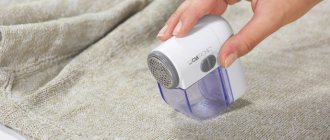
- steamer or nail scissors;
- ruler or measuring tape for sewing;
- chalk or dry piece of soap;
- tracing paper;
- interlining;
- iron.
When choosing a sewing machine needle and thread, be careful! It is best to choose sharp, thin needles from No. 60 to No. 100. It is recommended to sew at low speed, because the layer of fabric and filler is quite thick. As for threads, choose reinforced ones. They are particularly durable because they have a twisted weave and contain various fibers.
Should I make my jacket a size smaller? what's easier!!!
I don’t even know if this MK of mine will be needed, but autumn is coming, which means we will need a jacket... And it doesn’t always fit us in size, and sometimes it just tore along the side seam or sleeve. Well, which is easier to sew up or suture?
It's just the lining that gets in the way. And often we sew the seams over the edge on the front side or just have our wide jacket hanging on hangers in the closet... But it turns out that everything is so easy to fix. To begin with, we decide on what seams and how long we will sew our jacket. Then turn the jacket inside out
and then turn out one of the sleeves (I most often do this with the left one)
rip the lining along the seam on the sleeve to a distance of 15-20 cm
Important
We turn the entire jacket inside out through the resulting hole; if there are fastenings, use ribbons under the armhole to carefully tuck them in
And we sew the jacket to the required distance along the side seam, if necessary in the center of the back or reliefs. Or maybe we’ll just sew up a seam that was torn during wear?
turn the jacket back through the same hole as before, fold the lining on the sleeve, aligning the folds of the sections, and stitch exactly to the edge using a machine (make sure that both layers of fabric are captured by the stitching). stitches
the seam will not be visible at all, and when we turn the jacket right side out, no one will guess that there is a seam in your sleeve through which you turned your jacket inside out 15 minutes ago, and the entire suturing procedure will take you no more than 15 minutes ...
And your jacket will now become a couple of sizes smaller, or rather Already...
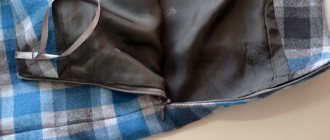
But the jacket can not only be sewn in, but can also be shortened... All through the same small hole in the sleeve. I'll show you how to shorten a sleeve with a cuff. Of course, first of all, we need to determine by what length we will reduce the length, then we need to rip the bottom and turn the jacket inside out. Here the sequence may be different. I always turn it inside out first, then rip it apart.
After the bottom of the sleeve is opened and the cuff is removed, we measure the required length of the sleeve, we start measuring directly from the cut, and not from the sewing seam, so that there is a seam allowance left
Draw a line and cut off the excess
Shorten the lining to the same length
We put the cuff into the sleeve with the wrong side of the cuff towards the front side of the sleeve, align the cuts
and sew with a seam of 0.7-1 cm, cut the threads... Don’t reassure yourself that you can leave the threads, because they won’t be visible... you will still know that they are hanging out inside. Remember that mastery comes from the little things.
Next, connect the sleeve and the lining, matching the seams and aligning the cuts. In this case, the front side of the lining should be inside the seam, and the previously sewn cuff will be placed between the lining and the sleeve... be careful not to twist the lining when joining, otherwise you won’t be able to put on the jacket later... It can be pinned, but I prefer to baste in such places. Sew on a typewriter
turn the hole inside out and sew it up
cuff turns to the front side
Advice
And now your jacket has its original appearance, the only difference is that the sleeves are shorter
Source: https://stranamasterov.ru/node/404295
Shorten the sleeves on the jacket | | I LOVE TO SEW
SHORTEN THE SLEEVES ON A FAUX LEATHER JACKET I won’t write much about the fact that purchased clothes don’t always “fit” your figure well. It often happens that the sleeves are too long, so such a thing, often with a label, is immediately brought to the sewing workshop.
Now, using the example of a women's faux leather jacket, I will shorten the sleeves, and I will tell you everything and show you in photographs. On my women's jacket, the sleeves are slightly tapering towards the bottom with an inserted iron zipper.
You can see it in the photo (one sleeve before repair, the other after repair).
1. First you need to try on the jacket and determine exactly how many centimeters you need to shorten. In my case, I need to reduce the sleeves by 4 cm. I put a control point-mark.
Now let's get to work. I advise you to shorten and change one sleeve first, and leave the second untouched for the sample.
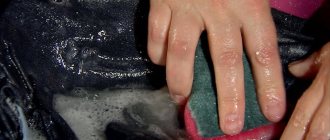
2. Without turning the sleeve, along its front side.
I unpick the top finishing stitch along the bottom of the sleeve. Using a seam ripper or a needle, I cut and pull out the thread, stitch by stitch.
Do not pull the thread - the leather may tear where the machine stitching is!
3. Then I unpick the machine stitching connecting the faux leather and the lining. As a result, the front leather part of the sleeve is separated from the lining.
Second stage - hem the bottom
Once you've figured out how to shorten a coat
, fold the bottom to the desired width and steam well with an iron. Pin the main fabric and lining together. Make sure the side seams are aligned. Sew by machine. The lining should not be pulled tight, it should be slightly loose. Look how it looks in the original version of the coat. After you have sewn all the seams, steam the bottom of the coat again and hang it on hangers or on a mannequin.
How to shorten a coat at home?
The services of an atelier will cost you more than shortening a coat yourself. Every girl will be able to trim, tuck and hem the bottom of the product. There's nothing complicated about it. The most important thing here is to correctly mark the line along which the excess fabric will be cut.
Stages of work:
- First of all, we decide on the length of our converted clothes.
- We pin tailor's pins to the desired length along the bottom of the product.
- Now we measure the cutting line of the material with a centimeter.
- Remove the pins. Lay out the coat on the table surface.
- We mark with chalk along the bottom of the clothing the size that we will remove.
- We draw a straight line along the previously marked points, and then put 4 cm down from it. We have created an allowance for hemming and hemming of our product.
- We secure the ends of the existing seams with a stitch so that they do not tear in the future.
- We duplicate the hem with adhesive tape, since we cut off the previously glued area, and now we need to restore the structure of the coat.
- We overlay the bottom edge of the coat, thereby protecting the cuts from fraying the fabric. If you do not have an overlock machine, then finish the cut with a zigzag stitch.
- Sew the bottom edge, focusing on the previously marked chalk mark.
- Now we sew the bottom of the lining fabric. The top line will be the hem line, the second line will be measured from the first line down by 4 cm, and the third line by 2 cm. We sew the top line with thread.
- We hem the corners along the bottom of the left and right sides. Now let's baste the lining.
- We begin ironing, after which we sew down the lining fabric along the bottom with matching threads.
- We sew the bottom of the coat with hidden stitches using the same 70-thick threads.
Important! The hem does not need to be hemmed by hand, but rather glued, for example, with adhesive web.
- Remove all previously basted threads.
- We carefully steam the shortened hem so as not to leave traces of basting.
- We put on the finished product and fasten the threads. We check that the length of the sides along the bottom edge matches.
That's all the work! New clothes are ready to go out!
How to shorten coat sleeves at home?
The technique for shortening the sleeves of outerwear is similar to shortening the bottom, described a little earlier. But still, it also has its own distinctive features.
Progress:
- We completely rip the bottom of the sleeves, removing all unnecessary threads.
- We put on our coat and ask our friend for help - mark the line of the desired shortening with chalk. We turn gradually, and during this time your assistant leaves marks on the front part of the bottom of the sleeve. To do this, it is better to use a ruler or a stationery triangle.
Important! Make all marks in a calm position so that there are no distortions in measurements.
- We draw a solid line along the previously marked marks.
Important! Do not mark the line along the old hem, as the factory stitching may have defects.
- Now we cut off the excess lining along with the main fabric.
- We hem the sleeves to the length we need, and then align the lining fabric.
- We fold the lining once, holding it in the place where the sleeve is sewn and turned out. The most important thing here is to fold only the edge of the lining, without affecting its main part.
- We machine sew the formed lining to the bottom of the sleeve.
- We put small fasteners on the lining so that the hem does not fall apart. This must be done with each seam.
- We turn the sleeve inside out, leaving a basting for now.
- Carefully iron the bottom of the sleeve.
- We perform all the above steps with the second sleeve.
Well, your long-familiar coat has been transformed!
Shorten the sleeves of a shirt, blouse, dress
Often you have to shorten the sleeves of light clothing. When buying a new shirt, blouse or dress, it is not always possible to accurately determine the optimal length. During wear, two or three extra centimeters are incredibly annoying, and you want to shorten the product as quickly as possible.
If the model’s sleeve edge is absolutely straight and there are no cuffs, the work comes down to the following steps:
- measure the required length;
- open the hem, straighten and smooth the edges of the part;
- measure the new length from the shoulder and draw a hem line with chalk;
- cut off excess fabric, leaving 4-5 cm for hem;
- place the hem inside and stitch with a stitch;
- steam with an iron;
- Sew the hem with a blind seam or machine stitch.
If you need to remake a product with cuffs, the work becomes a little more complicated. After all, you will have to not only remove the excess material, but also tear it off, and at the end of the work, re-sew the cuffs, preserving all the folds.
The sleeve with cuff and button placket should not be shortened by more than 2 cm. A short vent spoils the appearance of the product.
You can shorten the sleeves of the product not only from the bottom, but also from the top. To do this, you need to tear off the part, cut out the edging according to a new pattern and carefully sew it in place. An inexperienced seamstress will have difficulty coping with this job.
How to Hem the Bottom of a Lined Coat for the Perfect Fit
Outerwear is sewn with a thin or warm lining. When shortening the entire product, it is important to trim and hem it correctly.
The procedure will be a little more complicated.
- Shorten the coat; it is better to slightly tear the lining away from the edges and not cut it along with the main fabric.
- Finish the drape edge.
- Now cut the bottom fabric; it should be 3 cm longer than the main product.
- Finish the edge with a serger or cut with serrated scissors.
- Fold the top material over and baste or pin it to the fabric, then sew with a blind stitch, carefully working the corners.
- Connect the bottom of the coat and the edge of the lining, making sure that the bottom fabric does not stretch, otherwise the finished product will not fit well on the figure. Sew by hand or machine.
- Iron the finished product from the wrong side.
If the inner fabric is warm, then it does not need to be sewn to the hem. It's enough to just bend it a little and stitch it.
There are several important points in shortening outerwear yourself. You need to correctly measure the cutting line, carefully sew the edge and process the lining. The work is painstaking, but not difficult - you will definitely cope.
Women are prone to change, and sometimes we are tempted to change something. Why not experiment and make a new, even more attractive one out of an old thing? Many girls have a favorite coat hanging in their closet, the style of which is outdated, or it is simply too long. For example, by shortening the bottom and sleeves of your long-forgotten outerwear, you can make a stylish product that even the most advanced fashionistas will envy. You can even construct a jacket from a shortened coat, complementing it with various decorative trims. Shortening a coat with your own hands is as easy as shelling pears. And you don't need complicated tools to do this job.
How to hem the bottom of a coat correctly: step-by-step instructions
Technology for shortening outerwear:
- Put on a coat, this will make it easier to see how many centimeters you should cut off the bottom. Ask an assistant to measure the required length.
- Open the side seams, allow 3-5 cm for the seam allowance and cut off the bottom strip.
- If desired, you can reinforce the lapel with non-woven material. Cut a strip of the required length, the width of the intended hem, and glue it with an iron.
- Finish the edges of the bottom. You can overlock it with an overlocker, sew a zigzag stitch, hand overcast it, or cut it with serrated scissors.
- Secure the hem with thread or pins. This is necessary to ensure that the hem of the product does not twist during hemming.
- Hem the fold to the main fabric using a herringbone stitch, making sure that no threads are visible on the front side.
- Carefully fold the corner of the shelf. If the tissue is too thick, then it is better to excise it a little.
- Iron the finished product from the inside out.
This technology is useful for working with outerwear without lining.