The cocoon coat, characterized by an oval silhouette, widening at the waist and tapering at the bottom, first appeared in the world of high fashion thanks to fashion designer Cristobal Balenciaga in 1957. But this model gained real popularity in the 80s, when they began to produce models not only for women, but also for non-men. In this regard, the coat acquired a more formal shape, and bulky accessories were replaced with strict collars and straight pockets on both sides. A pattern for creating a cocoon coat with your own hands, of course, requires a little knowledge and skills in the field of design, but, nevertheless, building it is not as difficult as it seems at first glance.
Voluminous, but elegant! We sew a cocoon coat using a simple pattern
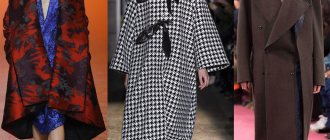
It's no secret that the role of the main violin in demi-season looks is assigned to outerwear. And no matter what options you create when putting together a stylish solution, the emphasis should always be on the coat. Among the huge number of models, it remains to find the one that suits you, and will be not only beautiful and impressive, but also comfortable and warm, which is especially important in the cold autumn. To guess for sure, we recommend that you pay attention to the cocoon coat. It received its name for its cocoon-like shape, and its silhouette, despite its apparent volume, smoothly envelops the figure, remaining at the same time very elegant.
This coat combines absolute pragmatism and subtle Extra Advice! To add luxury to your coat, use high-quality coat fabrics in soft shades. style, and will especially appeal to fans of avant-garde solutions. It remains to add that this season the cocoon coat is more popular than ever before. At the same time, the cut of this style is quite simple; it is not overloaded with voluminous details, such as patch pockets or cuffs. The sleeves and hem are very gently tapered at the bottom, and the dropped shoulders and low armhole refer us to “oversized” models, the image of which can be clearly seen in a cocoon coat.
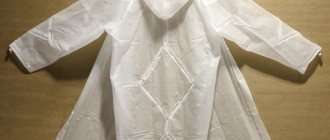
IMPORTANT! The presented model of a cocoon coat with a stand-up collar, without pockets, is fastened at the front with buttons. If desired, you can add pockets in the raised seams of the shelf.
To create a cocoon coat pattern, use measurements of the required size. The length of the coat along the back is 100 cm.
back to contents ▴
Cocoon coat pattern
Construction of the back (Fig. 1)
We start constructing the pattern from the back. Place point A in the upper left corner of the sheet of paper. From point A, lay down in a straight line the segment AA1 = 2.5 cm for all sizes. А1D=100 cm (coat length along the back).
- AA2=1/6 Neck circumference according to measurement + 1 cm (the increase can be increased depending on the size up to 2 cm).
- A1G = Armhole depth according to measurements + 5 cm (increase for freedom of fit).
- A1T = Length of back to waist according to measurement + 1 cm (increase for freedom of fit).
- AP=1/2 Back width according to measurement + 2 cm (increase for freedom of fit). Connect the straight lines from points P and G at right angles - at the intersection you get point G1.
- GG2=1/4 Hip circumference according to measurement + 5 cm (increase for freedom of fit). DD1=GG2. Draw a line for the side of the G2D1 coat.
PP1=4.5 cm - inclination of the shoulder seam of the back. To determine the length of the back shoulder seam from line AD, set aside a measurement of ½ of the shoulder width (Fig. 1). Draw a line for the back armhole.
Back shoulder lift. From point P1, set aside 2 cm upward (rise of the back shoulder). Extend the line and place along it the segment A2H = Shoulder length + Sleeve length according to measurement.
Lowering the armhole line. From point 2 (raising the back shoulder) along the segment A2H, set aside 2-P2 = 6 cm. Draw a lowered armhole line, deepening it from point G2 by 2 cm: G2G3 = 2 cm.
Draw the sleeve as shown in Fig. 1. Increase the length of the sleeve cap so that the length of the sleeve cap is equal to the length of the armhole. The width of the sleeve at the bottom is HH1 = 16 cm (draw HH1 at right angles to the segment A2H). Place a dart 13 cm long and 2 cm deep along the upper side of the sleeve.
Narrowing hem of the back. From point D1, set aside 2 cm to the left and draw a side line G3-2.
Rice. 1. Back pattern for a cocoon coat
Designing a barrel back. To create a rounded coat shape, it is necessary to construct raised seams. From point 2 (narrowing of the back along the hem), set aside 5 cm to the left and draw curved lines for the relief seams of the back and the side of the back (red lines). Transfer the 2 parts of the barrel onto tracing paper and glue along the side line (Fig. 4).
back to contents ▴
Building a shelf (Fig. 2)
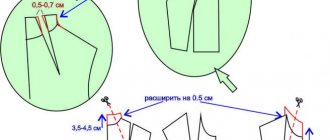
The shelf pattern is based on the back. When constructing, it is necessary to lift the shelf in accordance with the road accident measurement. All other constructions remain unchanged. To do this, from the waist line, put up the segment TA = Length of front to waist according to measurement + 1 cm (increase for looseness of fit).
Draw a horizontal segment AP. From point A with a radius of R=1/6 of the neck circumference according to the measurement + 1 cm, draw a cutout for the front neckline (A1A2). Connect point 2 (the extreme point of the back shoulder) and point A2. Straighten the lowered shoulder line by drawing segment A2P2.
Rice. 2. Designing the shelf of a cocoon coat
back to contents ▴
Selection pattern
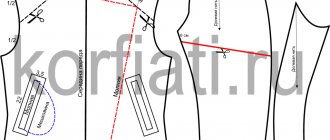
On the shelf, from the middle line along the waist line, set aside 3 cm to the right. Draw a slightly curved line for the fastener; deepen the neckline by 1 cm, create an emergency lapel configuration 4.5 cm wide as shown in Fig. 2.
Draw a edging line and transfer the edging onto tracing paper separately.
Sleeve and stand-up collar pattern
Transfer the details of the back sleeve and front onto tracing paper, align them in the center, raise the edge by 1 cm (Fig. 3).
Measure the distance along the neckline of the back and front between the control marks for sewing in the collar (Fig. 4, marks 3-3). Draw a rectangle ABCD: AB = 1/2 the length of the neck of the back and front between the control marks, AC = 8 cm. Build a stand-up collar 6 cm wide, as shown in Fig. 3.
Rice. 3. Pattern of sleeves and stand-up collar for a cocoon coat
back to contents ▴
How to cut a cocoon coat
To sew a cocoon coat, you will need about 3.0 m of coat cloth with a width of 145 cm, lining fabric, an adhesive lining for the hem and stand-up collar, 3 tone-on-tone buttons with a diameter of 2-2.5 cm, threads.
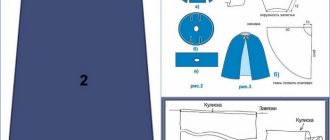
Cutting details are shown in Fig. 4. Cut out all parts with seam allowances of 1.5 cm, bottom allowances of 4 cm.
Rice. 4. Details of the cut of the cocoon coat
IMPORTANT! To prevent a lack of fabric in the allowances when hemming the hem and sleeves, cut them out with a slight flare towards the bottom.
You will find even more new interesting ideas on the website of Anastasia Korfiati’s Sewing School. Subscribe to free lessons and sew fashionable clothes with us!
See also:
- Coat pattern from Dolce&Gabbana
- Patch pockets with flaps for coats
- Coat pattern with a large collar
- How to sew a cardigan with your own hands
Working with the lining
In order to make the lining, you must first cut out the parts according to prepared templates. It is worth noting that patterns should be without edges. Here you should also take into account seam allowances of approximately 1 cm. There is little work with the lining. First, close the shoulder and sleeve seams, then move on to the side seams. Next, the lining is stitched to the lining. The final stage is hemming the bottom of the product and stitching the details of the sleeves of the main and lining fabrics.
Knowing how to sew a cocoon coat, the pattern of which is given in this article, you can save a decent amount of money, because this item is in trend today, and you will have to pay a lot for it in the store.
✄ Drawings of patterns for coats and linings in the gallery
The set of patterns for a raglan coat with a large stand includes the following patterns (Figure 1 in the gallery above):
- back,
- shelf,
- collar
- and sleeve.
Patterns for the hem and lining are not included in the kit, since these parts are cut using the same patterns for the front, back and sleeves (see the gallery of drawings ☝). The collar can be cut out either using a pattern or without it, which is described in detail on my website on the page with the finished pattern.
Pattern modeling
Elements such as fasteners, pockets, darts, raised seams, collar and cuffs are details that are indicated on the main pattern during the modeling process. Without them, the products would be boring and monotonous. With the help of these elements, you can correctly place accents and create just the perfect image. The pattern of the cocoon coat itself is so original that sometimes it is minimalism that gives the item a special charm. However, you can experiment with the clasp, sleeve length, collar option and pockets. Modeling a cocoon coat is one of the interesting stages, since when working, a simple template turns into a unique thing.
Collection by Irina Skakun
30
pins
•
26
subscribers
Pattern of a simple coat from SEWING SCHOOL
Pattern of a simple coat. There are no complicated details in this coat, the pattern is based on basic measurements, and you won’t have to waste a lot of time sewing in the sleeves!
Cocoon coat pattern from Anastasia Korfiati
Sew a voluminous cocoon coat yourself! Despite the apparent volume, it is very elegant. Cocoon coat pattern and cutting instructions for free!
Shift dress by Anastasia Korfiati
A loose-fitting dress is a simple cut, but very comfortable loose-fitting dress that is guaranteed to lift the mood of its owner. Pattern…
Shift dress by Anastasia Korfiati
A loose-fitting dress is a simple cut, but very comfortable loose-fitting dress that is guaranteed to lift the mood of its owner. Pattern…
Cocoon coat pattern from Anastasia Korfiati
Sew a voluminous cocoon coat yourself! Despite the apparent volume, it is very elegant. Cocoon coat pattern and cutting instructions for free!
Cocoon coat pattern | Magazine of the Fair of Masters
There are many different cuts of the cocoon coat. I want to share a pattern for a very simple coat, maybe someone will find it useful. Despite its simplicity, it looks very cool! This is, let’s say, a “skeleton”, you can already edit it to suit yourself (narrow, expand, lengthen, etc.