Choosing the perfect coat is as difficult a task as meeting your soulmate. If you are tired of endless viewing of fashion magazines, meaningless advice from consultants in stores and unsuitable clothes, catch simple instructions on how to sew a coat with your own hands.
In this article we will tell you:
- How to choose the right women's coat?
- How to choose fabric and lining for a coat?
- How to make a coat pattern with your own hands?
- How to sew a coat with your own hands for a beginner? Master class + 12 step-by-step photos
- How to properly treat a coat?
Materials, tools
To work you need the following:
- Material (wool, drape, cashmere);
- Non-woven fabric;
- Lining.
- Sewing machines;
- Threads (for basting, for stitching);
- Chalk or a piece of soap;
- Scissors;
- Pins;
- Needle for basting.
Attention! Before sewing the coat, the material is washed in warm water and glued with non-woven fabric. Similar steps are repeated after the oversized coat pattern is made.
Sewing tools
What measurements will be required?
Required measurements:
- ОШ - neck circumference.
Measure the base of the neck.
- OG;
- FROM;
- ABOUT. If there is a belly, you need to place a magazine or ruler.
- CG;
- ShG;
- ShS;
- DTS;
- VB;
- DTS1;
- VG;
- road accident;
- Accident1;
- Chest dart solution;
- military industrial complex;
- VLOOKUP (bottom);
- ShP;
- Druk;
- OP;
- OZ.
Increases
Adjacent - semi-adjacent:
| Abbreviation | Increase | meaning |
| PDT | To the length to the waist line | cm + 40 mm (under the belt, if any) |
| POG | To chest circumference | 100-200mm |
| SWEAT | To the waistline | 80-220 mm |
| FOB | To the circumference along the hip line | 100-140 mm |
| PShS | Bring your arms together in front, measure the width of your back - width + increase | 80 mm |
| PSHG | To chest width | 60 mm |
| Shoulder | Shoulder seam | Up to 2 cm |
| Pdli | To product length | 2 cm |
| Pop | To shoulder circumference | 90-150mm |
| Pdlr | To sleeve length | Up to 2 cm |
If you are sewing a straight-cut coat, the following increases will be required:
| Abbreviation | Increase | meaning |
| PDT | To the length to the waist line | 10+ 50 mm (under the belt, if provided) |
| POG | To the circumference along the chest line | 200-300 mm |
| PShS | Back width | 80-100 mm |
| FOB | To the circumference along the hip line | 200-300 m (when sewing a trapezoid, the increase must be increased) |
| PSHG | Back width | 60-90 mm |
| Shoulder | Along the shoulder seam | Up to 3 cm |
| Pdli | By product length | Up to 2 cm |
| Pop | By shoulder circumference | 150-200 mm |
| Pdlr | On the sleeve | Up to 2 cm |
You might be interested in what a pattern is and why it is needed
Modeling a stand-up collar
- Let's start from the back. Widen the neck of the back by 0.5 cm.
— Up the line of the middle of the back, set the height of the stand, 3.5-4.5 cm.
— In the shoulder area, the height of the stand is approximately 2.5-3 cm.
— Let’s move the shoulder dart into the neckline and decorate the sides of the dart with lines slightly tapering towards the top, in the form of a spindle, see figure.
- Shelf. Let's move the chest dart to the waist.
— We will widen the neck of the shelf by 0.5 cm.
- Draw the lines of the collar similar to the back, see the picture.
— Let’s transfer part of the solution, for example ¼, into the neck
— We will design the side of the dart in the form of a spindle.
Here we talk about Modeling collars of different types.
How to sew a coat without a pattern with your own hands
Building a pattern is an optional requirement for sewing a coat. Not every woman knows how to sew a coat without a pattern, but in many ways, sewing such a product greatly simplifies the life of the craftswoman.
To do this, give preference to wool, cashmere or double-sided fabric: the material should look beautiful both from the front and from the back (the coat will be sewn without lining).
“Burda” can suggest patterns for similar products. The pattern for a men's coat is often published in this fashion publication.
Taking measurements
Taking measurements:
- chest girth;
- waist;
- hips;
- neck;
- shoulder length;
- sleeve and raglan (if available).
All measurements are optional, but when sewing anything can happen (measurements are recorded).
Attention! Simple styles of the product are sewn without a pattern: there are no darts or folds on the coat (the coat is straight-cut, not very close to the figure).
Simple style
Increases
The rectangular parts of the back and shelves correspond in terms of the width of the half-circumference of the hips, with an increase of 5 cm for the freedom of fit.
To build a one-piece sleeve, the shoulder width is measured from the neckline, and the length of the sleeve is added here.
There should be no questions with a stand-up collar: a strip of material is taken in length corresponding to the neck and with the parameters of the required length (stand height parameters).
The side seams are sewn using a machine, the stand-up collar is processed and sewn in, the hem of the sleeves is hemmed, and the lower part of the product is sewn in.
To make the fastener, it is necessary to process the sides of the shelves. You can sew a coat without fasteners, but in this case you need to make a belt from leftover fabric.
Ready product
Patterns for cashmere products
Cashmere is one of the most suitable materials for coats. It is warm, soft and looks elegant and respectable. To ensure that all the features of the fabric are used, choose equally “status” styles - straight with a double-breasted wrap or with a dropped shoulder. Secure the product with a belt, and secure the classic turn-down collar with a button. Extend the neck according to the selected model. Make the sleeves one-piece and with three seams.
elema.by
A straight cashmere coat in a traditional style has several features:
- the hem is closed, so there are no seams on the sides;
- the chest dart is reduced by a centimeter and moved to the neckline;
- The width of the back is increased by 5-6 cm.
To model straight products with a dropped shoulder, the neckline is widened, and on single-seam sleeves, expansion and stitched cuffs are made. The shoulder point must be raised by a centimeter and the width of the chest and back increased by the same amount. The chest dart is moved from the shoulder to the neckline, and the shoulder dart is reduced by a centimeter. Taking into account all the changes, you can build a base according to individual sizes.
Classic coat pattern
The pattern of a demi-season coat is modeled on the basis of the basic pattern of a women's coat with the addition of 70 mm for a loose fit, and the basic pattern of a two-seam sleeve.
Classic coat pattern
Back modeling:
- The location of the back line relief. From point A, 70 mm is deposited along the shoulder to the left. A relief seam line is drawn.
- The line of the middle back seam is straightened and drawn under the ruler from the waist line. The back piece is cut along the waist line.
- A flare is made along the lower part of the back parts by 50 mm.
Shelf modeling:
- From point B along the shoulder, 70 mm is deposited to the right. The chest dart is moved, and the line of the raised seam of the front is drawn. The waistline of the shelf rises along the side seam by cm;
- From the line running in the middle of the front, 60 mm are deposited to the right and left. The shelf is flared sideways at the bottom by 120 mm.
- From point C, 20 mm is laid down and the lapel is drawn. 230 mm is laid down from the horizontal line;
- The shoulder line is extended to the right and laid down along it;
- The lapel fold line is drawn. The neck line deepens, the lapel configuration is built - 14 cm;
- A turn-down collar is constructed, cut and spread along the upper edge by 25 mm;
- Loops and buttons are marked;
- The side of the shelf and the shelf and the edge are removed. The double-breasted sleeve is cut unchanged.
What the classic version looks like
Attention! To prevent the product from stretching or deforming, all parts are duplicated with gray non-woven fabric.
Additionally, the edges of the sides, armholes, fold line of the lapel, neckline, collar corner, and outer part of the valve are duplicated with the shared edge.
To sew a product, you need 3 m of loden with a width of 1.5 m. The parts of the back, front and sleeves are cut with allowances of 15 mm, allowances at the bottom - 40 mm.
Perfectly duplicates the figure
Creating a pattern for the basic model
The first step in building a basic coat model is drawing out the back.
- A cutout is made on the neckline - a concave line is drawn from point A to A1, starting from 1/3 of the half-circumference of the neck (plus 1.5 centimeters) and bending the curve upward by 1.5 and 1 cm.
- 1.5 cm are set aside from point P for an inclination along the shoulder.
- The line of the shoulder and armhole is drawn through P-G2 (the bisector of the angle is drawn from G2).
- A seam is formed on the side - from T2 through G4, L2 to CD.
- Waist darts are made from half of G-G2, a guideline on the waist and hip lines T-T1 and L-L1.
womanadvice.ru
The front of the product is lined up, starting from the neckline. From mark Ш you need to set aside a third of Og to the left (plus 1.5 centimeters - a fixed value for all sizes). You need to put a third of the Og down, adding 2 cm to the segment. The resulting ends of the segments are connected by a dotted axis and its center is measured. It is connected to Sh.
Next, you need to shape the shoulder, measuring its length from the neckline to the dart on the chest. You will also need the distance from it to the armhole. Connect point P3 (the end of the left dart line) and the top P-G2 with a dotted line. Measure along the dotted line for the shoulder length, subtracting the distance from the neckline to the chest dart. Connect the resulting point to the lower end of P2-G3, set aside another 2 cm and extend the segment to P3.
Now you need to draw an armhole line, a seam on the side (from T2 through G4-L2 to CD ending at mark H). On the pattern, draw a line along the waist, hips and bottom, make waist darts along the front and sides. On a classic coat, you can make a fastener - for this, an increase in the side is provided (on double-breasted models it is up to 10 cm).
Having mastered the sequence of actions, it will be possible to design products of different styles and cuts.
How to cut and sew a coat using patterns
Before you begin directly sewing the product, learn how to sew a coat, you should decide on the type of product: sewing a straight-cut coat will differ from making a loose-fitting coat, the sewing technology with a lining will have its own characteristics.
Type of cocoon coat, pattern
It doesn’t matter who will wear the coat - a girl or an adult woman - not every novice craftsman can accurately cut out a children’s set, and if there is a hood and other details, the complexity of the product increases, and the class of skill increases accordingly. The best mannequin for improving practical skills is a doll.
You might be interested in this. Useful information about computer-controlled sewing machines
Features of sewing a straight-cut coat
Sewing a straight coat, following simple step-by-step instructions, is very simple - technologically this process is reminiscent of designing a women's dress. The pattern of a classic straight coat itself is quite universal - the only differences are in the modeling of the collar, the presence/absence of lowered sleeves, a hood, and the type of fastener (belt, zipper, buttons).
In order for both a thin demi-season coat with a straight silhouette and a winter model with insulation to look perfect in its finished form, when creating a pattern you should take into account the characteristics of the material, and also take all measurements very carefully. If all the rules are followed, the finished product will fit exactly to your figure, and the fabric will not gather in folds and wrinkle in unnecessary places.
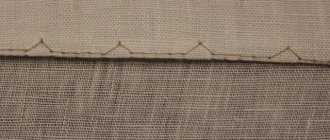
Processing the bottom of the sleeves with facing
There are many ways to process the bottom of products and sleeves. In many ways, the choice of technology depends on the type of product - cardigan or poncho, as well as on the equipment available to the master and his professional skills.
Pattern No. 2
Facing is often used. This type of sleeve processing is performed according to the following algorithm:
- The facing is sewn to the sleeves;
- The parameters of the seam allowance for turning the facing are adjusted;
- The stitching seams of the facing are ironed, the edging from the main part is straightened;
- The facing is secured with hidden stitches;
- The bottom is ironed.
Bottom facing
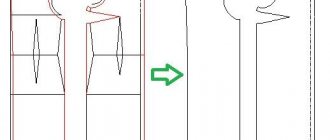
Basic lining sleeves
When sewing a product, not always everything turns out as planned. Sometimes it happens that the sleeve was intended to be single-seam, and when the product is ready for fitting, it becomes clear that the sleeve width is not enough. In this case, the appropriate option is to sew on a two-seam sleeve, which means that a foundation is required.
2 lines are drawn on the sleeve, defining the position of the inner and elbow seam (the minimum distance is taken). The width of the allowances is marked - 15 mm and the part is cut out along with the seam, which acts as a pattern.
What does the lining look like?
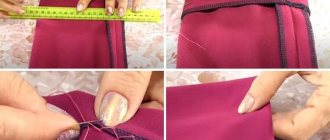
Processing pockets in darts
There are many types of pockets used in tailoring. Among them is a pocket with a leaf: often used when sewing coats. Making this pocket is not difficult if you strictly follow the instructions:
- The pattern is applied to the front shelf, the location of the pocket is noted. The corners of the pocket are pinned;
- The pocket frame is stitched (basted);
- The location of the pocket is duplicated on the reverse side of the product. A strip of dublerin is cut out (the proportion of the material coincides with the vertical of the pocket part). The parameters of the dublerin strip are 3 cm larger than the pocket and 4 cm longer than the frame of the part;
- From the inside, the part is glued with dublerin and ironed;
- The pocket leaf is cut from artificial leather or other fabric - wool, contrasting material. Additionally, the leaf detail is duplicated if it does not have the required density.
Leaflet parameters:
- Width – frame width + 30 mm;
- Length – frame length + 30 mm.
The leaflet is folded in half and stitched. It is placed in the middle of the frame in a vertical position and sewn on, falling into the blazed border of the frame.
Attention! The frame has perfect angles - the machine stitching does not extend beyond the blazed line even a millimeter.
This is necessary so that when you turn the pocket inside out, it doesn’t warp, and all the corners are straight.
Type of pockets
Cut out the linings
There are several ways to cut the lining.
According to patterns
The width of the facing and hem is subtracted from the middle patterns of the back and front, an increase is made in the places of “subtraction”, and a double allowance is added.
If the patterns are cut, they are combined.
The pattern is glued along the waist line, end-to-end, with tape, the middle parts of the front and back facings and hems are cut off from the patterns.
Attention! The sleeve is cut out by combining the top and bottom patterns, and a double hemming allowance of 7 cm is added along the bottom of the product.
The remaining allowances are made in the same way as for the “top” parts.