The skirt remains a popular wardrobe item among women and girls. This item is perfect for office work, relaxation or daily walks. Any look can be made brighter and more elegant with the help of a skirt, because there are a large variety of them, for example, circle skirt, pencil, tulip, etc.
The main problem when choosing a product is the length. However, it can always be shortened either in the studio or at home. If you have an overlocker or a sewing machine, you can do it yourself at home, but even if you don't have these items, you can always hem a skirt beautifully by hand. Let's look at what types of seams there are, and which of them you can apply yourself.
Blind stitch seam
Sometimes, when hemming a dress or skirt, it is necessary to lay a decorative stitch along the hem, in accordance with the style of the product itself. But most often, when hemming the bottom of garments, especially those made of noble, natural fabrics, it is customary to hide the stitch connecting the hem and the main fabric.
Blindstitching is done by hand, but a sewing machine can also be used to make such a seam. The seam is not visible on the front side of the product; on the back side, a seam is laid, catching the thread in the needle to the thread of the main fabric.
Blind stitch made on a sewing machine
Hand stitching, called a “goat” stitch, is the easiest way to hem a dress by hand with a blind seam. You can hem knitwear by hand, just like fabric, in the same way or with an “over the edge” stitch. The thread tension is also done manually. The needle clings to the thread of the fabric below the fold with the seam back, is brought forward and clings to the thread of the fold also with the seam back. This “rapport” is repeated along the entire length of the product, attaching the fold to the main fabric. How to hem knitwear by hand
The threads must be selected so that the thickness of the hemming thread matches the thickness of the fabric thread, and the blind stitches do not stick out or tighten the fabric. This way the stitching will not be noticeable and the surface will be absolutely smooth on the front side.
The needle catches on the thread of the fabric
How to hem a skirt with a blind seam by hand and by machine?
Sequence of work:
- Iron the skirt.
- Let's try it on.
- We outline the required length. You can not only mark with chalk, but also lay a hand basting stitch.
Advice! It is convenient to carry out marking work using a thread or fishing line stretched at the required level.
Knitted skirt
On thick knitwear, not a hidden stitch, but, on the contrary, a double stitch looks good. Ideally, it is performed with a special double needle and foot. You get two strictly parallel lines.
The same stitching is done on a denim skirt.
For thin knitwear, a single collar or American is suitable.
Hemming the bottom of the dress skirt
Cotton skirt
First of all, different types of blind hems, as well as double hems.
Chiffon skirt
For delicate American chiffon, Moscow seam, processing with bias tape is also suitable.
Wool skirt
A neat goat, single hem or hidden hem works well.
Necessary equipment
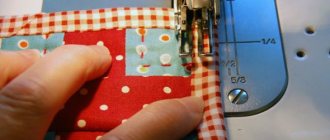
To create a blind seam manually use:
- Sewing thread,
- Sewing needle,
- Thimble,
- Chalk or a thin piece of soap,
- Ruler or pattern,
- Iron.
You might be interested in: Making patterns and sewing a hat with a brim yourself
Spool of thread, needle and thimble
The thread should match the thickness of the fabric. Thick fabrics, wool, and suits are not hemmed with thin threads. For hemming silk, satin, and crepe de Chine, thin threads of the same composition are used. The same applies to needles; thick needles are used for dense fabrics, medium ones for suits, thin ones for silk and chintz.
For manual work, use a thimble, which will help protect your fingers from punctures and make it easier to work with the needle.
Chalk or soap is needed to draw fold lines on the fabric. To get a clear and thin line of the future fold, you need to sharpen the edges with soap or chalk.
Important! When steaming or ironing, soap will completely disappear from the fabric under the action of steam. It is better to use soap without fragrances. The chalk will need to be further cleaned.
When hemming a product using a machine, use special feet or separate attachments for a standard foot. The purpose of the nozzle is to prevent the needle from catching excess threads on the front side.
Blindstitch feet are included in the set of sewing machines, and working with them is described in detail in the instructions for use.
Blind stitch foot
Methods for hemming a product
There are several simple and popular ways to finish the bottom of a garment, including how to blindstitch a skirt by hand. Each of the methods is used when working with certain fabrics, styles and forms the hem of the product.
Note! It is recommended to make test samples if possible, make changes if necessary, and only then proceed to processing the bottom of the product.
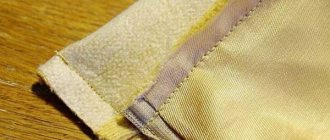
Double hem
A double hem as an option for processing the bottom is made with a closed seam in the fold, which gives the product a neat appearance from the wrong side. It is used when working with fabrics of different densities and weaves, from thin to suiting.
- The front side of the bottom of the product is turned over to the wrong side by 1-2 cm and ironed.
- The fold is once again turned over to the wrong side by the amount of the hem, from 3 to 7 cm depending on the cut, style and other parameters, and ironed.
Then it is hemmed with a hidden stitch or manually with a goat stitch.
Double hem by hand
Hemming with hemmed facing
The tailored facing completely follows the curves of the product and makes it possible to create unique models. These can be cutouts at the neckline, armholes, slits at the bottom. Open seams are finished with a trimmed facing.
You might be interested in How to make a felt toy pattern with your own hands
The facing is cut out, exactly repeating the cut that will be processed. Sewn to the edges using a machine. The facing is then turned over to the wrong side and hand sewn with a blind stitch.
Hemming with cut edge
Original models with trims made from edging tape or with the possibility of double-sided wearing are processed using the cut edging method. The edging tape or trimmed strip of fabric is folded with the wrong side inward and ironed. The front side of the tape or strip is applied to the front side of the product so that the open cuts are on one side. The tape is stitched and turned down and to the wrong side. On the reverse side, the open cut is folded over and manually hemmed with a blind seam.
Hemming the cut with edging
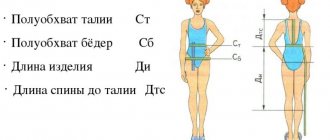
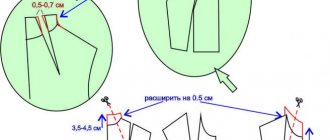
How to correctly mark the bottom line of a product
Before marking the bottom line in a product with a free pattern, preliminary preparation for this operation is necessary. The product should be ironed well, the length should be determined, and the shoes should be prepared. The length is determined by measuring the segment from the floor to the bottom of the product. The segment must be the same length. A mark is applied to the fabric, and subsequently the marks will be connected into a single fold line.
Important! A skirt, dress or robe cut along an oblique line requires special care when preparing for measurements. Seams and darts must be perfectly ironed. Check the side seams for distortion.
Checked fabric requires a different approach: at the time of cutting, you should take into account the size of the check, its “rapport” and decide on the length.
Using adhesive tape
This method is one of the easiest; it can be used even when you have absolutely no knowledge of any sewing technique. The adhesive tape itself comes in different widths, so you can find it in the same size as you want the width of the hem to be.
Glue it on the wrong side, iron it on the side of the paper tape, moving about a centimeter away from the edge of the folded fabric. After this, you need to remove the protective film from the paper, bend the hem to the desired length and iron again.
The excess fabric must then be carefully cut off. The seam will not be visible.
If the dress material is heavy textile, you will need two inserts.
Advantages of the method:
- The tape is suitable for fixing the hems of skirts, trousers, and coats.
- In fact, it is convenient and quick, and you can easily secure any hem.
Flaws:
- Professionals do not recommend using this option for securing the hem, believing that it increases the rigidity of the fabric, which will affect the appearance of the finished product. Since the glue has the property of hardening.
- The web is printed onto the face of the skirt fabric.
- Low quality cobwebs quickly lose their stickiness after just a few washes.
We offer you a two-minute video on how to properly glue the tape:
There are options for finishing the hem of the dress with and without hems.
- Godet skirt: pattern making, master class on how to sew a skirt with your own hands (from six wedges), fabric consumption
Fixing the hem with a web
The adhesive tape in the form of a web makes it easier to form the bottom of the garment. The ribbon is placed inside the hem, as close to the cut as possible. The cut must be processed. Using an iron heated to a temperature appropriate for the type of fabric, iron the hem. The hem is secured with pins or thread.
Important! Do not iron the adhesive tape several times. Overheating the ribbon will cause the fabric and hemline to deform.
Processing the bottom with adhesive web
Bottom preparation
Most often, the bottom of the products is processed after joining and finishing the side sections.
The cuts or slots placed along the bottom edge are processed before or during finishing the bottom of the product.
Processing begins by leveling the bottom line,
For this:
- The product, turned inside out, is folded in the middle of the front and back;
- Lay out on the table and combine the side and relief seams, darts on the right and left sides of the product;
- Having specified the length, mark the lines of the bottom and hem along the auxiliary pattern;
- Trim off excess material along the bottom line.
In products made from thick materials, excess side and relief seam allowances are cut out in the hem allowance area.
Hem seal
Suit and dress fabrics in the hem area are compacted with duplicating fabric to achieve an ideal smooth surface on the front side. To do this, the duplicating fabric is secured on the wrong side of the product along the fold line of the hem. The hem is turned to the wrong side and hemmed.
Using the techniques described above, you can carefully decorate the bottom of the finished product. The final operation of tailoring creates the final appearance, emphasizes the style and shapes the image. Properly selected threads and tools will help you complete this job efficiently.