Has this ever happened to you? We took measurements and tailored the trousers or skirt. When you try it on, everything looks great, but as soon as the belt is sewn on, the tricks and whims begin. The skirt tends to creep away from the waist or turn 180 degrees when walking. And the top of the trousers bulges out unattractively at the back and sides. And all attempts to fit the item to the figure do not help. Something went wrong?
And the whole catch is... the belt. “Well, what could be simpler?” - you ask. But real masters know that it is not as simple as it seems at first glance. This inconspicuous detail, if cut and sewn incorrectly, can ruin any thing!
The simplest and most common version of this detail on skirts and trousers is with a fold. And we will tell and show you how to sew a belt to a skirt correctly in our master class!
Our body in the area from the waist to the hips is more like a cone with a cut off top. Therefore, a well-fitting finished belt should follow this conical shape. And for this, professionals use... the property of the fabric itself to stretch in the transverse direction (even without adding elastic fibers)!
Always place the waistband pattern of a skirt or trousers across the grain. Only separate belts or belts are cut along the lobar.
Another secret: the pattern of this part from two (if the clasp is on the side) or from three parts (if the clasp is in the center of the front or back) is the easiest to fit to the figure.
Always cut your waistband in 2 or 3 pieces; adjusting the side seams will make it easier to fit even the most complex body shapes.
Brief step-by-step instructions
- Using a measuring tape, you need to measure the top cut and add another 1.5 cm to the obtained parameters. This is necessary for the allowance.
- Afterwards you need to chop and process the top cut. Then you need to duplicate the actions on the bottom of the cut.
- Then you can sew the zipper to the skirt. It is necessary to distribute the zipper along the belt and skirt.
- To sew, you need to secure the zipper with pins and make notes.
- Then you can start stitching using a sewing machine.
- Then you need to stitch the edges with a bend in the part of the fabric where the zipper will be sewn.
- The corner with a deflection must be even. And therefore, any excess tissue must be cut off.
- On the front side you need to make a securing stitch. To make a stitch, you need to align the cuts and pin them.
- The stitching should be located on the seam line of the skirt and waistband.
Sew the first side
Instructions:
- Set up the machine. Do not forget that the allowance for processing the top of the skirt is 1 cm.
- To prevent the seam from moving, “arm yourself” with a pin and push the top layer of fabric under the needle as you work.
- After sewing the first side of the product, close the zipper on the skirt and see if the lines match.
How to sew a belt to a skirt with a zipper
Before sewing the belt to the skirt with a zipper, you need to carry out preparatory work. After all, a belt with a lock is not the simplest element. Quality sewing requires effort and patience. The process of sewing a zipper to the belt and skirt is carried out step by step.
Cutting out a belt
Draw a rectangle on the fabric. To do this, measure the waist size (length) with a centimeter tape and add an allowance of three centimeters (one and a half centimeters on both sides). And the width is calculated as the width of the belt multiplied by two. And don’t forget to leave a small two-centimeter allowance. Cut it out.
Gluing and duplication
During prolonged wear, the belt stretches. To avoid this, you need to glue the adhesive fabric to the piece using an iron.
The belt is cut out and needs to be duplicated. Dubbing is a rectangular strip of adhesive fabric (dublerin, non-woven fabric). To give the desired density and rigidity. When used, such a belt will not stretch or lose its shape. The dubbing copies the prepared belt in size. The adhesive side is distinguished by its roughness. So, take the adhesive fabric and apply it to the underside of the belt. Using an iron, glue it using damp gauze.
Top cut processing
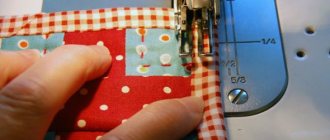
With the right side facing inward, the belt is applied to the skirt. It is fastened with pins along the entire length, leaving allowances for the seam and fastener. Can be basted with threads by hand. Both parts are sewn with a straight stitch on a sewing machine, stepping back about a centimeter from the edge. The allowances are carefully trimmed. Turn out and iron right side out. Overcast the bottom edge.
Connecting a belt with a skirt
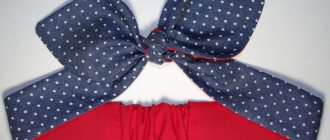
After all the details are prepared, you can start sewing. Make sure the seams are tucked inside. Cover them with a belt. We pin along the entire length with pins. We turn the belt and seam allowance up. Ironing. We are preparing satin ribbon for two hangers. Fold in half. We insert it into the side sections of the belt. We sew on the front side using a sewing machine. As a result, the folded belt is stitched from the inside out. We perform the securing stitch with special care.
Attaching a zipper
First we mark where the lightning will be located. Apply to the ironed seam and waistband of the product. Finish the edges of the seams with an overlocker.
From the inside, attach the lock with the slider facing up. We pin the zipper along its entire length with pins. And then, armed with a needle with a thread contrasting with the fabric, we baste the details. We remove the pins as we go so as not to interfere.
Using a machine, we stitch on one side of the product. We fasten the lock on the skirt. The edge of the zipper and the seam allowance should match. You need to make sure that the cut along the stitched seam on the left side is folded in the direction of the waistband. Unfasten the clasp. The left side of the belt is turned inside out. The edges are secured using safety pins.
Close the lock and apply it on the other side. The belt being sewn must be the same on both sides, so the zipper is pinned, taking into account the distance from the edge of the fabric. We check that there should be no curved lines or various distortions on the front side. Unzip the zipper and sew it on the other side. Fasten and check that both ends match.
Sew in the rest of the belt
Instructions:
- Baste the rest of the piece. At the same time, turn the allowance inward. To make your work easier, smooth the product with your fingers as you go. When folding the seam allowance, fold the product along the ironed edge.
- In order to sew the inside of the product, make a stitch from the front side. As you work, try to get into the previous seam. In order to get exactly into the stitch, slightly pull the part with your hands.
- After completing the work, iron the product well - after this it will form a slight overlap. This will help you “hide” the line. To hide the ends of the thread, insert it into a needle and pull it inside the product.
Lifehack Before basting, do not forget to pin both layers of fabric with pins. They should be placed across the seam. This will help the product not move. It is better to baste along the bottom edge, while simultaneously fixing the internal allowances so that they do not turn out later.
Sewing a belt to a circle skirt
To calculate the length of the belt, you need to calculate the waist measurements and add 2 cm to them for an allowance. You will also need 3 cm for stretching. All edges of the segments must be processed with an overlocker.
Instead of an overlocker, you can sew on a machine. To prevent the skirt from tearing, it is necessary to make the seams in a zigzag shape. Sometimes you need to glue the adhesive backing to the middle of the belt. It is also recommended to make a side seam for the zipper.
Afterwards you can start sewing the belt. The front side should be attached to the waist line. Next you need to sew in a zipper. The edges of the lock are secured with thread. The excess parts must be cut off. Afterwards, the skirt must be ironed.
Materials and tools
Before sewing a hidden zipper into a skirt, you should prepare all the necessary tools and materials. Most often, a sewing machine is used for work. For an ideal result, it is better to purchase a special foot. With its help, sewing in a zipper is simplified and it becomes possible to lay the seam as close as possible to the teeth, because this tool has special grooves on the “sole”. Without such a foot, there is a risk of damage to the teeth and a crooked seam.
It is best to purchase a metal foot, as it glides over the fabric more easily and is not damaged by the needle. Plastic is short-lived, but is suitable if the work is one-time.
In addition to the special foot, you will need the following tools:
- tailor's pins;
- thin threads to match the color of the fabric;
- thin needles;
- chalk;
- ruler.
To make the lock invisible, it is important to choose it correctly. A hidden zipper is different from a regular one - its slider is located on the other side of the teeth, so it is not visible when fastened. They are practically the same in cost. In addition, when fastened, the teeth of the hidden zipper can be easily bent.
When choosing a hidden zipper, it is important to take into account the color and material characteristics of the skirt. In order for the fittings to be invisible, their color must match. It is important that the runner matches the tone, as it will protrude slightly from the seam. It is difficult to choose a lock for a product made of delicate or stretchy material. In this case, you should try to choose it with small teeth and on a thin base. For a skirt, you can use metal and plastic zippers. The latter are more recommended for sewing clothes made of thick fabrics, natural and artificial leather.
The length of the zipper should be 2–3 cm longer than the cutout intended for it. It is better to cut off the excess part and fasten the cloves by hand. Before sewing a zipper into a skirt, it is recommended to iron it. If it is on a cotton base, it is better to steam it, then after washing the finished product it will not shrink and the fabric will not be deformed.
Hidden zipper
Special foot
Machine, thread, needles, pins, chalk
How to sew a belt and zipper to a pencil skirt?
Marking a belt from skirt fabric
The belt is sewn from the same fabric as the pencil skirt. Next, you need to measure your waist circumference and apply the measurements to the fabric. On the segment you need to mark the middle and pin it to the skirt with pins.
Cut out the belts
For proper fixation, the fabric must be folded. The first mark should be applied to the zipper. You will need a pin to secure it. The second mark is fixed on the other side.
Serging the belt
Next, the skirt needs to be folded in half so that the joints are on the same line. The mark should be located in the middle of the belt. You need to attach all the parts one by one and pin them.
Sewing a belt to a skirt
It is important to know that all darts are pinned on only one side of the belt. The allowances should be directed in different directions, and the darts should be directed towards the middle of the back. The front dart needs to be fixed to the middle of the front part.
The easiest way
The easiest way to sew on a belt is with an elastic band. It is recommended to use soft decorative elastic as a material. The length of the strip is selected according to your waist circumference. But the rubber band should be 3-5 cm shorter. You need to connect the sections of the rubber band and sew them on the back and front sides. Next, you need to insert the elastic into the skirt and secure it with pins. Then you can start sewing on the elastic using a machine. When sewing, it is necessary to straighten the fabric.
In this video, a short master class on how to cleanly sew an elastic waistband, so that all seam allowances are inside. This method is suitable in many situations when you need to sew an elastic belt, for example, in tulle or silk skirts, trousers, and even in underwear, for example, in men's boxer shorts.
A skirt is an indispensable attribute in a woman's wardrobe. She is loved for her femininity and versatility. Skirts are worn by girls in kindergarten, schoolgirls, business women, older ladies... Long, short, fluffy, narrow, summer, winter - there are no restrictions on use for this item. It is not surprising that needlewomen want to sew such a popular type of clothing on their own.
Beginning craftswomen wonder how to sew a belt to a skirt. After all, this is a very important element. The belt will favorably emphasize the waist, or vice versa, hide figure flaws. We hope you found the tips presented here helpful.