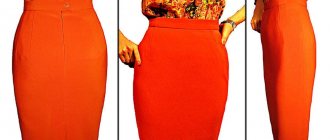
Fitted to the figure, stylishly tapered at the bottom, an elegant pencil skirt has long been popular with women of all ages. Would you like to add this classic look to your wardrobe? Let's try to sew it with our own hands. After all, the pattern of a pencil skirt is based on the pattern of a classic straight skirt for beginners. And the lack of flashy decor makes this product indispensable for business occasions and relaxing parties.
Purpose and characteristics
A vent is an open fold that may or may not have a cut. Its main purpose is to provide comfort while wearing the product. After all, a classic straight-cut skirt often hinders movement. Due to the presence of this detail, the step turns out to be much wider.
In addition, such a detail performs a decorative function. If present, a pencil skirt looks more sophisticated, sophisticated and moderately strict. This type of clothing fits perfectly into a business style.
This element is placed strictly in the seams along the bottom of the product. As a rule, there is only one on the skirt. The most common models are those with a rear slot. True, there are options of a different cut. Not so popular, but still there are products with a front slot. It can be located in the area of the central and even relief seam. Sometimes they even resort to using two such parts at once.
What you need for work
The initial stage in the work is preparation. When fully prepared, the technological process for creating a skirt will go much faster.
Materials and tools:
- fabric for the product;
- sewing meter;
- ruler;
- cardboard or paper;
- pencil;
- scissors;
- matching threads;
- needle;
- piece of chalk;
- safety pins;
- iron;
- sewing machine.
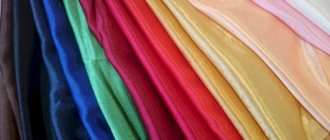
Special attention should be paid to the choice of fabric. Suitable material:
Suitable material:
- For a classic style, tweed, flannel, cotton, knitwear, and suede are suitable. A product made from this material will help complement a strict business ensemble, and will also warm you up in cool weather.
- Knitwear, linen, and cotton are suitable as an everyday option. Pencil skirts made from denim materials have been especially popular lately.
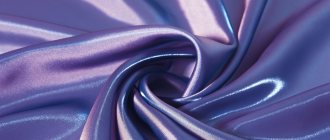
- For lovers of sophisticated evening dresses, satin, silk, suede, and velor are suitable. The model, tailored for an evening look, can also be used for a romantic meeting or date.
Building a basic skirt pattern
As a rule, the presence of this element is assumed on clothes that are sewn using thick fabric.
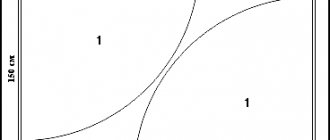
The pattern of a straight skirt with a vent is created only after taking all the necessary measurements. You need to determine half the volume of the hips and waist, and also decide on the length. You should immediately add centimeters to the values obtained. Otherwise, the outfit may turn out to be too tight. Length measurements are taken strictly from the waist line. To create a drawing, it is most convenient to use graph paper. When using it, the pattern will be perfectly accurate. In this case, it is necessary to mark the length of the product on the mesh by drawing a vertical line. Also, by drawing a horizontal line, half the volume of the hips is indicated. This drawing is made in a couple of copies. One of them will be the front, and the second the back of the future clothing. At the top, you should make an indent of about twenty centimeters and mark the waist line. This creates the basis of the drawing.
the vertical line should be marked in the form of the letter T. The segments to the right and left should be divided in half and immediately marked. From each of these points the contours of the darts are drawn vertically. At the front they should be approximately 15 cm long and 3 cm . For the back, the length is only 10 cm and the width is 2 cm .
The next step is to bevel the waist line. For this purpose, it is necessary to draw a smooth line from the T mark. The bevel at the front is one and a half centimeters, and at the back it is only a centimeter. After this, the hip line undergoes changes. For this purpose, from half of this volume with the addition of a centimeter, you need to subtract half of the waist circumference with the addition of a centimeter. You need to subtract 5 cm from this value and divide the result by two. This figure is postponed from the T mark and is designated as T1 and T2.
At the final stage, the splines themselves are applied directly to the pattern. It can be placed at the back, front and even the side. The main thing is that there is a seam in this area, with the help of which the fold will be formed.
Preparing for sewing
Before making a skirt pattern, you need to decide on the basic style and take measurements. These are the numerical values needed to construct the drawing. Outside help will be required, since a person is not able to take the necessary measurements of himself. Constructing a skirt pattern will require the following numbers:
Half waist circumference (St).
- Half thigh circumference (Sb).
- Length to back waist (Lts).
- Product length (Dizd).
- Length of the skirt to the floor in front (L yu to n sp).
- Length of the skirt to the floor at the back (L yu to n w).
- Length of the skirt to the floor at the side (L yu to n sb).
To take measurements, you need to prepare a sheet of paper on which you can carry out the necessary calculations, a pencil, a meter tape and a control belt. The latter can be any lace no more than 1 cm wide and long enough to be tied around the waist.
Construction of a spline drawing
A straight skirt with a vent is modeled taking into account certain nuances. The first step is to decide where exactly this element will be placed and how many such parts will be on the clothing. Sewing technology directly depends on this.
Depth is important. It is selected taking into account the density of the material used. If the fabric is thin, only 4 - 5 cm is enough. In the case of dense fabric, the slot is made with a length of 6 - 7 cm.
An equally important indicator is the length. When determining it, you need to adhere to a certain rule. The distance from the top of the fold to the hip level should be at least 15 cm. As a rule, its height reaches 22 cm. In many ways, this parameter depends on the length of the skirt. The larger it is, the longer the fold will be.
The obtained values must be transferred to the pattern. To indicate a fold, you need to use shading. Thanks to this, the vent will be separated from the base of the pattern.
Mark the location of the splines
Determine element depth
Select length
Transfer details to skirt pattern
Ready-made patterns
High waist
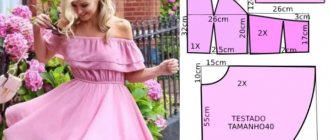
An excellent high-waisted model that can be used as an outfit for special occasions. In the photo, the pencil skirt is made of leatherette. It can also be leather.
Download for sizes 40, 42, 44, 46,48 - yubka-karandash_r-r_34-42.pdf
Elasticated, long and elongated
Before us are two patterns. One of them is long - almost to the floor, the other is elongated and ends just below the knee.
For women's sizes 44, 46, 48, 50, 52, 54, 56, 58, 60 - r-r_44-60.pdf
Description of tailoring - opisanie_poshiva.pdf
With pockets on the sides
This model is quite short. It has no darts, no vents, no belt. The most common. At the same time, it is decorated with pockets on the sides, which can be used to hide some small detail.
Patterns - 117-02-2017-Schnitt.pdf
How to sew - 117-02-2017-Anl.pdf
Knitted pencil skirt with front zip
The main feature of this model is that there are 3 of them. It can be above the knee, below the knee or even floor-length. There is also a zipper on the front, which both decorates it and makes it quite easy to remove.
Download for sizes 42, 44, 46, 48, 50 - 101-103_0817.pdf
Simple for beginners
In our blog there is a place for simple skirt models. This model is intended for beginner seamstresses. I am sure that sewing it will not cause you any particular difficulties.
Sizes 42, 44, 46, 48, 50 — yubka_-karandash_r_36-44_EU.pdf
Straight with fabric flounces
Model of a straight skirt with flounces. It can be sewn from any fabric. Good and simple for sizes 42, 44, 46, 48, 50.
Download — yubka-karandash_r-r_36-44.pdf
Download for sizes 44, 46, 48, 50 — Bleistiftrock_A4YuBKA_KARANDASh.pdf
Maternity elastic with one seam
This model is for obese women or for early pregnant women. It is supplemented with elastic, which makes it universal a couple of sizes back and forth along the size chart. With one seam.
Download - u170874_f593305d2016-10-31-12-30-46.pdf
Patterns – Yubka-karandash.pdf
How to sew it yourself - LSlottieskirtininstructions.pdf
With reliefs and drapery
An interesting model with reliefs on the fabric. It even seemed to me like a drapery. If I'm wrong, tell me.
Size 46 — yubka-karandash_s_ryushami_46_razm_168_rost.pdf
Size 42 — yubka-karandash_s_ryushami_42_razm_168_rost.pdf
For 40, 42, 44, 46, 50 size - 117-122013-Schnitt.pdf
How to sew - 117-122013-Instruction.pdf
Free patterns - 191_schnitt.pdf
Sewing instructions - 191_anl.pdf
For plus size women with slits in front and back
This model is available in sizes 50, 52, 54, 56 - for obese women. It has slits in the front and back. But if you redesign it a little, you can make the size from the side.
Download for sizes 50,52,54, 56 - 334.pdf
Cutting rules
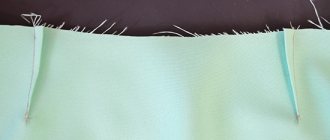
A skirt with an additional fold is cut, taking into account several nuances. You should familiarize yourself with all the intricacies of this process in advance to avoid making mistakes. The first thing to do is mark the back and front sides of the fabric. The pattern will be transferred only to the wrong side.
After this, the fabric should be spread on a flat surface, always taking into account the direction of the lobar fibers. It is along them that matter folds in half. Naturally, the print in this case also needs to be taken into account.
The prepared drawing is superimposed on the canvas and fixed on it with pins. It is outlined exactly along the contour, after which an increase of about two centimeters is made on the seams and another contour is drawn.
The matter is cut along the second of the lines. If you use striped or checkered fabric, you need to ensure that this pattern on the seams matches perfectly. If the image is large, it is placed in the most visible area.
If the vent was not drawn on the pattern, it can be marked on the fabric. For this purpose, add a width of 5–7 cm and a height of about 22 cm to those sections where it will be placed. The top line must be drawn at an angle of 45 degrees.
In order for the fold to have an attractive appearance and not diverge on the clothes, you need to take into account several nuances. Below, the depth is reduced by a centimeter from the starting parameter. At the top, on the contrary, it is increased, but only by half a centimeter. After performing such manipulations, allowances for seams should also be added.
Subtleties of processing
Processing the slots on the skirt can be done in two ways. Products with and without lining are created using different technologies. The features of the first and second options should be considered in more detail.
Lined
The lined model with a vent at the back is processed using simple technology. To cope with this task, you just need to follow the following instructions.
The first step is to sew down the middle parts of the main part of the skirt and the lining.
The allowances are smoothed out, and one of them is notched.
The middle line is marked on the slot.
The lining fabric allowance is ironed.
The wrong sides connect the base and the lining.
The lining material is folded back and the left seam allowance is attached to the fold seam allowance.
The angle of the allowance on the slot is notched and connected with the upper part to the skirt.
The right indentation of the lining material is folded with the allowance for the hem of the fold.
The slots on the skirt are processed by stitching to the top notch.
The lining is folded back and the top indent is connected to the indent of the base.
The indents on the lining fabric are sewn to the base by sewing a vertical stitch.
The lining material is lifted and the seams are ironed.
Unlined
When sewing clothes that do not involve the presence of lining material, the work is carried out according to the following scheme:
- The slot is processed using adhesive tape. It is especially important to perform these steps if thin fabric is used when sewing.
- On one side this part is glued directly, and on the other only its indentation.
- The seam allowances are ironed to the wrong side.
- The two parts of the future product are folded facing each other and stitched along the entire length of the middle cut, capturing the upper edge of the fold.
At the final stage of the edge, the product is carefully ironed. In this case, the fold should be directed to the left.
Sew or buy
Shops and boutiques offer a wide range of products.
However, many ladies continue to face the problem of choice related to their body shape. The average sizes accepted everywhere fit differently on each figure, but you always want to look good. If you sew a skirt to order, there is a guarantee that the item will fit well. At the same time, all the little things will be taken into account, such as the shape of the pockets, vents, smell, cut, etc. An experienced craftsman will build the ideal style, after which he will model it and sew the item. The timing and quality of execution are purely individual and depend on the seamstress.
Hem hem
This stage of work is the final one. It is performed after all other manipulations have been performed. The indentation when decorating the bottom is made within 2 - 3 cm. The bottom edge should be folded inward along the entire perimeter and then ironed.
After this, it is necessary to bend the allowance of the right side of the slot to the left and stitch from the edge at a distance of about two centimeters. The fold is then turned inside out and the stitching is on the inside.
On the left side, the design is done using an envelope corner. The finishing seam is made at an angle of 45 degrees. It is carried along the entire width of the fold, while fixing the indentations on the wrong side. After this, all that remains is to hem the hem completely.
The vent is a unique detail that allows you to make the skirt as comfortable and elegant as possible. Beginning needlewomen often refuse to sew products that require it. They believe that the process of sewing such clothes is incredibly difficult to master. In reality, everything is completely different. To cope with this task, you just need to carefully study the instructions and strictly adhere to them at all stages of sewing a skirt.
How to sew a hidden zipper
After you have connected the sections of the skirt panel and left the area for the fastener unsewn, you now need to insert a hidden zipper. To prevent the hidden zipper from moving, you have to sweep away the zipper tape before stitching it on the sewing machine. More experienced seamstresses, instead of basting, pin it to the fabric with pins. You can sew a hidden zipper without shifting or basting if you first sew the zipper braid with an additional seam, departing 0.5 cm from the edge. Do not make too large fabric allowances for sewing the hidden zipper. The zipper tape should run next to the overlock seam. Firstly, it will be easier for you to stitch the tape exactly along the edge, and secondly, allowances of 2.5-3 cm are already outdated technology. Wide seam allowances may be printed on the front side of the product. And also, from the top edge of the product, the zipper fastening should be lower, approximately 1.2. By the way, the plastic, molded fastener often interferes with the foot when sewing on the zipper. To prevent it from getting in the way, bend it back with your fingernail.