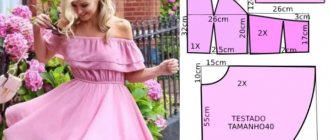
A-line dress is an ideal choice for any body type. The shape of the pattern corresponds to the name of the style. This is a trapezoid with a wide base at the bottom. This solution visually narrows broad shoulders, corrects the silhouette, giving it a feminine outline. There are several cut options for this style. But they are all equally practical, comfortable and easy to wear. Another advantage of the trapeze dress is its extreme ease of manufacture. This style is the model of choice for seamstresses with minimal experience. In this article for beginner dressmakers, we will look step by step at constructing an A-line dress pattern.
Mandatory elements of an a-line dress
When cutting a trapeze dress, the pattern should contain the following elements:
- The shelf consists of one piece.
- Back - usually it is made from one piece of material, but in some versions it may include two parts.
- Sleeves can have different shapes: full, three-quarters, short. Some models may not have them.
- A collar may be used. It must consist of one piece. Some models do not provide for the use of a collar.
A-line dress
If you sew pockets to decorate a dress, to make them you need to prepare patterns for the valance, patch pocket, facings, flap, pocket burlap. Decorations (such as a shuttlecock) may be used.
Where to start
Before you start building any product, you need to analyze the color scheme, style, proportions, details, accents. A creative and competent approach to creating a dress is the key to a beautiful image.
Before sewing you need to do the following:
Determine the dress model. Despite the simple design of the trapezoid, the product may have additional elements: a yoke, pockets, flounces, a collar and other cut details. It is recommended to draw a sketch or choose a photograph you like.- Select material. Fabric or knitwear should drape easily. This property allows you to get coattails at the bottom of the product. The choice of material depends on the desired shape. For example, chiffon gives a light silhouette shape, while gabardine gives it a stable and rigid shape.
- Prepare a base pattern. You can copy it from a magazine using tracing paper or build it yourself. You can also use a knitted T-shirt or T-shirt as a basis for the drawing.
To create a pattern you will need:
- pencil;
- graph paper;
- ruler;
- right angle.
Recommendations for choosing fabric
A-line dress can be made from almost any fabric. However, there are materials that are especially popular. For this purpose, designers prefer to use thick knitwear, linen, staple or cotton.
When choosing the most suitable fabric for a girl, you need to take into account the look you want to create and the time of year when you plan to wear such a dress.
It’s convenient if you have a-line dresses in your wardrobe, designed for different situations and seasons.
Taking measurements
The word “waist” translated from French means “figure”. It is better to measure your figure with an assistant; mark the waist line with a ribbon or elastic band.
You should stand straight, as naturally as possible, without trying to strongly pull in your stomach, straighten your shoulders, or otherwise “improve” your figure. If you plan to wear a dress with shapewear, then measurements should be taken while wearing this underwear.
Necessary tools for creating a pattern
Before work you need to prepare everything you need. To cut and sew a women's trapeze dress, you will need the following tools and materials:
- You will need thick paper to make drawings and create patterns.
- To draw, you will need a simple pencil with hardness B or HB.
- You will need two rulers 50 and 90 cm long, as well as a triangle.
- You will need a measuring tape.
- To apply marks on fabric, you will need to prepare chalk or a bar of soap.
- To cut thick fabric, you will need tailor's scissors.
You might be interested in everything you need to know about tailoring car interiors
To cut the dress, you will also need safety pins.
Necessary tools for work
Some tips
You can sew a dress from a variety of fabrics : natural, synthetic and mixed. When transferring the pattern onto fabric, place lines A1A2, Y1B2 and O1 parallel to the grain thread, otherwise the product will not work.
It is better to trace the pattern with a piece of chalk or soap, rather than with a pencil or pen (it’s easier to wash off). Basically, allowances are left at 1.5-2 cm.
Originally posted 2018-04-19 05:11:29.
Attention, TODAY only!
Step-by-step construction of a pattern
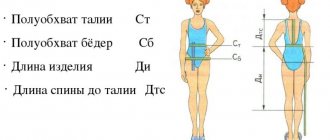
To make a dress that fits your body perfectly, you need to correctly take the measurements needed to create the pattern.
Dress measurements
In this case, it is recommended to use the bra that is intended to be worn under the dress, and shoes with a suitable heel length. The latter is important in order to correctly determine the length of the dress.
Location of pattern pieces
Beginners are not recommended to immediately take on a complex pattern. You should start with one of the simplest options. To create a pattern, you must follow the following instructions:
- Before making drawings, you need to measure your chest circumference. This length must be divided into four parts.
- On a sheet of paper prepared in advance, you need to put the resulting value horizontally along the top edge.
- Measure the size of the armhole and place it from the top edge down.
- Now you need to find out your waist circumference and divide it into four parts.
- This length must be set aside on the left side of the sheet.
- Measure the distance from the thoracic region and set this distance vertically.
- Now draw what the neck will look like.
- You need to mark a point on a piece of paper that marks the length of the dress.
- A line is drawn down from the waist, while widening the hem.
- Now, after making the back part, move on to the front, placing the darts in the right places.
- From the top edge of the armhole, lay three centimeters down and make a mark. The resulting point is connected to the upper edge of the armhole.
The pattern is now complete. It is transferred to the fabric and sewing begins.
How to check the underlying basis
The first fitting is best done after the bodice and the skirt are ready. Before sewing them together, it is better to make sure that the product will not be small in length, will not compress the waist too much and be sure of such little things. In addition, after trying on, there is clarity in the vision of the finished item.
Perhaps the designer, having made the first fitting, will want to make fundamental changes to the design of the canvas or make interesting decorative details, use some other seam to fasten parts.
Note! The first fitting is also necessary in the case that if there were technical errors in the calculations, something could still be corrected before the product was hopelessly damaged.
Checking the basic parivan pattern as a necessity when creating a product
Instructions: how to cut and how to sew an a-line dress using a finished pattern
This dress has a large number of styles and options, among which many can find one they like. Next we will talk about the most popular varieties.
Dress pattern
With length difference
Such a dress can be made by novice craftswomen on their own with minimal labor and time. Its distinctive feature is that the front part is shorter than the back.
Pattern with length difference
This style of dress looks impressive, creating the image of a mysterious and romantic woman.
Cutting and tailoring can be done in the usual way, except for the following:
- The length of the dress in front and back is determined differently.
- When making side seams, you need to ensure that the length of the front and back matches at this point.
You may be interested in: Simple patterns of travel pillows for your car yourself
This style can be used for “cocktail style” or as casual office wear.
Trapezoid with difference in length
For girl
When making a trapeze for a little girl, it is enough to use existing clothes to create a pattern.
A-line dress for girls
An important point in the cutting process is determining the location of the lower point of the armhole. To check the accuracy of the construction, you must ensure that the following condition is met:
- Take a quarter of the chest circumference and add 3 cm.
- From the top of the pattern you need to set aside an eighth of the chest circumference, increased by 7 cm.
After the neckline and armhole are taken into account on the pattern, you can begin sewing in accordance with the step-by-step instructions:
- You can make a decoration on the shelf for the child: embroidery, bow or applique.
- Finish side and shoulder seams.
- Finish the neckline and armhole with bias tape.
- Use the same method to edge the bottom of the dress.
On the yoke
A special feature of the A-line blouse pattern of this style is the use of a yoke at the front and back. The cutting and sewing of the dress occurs in accordance with the general rules, with the exception that it is necessary to use a yoke. To do this, place the front part on the back and draw a horizontal line along which the yoke will be separated. When sewing it, you need to provide an allowance of 1 cm wide.
A-line dress with yoke
This dress can well correct figure flaws. The trapezoid, according to Burda, looks elegant, romantic and restrained at the same time.
Note! The yoke line can be located at different heights: below the chest or at the straps.
This style is particularly suitable for those who are expecting a child. Some options will require a high level of craftsmanship to produce.
A-line dress for plus size people
A-line dress pattern for plus size women allows you to hide your full figure. If it is floor-length, then this cut hides fullness.
Style for plus size
In this case, plain fabric or with a large pattern is often used. The dress can be flared. Also popular in the form of pears - when the bottom of the dress is slightly pulled inward.
Dress for plus size
Sleeveless A-Line Dress
This version of the trapeze is worn as an evening or business dress. A sleeveless dress is especially suitable for those women who have beautiful shoulder lines and necklines.
You might be interested in: Operation and repair of Veritas sewing machines
Without sleeves
This style is cut and sewn in accordance with the general rules for creating trapeze dresses.
Classic pattern
Pins
With a couple of pins you can change something that is too loose. Often tags are attached to clothing with small pins. Don't throw them away. They will definitely come in handy for sewing up the dress. The same technique works for shirts and light jackets. And all without a single stitch.
Simply secure the fabric at the sides or back with a pin. Of course, choose pins that won't come undone.
Use small pins so that no one finds out about your trick. But you can do the opposite. Pin the excess fabric at the sides with large gold pins. The Versace brand uses a similar technique. Large pins look elegant. You can’t even tell that they are needed not for decoration, but to reduce the size of clothes.
Colored pins will also work. They look especially impressive with dark, monochromatic items. For example, you can attach a few yellow safety pins to the sides of a khaki dress to break up the monochromatic look.
DIY trapeze sundress
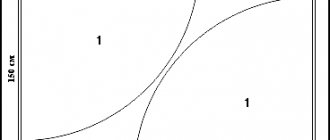
For sewing, you can use cotton fabric. With a cut width of 150 cm, you will need a length equal to the hip volume increased by 25 cm.
Trapeze sundress
You will also need a sewing machine, measuring tape, tailor's scissors, thread, pins and chalk. When making a sundress pattern for silhouette A, you need to prepare the required amount of fabric.
Materials and tools for sewing a sundress
For a sundress you need to measure two trapezoids. The upper part should be 10 cm larger than the chest circumference, at the waist and bottom the width will be the hip volume increased by 20 cm.
In addition, you need to prepare fabric for making a belt (150x5 cm) and straps (40x5 cm).
Open the sundress
Sewing a trapezoid sundress according to the pattern is done as follows:
- You need to sew the side seam. This is done along the entire length. Then it must be processed with a frequent zigzag. In this case, the appropriate dimensions would be a length of 1 cm and a width of 0.5 cm.
- Before working on the second seam, you need to process the edges of the fabric separately. An incision is made on this side at the mid-thigh level. The tissue is stitched from above before the incision begins. They make a paper clip on it.
Seam processing
- You need to iron both seams on the outside, as well as the allowances on the inside.
- Now you need to do a fitting. In this case, you need to accurately determine the length of the dress. It needs to be cut at this level, leaving 2 cm to fold the fabric. The allowance is folded inward and ironed.
Seam processing
- On the side where the fabric approaches the cut, a “U”-shaped processing is required.
- To make the straps and belt, you need to fold the fabric with the pattern inward and sew a seam at a distance of a centimeter from the edge. If the fabric frays, the edge is treated with a zigzag stitch. After finishing, the belt and straps are turned right side out.
- The fitting is carried out with the straps pinned on. This should be done in underwear in which you plan to wear a sundress. It is important to adjust their length so that the underwear does not peek out.
- The top edge is folded and the straps are sewn on from the inside.
A-line sundress made of cotton fabric
The A-line dress is not only elegant, but also has a large number of options, allowing every woman to choose the most suitable one.
The romance and femininity of the dress are combined with restraint and grace.
Simplicity and elegance
The straight dress is universal in its way, but far from tasteless and banal. Its form hides several big advantages . A moderately loose cut, on the one hand, emphasizes the lines of the figure, plays on it, and on the other hand, gives a slight touch of mystery. A straight dress can be light for a warm season and warm for a cold season - it all depends on the selected fabric.
In boutiques and stores you can find many options and styles of straight dresses. But at the same time, making it with your own hands will be much more pleasant, choosing the length, color and material for the product to your taste.
The pattern for a straight-cut dress is based on a universal pattern-the basis of the product according to the figure. Changing the original version is not difficult. For convenience, you can immediately draw the desired silhouette.
For a clear example, we will take dress patterns of size 52 .
Finished measurements (in cm):
- chest volume (Og) - 103-104;
- waist size (from) - 92;
- hip volume (Ob) - 112;
- back length to waist - 44;
- dl. front to waist - 49;
- back width (half measure) + increase - 20.5;
- 1/2 chest width + approx. - 23;
- shoulder length - 12;
- neck circumference - 40;
- armhole depth - 22;
- armhole width - 13;
- chest center - 23;
- hip height - 25;
- product length - 100;
- sleeve length - 49;
- sleeve length to elbow - 33;
- Sleeve width along the hem line is 29.
A straight dress with 3/4 sleeves looks most elegant. The silhouette of this piece will fit your body perfectly.
This is interesting: Pattern for a women's dress with a difference in length (size 40-52)
