What is jute?
Jute is a densely stemmed plant native to several continents. The fiber made from these stems is called similarly. It is often used in construction as an environmentally friendly insulation material.
This can also be the name given to a dense twisted thread made of fibers and a fabric made from these threads. Jute thread is widely known as ordinary twine, and jute fabric is used for sewing bags, bags and furniture upholstery.
Variety of jute crafts
Needlewomen all over the world cannot ignore such an attractive material, inventing more and more new jute crafts:
- decorative and functional pillows for home and garden;
- flat and voluminous wreaths for the door on the occasion of any holiday;
- rugs and paths;
- vases and candlesticks;
- bags;
- boxes, needle cases, tea boxes;
- bags for fragrant herbs.
Even walls are decorated with jute cloth (or burlap) instead of wallpaper. It looks very original.
How to make beautiful flowers from jute with your own hands
Jute flowers can decorate many interior items and clothing. Even a novice craftswoman can make them if you follow a detailed master class.
Jute for making floral ornaments
You need to prepare the following tools and materials:
- Super glue;
- jute of different shades;
- scissors;
- safety pins;
- pencil;
- office file;
- cardboard;
- compass;
- needle;
- ruler.
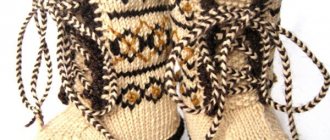
The simplest twine flowers
Features of making chamomile from jute:
- Using a compass, form a circle of the required diameter from cardboard. It is this parameter that will determine the size of the bud. Cut out the part.
- Using a ruler and a simple pencil, draw a cardboard circle according to the principle of a snowflake. It is necessary to carry out 6-8 diameters.
- Stick safety pins along the edge of the cardboard circle, along the outer diameter.
- At the point where the diameters intersect, use glue to glue the tip of the jute.
- Next, wrap each pin with thread, forming loops. It is necessary to alternately wind each pin 2-3 times.
- After finishing the winding, cut off the thread, leaving a tip 25-30 cm long.
- Thread the tip of the thread into the needle and sew loops through the middle of the flower. Grab bundles of thread in equal quantities and pull the needle through the middle of this ring. Tighten the knot.
- Glue the tip of the thread to the middle. This way, the complete product will be fixed.
- Carefully remove the needles and pull out the cardboard circle.
Note! All work is done on a stationery file so as not to stain the table surface. You can make a flower like this and decorate the middle of the product in an original way
Popular articles White roses
Place a few coffee beans in the center and sprinkle some with cereal. Other types of powder can be used. The main thing is that the material is natural
You can make a flower like this and decorate the middle of the product in an original way. Place a few coffee beans in the center and sprinkle some with cereal. Other types of powder can be used. The main thing is that the material is natural.
Flowers with a natural center
A flower can be made from the same materials by forming jute filigree. A figured flower is printed on a sheet of paper, which is then placed in a stationery file. After smearing the file with glue, use tweezers to lay the twine along the contour of the design. Additionally, all connections and intersections of threads must be additionally glued.
Filigree technique
Note! Flowers made from jute and burlap look even better. The materials are similar in texture and structure, so they fit together perfectly
Advantages of jute products
Souvenirs and practical products made from natural fibers are attractive for the following reasons:
- environmental safety (jute does not release harmful synthetic molecules into the air);
- durability, color and shape retention; Most often, jute thread and burlap are used undyed - its straw color remains unchanged;
- plasticity, ease of processing;
- low cost; burlap is much cheaper than linen and other natural fabrics.
Disadvantages of jute products
Jute, like any material, has disadvantages:
- if you work with the material for a long time, you can damage the skin of your hands, since jute is a coarse fiber; for the same reason there is no need to make bag handles from it;
- When using products, small particles of fiber may fall off, causing or exacerbating allergic reactions;
- many souvenir items standing in open places will accumulate a large amount of dust over time (and if in the kitchen, then soot); odors are also preserved;
- absorbs jute and moisture well, but dries after that for a long time and poorly;
- may be attractive to insects and bacteria.
Pros and cons of jute rope
Before you start weaving with jute, you need to get acquainted with the material.
Jute is a plant that grows primarily in India. After the jute reaches its maximum length (3-4 m), it is cut and delivered to production. There the plant is soaked in water for 2-3 days, it is dried and turned into threads.
The main disadvantages of fiber include fragility. Like all natural materials, it is subject to rapid rotting. In addition, the plant absorbs up to 30% moisture, and therefore takes a long time to dry out and is difficult to process.
Important! Handmade jute products are durable, but have certain difficulties in manufacturing.
How does jute rope differ from linen and manila rope?
Manila rope is moisture resistant. It is a weave of Manila hemp fibers. They are multi-colored, so they visually resemble a zebra. Manila rope is much stronger than its analogs and has a noble color. It is used to decorate presentable premises, and it is quite expensive.
Manila rope
Linen rope has a dull gray tint. The advantage of working with linen rope is the softness and pliability of the material. It is not durable, but it is the most popular material for creating canvas.
Linen rope
Jute rope has a golden hue with a natural yellow effect. It is durable, moisture-resistant and unpretentious to use. The visual combination of jute thread with wood makes it a favorite decorative tool.
Rag dolls
Once upon a time, our great-grandmothers played only with such dolls - simple, cloth, somewhat figurative. Do not assume that they have lost their relevance. And today, little girls are drawn to simple packages that represent both women and men.
Rag dolls usually have no face. But, oddly enough, this does not scare children. On the contrary, it gives room for imagination, because you can come up with different emotions for your favorite doll depending on the game scenario.
Do-it-yourself jute crafts, folded and tied with your own hands, are safe and durable. And if, as a result of active games with a rag doll, something irreparable happens, you can always make another one, exactly the same.
Getting started on a craft
First you need to choose a pattern.
You can find and print diagrams of jute filigree or draw them yourself. The pattern must be clearly drawn. Then the drawing is placed in a transparent file. Next there is a choice. You can carefully spread glue along the outline of the sketch and lay a jute cord on top of it. Beginners can easily handle this technique.
A more difficult option is to coat a small section of the cord with glue before work and begin to form the elements. You need to rub the glue into the rope to make it smooth. While the twine remains flexible, you need to start shaping the elements. If the rope has hardened, then you can coat it with glue again.
Glue is very important in the work. It must be transparent and moisture resistant. The glue adheres well to the plastic surface and is just as easily removed from the file without breaking the design.
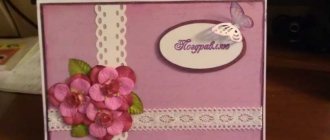
Pillows
Making a pillowcase from jute fiber is very easy. For the base you will need a rectangular piece of burlap and a fastener. This could be a zipper or ribbons from which bows will be tied on the side.
You can decorate a pillow in different ways. The following options are popular:
- snow-white lace;
- ribbons;
- buttons;
- embroidery with threads and beads.
Rope filigree
Similar to precious metal filigree, jute filigree is the art of weaving and laying out various patterns with thread. Using this technique the following can be created:
- caskets and caskets;
- decorative decorations for curtains, walls, doors;
- bijouterie;
- carnival and themed masks;
- frames for photographs and paintings;
- vases, candy bowls, napkin holders, trays.
As well as small table souvenirs, Easter eggs, dolls, figurines of animals and birds.
Essential elements
In order to create one or another openwork pattern, we will always use figured elements. They are simple in shape, but are basic when typing any design. The main elements of jute filigree can vary in size. May have a more or less curved shape. They can be hollow inside or filled with other, smaller elements. Each element is made from a separate piece of jute. The cut ends of the element must be firmly glued together or with adjacent elements. They need to be cut at an angle.
The elements are glued together on a polyethylene surface; it is more convenient to do this on a file folder. The drawing is placed in the pocket of the file folder and does not move anywhere. First we draw the element, then glue the outline according to the drawing, distributing the glue with a toothpick or skewer. We glue a piece of jute cord to this outline, bending it according to the pattern and being sure to press it a little with tweezers so that it sticks more tightly to the surface of the film. The element must be flat and even.
Any element can be formed directly on the surface of the film, or you can first twist it in your hands using tweezers, then glue it to the film and cut the required length from the cord. All elements must be well glued together. To do this, each element must be coated with glue, and then fixed on top with a drop of glue for reliability.
There are not many basic elements: these are “loops”, “curls”, “leaves”. The loop can be simple (hollow) or filled, that is, another element can be placed inside, for example a smaller loop. The top of the loop can be round or peak-shaped. A round loop is made from one piece of jute. A peaked one can also be made from two segments glued together at the top and bottom. You can make it from one piece if you bend the upper part and squeeze it with tweezers so that it turns out sharp.
The curl can be simple - with one turn (head, or ring) at the end or complex - with two or more turns. The coils can be loose, receding from each other, or tight, creating a tight disc at the end of the curl.
The curl can be double, that is, have rings on both sides.
This element can be twisted using tweezers. Grabbing the end of the rope with tweezers, we make turns around the grip. We fix the rings with glue so that the curl does not unwind.
The leaf can be straight or curved (curly). It is made from one piece of jute or two, the ends are glued together. The leaf can be hollow or filled with smaller elements. Often the filling resembles small arcs located one above the other. You can also fill the piece of paper with a “spiral”. The tip of the jute is glued to the corner inside the leaf and twisted in a spiral towards the center.
By alternating or repeating these simple elements, you can create many different openwork patterns.
Below is a master class in jute filigree technique for beginners.
Basic elements of patterns
Taking a closer look at any, even the most complex product, you can identify simple elements in the pattern. Knowing them will help you lay out the pattern in stages, without getting tangled in unnecessarily long threads. The most popular elements are:
- ring and half ring;
- cucumber, pear and petal (they differ only in how the thread is bent at the edges);
- several petals nested one inside the other are called curl;
- a clove is simply a bend of the thread at the desired angle;
- head and wall - two options for curling the tip of the thread;
- if the thread is curled at both ends, it is already a double curl;
- several single curls in one bunch (in one direction) - grass, and in different directions - horns;
- the contours and edges of the pattern are decorated with either a straight thread or a snake;
- a thread twisted into a tight spiral is called grain.
If you form petals in simple rings, the resulting shapes are called gears and burrs.
Tools and materials
Jute, or jute twine, is a natural material made from flax. It is usually used for domestic purposes, during construction work, and we will make beautiful things from it, giving it a different status. You can purchase jute cord for filigree at any hardware store. It has a grayish color. The plait is twisted from two or several threads, slightly shaggy.
To make products using the jute filigree technique, you can purchase jute of different twist thicknesses. Mostly two-strand twisting is used.
The structure of jute twine for filigree is such that it allows you to lay out a pattern of elements and lines of any configuration. This is an ordinary rope. The finished work looks like a large filigree. With this rope you can create an absolutely real filigree pattern, only much larger than a pattern made from metal filigree.
To ensure that the jute thread for filigree does not fray, and the finished work is smooth, shiny and rigid, it is necessary to follow a mandatory rule.
Everyone has the simplest tools for our work at home. Scissors, tweezers, a stationery knife with a set of blades, a metal knitting needle or a small awl. Wooden skewers and toothpicks will come in handy. You can have small wire cutters.
Tweezers for forming elements of jute filigree are indispensable in the work. With its help you can twist, tighten or press down the rope. It is better to have medium-sized tweezers.
Scissors with sharp tips or small wire cutters are needed to cut the cord. With their help you can make a good cut at an acute angle. This cut is important for the correct connection of the elements.
Toothpicks and wooden skewers for making jute filigree will help beginners when distributing glue.
A utility knife is needed to remove glue drips. The tip of a knife can be used to cut off excess glue between the elements.
You should also have a ruler, a sheet of paper, a pencil and a wooden board on hand. The board is needed when we cut off dried glue streaks from the finished work.
Titan type glue.
These are all the jute filigree tools and materials you need to get started. And, of course, you need desire and inspiration!
Feather in jute filigree technique
To familiarize yourself with the technique, you can make small-sized crafts from jute. A master class on making a magic feather from an unknown bird is described below.
- Transfer the pattern to paper or print it.
- Place a piece of patterned paper in a file or transparent bag.
- Start the work with the feather shaft: coat its outline with glue and lay it out with thread.
- Apply glue to one element of the pattern, spreading it with a toothpick or knitting needle.
- Lay out the curl with jute thread, cut off the tip diagonally.
- Coat the next element and lay it out again with thread.
- When the entire pattern is laid out, the product can be secured with the same transparent glue, PVA glue solution or acrylic varnish.
- Leave to dry under the press, having previously placed a film between the press and the product.
- Once the feather has dried, all that remains is to separate it from the film and cut off the remaining glue. You can use scissors along the edges; for the inner areas, a stationery knife is more suitable.
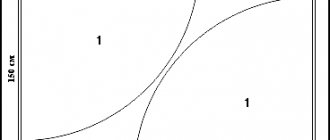
Recommendations for creating stencils
Before you start creating crafts from jute thread, you need to prepare a stencil.
A stencil is a drawing or a schematic sketch of an image that craftsmen use to apply a symmetrical image to all kinds of surfaces. A stencil is a kind of self-made copying machine, which helps to repeatedly increase the number of drawings, create all kinds of copies and transfer the desired design to any household item.
Simple tips for creating it:
- The technology for making jute paper is very simple, you just need to choose the right pattern;
- You can draw stencils for jute filigree yourself, relying on your own desires and imagination. However, it will be difficult for a beginner to imagine a pattern for working with jute thread, so at the stage of getting acquainted with needlework, it is recommended to print a stencil from the Internet;
- The main rule of a stencil is a clear and visible pattern. The lines should be big and bold. For ease of use, it is better to use white A4 paper.
You may be interested in what fabrics to choose for sewing skirts
Stencil example
Volumetric crafts made of jute filigree
The first idea for jute crafts in volume was a round box with a lid. To make it you will need:
- jute of natural color and bleached (any chlorine-containing bleach is suitable for this);
- wooden skewers for the frame;
- transparent glue;
- hand cream;
- scissors, awl, tweezers and needle;
- acrylic lacquer;
- cardboard for the bottom;
- template diagrams.
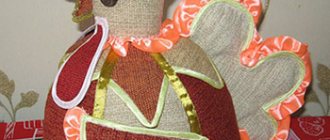
Flowers
Crafts made from twine in the form of flowers are used to decorate surfaces, separately or for a bouquet. One of the simplest options is shown in the photo. The flower is made in this order:
- A circle of the required diameter is drawn on cardboard.
- The circle is divided into 12 equal sectors. Toothpicks are stuck around the circumference at the intersection points of the diameters and the arc.
- Between toothpicks located opposite each other, twine is wound in 3-4 layers.
- Stepping back from the center by 1.5-2 cm, we tie together 12 bundles with red twine, which then form the petals of the flower.
- Red twine is passed between the knots of the ligaments, forming a circle - the border of the core of the flower.
- Red twine is wound randomly inside the central circle.
- The toothpicks are removed and the petals are given the desired shape.
- The workpiece is coated with glue, which, after drying, ensures that it retains its shape.
Another option is a voluminous flower. First, the flower petals are made. For this, a tablespoon is used as a template. Glue is applied to its spherical part, then jute twine is applied spirally. After laying, the material is once again generously saturated with glue. After it hardens, the workpieces are removed from the spoon. To make the core, take a small skein of twine. It is tied in the middle with wire, and the ends are trimmed and fluffed. The core is secured to a wire wrapped with twine. The petals from below, in a circle, are glued to the central part. The leaves are made similarly to the petals.
An original flower can be made from burlap and twine. The burlap is soaked in glue and dries within 24 hours. A round template of the required diameter is made from cardboard. According to the template, 3-5 round blanks are cut out of burlap. Each workpiece is divided into 5-6 sectors, then the borders are cut and the edges are rounded. This is how rose petals are formed. Each petal is edged with twine (it is glued around the perimeter). If desired, pieces of twine are glued lengthwise inside the petals to imitate veins. The petals are gathered into a rose, pinned at the center and shaped accordingly. The flower is fixed on a wire stem and can be collected into a bouquet.
Sequence of making a box
The box consists of a bottom, six sides and a lid.
- Lay out each side using the same pattern of simple elements. The finished side is rolled up over the bottle to give volume to the finished box and finally dries without a press, in a free state.
- Roll the bottom into a simple spiral, tightly arranging the rows of thread and gluing them onto the cardboard.
- Wrap wooden skewers in jute. Using an awl or needle, make six holes in the bottom at equal distances from each other.
- Stick skewers into the bottom.
- Glue together a tight ring of several rows of jute along the diameter of the bottom. Fix the upper ends of the skewers with it.
- Glue the side elements onto skewers one by one, changing their shape with a hairdryer if necessary.
- Similarly to the side fragments, make the lid of the box according to the diameter of the bottom.
- The box is ready.
Jars, vases
- Prepare jars or any other unnecessary small containers in advance. This could be a gel or shampoo bottle, a mayonnaise bucket, or other plastic and glass containers.
- Use a glue gun to apply the twine. This should be done in a circle of the selected container, starting from the bottom.
You can glue a piece of burlap to the bottom and lid. To do this, you need to measure and cut it in advance. Which option to choose is up to you.
Wrap the sides of the jar very tightly with jute so that there are no gaps between the threads.
You may be interested in: Crafts made from cement - beautiful and unusual garden design
Wind it all the way to the top of the can, cut the thread and glue it carefully.
Decorate the jar with the following materials as desired: lace, decorative flowers, beads, rhinestones or ribbons.
You should end up with a decorative vase like this. It will perfectly decorate any interior. We invite you to consider a few more ideas for creativity.