The Samoshveyk website offers you a simple way to build:
Laconic cut of the model
The four-piece skirt pattern takes its rightful place in high fashion because of the uniqueness of its construction. It is a classic because one of its advantages is its versatility. The product fits almost all body types. In addition, it is visually slimming. From the main drawing you can model several different types of products consisting of cut out parts. What is the most important thing in a four-piece skirt? This is pattern making, which is not such a complicated process.
Who is this style suitable for?
Attention! This product is best suited for girls with narrow hips, as the splendor of the wedges adds a little volume. Basically, the skirt emphasizes the waist and makes you look slim. Fashion designers and designers recommend this style of skirt for any figure and for any age. Plump girls can reduce the volume of their hips a little and emphasize their shape. Floor-length skirts will help hide leg imperfections. A product with a yoke as a type of skirt with wedges is suitable for girls with an hourglass or pear body.
If you need to visually change the size of your hips, then it is better to take a skirt with a shelf. Cross stripes add volume and slightly reduce height. Longitudinal stripes, on the contrary, slim the figure, adding a few cm of height. The oblique stripe makes the figure look a little slimmer.
Women's body types
Instructions
To create a step-by-step pattern for a four-piece skirt, you need to prepare a sheet of paper, a pencil, a ruler and an eraser. We need tracing paper so that we can make a design on it, as well as draw precise thin lines using a pencil and ruler. But the eraser is used for erasing, correcting defects and putting everything else in the correct order. It is necessary to position the paper sheet towards you so that it is convenient for you to draw precise lines on it (of course, after calculations).
How to make a four-piece skirt pattern for a girl? A simple construction method is used for this. Let's make a small indent from the top edge of the sheet down by 2 cm. Draw a straight line parallel to the line of the top edge of the paper. Let's divide this line in half and put a dot in the middle, mark it with the letter A. This long straight line means that it is the waist line. Now from point A to the right and left along this line we place points A1 and A2.
For example, when taking measurements, we found out how many centimeters we currently have when measuring our waist, say 64 cm. Then we begin to calculate 64:8 = 8. It turned out to be 8 cm. From point A, put 8 cm to the right and left, designated by points A1 and A2. A1A = AA2 = 1/8 waist circumference.
Then, from point A, perpendicular to the segments A1 and A2, draw straight lines and mark point C on one, and point B on the other, where:
- From point A to point C is the length of the segment from the waist line to the hips, this measurement is measured from the waist line to the hips, it is approximately 16 - 18 cm.
- From point A to point B is the length of the skirt section, this measurement is measured from the waist to the knee or below, fixed on a line in centimeters.
- We draw a straight line through point C, and also through point B we draw a line. The straight line of the hips and the bottom line are parallel to the waist line, the segment of which is equal to A1A2.
- We measure segments from point C to the right and left. We give an example, if after taking measurements the hip circumference is 94 cm, then you need to measure from point C to the right side 12 cm, to the left side 12 cm. Here 2 cm is given for a loose fit, so we add them to the hip circumference (it equals 94 cm). This means 94 + 2 = 96 cm. Divide the number 96 by 8, we get 12 cm. From point C we put 12 cm to the right and left. We denote it as points C1 and C2. C1C = CC2 = (hip circumference + 2 cm): 8.
- From point A1 we draw a straight line, connect it to point C1, bring it to the bottom line and at the intersection with it we designate point B1, and also from point A2 we draw a line, pass through point C2, draw it to the bottom line and at the intersection with it we put a point AT 2.
- The waist line must be drawn up; to do this, you need to move 1.5 cm down from point A, mark point A3. From point A1 we draw a smooth line and connect it to points A3 and A2.
- After this, you need to draw the bottom line of the drawing of the four-piece skirt. To do this, you need to measure the length from point A3 to point B, this length should be marked on side A1B1, mark it with point B4. We also measure the length from point A3 to point B, measure the resulting distance in centimeters on side A2B2, and denote it as point B5.
- From point B4 we draw a smooth line to points B and B5. The pattern drawing for the four-piece skirt is ready.
Measurements needed to create a pattern
Preparing a drawing with your own hands is quite simple. First you need to take the measurements correctly and write them down.
IMPORTANT! Up to 2 cm is added to the circumference of the waist and hips for freedom of fit.
The following measurements are required for operation.
- Waist circumference (OT) . Measured at the narrowest part of the waist . In this case, the measuring tape should lie flat and free, without tension. A person should feel comfortable, since the convenience of wearing the item received in the future depends on this.
- Hip circumference (H) . Measured at the widest point of the hips .
- Length from waist to hips . The standard value is 20 cm. However, for greater accuracy of the drawing, real measurements are taken. Measure from the waist to the fullest point of the hips .
- Product length (DI) . The measurement is taken from the waist to the estimated bottom of the skirt. Depends on the purpose of the skirt, the characteristics of the figure, as well as personal wishes for the length. This style is universal and has no clear restrictions on length . These can be a variety of mini, midi and floor-length skirts.
IMPORTANT! From the resulting four-blade base, you can later model various options, including on the yoke.
Additional details for the skirt
Then we use scissors to cut out the finished pattern of the four-piece skirt on paper. We lay out the wedge-shaped pattern on previously prepared fabric. Then you need to cut out four wedges. Before cutting, do not forget that you need to add 1.5 cm to the seams along the waist line, 1.5 - 2 cm at the bottom of the part, and 1.5-2 cm at the edges of the wedge. After the increases along the edges of the wedges four parts can be cut.
To cut the belt, you need to know the waist circumference measurement, add another 12 cm to this calculation (waist circumference + 12 cm), after which you can cut out a strip of the length you need. And for the width of the belt, when cutting out, you need to know how many centimeters it will be in finished form. For example, if in finished form it is 3 cm, then when cutting we add the width of the part twice, on each side we need to add another centimeter (3+3+1+1=8 cm). For this version of the belt, a zipper is used.
There is another type of belt processing for patterning a four-piece skirt with an elastic band. In this option, a belt is sewn to the skirt at the top of the product and an elastic band is inserted into it. Only when cutting the wedges at the waist line, you need to add a few centimeters on both sides, this is taken into account, since the skirt needs to be assembled in this area. This pattern of a four-piece skirt is suitable not only for girls, but also for adult women.
Types of four blades
A skirt made of four wedges will be a classic model. Based on the basic sketch, various styles are made that are comfortable to wear at any time of the year. If you choose the right material, even a novice needlewoman can sew a beautiful and comfortable skirt. The length is selected based on the shape of the figure. The skirt can be either mini or midi, floor-length. This model has a low waist and increases at the bottom.
You can use a belt to visually enlarge your hips. Thanks to this element of clothing, the silhouette becomes more feminine. If you increase the length of the skirt, it will help hide voluminous hips. You can sew a product with a belt, elastic band or buttons; a zipper is rarely used.
Models with different lengths
Assembly and grinding of finished parts
The finished wedges resemble a trapezoid.
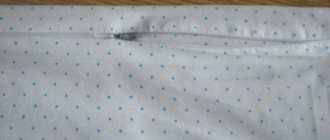
The cut parts need to be pinned together so that the fabric does not fit under the foot while working, otherwise you will have to rip everything apart and sew it again. The four-piece skirt is sewn with even stitches. When making the last seam at the top you need to leave about 15 cm for the zipper.
A final fitting is required to ensure that the product fits properly. If necessary, the craftswoman should make final adjustments, for example, removing it a little along the hips or narrowing it a little at the waist. When the product fits well on the figure, you need to process the cuts on an overlocker, turn the bottom under and stitch.
Four-piece skirt: description of sewing, photo
A four-piece skirt is timeless. Let's learn how to sew it.
Many women prefer to wear trousers and jeans in everyday life, but when the holidays come, almost everyone switches to dresses and skirts. The choice on the market is huge, but, alas, the size is not right, the length is not right, the fabric is not to your liking, the waist is wide, the hips are narrow, or the waist doesn’t fit. Almost everyone has experienced this; eventually, another thing appears in the wardrobe that you don’t really like. To avoid such unpleasant moments, you can sew the skirt yourself.
The simplest skirt patterns that you can sew at home
There are different models of skirts, some of them are quite simple, others need a lot of work. One of the most affordable options is a four-blade. The skirt, of course, can have complex modifications with a combination of fabrics, a yoke, a vent, pockets and decorative elements. Decorative stitching, belts, facings, codpieces and belt loops are often used as additions to the basic model of the product. But before moving on to complex finishing options, you need to try to sew something simpler to practice your skills. The four-piece skirt is timeless and perfect for beginners. Due to the length of the product, you can create different looks; this model fits well on almost every woman. By choosing different shoes, you can change your style: with moccasins it will be casual, with pumps it will be businesslike.
It’s worth saying right away that patterns for a six-blade are built according to the same principle, the main thing is to understand the basics. As always, work begins with construction. Tracing paper is most often used for drawing, but thick Whatman paper and flipchart paper can also be used. As a last resort, wallpaper with newspapers will also work; there are craftswomen who work with transparent cellophane.
First you need to take measurements and write them down in a working notebook.
| The four-piece skirt has truly become a classic and therefore will never go out of style. What is her secret? In versatility and practicality. A skirt made of four wedges is suitable for almost any female figure, and thanks to the combination of decorative details and varying the length of the product, several different models can be obtained from one skirt pattern base. But the most important advantage of a four-piece skirt is the ease of constructing the pattern itself and sewing it. The Samoshveyk website offers you a simple way to build: DIY four-piece skirt patternIn order to create a pattern, we will need the following measurements:
The process of constructing a wedge pattern for a four-piece skirtTake a sheet of paper, step back about 2 cm from the top edge and place point A in the middle. Through it, draw a straight line parallel to the top edge of the sheet - this will be the waist line. Along it to the right and left, mark points A1 and A2. From point A, perpendicular to segment A1A2, draw a line and mark two points C and B on it, where: Through points C and B we draw lines parallel to the waist line (A1A2): the hip line and the bottom line, respectively. From point C to the right and left we measure the segments: For example, if the hip circumference is 94 cm, then 12 cm should be set aside to the right and left of point C: to 94 cm we add 2 cm for the freedom of fit, we get 96 cm. Divide the number 96 by 8, we get 12 cm. Through points A1 and C1, as well as through A2 and C2, we draw straight lines to the bottom line. At the intersection we mark points B1 and B2, respectively. We shape the waist line. To do this, set aside 1.5 cm from point A down and place point A3. We connect points A1, A3, A2 with a smooth line. Now let's start designing the bottom line of the four-piece skirt. To do this, measure the segment A3B and put this measurement on side A1B1, put point B4 and A2B2, put point B5. Let's connect points B4, B and B5 with a smooth line. The four-piece skirt pattern is ready. We cut out the part from paper, draw 4 wedges on the previously prepared fabric. You can find out how to prepare fabric for cutting here. Don’t forget about the allowances: 1 cm at the waist, 1.5-2 cm at the bottom, about 1.5-2 cm at the sides of the wedge. Cut out 4 wedges. For the belt, we cut out a strip equal in length to the waist circumference +12 cm, and in width about 8-10 cm, depending on the width of the finished belt (for example, if the finished width of the belt is 3 cm, then the width of the part when cutting will be 3+ 3+1+1 = 8 cm, where 1 is processing allowance) You can learn more about making a four-piece skirt in the article How to sew a skirt with a belt with your own hands. Author: Ksenia Radonezhskaya | ||
| Measurement name | Short designation | Measurement result, cm |
| Waist circumference | FROM | 70 |
| Hip girth | ABOUT | 100 |
| Length of the product | DI | 65 |
Let's take arbitrary measurements close to real sizes.
Our goal is a four-piece (skirt), which means that the product will be sewn from four elements (parts), but only one pattern is used to cut them. The pattern is built according to the measurements taken.
The waist circumference should be divided by 4 (number of wedges): 70:4=17.5 cm.
The hip circumference must be divided by 4 (number of wedges): 100:4 = 25 cm.
These measurements are enough to create the pattern we need. On tracing paper we draw a horizontal line, 17.5 cm long (1/4 waist circumference). Divide the segment into two and put a point (center): 17.5:2 = 8.75 cm.
From this point, at a right angle downwards, draw a line 65 cm long (DI).
The most convex point of the hips is approximately 19 cm below the waist; in your specific case, you can measure this length separately. On the DI line from top to bottom, set aside 19 cm and put a dot. Through this point you need to draw a horizontal line of 25 cm (OB), respectively 25:2 = 12.5 cm, i.e. set aside 12.5 cm in each direction
When the main elements are marked on the fabric, you need to connect the side points with straight lines and decorate the bottom. It turns out to be a trapezoid.
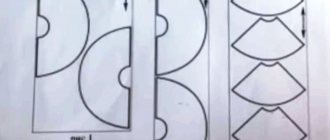
The four-bladed version is marked in red, which will not be as fluffy, but it will require less fabric. We also remember that the length of the skirt is 65 cm, so the sides should also be that long. We round off the extra centimeters at the corners with chalk and cut them off.
Cut skirts onto fabric
There are several options for how a four-piece skirt is laid out on the fabric. The description is quite simple. All the parts are the same, which means you need to cut out 4 wedges from the fabric with seam allowances. In this model you need to pay attention to the fabric itself. If there is a drawing, it should not be upside down; you need to check this point before cutting.
The pile should be directed from top to bottom. If the fabric is plain and smooth, then the wedges can be laid out on the fabric alternately: the part with the waist up, the part with the waist down. This will save material and use it wisely. From the remaining section you can cut out a belt or facing.
If the hip circumference is large enough, then all the fabric will go to wedges, so when purchasing a cut, you need to take into account an additional 15-20 cm for the belt.
It is cut on tracing paper and on the fabric of a six-blade, like a four-blade. The skirt is sewn very quickly. In just one day, you can update your wardrobe.
Assembly and grinding of finished parts
The finished wedges resemble a trapezoid.
The cut parts need to be pinned together so that the fabric does not fit under the foot while working, otherwise you will have to rip everything apart and sew it again. The four-piece skirt is sewn with even stitches. When making the last seam at the top you need to leave about 15 cm for the zipper.
A final fitting is required to ensure that the product fits properly. If necessary, the craftswoman should make final adjustments, for example, removing it a little along the hips or narrowing it a little at the waist. When the product fits well on the figure, you need to process the cuts on an overlocker, turn the bottom under and stitch.
The final stages of work
The type of product will depend on how neatly and evenly the stitches are laid, the zipper and belt are sewn. You can use a hidden zipper or a regular one. The top of the product is processed either with a facing or with a belt of the desired width. A button, button or hidden clasp is suitable as a fastener. You can see what the finished four-piece skirt looks like. The photo shows the model, the tailoring of which is described in the article.
If you add a few centimeters along the hip line, the skirt will be fuller and will not fit tightly to the figure. You can leave a playful cut along the seam line in front.
fb.ru
Material saving
To create a pattern you need the following items:
- tracing paper on a roll;
- long ruler;
- pencil;
- scissors;
- a centimeter tape to take all measurements;
- a flat surface on which you will work.
Now you have everything you need to make a wedge skirt. The drawing is done very simply, and you can significantly save fabric by arranging the wedges in a checkerboard pattern.
Thanks to this method, the flared hem in the wedges can be adjusted according to the fabric's capabilities. It is also worth rounding both the top and bottom a little. Some craftsmen fold the fabric in half and draw a diagonal line right across the material. This way they save time on the pattern.
General information about the wedge skirt
A wedge skirt is a high model that is located at waist level. It tightly fits the figure up to the hips, and then goes down to the ankles in folds or folds. The lines of the skirt can be positioned differently, you just need to change the pattern a little. It all depends on the direction of the bevel lines. The silhouette of the skirt can vary dramatically. The model can also be made wider at the waist by adding to the width of the wedge.
Any materials can be used. Chiffon is suitable for making a skirt for ballroom dancing, silk or viscose are ideal for summer looks and walks, and wool is ideal for winter outfits. In 2016, striped and checkered fabrics are considered fashionable. Such skirts will never go out of fashion, because they fit well on any figure and emphasize a woman’s strengths and also hide flaws.
First, it’s worth considering the standard construction of wedge skirts.
What to wear with a skirt?
How to beat the four-blade to become the most charming and attractive? What to wear with a skirt to create a harmonious look? When composing an ensemble, it is important to choose the right color, texture and length of the products. The first rule is not to mix styles and textures of fabrics. If you wear a light and airy skirt made of chintz, linen, or lace, then the upper part should be just as elegant.
Summer option - light skirts with guipure inserts and lace or nylon blouses. You can add a hat, glasses, a clutch handbag and high-heeled shoes to the ensemble. Often the top part is tucked into the skirt. Thus, you can visually enlarge your breasts and emphasize your waist.
For spring and autumn, items made of wool or corduroy, plain or checkered, are appropriate. A sweater, jacket, fitted blouse, plain or colored turtleneck will suit such skirts. For footwear, you can use high-heeled boots, ankle boots or over the knee boots. A small accent - an elegant silk neckerchief will add chic and emphasize the individuality and originality of the image.
When composing an ensemble, it is important to consider the length of the product. Short samples are best combined with tops and T-shirts. Medium-length skirts are in harmony with jackets, cardigans, and fitted blouses. A long skirt looks great with a short jacket or jacket. The texture of the fabrics should also be taken into account. The top material should be thinner and more delicate than the skirt fabric. Thin sweaters with floral prints and blouses with polka dots will decorate a plain skirt, and dark cotton jackets will go well with light-colored items.
Stylists advise to be careful when wearing the top untucked, as there is a danger of creating a shapeless silhouette. In this case, you can skillfully use an oversized top. Blouses, sweaters, vests, jackets should not be longer than the hips. It is advisable to use a belt to emphasize the thinness of the waist.
Whatever ensemble you choose, be confident in your irresistibility and those around you will believe your smile and proud posture!
Sewing technology
By laying out the cut fabric in a circle, you will see that you have a wedge skirt. Her sewing technology is elementary. First you need to sweep the side seams of the wedges. In this case, you should pay attention to the points of the waist and hips, which should be connected to each other. In the place of one of the seams you need to leave about 16 cm unswept for inserting a zipper. After basting, the first fitting is carried out.
If during the fitting the skirt fits as it should, then we sew the outlined lines together using a sewing machine. Next, insert a zipper; you can also insert buttons or hooks instead of a zipper. The waist line can be equipped with an elastic band or a belt.
The simplest skirt patterns that you can sew at home
There are different models of skirts, some of them are quite simple, others need a lot of work. One of the most affordable options is a four-blade. The skirt, of course, can have complex modifications with a combination of fabrics, a yoke, a vent, pockets and decorative elements. Decorative stitching, belts, facings, codpieces and belt loops are often used as additions to the basic model of the product. But before moving on to complex finishing options, you need to try to sew something simpler to practice your skills. The four-piece skirt is timeless and perfect for beginners. Due to the length of the product, you can create different looks; this model fits well on almost every woman. By choosing different shoes, you can change your style: with moccasins it will be casual, with pumps it will be businesslike.
What to wear with?
Now you know how to sew a four-piece skirt with your own hands. Let's talk about creating stylish looks:
- Blouses and pullovers look great with a four-piece skirt. They can be tucked in or worn untucked.
- Shoes - exclusively elegant shoes or boots with heels. No platform or wedge will do. The heel is of medium thickness or thin.
- Tall girls can experiment with ballet flats, but don’t get too carried away. It may be convenient, but the elegance will be significantly reduced.
Dart location
To find the location of the darts, you need to follow this diagram. Divide the distance from the center to the side seam in half. Draw a dart from the mark down. An allowance of 4 cm is made for its solution, and for the length - 10 cm (vertically from the waist line). The location of the dart on the shelf is found using the same method. The tuck opening is 4 cm, and the length is 10 cm. The sizes can be changed, it depends on the body type.
Guipure product
Cut skirts onto fabric
There are several options for how a four-piece skirt is laid out on the fabric. The description is quite simple. All the parts are the same, which means you need to cut out 4 wedges from the fabric with seam allowances. In this model you need to pay attention to the fabric itself. If there is a drawing, it should not be upside down; you need to check this point before cutting.
The pile should be directed from top to bottom. If the fabric is plain and smooth, then the wedges can be laid out on the fabric alternately: the part with the waist up, the part with the waist down. This will save material and use it wisely. From the remaining section you can cut out a belt or facing.
If the hip circumference is large enough, then all the fabric will go to wedges, so when purchasing a cut, you need to take into account an additional 15-20 cm for the belt.
It is cut on tracing paper and on the fabric of a six-blade, like a four-blade. The skirt is sewn very quickly. In just one day, you can update your wardrobe.