Creating a basic dress pattern with sleeves is the main stage in design. But also the most difficult, especially for a beginner. Today I will show you step by step how I build a pattern, and, as always, I will try to make it clear and visual. I wish you that by the end of this master class, each of you will have your own basic pattern for a dress with a sleeve!
If you don’t yet know how many advantages and opportunities such a pattern opens up for a tailor, I’ll tell you now.
An individual pattern improves the quality of the product’s fit, reduces or completely eliminates the number of changes made during fitting, and also minimizes the number of fittings to one. At first, my clients were surprised that I invited them to try on only once, since they were used to running to the studio three or four times, but my method is about quick and simple. I am a lazy person by nature, and if I can simplify or automate something, I will definitely do it.
Why do you need a basic pattern?
- Ready-made patterns are made to fit a standard figure. Do you have a standard size figure? If not, create the patterns yourself. You will be able to take into account all the features of your figure - breast size, posture, hips, bulge of the abdomen.
- All patterns for different product models are obtained by modeling the base pattern. That is, having built the base once, you will then be able to sew more than a hundred clothing models using it!
- Sometimes creating something new is easier than redoing it. Correcting and adjusting a finished pattern will take no less time than making a new pattern.
- It happens that you want to sew something for which there is no pattern. For example, you saw her in a store, in a photo or to an unfamiliar girl.
- Even if you use ready-made patterns from magazines, you can adjust the product if you only know the principles of design, that is, you know what to adjust and how to do it. And in the basic pattern, changes after fitting are minimal and even a beginner in sewing can cope with them, or are completely reduced to zero.
Well, do you also want to make your sewing easier? Then let's learn how to build a pattern ourselves.
Pantone presented the fashionable colors of New York Fashion Week, the season…
Hello, dear readers of crossfashion.ru!
Winter is coming to an end and today I propose to sew a new dress for this occasion, which will come in handy on warm spring days. Well, if the weather in your locality is not warm until summer, then you can sew a new thing from the warmest fabric.
I suggest taking a dress with a loose silhouette.
Firstly, it is very comfortable to wear, and secondly, this model is relevant. Take, for example, the DG “Viva La Mama” collection. Here they are, dresses with a fairly loose cut, but at the same time not hiding the figure at all.
Our dress, of course, will be a little more modest than its famous catwalk counterpart, but that won’t make it any worse.
So, we will need:
- fabric, approx. 1.5m - thread, scissors, needles, chalk - bias tape approx. 0.6 m
Today I want to draw attention not so much to sewing a dress in general, but to one of the methods of processing the neckline - processing with bias tape. It is used on fabrics of different densities and textures. The binding can be either ready-made or made by hand. I took ready-made binding.
For the second option, the fabric is cut into strips 3-4 cm wide (the finished binding will be 4 times narrower than this blank) strictly at an angle of 45 to the grain thread. This is necessary so that the fabric fits well even on rounded areas. If necessary, we sew the strips together (two options at the bottom of the picture).
Next, fold the strip in the middle with the wrong side inward, iron it, and fold each half again. In addition, the store sells special tools for making bias tape at home.
Processing the neckline with bias tape is also useful if you do not have enough fabric for the facing (or there is no interlining/dublerin for it).
But let's start in order. We cut out the details. As a basis, I took a loose-fitting dress from Burda 9/2012 No. 109. In the magazine it is presented in three versions (I would like to personally recommend this pattern. I have sewn several dresses using it for completely different figures and in each case the adjustments were minimal).
I didn't use a zipper because it's easy to put on/take off the dress. Otherwise, the zipper is sewn into the seam on the back.
We cut out a shelf with a fold, two halves of the back and two pieces of sleeves. I made one adjustment to the front: I extended the darts all the way to the neckline. As practice shows, in this case the best fit is obtained.
We process the parts using an overlocker. Sew the darts and side seams.
We sew the sleeve, having previously attached the edging. We process the neck. Place the bias tape right side to the right side of the fabric. Sew, placing the needle in the fold of the binding. The binding needs to be stretched very slightly for a better fit.
We stitch along the binding, stepping back just a couple of mm from the seam.
We turn the binding over to the wrong side of the dress, “hide” the cut of the neckline inside the binding, and, bending the binding under the machine foot, we lay a line parallel to the stitching. It sounds complicated, but in practice it is much simpler and more intuitive.
Our binding remains on the wrong side. There is one seam on the front side.
The trim can be used to match the fabric or in a contrasting color. We process the bottom of the dress and sleeves. We do the final ironing. In addition, I decided to decorate the dress with strips of fabric with frayed edges. I sewed them on, gathering them a little, along the line of the darts.
We're waiting for spring to wear a new dress with shoes, or we'll wear it to work with warm tights and a jacket tomorrow.
I wish you all smooth lines and good weather.
Master class, patterns and collages from the blog “Sewing Things”
More on the topic:
How to sew a pencil skirt? Master class with patterns and tips from the Sewing Business blog
We sew a fluffy new-look skirt: MK with a pattern and tips from the blog Sewing Affairs
Go back to the main page
What design methodology will I use?
In design I use the EMKO method. It stands for the Unified Method of Clothes Design, it was invented back in the Soviet era, it is time-tested and is still successfully used in their work by leading ateliers and fashion houses.
In fact, there are many technologies in design - this is the English system, Muller and Son, TsOTSHL and others. And in the end, when building according to one of them, a pattern is obtained for the model that is planned. But from the height of my many years of experience, I can say that the best technique is experience! Only by trying and experimenting, constantly working and learning new things can you find the very system for creating ideal patterns.
The design method is a tool in the hands of the tailor. Therefore, you can not stop at one system, take for yourself the best from each and draw on something new.
Therefore, I advise you not to sin on the methodology; if your product does not fit your figure perfectly, analyze your work, perhaps you made mistakes in the calculations.
Modeling based on basic patterns
These patterns are used as a basis for the construction of products of many styles. For example, they can be used when sewing products with a semi-fitting or adjacent silhouette.
Help: this pattern is also useful when creating patterns for a blouse, shirt or coat.
Darts
The difference between these styles and straight cuts is the presence of darts. They will help hide excess fabric and make the silhouette more fitted and sophisticated. These darts contribute to the formation of shapes, located in the chest area, along the length of the skirt and on the back.
Darts are formed at the initial stage of pattern construction . We retreat a few centimeters from the neck on each side, forming the width and depth of the part. They depend on the chosen style. For a tight-fitting dress, more material should be removed. In the back area, the depth of the darts is several centimeters.
The result is a pattern with darts.
Note : Make sure that the dress does not constrict your body. If calculated incorrectly, using such a product will be uncomfortable.
The base of the lower dart is located at the level of the end of the armhole. The recommended length is approximately to the middle of the buttocks.
Increases in looseness of fit for the basic dress pattern
Before you start building the base, you need to know that the measurements in the pattern are not laid out “clean”, but with increases. What are these meanings? The increase is a value that determines the freedom of fit of the product. Here we will take increases designed for maximum fit, that is, for a dress.
Increases in calculations are indicated with the prefix - P. In my construction, the following types of increases will appear:
- PG - increase in chest - 3 cm.
- Fri - increase in waist - 1 cm.
- Pb - increase in hip circumference - 0 cm.
- Pspr - increase in armhole freedom - 2.5 cm.
- Pore - increase in sleeve girth - 4 cm.
- Pshs - increase in back width - 1 cm.
- Pshg - increase in neck width - 1 cm.
In the figure you can clearly see how the increase in Pspr determines the level of fit of the sleeve along the armhole. Depending on the value of the increase that you choose when constructing, it will depend on which sleeve you get in the finished product.
Basting and stitching
When all the elements are carefully cut out, they are basted and sewn. This must be done in a certain order. Start from the front. Sequence of work:
The details of the sleeves and front are first basted, then (after the first fitting) they are stitched. Process the edges and smooth them thoroughly with an iron. If you do not iron at this stage, it will be difficult to work with the product later.- Next, the side seams and back are worked, as well as the shoulder seam. The sleeves are joined into a single whole, all the details are stitched together, the edges are processed and also ironed.
- The most important stage is attaching the sleeves to the armholes. This is where beginners make the mistake of forgetting to fit the sleeves along the edges. This must be done, otherwise the seam will turn out uneven, because the hem is several centimeters longer than the armhole. This difference is needed precisely to ensure a perfect fit of the sleeve to the main part.
- Turn up the seam allowances on the entire product and finish them with a blind stitch.
When the details are drawn up, you can lay out the dress and make sure that it turned out exactly as intended.
Shelf calculation
10. T3 A3 - traffic accident measure up.
I draw a horizontal line through point A3:
Neck width = A0 A2 (from the back drawing) – 0.5 cm.
A3 A5 - Neck depth = A3 A4 + 1 cm. I build a rectangle and use a pattern to create a round neck.
11. G3 G6 - measure Tsg, through point G6 I draw a vertical line to the waist line, at the intersection of the lines I get point T6.
12. From point A4, using a measuring stick Bg, I make a notch with an arc on the line G6 T6. I get point G7 - the center of the chest. It can turn out either above or below the chest line, or it can intersect with it, it depends on the type of figure.
13. Bust dart opening (point A9):
A4 A9 = 2 (Shg2 – Shg1) +2
At the intersection of these two dimensions: the segment (A4 A9) and the segment (G7 A4) - I get point A9.
14. Shoulder cut (A9 P5):
I get point P5 by crossing the Vppk measure from point G7 at the intersection of the Shp measure from point A9.
I connect point P5 with point A9 and get a shoulder section of the shelf.
15. Armhole shelf
G4 P4 = G4 P5 along an arc from point G4
Shelf control point (P6)
G4 P6 = G4 P4 / 3
Bisector (G4 2) = Bisector from the drawing of the back (G1 1) – 0.5 cm.
P6 P5 I connect a straight line and divide the resulting segment by 2 - I get point 3. From point 3 I put up a perpendicular of 0.5 - 1 cm. I connect points P5, P6, 2, G2 with a smooth curve - I draw the armhole of the shelf. I remember that the angle at point P5 is 90
Model without cut
Although cutting a straight-cut dress is not difficult, there are girls for whom even this process seems incomprehensible. An even lighter option will suit them - an outfit without a pattern and without any darts. This model will look stylish only if it is made of elastic fabric, for example, elastic knitwear. Color is no less important.
It is better to choose a bright material with a large expressive pattern, but not strict, but chaotic, then the defects will not be noticeable. It’s good if the composition contains cotton fibers, then the fabric will allow moisture to pass through. But it is not recommended to sew a dress from completely natural textiles, because it is synthetic fibers that provide elasticity.
When choosing material, take into account the time of year for which the outfit is intended. In summer it is convenient to wear a thin dress, but for cold seasons it is better to choose thick textiles.
Calculation of the amount of material
The amount of material depends on the girl’s height and her measurements. The width of the fabric remains the same and is 150 cm. Thus, if the girl’s height is not higher than 180 cm, and her size is not more than 48, the cut length will be:
- for a short dress - 110 cm;
- for long - 180 m;
- to the knee - 130 cm.
Darts
Calculation of darts = (segment T T3 – (St + Pt))/ 4.
I distribute the resulting difference between the back and front details in the waist and side darts.
The center of the waist dart on the back runs in the middle of the segment G G2, the descent from the chest line G G3 is 4 cm down, the descent from the waist line T T1 is 10 cm down
The center of the dart along the front runs along the center of the chest G6 T6, the descent from the chest line G G3 is 4 cm down, the descent from the waist line T T1 is 12 cm down.
In order to construct side darts along the hip line, you need to calculate the difference using the formula: segment BB3 - (Sb + Pb). We divide the resulting value (it can be either positive or negative, it depends on the type of figure) in half.
And with a positive value we retreat along the line of the hips of the back to the right, and along the shelf to the left. For a negative value it's the opposite. In the figure below, the side slices intersect, which means I got a positive difference.
If the value is zero, the side darts meet at one point.
With a negative value, the side darts are located further away from each other.
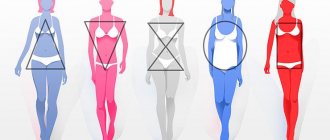
Which pencil dress to choose for tailoring?
You probably want the dress you sew to be fashionable, beautiful and sophisticated. Therefore, we suggest that you familiarize yourself with some of the main models that are fashionable this year.
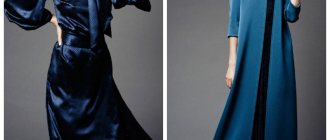
You can remove darts from the dress and reduce the neckline. The result is a fashionable, versatile pencil dress. The photo clearly demonstrates this.
But there are other interesting options. For example, by making a pattern with one shoulder, you will get a spectacular asymmetrical pencil dress. The photo below confirms this.
You can sew a dress with an unconventional neckline that will look great during a business meeting.
You can choose almost any fabric. For a dress that you plan to wear to work, you can choose a high-quality crepe or gabardine. For a festive outfit of this cut, satin, satin or poplin are suitable. When choosing fabric, you should avoid very thin ones, such as chiffon or chintz. They look natural on A-line dresses, while they are not at all suitable for narrow ones.
Construction of a drawing of a straight set-in sleeve
The construction of the sleeve also begins with drawing the mesh.
01. Sleeve hem (O1 O2):
In the drawing of the shelf and back, I connect the end shoulder points P1 and P5, divide the resulting segment in half, lower the perpendicular down to the chest line G G3. I measure the length of the resulting segment - a perpendicular.
The height of the sleeve cap (O1 O2) = the resulting segment minus Pspr (increase in armhole freedom) minus “Value for the development of the deltoid muscle of the arm”:
- for sizes 44 - 46: 2.5 cm.
- for sizes 48 - 52: 2 cm.
- for sizes 54 - 56: 1.5 cm.
02. Sleeve width (O1 P1) = O1 P2 = Measurement Or + Pore (increase for sleeve girth)/2
O1 Рп = segment O1 Р1 /2
O1 Рл = segment O1 Р2 /2
03. Sleeve length (O2 M1) = Measurement Dr. I draw horizontal lines left and right and get points M2 and M3.
03. Rp 1 = G4 P6 (control point from the shelf drawing). From point 1 I move 0.5 cm to the right and place point 1'
04. RL P3 = G1 P3 (control point from the back drawing). From point P3 I move 0.5 cm to the left and place point P3'
05. I connect P3' and P2 with a straight line and divide them in half. I get point 4. From point 4 there is a perpendicular (1-2 cm)
06. O2 O6 = O2 O4 / 2
O6 and O3 are connected by a straight line, O6 (3) is the bisector of the angle P3' O6 O2 = 1 – 2 cm.
07. O2 O5 = O2 O3 / 2 + 2 cm, set aside the resulting value from O2 to O5.
I connect O5 and 1' with a straight line, O5 (2) - the bisector of the angle O2 O5 1' = 1.5 - 2.5 cm.
08. Рп 8' = bisector from the drawing of the shelf armhole (G4 2) + 1 cm.
09. I draw the okat line by smoothly connecting the points: P2, P3', 3, O2, 2, 1', 8', P1.
The drawing located to the left of point O2 is the back of the sleeve, to the right is its shelf. The control point, the center of the O2 sleeve, is transferred 1 cm to the shelf.
After constructing the sleeve, it is necessary to check the length of the collar. It should correspond to the length of the armhole from the base drawing + (1 - 1.5 cm) for fitting.
This completes the basic pattern of a dress with a sleeve, step by step instructions. I hope you were able to figure out all the calculations, and you got your own pattern, which you can now use to sew more than a hundred models of things, and they will fit your figure flawlessly!
Modeling a straight loose-fitting dress
Simple design, an interesting and trendy straight cut, a loose silhouette that adds dynamics to the image are some of the advantages of the model. For its manufacture, knitwear is best suited, moderately elastic and dense - you will need about 1.5 meters. Use your favorite T-shirt as a template. It needs to be folded in the middle (lengthwise) and ironed. The piece of fabric is also folded in half, facing inward.
Next, the fabric and the template T-shirt are combined with the fold axes. The sample is secured to the knitwear with tailor's pins. Trace the template with chalk, a disappearing felt-tip pen or soap, not forgetting about the allowance - about 1.5 centimeters. Next, you need to complete the backrest by adding the width along the armpit line and the selected length. When calculating transverse values, remember that you need to operate with half values - half-girths. Having outlined the length, draw a smooth line for the bottom of the product.
womanonly.ru
Then comes the construction of the front parts. The progress of work is similar, as are the sizes of increases and allowances. The neckline needs to be deeper from the front than from the back. The sleeve drawing is also based on the T-shirt sample. It is built on paper and fabric to the required length - up to the elbow or “three quarters”. Two more elements - front and back for facing along the neckline. After modeling, the parts are cut out taking into account the allowances and carefully sewn together using a knitted seam or “zigzag”.
Construction sequence
- Sew the front and back folded facing inward (after moving them along the shoulder line).
- Sew the sleeve aligned with the shoulder seam along the axis of symmetry.
- Connect the side seams - from the sleeve line to the waist level.
- Pin and sew a line from the waist to the bottom of the product.
- Sew and iron the neck facing.
- Sweep hem and sleeves using a blind stitch, either by machine or by hand.
If you want to make a zipper (to make a straight dress easier to put on), sew it into the back seam. For long sleeves, it is advisable to attach the edging before sewing. The neckline can be finished with bias tape, the sleeves and bottom can be decorated at your discretion.
grass.ua
My online cutting and sewing courses for beginners
My core principles are honesty, openness and caring for my students. I am 100% confident in the quality of my product. Today in my sewing school “Beloshveika_school” there are three directions of teaching cutting and sewing for beginners in online format:
1) Design - this course is suitable for those who want to learn how to create patterns and take measurements of a figure. To successfully pass here you do not need to be an ace in drawing or have any special skills, the information is presented easily and simply
2) A basic course in cutting and sewing is the basics. I suggest taking it to all beginners who are in search of sewing knowledge and don’t know where to start. This course was pieced together from my offline (live) sewing courses, which I have been teaching in the city of Ufa since 2014. I know at what stage students may have difficulties, so I can help you
3) Course on sewing pajamas and underwear This course was born in the process of working on master classes on home clothes, when I saw that my interest in it deserves separate training. In this course we sew using ready-made patterns, so it is perfect for complete beginners who are still afraid to delve into the processes of constructing patterns. Honestly, you can even take this course with your children, because it is interesting, and you can get results very quickly!
What is a pencil dress?
The classic pencil dress is a narrow, straight dress without a collar and with a rounded neckline at the chest. It perfectly emphasizes all the advantages of the figure and looks appropriate in almost any situation.
Many women spend long hours in shopping malls trying to find a unique dress that fits their body perfectly. The cut of such a product is quite simple, so it is not difficult to sew it yourself, with accuracy and patience. As a result, you will receive a unique outfit that only you will have and will become an indispensable attribute of everyday life.
The pencil wedding dress has become widespread. This elegant style looks appropriate at a celebration, emphasizes the figure favorably and does not distract attention from the bride. If you want to sew a pencil dress for a wedding, you can use the classic pattern below as a basis.
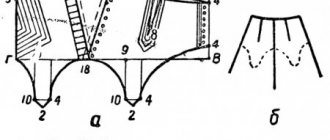
Dress darts along the waistline
From point W2 to the left and to the right, set aside 1 cm.
Segment W2d = 12 - 13 cm. Segment B9d1 = 4 - 5cm. Connect all the dots with straight lines on the front of the dress pattern.
Now let's make a dart on the back half of the dress. BB6 = B6B2 = BB2 / 2. W3d2 = 15 - 16 cm. B6B7 = 3 - 4 cm.
Place point W3 and set aside 2 cm from the right and left. Connect all the points with straight lines on the back of the dress pattern.