Folk arts and crafts are rich and varied. Nowadays, from year to year, interest in this massive, truly universal creativity, in which people express their ideas about beauty, is growing.
The houses and costumes, utensils and tools that we see in museums and galleries are countless examples of this. In my articles I want to help our needlewomen revive various types of needlework. It's so beautiful! And practical. And today we will talk about hemstitch embroidery, about the types of seams for this embroidery.
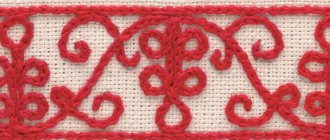
What is hem embroidery
The technique of embroidery on thinned fabric - in other words, hemstitching can be called.
The main feature is the precise counting of the number of threads so that the repeating motifs are even and identical. The second feature is the preparation of the canvas depending on what pattern is planned to be made. In the old days, the hemstitch technique was used to decorate clothes and kitchen utensils . At some point it was forgotten, but now it is gradually being revived and gaining fans among young people.
simple motifs, complex and combined patterns in hemstitching . If you use this technique for finishing clothes, it is enough to master 2 - 3 simple patterns, as many complex ones, as well as the possibility of hemstitching when connecting stitches.
Have you tried hemstitch embroidery yet?
Not really
Flooring (Fig. 18)
It is performed on the basis of a “simple column” hemstitch. Widely used in Russian and Ukrainian embroidery and has many varieties. In Russian embroidery it is done with threads that match the fabric. In Ukrainian embroidery, if it is done with threads matching the fabric, it is called “countless hemstitch”, if with bright threads (which is typical for the western regions) it is called “shabak”.
Rice. 18. Hemstitches “flooring”: from above - to the entire height of the column; in the middle - half the height of the column; from below - one third of the height of the column
Hemstitching with flooring includes Russian stitching embroidery and Ukrainian hemstitching through chisnitsa with flooring with a twig (Fig. 19) and without a twig, hemstitching on a grid.
Chisnitsa is the name given to the longitudinal threads of fabric left in the hem strip. In fact, hemstitching through a chisnitsa with flooring is hemstitching on a grid or understitching. The difference is that in hemstitching and understitching, the pattern is covered only after the remaining strips of fabric are formed into a mesh (in the first case, with a “tassel” hemstitch, in understitching, with nankee).
And in hemstitching through a chisnitsa with flooring, the design of the pattern is laid out simultaneously with the execution of the tassel on the left strips of fabric, sequentially from row to row. The hemstitch through the chisnitsa with the flooring should always start from the right edge of the hemstitch. Having reached the left edge of the drawing, we fasten the thread and start the next row again from the right edge of the work. In this case, the same slope of the tassel stitch is obtained throughout the entire embroidery.
Rice. 19. Hemstone through chisnitsa with flooring and twig
The hems across the chisnitsa with flooring with a twig and without a twig differ only in the pattern. The first has untwisted columns between the elements of the pattern, the second has a pattern so dense that there are no untwisted columns.
In all these hemstitches, the flooring is done in two ways : either by darning (Fig. 20) or by attaching (Fig. 21).
- In the first option, during the working stroke of the needle, one column is drawn onto the needle, the other remains under it. During the reverse stroke, the column that was on the needle is now under the needle and vice versa. We press each new row of columns against the previous one and obtain a dense ribbed surface.
- In the second option, we lay the working thread loosely over the posts and attach them to them by moving the needle in reverse. This technique is used mainly in Ukrainian embroidery on dresses and folk costumes.
Rice. 20. Performing darning flooring
Rice. 21. Performing flooring with attachments
Preparation for embroidery and necessary supplies
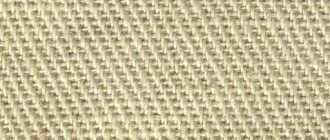
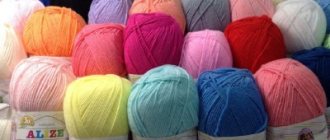
The basis of hemstitch embroidery is fabric. It should have a clear weave .
Embroidery canvas, thick linen, as well as fabrics made from natural fibers, such as hemp or cotton denim, are suitable. Needles can be used with a blunt tip, as there is no need to pierce the canvas. Floss or regular sewing threads are suitable to master the technique.
To trim the warp threads, you will need nail scissors with a straight nose , very sharp.
Editorial Voice
Matryona
Fan of embroidery and sewing
Ask a Question
At the preparation stage, you need to pull out several horizontal threads so that only vertical ones remain. They will need to be counted. Each pattern will necessarily indicate how many threads are needed for the pattern, especially for a complex or combined one.
Star
The pattern is obtained as a result of making a simple column using a special technique.
We pull the fabric through squares. We pierce a hole in the center of each uncut square (Fig. 17). Then we make simple stitches, but we do not fasten the working thread as usual, but pass it through the punctured hole each time.
Having passed through the hole from the front side to the wrong side, the working thread, having separated the number of threads of fabric required for the hem, stretches to the next column, wraps around it, tightens it and along the front side enters the hole in the center of the square.
Having sheathed the top side of the square, we turn the work 90° so that the left vertical side of the star becomes the top horizontal side, and make columns on it.
On the third side of the star we take the same threads into columns as on the first side. Similarly, columns are formed from the same threads of the fourth and second sides of the star. Having completed the last stitch, we bring the needle with the working thread through the center of the star to the wrong side and with several small stitches, without grabbing the embroidery on the front side, we fasten the working thread under the stitches and cut it off. We process all the squares in the same way, each time securing the thread at the beginning and end of the work.
Rice. 17. Performing star stitching
The pattern, made with star stitching using threads to match the fabric, turns out soft and airy. Embroidered with bright contrasting threads, the hemstitch looks good on women's and children's clothing. Often this embroidery is done on wedding dresses. It is better to take soft threads with low twist.
Embroidery patterns
To begin with, it is enough to pull out the threads 1 cm in height . To do this, use a needle to pry a horizontal thread and, carefully gathering the fabric, pull it out. For each type of fabric, the number of elongated threads per 1 cm may be different.
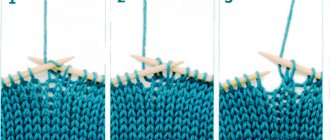
Simple hems
Learning the hemstitch technique traditionally begins with simple stitches . Take a thread of floss (can be in a contrasting shade) about 1 m long and divide it into 2 parts. The ends are threaded into a needle, and a loop should be made on the other side. This is necessary to secure the thread without a knot.
Further:
- Fasten the thread on the reverse side by prying two threads on the fabric. Pass the needle through the loop and tighten.
- Move the needle to the front side where all the threads are in place - not pulled out, under the strip.
- Use a needle to circle 4 threads from the back and bring them to the face.
- Circle the back again and bring it to the face under the embroidery through the next 4 threads, tightening the previous stitch.
In this way, go through the entire row. Make the same twists on the reverse side so that the columns match .
A split column is made a little differently: on one side as usual, and on the other you need to count two threads from one column and 2 from the other. You will get triangles.
Twisted posts are made after straight ones are made on the top and bottom sides. The thread is secured with a loop, and then you need to work with two columns:
- The needle is wound under the left (second) column, then on top of the right (first).
- The columns are twisted with a needle that turns 180 degrees.
- The needle is brought out to the front side.
Then the same thing is done with the next two columns.
Goat (Fig. 
This hemstitch is another combination of paired stitches. We tie them two together at about one-third of the height, either from above or from below, and each time we attach only one new one to the already tightened column so that each column is connected to two neighboring ones.
Rice. 8. Performing hemstitch “goat”: a - combining two columns from above; b - combining two columns from below
If we combine two columns from above, then the working thread makes a loop from top to bottom counterclockwise (Fig. 8, a). We insert the needle into the resulting loop from right to left, simultaneously picking up the stitches being pulled together and the working thread. When combining the columns from below, we make a loop from the bottom up clockwise (Fig. 8, b).
When tightening the loop, the working thread must be pulled to the right along the hem. In this case, a beautiful loop is obtained and the transition of the working thread from one step to another lies on the wrong side of the hemstitch.
Rice. 9. “Mesh” hemstitch (top) and wide linen hemstitch (bottom), made on the basis of “goat” hemstitch
To obtain an openwork mesh (Fig. 9, top), it is necessary to embroider two rows of goats on a “simple column” hemstitch 2-3 cm wide: one on top, the second on bottom. When making the second row of the goat, we split the columns that were combined in the first row of the goat. If you leave two combined goat stitches from the first row in the second row, you will get a so-called wide linen hem (Fig. 9, below). For greater decorativeness, you can stretch bright or matching braid into the resulting medium wide holes. It looks good on blouses, children's clothing, and lingerie.
Complex hems
A complex hemstitch differs from a simple one in that the embroidery occurs on several elongated strips without horizontal threads . There is more room for creativity here, but first you need to master simpler motifs.
The threads must be pulled out in a certain order. For example:
- Remove 3, leave 2.
- Remove 4, leave 3.
One of the patterns that can be made based on simple columns:
- Prepare the fabric according to the algorithm as described above, choosing yourself how many threads to remove.
- Sew all rows with columns (twigs).
- Take a thread of a different color, perhaps thicker than the one used to make the stitches.
- Connect 2 twigs across a row.
- Sew another row of posts
The “ Lyakhovka ” pattern is performed as follows:
- Remove 2 horizontal threads and stitch in stitches.
- The next 4 threads need to be skipped and 8 horizontal ones removed.
- Make a bias stitch highlighting 2 columns of 4 threads.
- Pass the needle through the next 8 threads so that the working thread is on top.
- Pull 8 threads, bring the needle from top to bottom, leaving the working thread on the right.
- Insert the needle under the thread. Continue in the same way until the end of the row.
- Pull 8 threads, skip 4 and pull 2 more. Pull 8 threads to the left.
- Pass the needle from above and inject from the side. Insert the needle down the hemstitch and select the next 4 threads.
- Work 4 more threads and stitch to the end of the row. Make the bottom row of columns and call it a day.
The " Flashlight " hem is a difficult pattern to perform. To implement it, the canvas is prepared as follows:
- Pull out 7 - 8 threads, leave 3 threads in the middle and then remove 7 - 8 threads again. One-sided twigs (tassels) are sewn in each gap.
- One flashlight requires three ready-made twigs.
- When the fastened thread is on the front side, you need to skip the first twig and insert the needle under the next 2, pull the needle to the front side.
- Make a loop from the working thread and pass the needle under three twigs, tighten the thread in the center.
- Turn the embroidery over and pull the thread under the three threads in the center of the embroidery and tighten it.
- Repeat with the next three twigs. And so on until the end of the row. After turning in the opposite direction, make symmetrical stitches in the opposite direction.
On a napkin
At the next stage of getting to know this type of embroidery, we’ll look at how to make a hem on a napkin.
Along the edge of the napkin, leaving room for a hem, we pull out eight to ten threads from the fabric. Let's go through all the edges in this way. Now let's make the folds. Then you can start embroidering. You should always sew from left to right.
We secure the thread by making several stitches. We collect from 4 to 8 threads on the needle (optional). The needle goes from right to left horizontally. Then we insert the needle from the wrong side and tighten the working thread to form a tassel. In this way, go along the entire length of the napkin. We must remember that the brushes must be of the same thickness, so you must carefully count the number of threads. Also pay attention to the passage of corners so that they are neat.
This work clearly shows how to make a simple hem on a napkin.