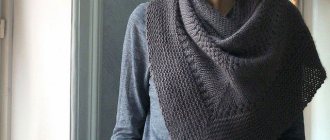
The variety of models of knitted women's hats is amazing. The skillful hands of craftswomen create so many variations: hats, snoods, shawls and, of course, berets. The last item is one of the most popular options, and it is quite simple to implement. Therefore, even a novice knitter can cope with its independent production. For this process you will need to be patient and perseverant, and also spend some free time. Let's take a closer look at all the stages of work.
How to choose yarn for a beret
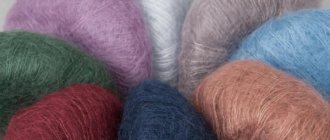
The main criteria for selecting a model will be not only the style, but also the yarn. It is she who plays the main role in how the beret will lie, keep its shape, and most importantly, how it will be worn.
Angora
Description:
- Soft, fluffy yarn made from the wool of Angora rabbits.
- To make the yarn stronger, a thin thread of acrylic or wool is added as a base.
- Products made from Angora yarn do not like water and can shrink significantly.
- Having knitted a warm beret from such yarn, you will have to protect it with an umbrella in snowy weather.
Cashmere
Description:
- The amazing properties of mountain goat wool yarn allow you to knit an absolutely smooth, warm and soft fabric.
- Cashmere thread is lighter than wool thread, but much warmer.
- To prevent pilling, cashmere thread is mixed with wool thread in different proportions.
- Cashmere does not like dust mites, which is important for allergy sufferers.
- Such a thread cannot be cheap, since it is combed out of goats only once a year, during the spring molting period. There is a lot of manual labor involved in production.
Alpaca
Description:
- The yarn is collected from the wool of alpaca animals.
- Like camel wool, alpaca wool is stiff and does not mat at all.
- Does not form pellets.
- Has thermoregulatory properties.
- In order to reduce itching, mix with other types of yarn.
Mohair
Description:
- Mohair is the wool of Angora goats.
- Yarn consisting entirely of goat hair is not produced, it does not hold its shape. To do this, add the hair of other animals to the composition.
- The wool of these goats has the ability to increase blood circulation in humans.
Wool
Description:
- Wool thread can be twisted from the hair of any animal: rabbit, sheep, dog, goat.
- The thread is sinuous and elastic, for this reason products made from it do not wrinkle.
- The disadvantage of wool is the formation of pilling on products, so it is often mixed with other types of yarn to reduce this defect.
Acrylic
Description:
- The popular yarn is widely available due to its price range.
- The brightness of the colors in the coloring is difficult to find equal.
- Often used in a mixture with wool.
- The yarn is warm and cozy and does not become covered in pellets.
- Looks good in knitted berets of any style.
Mersenized cotton
Description:
- As a result of the latest processing technologies, the yarn becomes dense and slightly fluffy.
- The products do not stretch, creating a light backcombing effect.
- Does not form pellets.
Iris
Description:
- Perfect for summer openwork berets.
- Available in a wide range of colors.
- The thread has a shine, which gives the product an elegant look.
- Does not shrink, washes well and can be starched if necessary.
Bamboo
Description:
- Made from plant fibers, the thread is not chemically treated.
- Retains its antimicrobial properties without causing allergic reactions.
- Bamboo fabric is softer than cotton when knitted, silky to the touch, with a slight shine.
- Widely used for knitting summer openwork berets.
Silk
Description:
- Natural thread is a waste product of the silkworm.
- Pills do not form on products made from silk yarn.
- Perfect for summer openwork berets.
- Does not deform after washing, soft and pleasant to the body.
Knitting from grass
Before creating things knitted from grass, you need to choose the right model. Due to its specificity, this yarn is not suitable for making all things. Grass is good for knitting clothes for children. In such clothes, children are very cute and look like bear cubs. Of course, it has its downsides. For example, in clothes that are knitted from grass, you cannot keep warm in the cold. But from this yarn you can safely knit costumes for your children for matinees and other holidays.
Collection of my hats with fitting
Women will look spectacular in shawls and scarves, as well as capes and boleros made from grass. It is worth noting that grass capes and boleros are not suitable for everyday wear. They should only be worn in addition to evening and festive outfits.
In addition, you can use combinations of grass with other types of yarn and use it as trim, and also knit toys, pillows and other interesting things.
Basque beret: diagram and description
Description:
- Stylish, warm beret, suitable for the cold season. Made from wool, alpaca or cashmere.
- Braids, textured, voluminous fabric look advantageous if the product is made in pastel, soft colors.
- Due to the width of the elastic band, the model looks beautiful if worn to the base of the eyebrows.
- According to the described scheme, the length of the model is 25 cm.
- This pattern does not require tight knitting; when weaving, the loops should lie airy and create volume.
- When knitting the pattern, circular knitting needles are used, this allows you to see the result of the work and immediately make adjustments.
Description of work:
- To make a beret you will need 100-120 grams. yarn.
- The product is knitted from the bottom up, starting with an elastic band.
- Depending on the circumference of the head, cast on 3.5 mm circular needles from 84 to 96 loops and knit 10 rows with a 3x3 elastic band, alternating knit and purl stitches.
- Switch to 5mm circular knitting needles and begin knitting the pattern. 1 round—*3 purl, 1 knit, yo, 1 knit, yo, 2 knit, 1 purl, 2 knit, yo, 1 knit, yo, 1 knit *repeat until the end of the row from *to*.
- Continuation of work: * 3 purls, then knit according to the repeat pattern, yarn over the previous circle, behind the back wall, knit with a front loop * continue from *to* 7-8 repeats, depending on the thickness of the thread.
- As soon as the number of loops, after knitting the rapport, decreases and it becomes difficult to knit on circular knitting needles, switch to 2 regular knitting needles. There should be 42-48 loops left on them.
- Start decreasing 3 purl stitches together and knit one purl stitch. On the next round, knit 2 loops together.
- 10-12 loops from the knitting needle are collected onto a thread, securing from the inside of the beret.
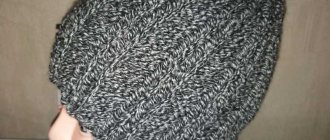
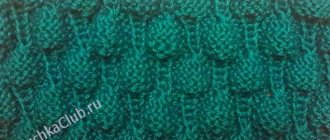
"Fur" takes from "grass" yarn
This demi-season beret is not made of faux fur, but is crocheted in the form of a mesh. The “fur effect” is created by the “grass”, the fibers of which fit so tightly to each other that they completely hide the mesh structure of the beret and make it quite warm. The mesh pattern, in turn, provides good ventilation inside the beret, which is important when using synthetic yarn.
What to do if you feel sick from marijuana
This beret is knitted from “Yumosh” yarn from Madame Tricote Paris. This yarn is wound into skeins in such a way that the pile of the “grass” is located towards the knitting. This complicates the work and makes the product rather untidy, so it is better to carefully wind such yarn into a ball before starting knitting and start working from the other end of the thread. When knitting, you need to try to ensure that the “grass” fibers lie on only one side of the product, only then will you get the effect of fur. It is most convenient to leave the fibers on the wrong side of the knitting, that is, the wrong side of the knitting will become the front side of the beret.
“grass” - 80 - 100 g depending on the size of the beret;
half-woolen or acrylic yarn for the headband - 40 g.
Hook 3 – 3.5 mm.
How to mow tall, tangled grass, 2 ways
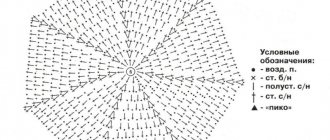
The beret is knitted from the center with a mesh formed by double crochets and arcs of air loops according to the following pattern.
The diagram shows that additions to form a flat bottom of the beret must be made in five places around the circle.
Weed is a very dangerous drug | marijuana hashish heads will slowly take your life | video 18+
To start knitting, you need to wind the thread around your index finger 2 turns. Pull a loop through the resulting ring and knit a chain of 5 air loops. Then knit 9 double crochets on a thread ring, separating them with chains of 2 chain loops. After the 9th double crochet, also knit a chain of 2 chain stitches and connect it to the beginning of the row with a connecting stitch.
In the 2nd row, above every second double crochet of the previous row, knit two double crochets. Separate all double crochets with chains of 2 chain stitches.
Next, knit a circle with additions according to the pattern until the diameter of the beret reaches 27-28 cm. If you want to knit a wide flowing beret, then you should increase its diameter to 30 - 35 cm.
When the desired diameter of the bottom is reached, you need to stop adding and knit 3-4 rows with a simple mesh of air loops and double crochets (see diagram).
After this, we proceed to knitting the lower part of the beret.
To do this, we need to do everything in the reverse order: in those five places where we previously made additions, we will now decrease the columns. To do this, you need to knit a couple of unfinished stitches on two double crochets of the previous row and then knit them together.
In order to calculate the diameter of the hole for the head, you need to divide the size of the head circumference by the number π (pi):
Knitted slippers. DIY gift
Girth/π = dgoal,
Crochet "Peach". 1/2 part of the Master class with a diagram. Beret crochet
where Head circumference is head circumference in centimeters;
π – pi number equal to 3.1416;
How long does it take to remove marijuana from the body?
dgoal is the diameter of the beret hole.
If you don't want to bother with calculating the diameter of the hole, you can simply fold the edge of the hole in half and measure its length without stretching it. When this length becomes equal to half the circumference of the head, it is time to finish knitting.
Now for our beret we need to knit the headband. We will knit the headband using stockinette stitch using the Tunisian technique. Tunisian stockinette stitch is very similar to stockinette stitch made with knitting needles, but this fabric is much denser and does not curl at the edges - an ideal solution for beret headbands, front panels, and turn-down collars.
Since the headband of our beret is not very wide, there is no need to crochet it with a long crochet hook. A regular hook, such as the one you used to knit the beret, is suitable for this. Knit a chain of 12-14 chain stitches and start knitting stockinette stitch on it using the Tunisian technique. Knit a strip with a length equal to the circumference of the head; when it is ready, sew the ends of the strip. Our headband is ready.
All that remains is to pin the headband with one edge to the edge of the beret hole and sew these edges with matching thread. The finished beret can be carefully combed with a massage brush to make it even fluffier.
Volumetric beret: diagram and description
Knitted berets (patterns and descriptions for women are extremely varied) look beautiful both with openwork patterns for the spring-summer season, and with a dense weave for winter.
Description:
- A voluminous beret can be knitted with a wide elastic band, which holds its shape on the head, or with a thin binding, allowing it to fall freely.
- Products of this shape look good made from thick yarn in bright colors in combination with scarves or snoods knitted in similar patterns.
- If you take it, knit it with mohair thread, choose a knitting pattern with a large texture and weave.
Garter stitch beret: diagram and description
Description:
- Despite the simplicity of execution, products using garter stitch are obtained
- original and comfortable.
- The yarn can be boucle, mohair, or thick acrylic.
- Garter stitch is knitted only with knit stitches from the face and back of the product.
Stages of work:
- A strip of ten loops is knitted in length corresponding to the volume of the head. For contrast, you can knit it alternately: 1 row with knit stitches, 2 row with purl stitches.
- On the extreme row, the strip is closed, and with the help of the last loop, the beret fabric begins to be cast on.
- From each side edge loop, pick up 1 air loop onto the knitting needle.
- Row 1 is knitted with knit stitches.
- On the second row, a yarn over is made through one loop, increasing the width of the fabric.
- In the 3rd row, yarn overs are knitted and the fabric continues to be knitted for 36 rows.
- On the 37th row, the fabric begins to decrease, knitting together every 3rd and 4th loop.
- Next 4 rows are knitted without decreasing.
- From the 41st row, 2 knit stitches are knitted together.
- Reduce to 10 loops. Collect on a thread, tighten and secure.
- The fabric is sewn together, the horizontal strip - the rim is folded in half and hemmed from the inside out.
Blue beret from "grass"
To knit a beret you will need: 100 g of wool and 100 g of grass-type yarn; knitting needles No. 4,5 and No. 6.
How to brew medicinal herbs correctly
Description of the beret
- interesting selection on knitka.ru.
How to Make Hemp Oil in 7 Easy Steps
Cast on 60 stitches with wool yarn on knitting needles No. 4.5 and knit 4 cm with a 1×1 rib. Combine 2 types of yarn into one thread and knit further on needles No. 6. To expand the circle, add 1 stitch every 5 stitches with a twisted yarn over. Knit 5 cm straight, and then decrease every 5 stitches by 1 stitch in each front row. Gather the remaining (8-10) loops with a needle onto a thread folded in half and secure it. Sew the beret using a knitted stitch.
Beret with an English elastic band: diagram and description
The thicker the thread in the yarn chosen for the beret, the larger the number of knitting needles you need to use to knit the product.
The presented model requires a 100-gram skein of yarn 500 meters long.
Description:
- The side is knitted with 2 mm knitting needles using an elastic band in accordance with the volume of the head. The elastic is knitted with a 1x1 3-4 cm pattern.
- It should be remembered that the elastic tends to stretch a little during wear.
- To increase the volume and create the fluffiness of the English elastic, you can replace the knitting needles with 1-1.5 numbers larger.
- In the 1st row, knit and purl stitches alternate.
- In the second row, start with the front one, after it, yarn over, and remove the purl loop without knitting it on the right needle.
- Having turned the knitting over, the loop that was purl in the previous row is knitted, the yarn over is also knitted, the next yarn over is made and the purl loop following it is removed without knitting.
- Thanks to the yarn overs, the volume of the beret increases significantly.
- Having knitted 12-15 cm of English elastic, transfer it to a regular 1x1 elastic band, and knit 6 rows with it.
- The loops are counted, divided into 6 equal segments and at their junction, 2 loops are removed evenly through the row from each part. In this case, the elastic band is knitted strictly according to the 1x1 pattern.
When there are 12-15 loops left on the knitting needle, the thread is broken and pulled through all the remaining loops at the same time, pulled together and secured from the wrong side.
Knitted grass bolero
The offered bolero is designed for sizes 40/42/44. In order to knit such a bolero, you will need to purchase soft grass (150 g), smooth yarn of the same color (100-150 g), knitting needles No. 5, 6, and buttons.
- The bolero must be knitted alternately with grass and smooth yarn, approximately 2 rows each.
- To knit the bottom edge, cast on 66/70/74 stitches with grass. Knit in stockinette stitch. Alternate stripes with stripes of smooth yarn.
- When you get to the 5th row from the beginning of knitting, start making increases. You should add 1 loop on each side. Then add 1 stitch on both sides according to the following pattern: 1 time in the next 2nd row, *2 times in each row, 1 time in the 2nd row, then repeat from * another 16/17/18 times. Your work should total 166/176/186 loops. Then we start knitting straight 18/19/20 cm.
- When the product reaches 46/48.5/51 cm from the beginning of knitting, close all the loops with weed.
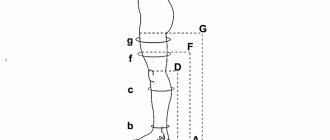
- To assemble a grass bolero with knitting needles, you need to tie its edges with a strap belt. To do this, you need to pick up loops along the edge of the resulting fabric. Choose the direction from edge A to edge C. On edge A, pick up 30/31/33 stitches, along the beveled edge (armhole) - 14/18/22 loops, on edge B - 59/61/65 stitches, on the second edge of the armhole – 14/18/22 loops, along edge C – 30/31/33 loops.
- You need to start knitting with an elastic band (1 knit stitch, 1 purl loop), using grass. Then you need to alternate, as when knitting fabric. Holes for buttons need to be made on the right edge of the belt. To decorate them, you need to yarn over and knit 2 loops together. The first hole should be located at a height of 2 cm, and the second at a height of 5 cm from the edge of the belt.
- The belt-strap must be knitted until its width reaches 7 cm, after which it is necessary to close all the loops and sew on the buttons.
How I knit from grass
Beret with leaves: diagram and description
Description:
- In a light summer version, this beret can be knitted from cotton, acrylic, iris or bamboo yarn.
- For the cool season, using mohair yarn you will get a warm, original model.
- The yarn for such an openwork model is taken thin so that all the grace of the lines can be seen.
- Having collected the loops of the rim, knit it to a height of 10 rows, then you need to add loops by knitting 1 row, knitting two from one loop, increasing their number by half.
- The rim is knitted 1x1 and further according to the pattern.
- The loops are calculated so that the front loops from the knitted elastic band go into the stem of the leaf, as a continuation of the pattern.
Knitted grass bolero: second option
The bolero is designed for sizes 44-46.
In order to knit it, take grass threads - 200 g, straight and circular knitting needles No. 5.
I smoked weed for 7 days in a row and this is what happened to me
- You need to start making this bolero down from the neck with a solid raglan without a front on straight knitting needles. Cast on 56 loops according to the pattern: 1 raglan loop, 12 sleeve loops, 1 raglan loop, 28 back raglan loops, 12 sleeve loops, 1 raglan loop. In each of the front rows, add 1 loop to the right and left of each raglan loop using a yarn over. Add to the outer raglan loops only from the inside of the raglan loops.
- Continue knitting in this way until the length of the raglan lines reaches 26 cm. As soon as the length reaches this figure, bind off all the loops. The raglan lines of the back at the lower points must be connected to the raglan lines of the front.
- Cast on the edge of the loop on circular knitting needles and knit the binding in stockinette stitch. In the third and fifth circular rows, add 6-7 loops at the same distance from each other. The binding must be knitted 15 cm, after which the loops must be loosely closed.
Braided beret: diagram and description
Knitted berets (patterns and descriptions for women are in magazines and on Internet portals) allow you to make your wardrobe individual.
Description:
- A braided beret is chosen by middle-aged and older women who love classic shapes.
- In order for the beret to have pomp and volume, beautifully showing the texture of the pattern, knitting needles for its execution need to be taken from 2.5 and above, depending on the thickness of the yarn.
- Braided fabric looks good on berets that lie evenly around the circumference of the head.
- The headband is knitted with 3 cm stitches, based on the measured volume of the head. If you want to insert an elastic band for fixation, the rim is doubled, repositioned and sewn.
- On the last row of the rim, add one loop at an equal distance to increase the volume by 20-30 as desired. After 20 cm, they leave the pattern and decorate the bottom, as shown in photo 2.
- In a row with facial loops, knit 2 loops of one at the same distance.
- Purl rows are knitted without shortening.
- When there are 15 loops on the knitting needles, pull them into a ring and secure.
How to knit a black hat using mohair knitting needles
The description of knitting a mohair hat is designed for sizes 48-50 cm.
The finished height of the hat is 19 cm.
To knit a hat you will need: 2 skeins of super kid mohair; knitting needles No. 4.0 - 6.0.
Hat knitting density: 16.5 loops = 10 cm; 25 rows = 10 cm.
We cast on 79 loops on the knitting needles and knit 3 cm = 6 rows with a 1x1 elastic band.
Next, evenly add 3 loops = 82 loops and continue knitting according to the pattern pattern 12 cm = 30 rows.
In the next row we begin decreasing stitches to form the top of the hat.
Knitting pattern for a mohair hat
For children's hats, it is better to use only natural fibers or special children's yarn, especially since craft stores now offer it in a huge variety.
For berets, yarn must meet the same requirements as for hats. But when choosing pure wool yarn or with the addition of mohair, you should choose one that does not prick and does not irritate the skin.
On average, a knitted hat takes about 100-150 g of yarn, but if the set includes a scarf, then you should add the same amount, and 80-100 g for mittens. Thus, a complete set will require 300-350 g of yarn.
If you plan to knit a hat and a mohair beret, 70 g of yarn will be enough. Mohair is very light and voluminous and the product, knitted with knitting needles, turns out to be almost weightless.
Beret “Pumpkin”: diagram and description
The “Pumpkin” beret is shaped like a vegetable of the same name, however, it is one of the most interesting knitted models for women. Its knitting pattern is not as complicated as it seems (detailed description below).
Description:
- The presented beret is knitted from wool with threads of medium thickness.
- In the flowing mixture of colors of various shades, this model looks stylish and original.
- Interesting in its design and assembly method.
- Knitted with circular needles.
Stages of work:
- Cast on 90 stitches on circular knitting needles and knit 5-6 cm in a circle.
- For teeth in one row, knit 2 loops together and then make 1 yarn over.
- Returning to the previous number of loops, continue the inner part of the rim for another 5-6 cm.
- Starting to knit the central part of the beret, you need to divide all the loops into 30 parts. These will be its convex parts.
- The center of the pumpkin tooth-rib consists of 2 loops, they are always knitted with the front one, and 1 loop, knitted with the purl.
- Add loops through the row in each clove - edge on both sides of the purl loop, simply pulling an additional loop from the bottom row.
- As a result, 6 loops will be added on both sides of the purl loop.
- In one clove - rib there will be 1 purl, on both sides there will be 6 scarf ones and between the cloves - ribs there will be 2 front ones.
- After a complete set, you should begin to decrease the loops, after one row, returning to 90 loops.
- For contrast and knitting the bottom of the beret with a garter stitch pattern, knit 4-5 rows.
- The previous 90 loops are divided into 6 and after every 15th loop they are joined together with 2X 1 loops across the row.
- When there is 1 loop from the sector on the knitting needle, the product is finished.
The best master classes on knitting different patterns
There are many patterns for a beret. Some of them are suitable for summer models, others for winter ones. For craftswomen who do not have sufficient experience, it is better to start with simple ones. In any case, a detailed master class makes the work much easier.
Basque beret
A universal model that will suit many women. To work you need:
- Yarn Drops Nepal - 150 g;
- knitting needles - stocking, circular No. 3,5 and 5.
The diagram and description are designed for a density of 17 loops per 10 cm in stockinette stitch. OG - 56–57 and 57–58 cm.
Often there is a section highlighted in red on the diagram. It is provided in case the knitting density differs from the specified one. To achieve the required height, the sector is knitted twice.
Operating procedure:
- On knitting needles No. 3.5, knit 10 rows of 84/96 loops with a 3 x 3 elastic band. Start with three purl stitches.
- Transfer the fabric to knitting needles No. 5. Next, knit 3 IP (purl loops), 1 LP (front loop), yarn over, 1 LP, yarn over, 2 LP, 1 IP, 2 LP, yarn over, 1 LP, yarn over, 1 LP. You should get 112/128 stitches.
- Next 7/8 repeats *3 IP, pattern according to the diagram*, repeating from *.
- Continue knitting with stocking-type knitting needles of the same diameter as the circular ones.
- Having reached the required height, knit 3 purl loops together, and in the next row do the same with 2 knit stitches.
- Cut the thread and pull it through the remaining 14/16 loops in two turns. Gently pull it together.
By knitting the yarn over with knit stitches behind the back wall, you will be able to avoid the formation of holes.
An equally beautiful beret can be made from a different yarn. Some experienced craftswomen knit a higher elastic band, getting a double band. A longer model, part of which hangs down, looks interesting.
Volume
This model is ideal for cool autumn and even winter. The pattern used gives the product originality. To knit a voluminous beret, you will need a set of:
- 150 g yarn (55% wool);
- double needles No. 5 and 6, plus extra;
- markers.
The knitting pattern is designed for OG 54/56 cm. The density on the main pattern is 14.5 loops per 21 rows. Knowing these nuances, it is easy to make changes according to your own sizes.
On knitting needles No. 5, cast on 78 stitches, knit 4 cm with a garter pattern (1st row - only knit stitches, 2nd row - only purl stitches, repeat). Transfer the loops to needles No. 6. Add 34 loops evenly and knit the main pattern step by step:
- Rows 1–4: knit stitches;
- 5th row: * 8 LP, 1 knob - 6 loops are removed on an additional knitting needle and knitted 8 rows, transferred to the right main knitting needle *, repeat from * to the end;
- 6–9 rows: LP;
- Row 10: 1 LP, 1 bump, 7 LP.
Repeat from rows 1 to 10 to the required height. Total - 30 rows. Next, the work is done by the facialists. A marker is attached to every 14th loop and in each row it is knitted with the previous one. When there are 8 loops left on the knitting needle, the thread is cut and carefully tightened, passing its end through the loops.
Garter stitch
This beret knitting pattern is best for beginners. Versatility also lies in the freedom to choose yarn. Using one description, you can knit a headdress for different seasons.
To work you will need the following:
- circular knitting needles No. 3;
- Alize Angora Melange Colors yarn - about 100 g (480 m).
The pattern is designed for a density of 2 loops per 1 cm, OG - 57. To make the product fit tightly, subtract 2 cm. Further procedure:
- Cast on 112 loops, knit 6 rows with a one and a half elastic band: all odd rows alternate between knit and purl, even rows - only knit, and purl are removed, leaving the thread before work.
- Increase 10–20 stitches. The next 14–16 cm is occupied by garter stitch.
- Close the bottom. In an odd row, knit 2 loops together, then 4 cm without decreasing, again a row with reductions, 1.5 cm without decreasing, reduce for the last time. Knit 2 rows, collect the remaining loops onto the thread, and carefully pull them together.
After finishing the work, the two edges are sewn together. The use of melange yarn makes the product original and elegant at the same time. But no less beautiful berets come from other threads.
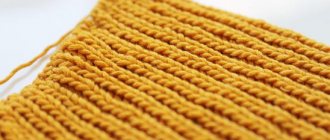
English rubber band
This option is suitable for knitters with little experience. The finished canvas is voluminous. As with garter stitch, the pattern is compatible with any thread.
You will need to take 100 g of Semenovskaya yarn “Aelita”, knitting needles No. 3,5 and 4. The pattern is designed for a 56 cm wide gauge. Work procedure:
- Cast on 84 stitches using the Italian method on knitting needles No. 3.5 and knit 14 rows with a 1 x 1 rib.
- Transfer the loops to needles No. 4 and knit 15 cm with an English elastic band: the front one is removed with a crochet, the back one is knitted.
- Return the loops to needles No. 3.5 and knit 10 rows with a 1 x 1 elastic band.
- Next, 4 rows of purl and knit stitches are knitted together. Carefully tighten the remaining loops and sew the edges.
The beret with an English elastic band does not require an increase in loops after making the band. This makes the pattern popular among beginner knitters. Although experienced craftsmen do not ignore this pattern.
With leaves
An elegant and simple model. The original appearance attracts women of any age. The headdress is perfect for autumn.
Size - for exhaust gas 54–58 cm. For work you will need the following tools and materials:
- 100 g of wool or wool blend yarn (150–180 m);
- contrasting color thread 2–3 m;
- bobbin rubber;
- round knitting needles (line length 40 cm), hosiery no. 4 and straight no. 3.5;
- knitting marker.
Using an auxiliary thread, cast on 100 loops. Then the main row is knitted purlwise. Transfer the stitches to round knitting needles and knit circular rows with a hollow elastic band:
- 1st row: *knit, the loop is removed (the thread remains before work)*, repeat until the end of the row, do not turn the fabric;
- Row 2: *Slip 1 stitch (thread at work), purl*, repeat.
Knit circular rows twice. Carefully remove the auxiliary thread. Mark the beginning of the row with a marker and knit a curly elastic band:
- Row 1: *knit, yarn over, knit, purl 2*, repeat 25 times from *;
- Row 2: *knit 3, purl 2*, repeat;
- 3rd row: * 1 loop is removed as a purl on the knitted 2 knits, then the removed loop is thrown on, 2 purls *, repeat.
Repeat the whole process three times. Next, all the loops are knitted. Add 35 loops. Knit the main pattern and repeat the sector 9 times. Reduce the stitches evenly and transfer the work to stocking needles. The remaining 9 loops are pulled together.
To prevent the knitted beret from stretching, a bobbin elastic band is inserted into the edge. When slightly stretched, its length is equal to OG. All seams must be neat.
Pumpkin-shaped
Knitted hats can have a wide variety of shapes. To make a beret similar to a vegetable, you will need the following kit:
- semi-woolen yarn, wool - 100–150 g;
- circular knitting needles.
Operating procedure:
- Cast on 90 stitches and knit 6 cm in the round.
- Knit a row according to the pattern: two loops together, 1 yarn over. Again 6 cm facial.
- The initial cast-on stitches are removed onto separate circular knitting needles. Then knit a loop from the additional and main knitting needles together.
- Divide 90 loops into equal intervals of 3 loops. There are 30 teeth in total, each with 2 LPs and 1 IP. In the next rows, increase 6 stitches on both sides of the purl stitch and knit them in garter stitch.
- In places of increases, decreases are made through the row. Then purl 2 rows, knit 1.
- Divide 90 loops into 15 sectors of 6 loops. Decreases are made again through the row.
- From the remaining 6 loops, knit a loop of the required length and secure the thread.
The resulting women's beret looks original. You can take any yarn and knitting needles. Using the diagram, it is easy to make changes to individual sizes.
Openwork
Stylish and easy to wear beret. Exhaust size - 51–56 cm. For work you will need the following kit:
- 70 g Boutique Midnight yarn from RED HEART;
- circular knitting needles No. 5,5 and 8;
- stocking needles No. 8;
- marker.
Knitting density per square 10 x 10 - 13 loops, 16 rows. The following abbreviations are used in the diagram:
- 2pv - 2 loops together with the front one (decrease);
- LPZ - knit 2 knit stitches from one loop: first behind the front, then behind the back wall;
- H2PV - yarn over, and knit the next 2 stitches together.
Operating procedure:
- cast on 80 loops, knit with a 2 x 2 elastic band about 4 cm, then switch to knitting needles No. 8 and continue knitting another 4 cm;
- 11th row: 4 times LPZ are evenly distributed along the row, the rest are facial ones;
- Row 12: knit;
- Rows 13, 20, 27: *2pc, yo*, repeat;
- 14–19, 21–25, 28 rows: knit;
- 26th row: distribute evenly 4 times in 2 stitches, the rest - with facial stitches;
- Row 29: *K3, 2p*, repeat – 64 stitches remain;
- 30, 32, 36, 38 rows: knit;
- Row 31: transfer knitting to stocking needles, *knit 2, ch 2*, repeat;
- Rows 24, 37: 2VP to end.
Pull the remaining 8 loops with thread and secure the rest on the wrong side.
Openwork berets knitted look no less impressive than those crocheted.
Braids
With this model it’s easy to add French chic to your look. For a beret size 56–58 you will need a set of the following tools and materials:
- gray yarn - 200 g;
- stocking and circular knitting needles No. 4.5;
- auxiliary knitting needle;
- hook number 3.
Operating procedure:
- Cast on 112 stitches on circular knitting needles, knit *3 IP 4 LP (braids)*, repeat 15 times. Continue working, forming wedges according to the pattern.
- The remaining 16 loops are tied with thread. The bottom edge is tied with fabric in 6 rows. RLS, 1 more row in a crab step using a crochet hook.
By varying the thickness of the threads, a product of different densities is obtained. The finished beret will look even more impressive when using yarn with a gradient. Knitting needles with a larger diameter will, accordingly, give the product more volume.
Classic Nutlet
This classic beret is knitted from ANGORA GOLD BATIK yarn in 2 threads, knitting needles No. 2 and 2.5. Original size: 56–60 cm. Description:
- On circular needles No. 2, cast on 128 cm and knit 4 cm with a 2 x 2 elastic band.
- Then knit row 1.
- Make an increase of 32 loops by knitting two stitches from one at equal intervals.
- Transfer the work to needles No. 2.5 and knit up to 14 cm, counting from the cast-on edge.
- The work is divided into 8 wedges and 20 loops in each are decreased every other row.
- When there are 8 loops left on the knitting needles, knit a loop.
The loops are tightened with thread, the remainder is removed to the wrong side and ironed.
Seamless on round knitting needles
How to knit a beret without a seam, which is not always possible to do neatly, is a common question for beginners. There is nothing complicated about this. To work, you will need circular knitting needles with a fishing line length of 40 cm or more. You can close the loops around in several ways:
- the first loop is knitted with a working thread and its free end;
- cast on one more loop, remove it at the beginning of the circle, and at the end knit it with the first one from the set.
For inexperienced knitters, it is recommended to do the first projects with simple patterns. Classic knitted berets are the best example. More complex options should be used as you gain experience. The technique of working in circular seamless knitting is no different from the classic pattern. The main thing is to make sure that the canvas does not twist, in which case it will come out without steps.
Knitting a beret for a woman involves increasing and decreasing stitches. To make this easier, the loop of the row is marked with a special marker. This “beacon” will help to evenly distribute additional loops and shorten them.
Simple braids for beginners
An original model in which braids are the basis of the fabric.
Description:
- Braids and plaits are voluminous knitting, so you should choose yarn without long pile, soft, and voluminous.
- The beret can be knitted in various braids; the distance between them should be at least 4 purl loops. It is against their background that the braids look the most textured.
- Crossing loops can be done at any distance, parallel and asymmetrical.
- In the proposed model, the braids begin to be knitted with an elastic band, turning into the beret fabric.
- After knitting the elastic, you should add loops to increase the volume from the purl loops between the braids and the front loops in the elastic.
The braid fabric is knitted at a height of 23 cm and begins to finish by first cutting the purl loops between the braids evenly, and at the end in the last two rows they switch to knitting.
Knitting from grass with knitting needles
The name “Grass” is given to long-pile threads used for knitting. You can knit from grass using both knitting needles and a hook. To make the knitting process more successful and the result pleasing, use thicker knitting needles and hooks.
✵Blatnoy Udar I’m Sitting on the Grass✵
Such threads are very popular among beginning needlewomen. This is explained not only by the beauty and originality of the resulting products, but also by the fact that loops that are not tied very evenly when knitted from such yarn will not be noticeable. You can find Grass yarn in every craft supply store.
Yarn "Grass". Features of knitting - part 1.
Summer openwork beret: diagram and description
Knitted berets (patterns and descriptions for women are publicly available) allow you to create unique models that captivate the eye.
Needlewomen knit them to give themselves a romantic, individual look.
Description:
- Openwork berets are ideal for summer. They are very light, allow the head to breathe and protect against heat stroke on a hot day.
- Knitting is made from threads of thin and medium thickness. Cotton and bamboo yarn are best suited for creation.
- Summer models are knitted not only with single-color threads, but also dyed in different tones, this allows them to be used daily with different sets of clothes.
- The edge of the rim of the model can be decorated with teeth.
- The volume is gained in the first row, after the knitted rim and gradually increasing due to the loops on the wrong side.
- After 10-12 cm, remove the loops according to the method as added.
- The bottom of the beret can be finished by collecting a larger number of loops than usual, this will give the thin beret stability.
- If desired, berets made of cotton and bamboo can be starched.
New: fashionable beret Nako
The Nako beret is the invention of an Italian designer. It was he who thought through the thickness of the spokes. And if you deviate from the master’s recommendations and knit the edging with smaller knitting needles, the beret simply won’t fit on your head.
Description:
- Thin yarn is not suitable for such a product. Threads of medium thickness and with the addition of acrylic are used.
- The beret consists of 3 parts that complement each other.
- First, the central part is knitted with the main braid pattern.
- Next, trim the trim around the circumference of the head. At the end of the work, the bottom of the beret is formed.
- For execution, take thick knitting needles number 5 and 6, as well as an additional knitting needle necessary for knitting a braid.
- This product is suitable for wool yarn with the addition of acrylic.
- Cast on 20 stitches for the central pattern on 6mm needles.
- The braid itself consists of 16 loops and 2 loops along its edges.
Beret bottom:
- On the right side of the strip with a braid knitted in the center, 73-75 additional loops are picked up.
- Knit the fabric for 8-10 rows in stock stitch and proceed to forming the bottom.
- The loops are divided into an equal number of parts, and 2 loops are knitted together at the same distance, tilted in one direction.
- The wrong side of the product is knitted as usual, without cutting.
- As a result, 2 loops from the wedge remain, they are collected on a thread, pulled together and sewn from the inside out.
Additional knitting option for the Nako beret:
- The central part - the braid - is knitted simultaneously with the bottom, and additional loops from the opposite edge of the product are added to the rim.
- The braid consists of 4 crossed loops (in total
 and 3 loops on both sides to give the pattern volume.
 - In the first row, having knitted a repeat braid, begin to knit a triangle for the bottom with 1 knit and yarn over.
- Even rows strictly according to the pattern.
- From the 3rd row onwards, after rapport, the braids are knitted, as usual, 1 knit with a double crochet and then the loops added in the previous rows.
- When the triangle next to the braid has 14 stitches, they begin to decrease it, and at the same time increase the second one.
- The shape requires 6 triangles.
- A connecting seam is made.
- From the opposite edge, pick up loops for the 1x1 elastic band and knit 10 rows.
What you need to knit a mohair beret
One of the main actions that can affect the progress of the work and its final result is preparation for needlework. It consists of the following points.
- Model selection . This point completely depends on the personal preferences and taste of the future owner and the creative vision of the craftswoman.
- Taking measurements . To create a pattern and carry out knitting calculations, you will need to measure your head circumference . The measuring tape should be placed across the forehead, above the ears and across the bottom of the head at the back. You will also need to find out the depth of the product . The measurement is taken from ear to ear through the back of the head.
Attention! For correct calculation, it is necessary to make a sample of the pattern. As well as carrying out its wet-thermal treatment.
This action will allow for more accurate calculations and will reveal invisible flaws in the yarn, if any. For example, such as stretching or shrinkage of the thread.
Materials and tools
This stage of preparation begins with the selection of material. Since we are considering creating a product from mohair, the selection of thread will mainly be carried out according to its density and the selected pattern of the model
for women.
Yarn
- For openwork items, it is better to give preference to thin fiber with parameters of 450–500 m/100 g . This density will give the product greater airiness and emphasize the lace.
- For aran weaves, use medium thickness yarn 350–400 m/100 g
. - Thicker the material should be knitted in any satin stitch or garter stitch.
Reference! When using complex openwork and weaves, choose a plain yarn. If you want to knit a product from melange thread, then use simple weaves. Several colors and a complex pattern in one product will “clog” each other.
Spokes
The tool is selected according to the thickness of the thread . To do this, you need to bend the fiber in half and compare the resulting volume with the thickness of the knitting needle.
You can also use the manufacturer's recommendation . The recommended tool number is indicated on the skein label.
Another good option for determining the right tool is the following method. Make several samples with different needle numbers . Compare them with each other. Use the knitting needles that were used to make the pattern you liked best.
Beret with checkerboard pattern
Simple to make, stylish and neat, this knitted beret is suitable for women of any age. Even a novice needlewoman can understand the creation scheme and description of the pattern.
Description:
- It is convenient to knit the beret with a 3x3 elastic band, which will smoothly transform into the “Leaf” pattern.
- Add volume loops from purl loops, increasing their number by 50%.
- You can also knit an elastic band with thinner knitting needles: the knitting will be tighter, and for the fabric of the beret itself, use knitting needles 2 numbers larger.
- Any yarn is suitable for this model; the beret is interesting both in summer and in insulated versions.
- The loops are cut evenly when the entire row is knitted with purl stitches only.
- In order not to disturb the beauty of the pattern, 5 cm before the end, they begin to knit with a garter pattern, reducing to 15 loops. They are collected on a string and pulled together.
Knitting pattern:
- To repeat the pattern and calculate the required length of the rim, cast on loops that are multiples of 10 + 2 edge loops.
- The original pattern is easy to knit. Suitable for young needlewomen, since only knit and purl loops are knitted.
To knit a beret, diagrams and descriptions for the product will help. - According to the pattern, the circles are purl, and the empty squares are knit.
- Rapport is performed from 3 rows.
- In the 4th, 8th row and further, after three rows, the entire fabric is knitted with purl loops to change the pattern.
- From the 5th row the pattern is changed in a checkerboard pattern.
Ideas for a male model
You can knit not only women's, but also men's berets. In the latter case, preference is given to simple patterns, such as stocking and garter stitch. The trend of today is geometry. This pattern can be created with knit and purl stitches. Colors should be restrained, as an option:
- black;
- Navy blue;
- sand.
You can try burgundy color as an experiment. He is very popular among men. But in this case, the master needs to be very careful when choosing a pattern so that the men’s beret looks exactly like that. Therefore, it is better to limit yourself to garter and stocking stitches. More complex options will deprive the image of masculinity and will look too sweet. To create a more harmonious ensemble, you can pair a scarf with the same pattern as the headdress. There are no peculiarities in performing the work: the men's beret is knitted with knitting needles in the same way as the women's models. The main thing is not to allow too much height so that the finished product does not hang too much over the ear. The yarn used is one that does not give much volume.
Mohair beret: diagram and description
Description:
- Mohair thread is full of advantages in itself: light, thin, and at the same time warm, it makes it possible to knit any berets from openwork to garter stitches. In any case, the beret looks decent.
- Mohair thread does not like tight knitting; it gets confused during wear.
- If you need a dense product, you need to choose larger knitting needles.
Berets knitted with mohair thread for women of any age do not need complex patterns and descriptions.
Decor options
For women, a knitted beret is not just an accessory, but also a great way to highlight your style. Therefore, such a wardrobe detail must be original. And decor is no less important in solving this problem. You can decorate the finished product as follows:
- embroidery with satin stitch or beads - combined with simple patterns;
- felt decor - it can be flowers, butterflies;
- a brooch - it is better if it is removable in order to adjust the decoration to your mood or clothing.
Quite often the beret is decorated with a small loop at the highest point. This detail is easy to crochet. From the middle of the finished product, a chain of the required length is made, then descended in single crochets. Another option: cast on 15 chain stitches separately and knit 4 rows. The loops are closed, the part is folded in half and sewn to the central part of the beret.
How to make a pompom
This is another interesting detail that is used as decoration on hats for adults and children. Very often, knitting a beret with knitting patterns and descriptions contains an indication of it. Making a pompom is easy:
- Two cardboard rings with a hollow middle are wrapped with thread until the gap almost completely disappears.
- The winding is cut along the outer edge, the rings are slightly moved apart, a thread is passed between them and pulled together tightly.
- The cardboard is removed and the finished pompom is fluffed.
If the decorative element turns out to be uneven, the ends are trimmed a little in a circle. The threads used to tighten the pompom are inserted into the middle of the beret and fixed from the inside.