Since ancient times, a headscarf has been considered an important item of women's wardrobe; if it was knitted with one's own hands, it had a special meaning and served as a strong amulet, protecting its owner. Such a treasure was carefully kept and passed from mother to daughter, prepared and given as a dowry. It is natural that in our time this accessory has not lost popularity. The headscarf can be worn not only on the head, but also pulled down over the shoulders or wrapped around the neck. Depending on the season, you can vary the yarn from wool to cotton, the sizes can be selected depending on preferences, and the pattern can be a reflection of individual preferences. But the best part is that knitting a scarf with knitting needles is possible even for those who are just taking their first steps in knitting. It is enough to choose clear diagrams and descriptions for beginners.
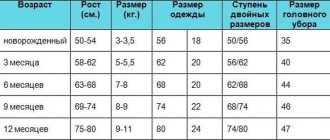
Preparing to knit a scarf
For knitting, you must correctly determine the type of yarn. Fibers that are too heavy can simply turn elegant models into incomprehensible rags.
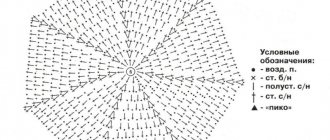
Basic symbols on the diagrams
Knitting has its own patterns, but there are so many of them. Very often one element can be displayed with different signs. For example, the front loop can be a dark square or just a stripe. Therefore, pay attention to the specific model and instructions - there should always be an explanation for each icon. Here is one example of circuit designation.
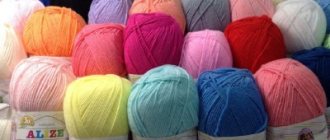
Selecting threads
The scarf can be knitted with different threads. Therefore, the best choice is the choice of a needlewoman. You can distribute depending on the warmth (more wool - warmer). Color preferences and fiber structure may vary.
Warm pink bactus
A thick triangular shawl is an excellent replacement for a scarf or shawl. This pattern is very easy to knit. You can knit several versions of this bactus from different types of yarn for different times of the year.
SIZE : Approximately 160 x 68 cm.
YOU WILL NEED:
- Yarn (87% superfine alpaca, 13% natural wool; 50 m/100 g) 5 skeins pink;
- short circular needles size 10.
WORLD STITCH Facial rows - purl loops, purl rows - facial loops.
KNITTING DENSITY : 7.5 p. x 13 r. = 10 x 10 cm, knitted in stockinette stitch using needles No. 10.
COMPLETION OF THE WORK Cast on 3 stitches and knit in purl stitch. For a side bevel, additionally cast on 49 x 1 p. along the left edge (before the edge, purl crossed) = 52 p. When finished, decrease 49 x 1 p. along the left edge (= before the edge, knit 2 loops together purl). Close off the remaining 3 stitches.
Knitting patterns for scarves
Initially, perhaps, there were several schemes. For example, the Orenburg down scarf is the first association when mentioning the product. The corresponding scheme was assigned to him. It has been created for decades without a single deviation. The scheme suited him so well, so to speak. Today there are no special rules for making a scarf. If you want elastic, you want volume. No one deprived the right to choose a lace other than that of the Orenburg model. Various meshes, honeycombs and other patterns. All this well-being is diluted by an interesting border, which makes the product complete. Beginners can create a simple fabric and simply tie it with a lace border - and it will be perfect.
Bactus scarf
Can a neck accessory look like a scarf, headscarf and bactus at the same time? You will probably question this possibility. But in fact there is one very original solution.
This model is original in that one end is wide, like a scarf, and the other is narrow, like a bactus or shawl. This format makes it possible to create beautiful and extraordinary images.
In order to knit such a bactus you will need:
- Rowan Fine Art yarn (45% wool, 20% mohair, 10% silk, 25% polyamide, 100g/140 m) - 200 g section-dyed in blue tones;
- circular knitting needles No. 3.25 mm.
You can replace the yarn with any other yarn of similar weight and yardage.
Basic patterns: Front stitch : knit. R. - persons p., out. R. - purl P.
Knitting density : 26 p. x 34 p. = 10 x 10 cm.
From 3 stitches, knit 3 stitches (3/3) : from 3 stitches, knit 1 knit, 1 yarn over, 1 knit. P.
Description of knitting a scarf-kerchief-bakutsa : on circular knitting needles No. 3.25, cast on 151 sts. Row 1 (knits): knit. n. Row 2: knit. n. Row 3: knit. n. Row 4: K2. p., out. to the last 2 p., k2. n. Row 5: K2. p., * 3/3, 1 persons. P.; repeat from * to last 5 sts, 3/3, k2. n. Row 6: K2. p., out. to the last 2 p., k2. p. Row 7: knit. p. Row 8: knit. P.
Row 9: Knit. p. Row 10: K2. p., out. to the last 2 p., k2. p. Row 11: k4. p., * 3/3, 1 persons. P.; repeat from * to last 7 sts, k3/3, k4. p. Row 12: k2. p., out. to the last 2 p., k2. p. Repeat these 1-12 rows again, then 1-8 rows x 1 time.
Next knit with decreases. Row 1 (knit): K9. p., (remove 1 p., 1 knit. p., throw the removed loop over the knitted one) - decrease, knit. to the end of the row = 150 p. Rows 2, 4: k2. p., 5 p. p., 2 persons. p., out. to the last 9 p., k2. p., 5 p. p., 2 persons. n. Row 3: K3. p., 3/3, 3 persons. p., (remove 1 p., 1 knit. p., throw the removed loop over the knitted one), knit. to the last 6 p., 3/3, k3. p. = 149 p.
Row 5: K9. p., (remove 1 p., 1 knit. p., throw the removed loop over the knitted one) - decrease, knit. to the end of the row = 148 sts. Row 6: k9. p., out. until the last 9 p., 9 knits. p. Repeat rows 1-6. Repeat decreases every 4th row. Knit until 21 stitches remain. Work 3 rows right after row 6.
Next row (persons): 9 persons. p., remove 1 p., k2 together, throw the removed loop over the knitted one, k9. p. = 19 p.
Next row: k2. p., out. to the last 2 p., k2. p. Next row: 3 persons. p., (3/3, 2 knit. p.), 3 times, 1 knit. p. Next row: 2 persons. p., out. to the last 2 p., k2. p. Next row: 2 persons. p., remove 1 p., 1 person. p., throw the removed loop over the knitted one, knits. to the last 4 p., k2 together, k2. p. = 17 p. Next row: knit. n. Next row: persons. p. Next row: 2 persons. p., out. to the last 2 p., k2. P.
Next row: k2. p., remove 1 p., 1 person. p., throw the removed loop over the knitted one, k1. p., (3/3, 1 knit. p.), 2 times, 2 knits together, 2 knits. p. = 15 p.
Next row: k2. p., out. to the last 2 p., k2. p. Next row: 2 persons. p., remove 1 p., 1 person. p., throw the removed loop over the knitted one, k7. p., 2 persons together, 2 persons. p. = 13 p. Next row: knit. p. Next row: 2 persons. p., remove 1 p., 1 person. p., throw the removed loop over the knitted one, knits. to the last 4 p., k2 together, k2. p. = 11 p. Next row: k2. p., out. to the last 2 p., k2. P.
Next row: K2. p., remove 1 p., 1 person. p., throw the removed loop over the knitted one, 3/3, k2 together, k2. p. = 9 p. Next row: k2. p., 5 p. p., 2 persons. p. Next row: 2 persons. p., remove 1 p., 1 person. p., throw the removed loop over the knitted one, k1. p., 2 persons together, 2 persons. p. = 7 p. Next row: k2. p., remove 1 p., k2 together, throw the removed loop over the knitted one, k2. p. = 5 p. Next row: 1 person. p., remove 1 p., k2 together, throw the removed loop over the knitted one, k1. p. = 3 p. Close off the remaining 3 p.
We knit a scarf with our own hands: patterns and description
It is not difficult to make such products with your own hands, if the pattern allows it. There are also quite complex schemes; they are not recommended for beginners. It is necessary to go through the ladder from the first step and gradually approach more complex models. But knitting skill is a huge plus. The more you knit, the faster you get results. After all, the speed becomes faster and at the same time the loops are smoother.
Important! Doctors have noted the fact that seriously ill patients experience relief, and some even get better, deciphering the complex patterns of the canvas. The thing is that a person constantly counts loops and rows. This way he pushes aside sad thoughts, and this is very important at the time of illness.
Scarves can be of different shapes. Some are even close to scarves and fashionistas use them like this: they simply tie them around their necks. From the outside no one will think that this is a scarf. Regular square models, triangular ones, variations that are closer to bactus. New items are models in the shape of a semicircle. With small lace collars. How many categories open up, you just have to dig deeper. But the coolest and most elegant models are collected in this review with diagrams and descriptions. Let's try ourselves as a clothing designer and knit a scarf for ourselves and our loved ones.
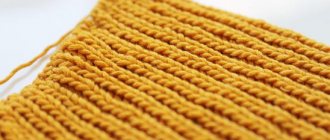
Knitted thick scarf
A tight pattern can be made with knitting needles by anyone who knows how to knit knit stitches, purl stitches and how to make yarn overs.
After all, this is all you need to create an elegant scarf model. To work you will need:
- yarn Tosh DK 3 skeins (100% merino) 615 m;
- circular knitting needles 4.5 mm.
The gauge of this knitting is 16 stitches = 10 cm in stockinette stitch. The width of the model is 117 cm. You can make it wider or narrower if you wish. The model is knitted from the center of the base (triangle) and down. For the initial set you will need only 5 loops.
After knitting according to the pattern:
- 2 knits/pet, yarn over, 1 knit/pet, yarn over, 2 knit/pet.
- K/st until the end of the row (there will be only 7 loops and this is the wrong side of the fabric).
- Continue rows with yarn overs and between one knit stitch. As a result, due to two yarn overs in each front row, an increase of two loops will be obtained. This is how the scarf will gradually expand and increase in size. Continue knitting until the desired length (in this case, up to a length of 117 cm). The scarf will be dense due to the garter stitch pattern. It will look triangular due to two yarn overs that turn the work and expand it to the sides.
Product border : it is created using a 1*2 elastic band. On the front side there will be one front and two purl loops. Additions along the border make it with a slight wave.
On a note! The increases will be unnoticeable if you add loops between the front loops of the elastic band.
Knit 10 cm of elastic and bind off the loops. In the last row you will get an elastic band of 1*3 (this is achieved by gradual additions). Then you can close the loops according to the fabric pattern. An elegant and thick scarf is ready and can be worn with jackets, cardigans and coats.
Scheme of an openwork scarf with knitting needles
Anyone who has not knitted will not understand that each pattern has its own ideal pattern.
If the braids are better visible in gray tones of the yarn, then this pattern is definitely better in the rich blue color. To work you will need:
- Alize Real yarn (100 g contains 480 m);
- knitting needles number 2;
- hook 2 mm.
The work is done not only with knitting needles, but a crochet hook helps a little after finishing, because it is this that creates the last air fibers. The openwork from pattern A is knitted with knitting needles, but only one half of the scarf is indicated. The second one is knitted symmetrically and immediately. Therefore, you need to cast on the knitting needles twice as many stitches as shown in the diagram. This pattern is knitted faster, despite the fact that there are more rows. The thing is that the rows will be shorter at first, then they will gradually expand due to the central loops and yarn overs. Next, we move on to pattern B and knit the larger elements of the openwork fabric. A hook will help you finish knitting. You need to follow this scheme for closing loops :
- several loops together;
- 6 air loops.
The pattern of the canvas itself will tell you. But in the end you should end up with such a beautiful weave.
You can finish the row with knitting needles, but it will be long and difficult.
Don’t be discouraged if you don’t like the canvas after finishing the work. Like all knitted items, the product needs to be wet and stretched. This way all the loops will dry and take the correct position. And you will get a product like in the photo. Such beauty, it’s a pity to even crush it.
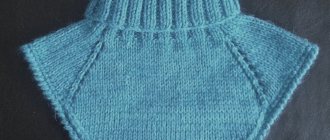
Knitted Scandinavian scarf
The model of the Scandinavian scarf is distinguished by its shape - it is almost a triangle. It is obtained by yarn overs or decreases with bends.
To work you will need:
- 200–300 grams of yarn with the addition of acrylic;
- knitting needles of the appropriate size, depending on the thickness of the yarn.
The model uses a checkerboard pattern, stockinette stitch and purl stitch. These are completely different elements, but together they create something unusual. Therefore, with them it may well turn out to be a Scandinavian scarf.
A very bright color was chosen for the canvas, and so the patterns began to play in a new role. The pattern shows that you can knit in different directions. The result will be one canvas.
Use knitting needles to cast on the desired number of stitches. Next, make decreases in one row, two at a time. Do this every second person (or every fourth in the general sense). But at the same time make increases on the opposite side, in the same way.
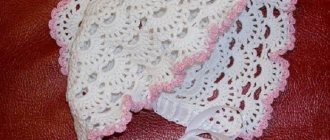
Knitted down scarf
A very interesting model of a down scarf. Beginners will probably think, why complicate everything - it’s just a square canvas. In fact, a scarf is not that easy to knit. Especially this model. After all, knitting occurs in corners and in different directions. It's easy to get confused, but that's not what this description is for. So, let's try and figure it out together.
To work you will need:
- goat fluff 90 g;
- contrast thread;
- knitting needles No. 2;
- pins or loop holders.
The diagram produces several corners that will need to be connected together using central loops.
Using this analogy, you need to create another angle. To do this, you will need to knit one side of the border to the desired length.
Next, attach the second diagram of the model to the work.
This pattern will run through the center of the scarf, between the three sides of the border. For it, you will initially need to cast on loops from one of the inner sides of the border. Work in the opposite direction from the border and join the right and left sides on each row, simply knitting the stitches together. Once the required length is formed, move to the border, which will be the fourth side of this scarf. Attention - the diagram should form a square in the center. All loops must be counted and knitted with the same density. The last border is knitted very similarly to the middle of the scarf, only the loops are caught on one side (from pattern number two).
Knitted bactus scarf
It can be called today “the most fashionable scarf.”
To work you will need:
- medium thickness yarn;
- knitting needles No. 3.
For bactus you need only two schemes:
- facial surface;
- purl stitch.
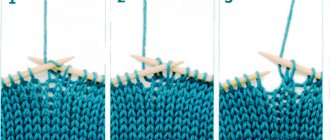
Three steps in work:
- Starting work from a corner. Cast on three stitches with knitting needles. Knit 6 rows in stockinette stitch. In the last row in the last loops, add one loop. Change the pattern to purl stitch. And again 6 rows and again adding 1 loop. By analogy, create 40 cm.
- Step for obtaining a rounded profile. In each even row, increase 1 stitch on the inner side. From the outside (this one is opposite the increases from the first stage), make decreases using the same technology. Do this exactly 30 cm.
- At the beginning of every 6th row, bind off 4 loops. At the same time, create increments along the loop: in an even row - at the end, in an odd row - at the beginning. Close when the desired length is reached.
How to wear bactus
Bactus became popular not so long ago and it came to us from the Scandinavian countries, or more precisely from Norway. It is an original headscarf or triangular scarf, which serves as a “warm neckerchief”.
Initially, baktus were part of the national costume and were a distinctive sign of high social status. And as soon as things in the national style came into fashion in Northern Europe, world designers immediately picked up this trend. And today almost every girl has bactus in her wardrobe.
There are many variations of wearing bactus - this is its main advantage in addition to its warming functions.
The first option is like a scarf, tied around the neck. In this case, the corner is located in the center, and the ends wrap around the neck and are hidden inside. Perhaps this is a classic way to wear this accessory. In this position it looks good with a shirt, over a turtleneck or under outerwear, like a scarf.
The second option is like a scarf, but the edges wrap around the neck and hang elegantly. This way of wearing bactus is very stylish, it adds some zest to your entire look, regardless of whether it is worn over a T-shirt or jacket.
The third option is when the edges of the bactus are not hidden, but tucked under its corner. In other words, the edges lie at a fundamental angle. Let's demonstrate it below with an example.
The fourth option is to tie the ends in a knot. A very convenient way to wear it, especially when you need to quickly tie a bactus and be outside in five minutes.
And let’s add a few more interesting ways to wear bactus as a fashion accessory.
Male bactus
You are mistaken if you think that bactus is exclusively a women's accessory. A men's bactus, like a regular scarf, does not go badly with a coat and naturally fits perfectly under a down jacket. The knitting principle is the same as for knitting women's bactus. The only exception is: more restrained colors and the absence of ruffles and openwork borders. although these are only conditional exceptions.
How to knit a male bactus with knitting needles?
Size : 150 cm.
You will need:
- 200 g gray yarn Qua! Andes (65% wool, 35% alpaca, 50 m/50 g),
- knitting needles number 8.
Facial surface : faces. R. - persons p., out. r.-iz. P.
Knitting density . Persons stitch: 11 p. and 15 r. = 10 x 10 cm. Description of work: cast on 3 stitches and knit. stitch, making additions from the right edge as follows: at the beginning of each knit. R. after chrome perform 1 yarn over, purl this yarn over. cross. At a total height of 75 cm, there should be 58 stitches in the work. Knit 2 rows on all loops, then decrease from the right edge as follows: at the beginning of each knit. R. after chrome perform 1 stretch (slip 1 stitch as knit, 1 knit and pull it through the removed stitch). Decrease until there are 3 stitches left in the work, then bind off the stitches.
Here are some examples of images with male bacti:
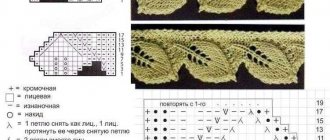
Types of patterns
The patterns used to create shawls and similar products have a distinctive feature - they are airy, have a thin openwork, but clearly depict the design.
For knitting, you can choose absolutely any pattern you like. There are a huge variety of them, so you will definitely be able to find something to your liking. The most popular patterns are plant designs such as leaves and twigs.
Knitting a shawl yourself is not so difficult if you carefully study this topic and choose the right material, tool and pattern. The main thing is not to despair if something doesn’t work out, but to try to figure it out and learn this interesting business.
Perhaps knitting will become your new and favorite hobby.