If you love and know how to sew, then you have probably thought about trying your hand at sewing a fur coat. Many people do not dare to do this, fearing that, without a special sewing machine, tools and extensive experience in working with fur, they may make a mistake. But not everything is as complicated as it might seem. You just need to carefully study cutting techniques, material layout, and methods of stitching artificial or natural fur. As a result, you will be able to sew with your own hands the exclusive item you have dreamed of.
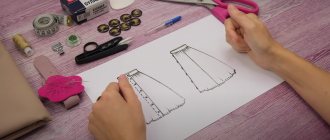
Pattern
Artificial fur
Sewing a fur coat from faux fur according to a pattern is somewhat easier than from natural fur. The cost of the material is affordable, and the choice is large. A faux fur coat will look no worse than a mink coat. Moreover, you will sew it with your own hands and exactly to your taste and size.
The model can be absolutely any:
- trapezoid,
- with a stand-up collar,
- with a hood.
You should work with faux fur just as carefully as with natural fur. Cut the parts only along the fabric base, carefully trying not to touch the pile, and follow its direction while cutting the parts.
The faux fur coat pattern is based on the coat pattern.
How to buy a beautiful fur coat, an original down jacket that fits your figure, with savings of up to 40%?
Sew it yourself! To do this, just use detailed full-size patterns from the GRASSER online store.
We offer you to buy patterns of fur coats and down jackets at an affordable price:
- fashionable original models - they are developed by our craftsmen, inspired by the latest fashion shows and collections of the world's leading designers;
- from simple to complex levels of sewing - both experienced craftswomen and novice needlewomen will find patterns for themselves;
- for the entire popular size range - from size 38 to 54 - and the main height groups;
- with detailed descriptions that will help you sew a quality item and learn the techniques of professional tailoring.
Stages of constructing a fur coat pattern
You can take your own ready-made coat pattern, take it from a free source, or build it according to your own measurements.
Patterning a fur coat from faux fur with your own hands or from natural fur is similar in the following:
- the direction of the fur pile of each cut piece is the same;
- parts from two parts should mirror each other;
- the drawing is completely identical in detail;
- We do not cut the pile, only the base of the fur.
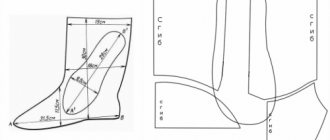
Mittens from an old fur coat
This is a necessary item for any wardrobe. Mittens are a great addition to winter boots, handbags, hats, and scarves. Good specimens in retail outlets are quite expensive, since to produce such a product you need to have at least two animal skins. But an old, worn fur coat will save you from unexpected expenses.
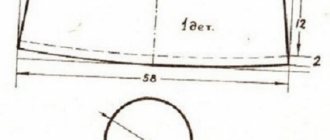
Making a pattern for mittens is quite simple. It looks like this:
This is a scaled version that can be enlarged to the size you need. Cutting is carried out in two copies. What should you not forget? Mittens are worn on the left and right hands, so they should be mirror-like in appearance. Due to the similarity of the parts, you should sign them with the letters “l” and “p” so as not to get confused later.
Sewing mittens is not difficult. The following must be taken into account:
- It is necessary to cut out the parts in such a way that the mittens fit freely on your hands;
- It is imperative to leave seam allowances;
- if you plan to put only a collar on the mittens, then there may not be enough fur, so the palms can be cut out of another warm material (leather will do);
- Fur gloves are worn not only by women, but also by men. The stronger sex prefers to fish and hunt in them in winter. To make mittens look more respectable for men, they should be sewn with fur on the inside.
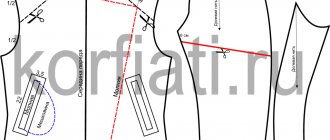
Uncover
- We model the back and shelves depending on the fur coat model you choose: with a hood or with a stand-up collar. If you have a coat pattern according to your parameters, you can use it. Back – 1 piece, shelves – 2 pieces.
- We are building a sleeve pattern - 1 piece. Most often it is made single-seam, straight or slightly flared. The flared sleeve looks great on a trapezoid-shaped fur coat.
- Cut out the stand-up collar or hood – 2 parts.
Rug made from an old fur coat
A very necessary thing in the house. Moreover, rugs can be both large and small, of regular geometric shape or completely free of it. The most correct option is to place such a rug next to the bed so that when you wake up, you place your feet not on the cold floor, but on a warm and soft bedding. This will not only lift your spirits, but also make the climb more enjoyable.
Carpets can be made oval, square, round, in the shape of flowers or hunting trophies. The set of tools should be the same as in the previous version. The scraps are cut out, sewn together, and a lining is made. You can even leave worn areas. They will give the product a certain charm.
Lining
Make the lining for your fur coat using the same pattern that you made for the top of the product. For insulation, the lining fabric is quilted in the form of any pattern with batting or woolen fabric. It is not recommended to use padding polyester for this purpose.
The lining with insulation for the sleeves is not quilted.
After you have cut out all the parts, you should baste the top and lining separately, stitch and sew them together.
An important point - dubbing
Often the basis of faux fur is knitted material. Although it is sealed with special glue, it still has the property of stretching. Therefore, it is imperative to strengthen the most worn areas of the product - the shoulder, sprout, pockets, and the hem of the fur coat.
If you are sewing from natural fur, such as mink, then the dubbing should be made even denser. This guarantees the product excellent durability for many years without the need for repairs.
At the bottom of the sleeves and at the bottom of the product, individual parts of the collar or hood should be duplicated with non-woven fabric.
Never use an iron when working with any fur.
As you can see, the pattern of a faux fur coat with or without a hood is not so difficult. But you need to be careful when arranging the material and have patience.
What do you need to sew a fur coat?
First of all, you need to buy materials for work:
- Natural fur is the most expensive material. Products made from natural fur always look impressive, but require special skills, knowledge and professional equipment;
- Faux fur as a more affordable alternative to natural material. Working with a solid piece of fur fabric will be easy even for sewing enthusiasts. In this case, you can always combine natural and artificial materials. For example, use natural raw materials to cut collars;
- The base from an old fur coat is the most popular raw material for new clothes. But, you should always understand that any fur can have a certain period of operation. Therefore, all worn areas cannot be used when sewing a new item and will have to be removed during sewing.
But artificial raw materials are quite accessible. In any fabric store you can find a variety of “natural” fur in a wide range of colors and types. The ready-made patterns presented below can be used for both natural and artificial raw materials.
The lining is simple satin , as the most classic option. But, you can use a quilted lining made of combined fabrics. This material is characterized by strength and acts as additional insulation. But satin looks more beautiful.
In addition to the material, you need to stock up on tools for work:
- Sharp scissors;
- Hairpins or clothespins (necessary for fixation). Their benefits will be appreciated by that category of seamstresses who preferred natural material;
- Punching pliers for installing accessories;
- Hammer with cloth winding (necessary for breaking or softening seams);
- Special triangular needles;
- Comb brush for combing fur;
- Chalk (soap) to mark markings;
- High-quality accessories: hooks, buttons, straps, ties and so on.
How to choose a quality case
Covers made of cotton, velvet and spunbond
The first thing you should pay attention to is the size. The fur coat should be placed freely in it, without folds or bends of the fur. See how the side insert is made. The longer the fur, the wider it should be. The length should also correspond to the length of the fur item and even slightly exceed it. There should be 10 to 15 cm of free space at the bottom, so it is better to purchase a long cover. Standard length available:
Read more: DIY chair headrest
It is important that the anti-moth cover is made from natural fabric. Give preference to cotton or linen. They will provide maximum air access, but at the same time the fabrics are dense enough to make the product dense and durable. Sometimes non-woven polypropylene material is used, which also allows free air circulation. The classic color is black or brown, for white fur – blue.
The zipper must be sewn along the entire length. Manufacturers of cases provide special reinforcement to provide protection against ruptures, which most often occur in the lightning area.
Fur headphones
To make these headphones you will need:
- scissors;
- black rim;
- felt fabric;
- artificial fur;
- hot melt adhesive.
Using scissors, cut out two interconnected circles from the fabric. Fur is applied to only one side of the circle. The eights are folded and the batting is placed inside. The rim is glued along the contour. The headphones are ready. They can be decorated with a brooch, rhinestones, bows.
Fur pillow
This beauty will decorate any sofa. And don’t despair if you don’t have cutting and sewing courses under your belt. There would be desire, patience, free time and an old fur coat. You need to choose the shape and size of the pillow yourself.
The list of everything needed is as follows:
- thick paper;
- scissors;
- needle;
- threads;
- ruler;
- snake;
- stuffing material;
- sewing machine;
- decorative details;
- pieces of fur, leatherette or leather, felt, fleece.
Before making a pattern, you need to decide on the dimensions of the finished product. It is worth keeping in mind that the stuffed finished pillow will be smaller than the pattern, so you need to add 3-4 centimeters to each edge, not counting the seam allowances.
A pillow of the correct geometric shape is cut out quite simply. A figure with the appropriate dimensions is drawn on thick paper, cut out and applied to the fur. Three sides of the figure are sewn on a machine, the fourth is left for sewing in the snake. Afterwards the pillow is filled with padding polyester or foam rubber. If you have feathers, you can use those too.
Square pillow pattern
In the same way, you can make a pillow from thick fabric, decorating it with fur inserts or decorative elements.
DIY pompom rug
A beautiful thing made with your own hands from an old fur coat. When making it, you can use even the smallest scraps.
Set of necessary tools:
- large needle;
- scissors;
- saucer;
- yarn;
- Crochet hook;
- plastic mesh to create a base;
- sheet of cardboard.
Place a saucer on the cardboard and trace it with a pencil. A circle is cut out along the contour and used as a template. Pieces of fur are cut out using the template. Using a needle and yarn, the fur patches are gathered along the contour and pulled together. The thread is tied tightly. You get pompoms.
Using a plastic mesh, a base for the carpet is made. It can be given a rectangular, round, square, oval or any other shape. Take the first pompom and place it on the edge of the base. Using a hook, the yarn on which the pompom is assembled is pulled to the wrong side. Tied with a double knot. All other pompoms are attached in the same way. If the rug is made for small children, then it can be depicted in the form of a lamb, sun, or bear.
Pet bedding
To ensure that animals sleep comfortably on the floor, bedding must be provided. They can be very diverse. But fur rugs are popular. And it doesn’t matter if it’s an old fur coat made from a rabbit, fox or mouton. Pets feel comfortable on such a bedding.
Fur bedding is made as follows:
| Preparatory stage | Buttons or other fasteners and the lining are torn off from an old fur coat, and the sleeves, back, hood or collar are separated. All pieces are carefully washed and checked to ensure that the fur is not showing too much. Fur flaps are dried and combed. |
| Stage one | We cut out a rectangle of thick fabric 60 x 70 cm and the same from fur. We process the edges using an overlocker. |
| Second phase | We sew the three edges of the two rectangles and turn the product inside out. The fourth side is equipped with a zipper. This is necessary so that something like a pillow or a small amount of filler can be placed inside. |
DIY fur coat cover
Many people prefer to have this luxury in their car. The seat is comfortable and not cold. The cover can be used not only for seats, but also for the backrest. Making covers - capes from fur is quite simple and does not require any special financial costs.
Before you start work, you need to acquire:
- scissors;
- dense natural fabric;
- a needle;
- threads;
- pins;
- chalk or marker;
- sewing machine
There is no need to make patterns for sewing fur covers. Enough:
- disconnect the headrest;
- spread the fabric over the seat and back with a 10cm overlap;
- make two holes for installing the headrest;
- put the headrest in place, thereby fixing the upper part of the fabric;
- the flap is leveled along the seat and slightly stretched;
- excess edges are folded inward and secured using pins;
- places on the flap are determined for fastening elastic bands or laces;
- the fabric is removed and stitched along the intended contours;
- The cape cover is attached to the seats using an elastic band or strings.
Vest made from an old fur coat
An irreplaceable thing in winter, when the house is cool. To make it, you will need a worn fur coat, in which, as a rule, the sleeves are very frayed. The vest is made quickly and with minimal experience in this matter. The sleeves are torn off from the fur coat, and the seams are treated with either leather or thick fabric. Much attention must be paid to the lining. As a rule, it already looks unsightly and needs to be updated.
Before you start sewing a vest, you need to make sure that both the outer and inner sides of the fur coat are in good condition. If there are problems with this, then the transformation into a vest may not take place. In this case, even a master will not help. If the fur coat was too long, then it is worth shortening it to the required length. You can gird yourself with a neat strap made of suede or leather. You need to get a little creative with the neckline and also pay attention to the clasp.
Hat made from an old fur coat
An outdated mink coat can, in skillful hands, turn into a beautiful mink beret or kubanka. To do this, you need to make a pattern for the headdress on a sheet of whatman paper. Transfer it to the fur and cut out the product, not forgetting the seam allowances. The beret is carefully sewn from the wrong side, turned inside out, and the lining is sewn to it.
Mink can also be used to trim hoods on jackets, cuffs on coats or any other outerwear. A piece of mink will perfectly complement the color of a fashionable leather handbag.
Fur toy made from an old fur coat
All kids love something unusual. So why not give them pleasure by making a toy with their own hands. Maybe an old fur coat can make a great bird. To do this you need to take the following steps:
- cut out all the details of the future toy;
- sew together all the details of the head, including the forehead, eyes, eyebrows, beak, carefully process the undercuts;
- side wedges are inserted into the chin, ears and head;
- the abdomen is sewn together from parts;
- feathers are sewn to the wings;
- then the tail, abdomen, back, and wings are sewn together;
- wings, tail and head are sewn to the body;
- eyes are attached to the head (you can use glue);
- The paws are made of fabric and claws are attached to them.
The feathered friend is ready!
In a similar way, you can make any other soft toy: from bunnies and bears to cars and houses.
Fur stool cape
Kitchen stools will look more impressive if you sew fur capes on them using long-forgotten fur coats. Such covers not only add softness to the chairs, but also keep them in their original condition. These capes wash well.
Necessary materials:
- a piece of fur;
- elastic or lace;
- strong thread;
- chalk for marking;
- pins;
- needles;
- ruler;
- sewing machine.
Using a ruler and chalk, the dimensions of the future cover are drawn on the reverse side of the fur flap. This takes into account the thickness of the seat and seam allowances. The figure is cut out using scissors or a special knife, the edges are folded and hemmed, leaving 2 - 3 cm of free space for retracting the elastic or lace. The elastic band or cord is pulled in, the cover is put on the stool, the elastic band is tightened well so that the cape fits tightly on the stool. The edges of the elastic are sewn together.
DIY fur coat blanket
For these purposes, you may need not one, but several old fur coats. It all depends on the size of the bedspread. In addition to fur, you must have:
- blade or sharp scissors for ripping seams;
- ruler or centimeter;
- marker or chalk;
- knife;
- sewing machine;
- lining fabric;
- threads;
- liquid sealant.
Step-by-step instructions for making a fur blanket.
- We only take clean fur. If you have doubts about its cleanliness, then you should resort to dry cleaning.
- The fur coat is separated from the lining and sleeves, and all existing seams are ripped out.
- The size of the bedspread is determined. This will depend on the quality of the fur coat and its size. You can use the patchwork method, then the dimensions will be more impressive.
- The top of the product is measured using a ruler or centimeter. Lines are drawn on the wrong side.
- The fur is cut along the drawn lines using scissors or a special knife.
- All newly formed seams are treated with liquid sealant.
- If the bedspread consists of many shreds, then they are sewn together manually or using a sewing machine. In this case, special threads and needles are used for sewing fur.
- The lining fabric is sewn to the resulting bedspread.
LiveInternetLiveInternet
Quote from message ksenija_82
Read in full In your quotation book or community!
We sew a fur coat from faux fur.
I love fur, even faux fur! Nowadays there are many types of fur that are practically indistinguishable from natural fur. And under a fox, and under a raccoon, and under a mink. I couldn't resist it - at a trot. It even feels natural to the touch. Unlike natural fur coats, faux fur items are easy to sew yourself. They are inexpensive and you won't have to wear them for decades. Girls with any figure will be able to choose the right faux fur for themselves. Stately girls are better off choosing short-haired ones. Nowadays faux fur is made on a knitted basis. Products made from it are light and comfortable, although they are blown by the wind. My friend bought a ready-made faux fur coat lined with padding polyester. He says it still blows. I like it warmer. For the lining I took another faux fur - simpler and cheaper. I will make a complete shelf and back out of it, and put the sleeves on a lining with padding polyester.
I make patterns myself, and for beginners I recommend taking any suitable ready-made outerwear pattern. Choose a simple model with a minimum of details. All the same, they are not visible on the fur, and sewing is much more difficult. Be sure to measure the re-shot pattern along the chest and hips. The increase in fit should be at least 18 cm across the chest and 14 cm across the hips. It all depends on how bulky the clothes you plan to wear under your fur coat. Choose a simpler pattern - without darts on the chest and waist. Moreover, belts are in fashion now. It is more important to choose the right length and volume of the fur coat at hip level. Thin girls can afford any volume, but for statuesque girls, I recommend making them semi-fitting. Closer to the body, in short. The length of the coat should not end at the widest point of the hips. Either higher or lower. Please note that faux fur is cut in one layer, so complete the pattern pieces provided with a fold. Ideally, let there be as many pattern pieces as needed: 2 front pieces, 2 sleeves, 2 hood pieces. This makes it more convenient to lay out the fabric to take into account all the increases and allowances. Make a layout before purchasing fur to calculate the consumption. Consider, if any, hem, hem and sleeve, pockets, cuffs and hood. Pay attention to the direction of the pile. If the pile is directed in one direction, then all parts should be laid out in one direction. Look at the fur from different angles - the direction of the pile may not be obvious. We will cut with a blade. I tried both a stationery knife and a special knife for leather - it didn’t cut. You can cut with scissors, carefully trimming the fabric so as not to touch the pile.
Everything is covered in wool! Even sandwiches the morning after cutting. We continue making faux fur coats. Start here. To my great regret, it was not possible to use fur as a lining. The thickness of the fur coat was incredible. During the fitting, I looked like a hut on chicken legs. The next day I had to go out and buy a regular lining and wool. Now in our city only one type of sherstepon is sold - thick three-layer, plump like padding polyester. It is quite likely that even with such a lining I will look like a hut (I don’t try it on anymore, so as not to be upset). I remember that previously there was a thinner wool wool on sale, like batting, only lighter. Get to the point! After cutting and fitting the fur, we make the necessary adjustments. I had to reduce the width of the product a couple of times around the chest and hips. I left the sleeve width and armhole depth the same. Don't rush to cut off too much at once. It’s better to sew it in about a centimeter and a half and try it on. If the lining is quilted, be sure to try it on together with the lining. Transfer all changes in the cut of the upper part of the fur coat to the pattern. And according to the pattern, trim the lining. Since I’m unlikely to wash my fur coat, I simply ironed the lining (decatting). We fold the lining in half, pin the patterns, trace along the contour of the pattern, and draw allowances for the seams. I usually add 1.5 cm, and 4 cm for the hem.
Now the quilting process: 1. Draw out the cut details that we will quilt. Note that the more frequent the stitch lines, the stiffer the finished piece will be. 2. Place the cut parts on the wool. We often pin details along the contour and stitch lines with tailor's pins.
3. Cut with allowances along the contour of the part of 2.5–3 cm.
4. We adjust the cut on the sherstepon along the contour, retreating 0.5 cm from the edge. Stitch length is maximum.
5. Carefully trim off the excess insulation.
6. Quilt the cut details along the drawn lines, holding, stretching and, at the same time, moving the fabric under the foot.
7. Remove the pins. Assembling the lining: sew the shoulder seams, side seams and the middle sleeve seam. We sew the sleeve into the armhole. Whoops!
I forgot to say that in the middle seam of the sleeve it is necessary to leave 20 cm unsewn; through this hole we will turn the fur coat inside out. Now we change the needle to No. 90, and the threads to No. 40 (when sewing the lining, we used a needle No. 70 and polyester thread No. 60). We assemble the top according to the same scheme: 1. Sew the shoulder seams. 2. Sew the sleeve into the armhole. 3. Sew the side seam of the top and, at the same time, the middle seam of the sleeve. When pinching, sweeping and grinding the seams on fur parts, carefully tuck the pile inward. I do this with scissors.
The bottom of my sleeve is decorated with a cuff made of knitted elastic. The collar is also made from it. Therefore, the next step is to sew on the knitted cuffs (already sewn along the middle seam) and the collar.
Next, check the length of the sleeves of the top and the lining. They must be equal. We insert the lining into place and check by holding it or attaching it in the shoulder area. Now we will connect the top with the lining. Be careful and attentive. 1. Sew the lining to the collar on the other side. 2. Turn both the top and the lining inside out. In order not to turn the sleeves over, we apply the top and lining with the shoulder seams and sleeves facing each other,
We cut off the bottom of the top sleeve and the lining along the middle seam face to face.
This is the result:
3. Check the length of the lining and the fur part at the bottom. Since I have a fur coat with a zipper, the lining is 4 cm shorter than the top. We sew the bottom of the parts face to face. 4. We check that the lengths of all seams match: we apply shoulder, side, and middle seams to each other. 5. Pin, baste and stitch the zipper to one side of the top. We begin to sew the zipper, stepping back 4 cm from the bottom. 6. Fasten the second part of the zipper to the already sewn part. We mark control points on it with chalk. This could be a line of a yoke or a belt. For me this is the sewing line for the collar. 7. We pin the second part of the zipper along the control points and between them, baste, and grind. 8. Pin the middle seam of the front lining to the zipper, matching the control points, and basting.
Sew along the top of the product, along the already laid seam, using a zipper foot. I have a zipper from top to bottom. We'll do the final finishing of the fur coat next time. Please, if there are any ambiguities or questions, ask in the comments. I'll be happy to answer.
Let's finish working on our fur coat. To make the lining one piece with the top: 1. Sew together the seam allowances for the collar of the top and the lining. Straight from zipper to zipper. Ideally, as if “iron” - unfolded, so that the seam is thinner. The fabric is thick, I sewed it by hand. 2. Sew the cuff seam allowances. 3. Sew the seam allowance on the sleeve of the top and lining in the shoulder area. It is more convenient to do this using a lining ribbon 5-6 cm long. We do the same in the side seam area.
4. Attach the hem of the bottom of the fur coat by hand in the area of the side seams. The fur cannot be pulled out through the sleeve due to its thickness. I ripped the seam between the fur and the lining along the bottom (35 cm between the side seams), turned the fur coat onto my face, then pulled the bottom through the unstitched area of the sleeve and stitched it. Now we attach, to be sure, the hem of the bottom also in the middle area. 5. Sew up the hole left in the sleeve right at the top.
The fur coat is ready! Please, if anything is unclear, write to me in the comments. I will be happy to help you!