Stages of pattern construction
The pattern is ready-made, as in the photo below.
If the leg is not standard, for example, a wide foot, a high arch, a protruding bone, then the patterns can be built independently, according to individual measurements.
To construct the sole, you can outline the foot, the insole, or a finished slipper that fits the size.
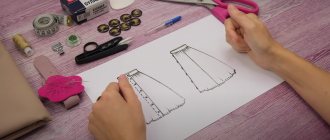
- Draw a center line and make a cut along it almost to the very top.
- Separate the halves at a distance equal to the lifting height. For this measurement, you need to measure the width of the foot at the base - the green line, plus 3 cm for freedom of fit.
- Mark the distance from the tip of the thumb to the instep - the blue line. This will be the length of the toe of the boot. Usually it is 12 - 14 cm.
- Draw a smooth arc - pink color. The toe is ready.
- Boot top. It is necessary to measure the circumference of the shin in the place where the boot ends, and the circumference of the ankle. Add 3 - 4 cm to these measurements for a loose fit. When using stretch fabric, such as fleece, and without insulation, a small increase of 2–3 cm can be made. If you want to sew the product looser, then add 4–5 cm.
- Mark the lifting point on the pattern. Draw the heel with a convex arc. Its height is usually 5 cm.
- Draw a semicircle where the toe and boot meet.
Determining children's sizes
In order for a pattern for a newborn to become a good basis for a future product, it is necessary that all the parameters not only correspond to reality, but also are suitable for the baby’s physique.
There are several nuances to consider when taking measurements:
- The baby should be dressed in light, thin clothing.
- The measuring tape should not be stretched too much, so as not to end up with clothes that fit close to the body.
- Record all data immediately after measurement.
Size chart
How to take measurements from a newborn:
- It is necessary to determine the height - the length from the heel to the crown.
- Chest circumference - place the measuring tape so that it passes under the arms and rests on the shoulder blades.
- You need to use the girth of the tape to determine the diameter of the waist in the tummy area.
- The volume of the hips is to grasp the buttocks at the most protruding part.
- The length of the back is from the middle of the neck to the place where the waist size was determined.
- The length of the arm is from the shoulder to the wrist when bent.
- Neck circumference - wrap the measuring tape around this part of the body with a sufficiently large overlap.
- The length of the foot is from the tip of the big toe to the heel.
- On the side, determine the length of the trouser leg - measure from the waist line to a certain level.
- Head circumference - place the tape so that it is located above the ears and lies on the eyebrows.
Fingerless gloves (mitts)
Making a carpentry workbench with your own hands
Very interesting are the gloves made of fleece, with no fingers at all. If you decorate them with hand embroidery or fabric flowers, you will get a rather elegant accessory.
The fleece gloves pattern is constructed as follows:
- Draw a rectangle on a piece of paper, approximately 11.5 x 23 cm;
- try it on on your hand so that the size matches;
- put two dots - the boundaries of the thumb.
Product assembly procedure
Cut four pieces from fleece.
- Connect two flaps and sew a straight stitch along the edges. Leave the hole area unsewn.
- Place the allowances in different directions and stitch them.
- Try on the semi-finished product to make sure it is sewn correctly.
- Finish the sections with a seam, bending them.
- Decorate the front side with bright buttons or flowers.
Pages
VIEW ALL
Reviews
Yulia Lindikrin
I like it, thanks for your work
al_ena671
I downloaded your fur coat pattern. But no one answered my question whether anyone made this product or not. The answer is silence... And the fur coat is wonderful.
VIEW ALL
This is interesting: Pattern Knitted trousers for boys (р 110-146)
How to sew fleece slippers with your own hands
How to sew a bean bag chair with your own hands
The step-by-step assembly of fleece ballet shoes looks like this:
- The upper and lining elements are sewn along the heel seam. Fold face to face, stitch along the side seams and turn inside out.
- The parts of the sole and the insole are folded together with the wrong side to each other, stitched together and attached to the upper part.
- The seams are sewn with an overlocker and turned right out.
Assembling fleece boots will take a little longer:
- The elements of the boot are connected to the toe and heel.
- After this, the boot is sewn together, leaving the outer seams free. The outer and inner parts of the boot are connected in a similar way (separately).
- The sole is sewn into all 4 elements, as in the diagram. As a result, you should get two boots: one with padding polyester, the second without.
- The parts are connected with a zigzag stitch.
You can decorate finished slippers with figures cut out of fleece or satin ribbons. The boots with long bunny ears sewn from fleece of the same color look especially interesting and cute. For inspiration, you can study various photos with decor.
How to decorate socks?
Even though your warm socks are already ready, you can always add new elements for decoration.
What can decorate socks?
- Buttons.
- Applications.
- Satin ribbons.
- Lace ribbon.
- DIY embroidery.
- Pompoms with ties.
- Knitted elements.
As you can see, you can decorate socks with anything you like, the most important rule is that you should be as comfortable as possible, because this is a home wardrobe item.
Product assembly
How to sew a canopy for a crib with your own hands
The main fabric of this model is fleece with a brown pattern, the lining is the same, only gray. Insulation – thin padding polyester. The sole is anti-slip “foot” fabric.
- Connect the toe and shaft, then sew the back seam.
- The lining piece is assembled in the same way, but leave a hole in the back seam for turning out, 8 - 10 cm long.
- Place one part inside another – face to face.
- Stitch along the top edge.
Sole assembly
Fold the layers of the sole in the following order: fleece, insulation, leather or anti-slip fabric. Stitch them together.
There are two ways to connect the sole to the main product: with seams outward or seams inward.
Processing with seams inside
The advantage of this treatment is a very neat appearance. Nothing is visible from the outside.
Negative aspects: due to the fact that thick seams are located on the inside, there is a decrease in space in the shoes and their size decreases. They can interfere with the foot when walking if the boot is not large enough.
The parts are connected as follows:
- Attach the sole to the lining piece.
- Connect to the outer part in the sequence as in the photo.
- Sew along the outline and turn through the hole left.
- Sew the hole by hand using blind stitches.
- Turn the product right side out and straighten it.
Processing with seams facing out
The advantage of this treatment is that the foot in the boot is very comfortable, the thickness of the seams does not interfere with it.
- The assembly sequence in stages is shown in the photo.
- Finish the outer edge with edging tape.
How to correctly take measurements from a child or adult?
We will need a measuring tape to determine the size of the legs.
For some models, the foot is additionally outlined on paper, and the sole is cut out along this contour.
Advice! A cut out and then sewn sole made of felt, felt, drape, rubber will turn your socks into soft house slippers - boots.
First of all, we are interested in the following measurements:
- sole length (G1);
- product height (G7);
- leg volume in the elastic area (G3);
- leg volume under the bone (G2);
- heel height (G6);
- foot circumference (G5).
Other measurements are given for a more comfortable fit and are taken into account as desired.
How to make a pattern for making a pink pig?
Creative work is always a complex process. The main thing in such work is imagination. If you already have ideas in your head about what the finished pig toy will look like, then you should transfer the ideas to paper. This will be the pattern.
For a novice craftsman or just a mother who is sewing a toy with her own hands for the first time, it is best to find templates on the Internet
It is very important for inexperienced craftswomen to choose a model with the least number of parts
When the desired pig model is selected, it can be the most popular now Tilda Pig, Peppa, characters from the well-known fairy tale about the Three Little Pigs or Little Heels from the cartoon “Winnie the Pooh” (there are many options); you just need to print the pattern and cut out all the parts. Now you can proceed directly to production.
What fabrics are best to use?
After you have already decided what to sew for the newborn with your own hands, you also need to select suitable textiles for this. The material must meet certain standards:
Variety of children's things
- Safety in terms of composition and hygiene.
- Strength that guarantees wear resistance.
- Comfort guaranteed by the pleasant surface texture.
- A high degree of hygroscopicity is required.
- Air permeability so that the baby's skin breathes and does not rot.
- It is better to avoid items that wrinkle during wear.
- The material should not fade during the washing process, since this procedure is carried out frequently.
Variety of fabrics for sewing
Additional information! When choosing a material, you need to additionally consider what season it will be used for.
There are many natural and synthetic textile options on the market. Many mothers have doubts about what type to choose for sewing clothes for a newborn. Experienced seamstress-mothers have come up with an exact rule - the closer the clothes are to the baby’s body, the more natural their composition should be. There are several fabric options that are ideal for newborns:
- A very popular option is chintz - a fabric with a standard weave of fibers. Mainly used for sewing diapers and light summer clothes.
- Flannel, which is divided into subtypes: cotton, wool, wool blend, is considered relevant. Can be used for sewing demi-season undershirts, pajamas, overalls, rompers and dressing gowns.
- Terry is a lightweight and versatile material option. Pleasant to the touch, easy to care for, absorbs moisture well and warms. Suitable for diapers, towels, scratch covers, caps.
- Knitted fabrics, which in turn are divided into footer, kulirka, interlock, ribana, capiton. Relevant for making almost any item for a newborn.
- Fleece can be used for sewing “outerwear”. Blouses and overalls that will be worn over more natural clothing.
- Calico will be a rolled-up alternative to chintz, but it is mainly used to make bedroom accessories - crib bumpers, sheets, mattress covers.
Calico for children's underwear
There are other types of fabrics, which in their composition are only ¼ or ½ natural fibers. Some options can also be used to make clothes for newborns. The most popular are velsoft and polyester.
What can you trust to your little helper when working with fleece?
What help can a baby provide in making a toy? It all depends on age, but even a three-year-old baby can complete a task that is feasible for him
The child can be assigned:
- cutting out parts from cardboard;
- tracing patterns onto fabric;
- stuffing sewn parts with filler;
- gluing or threading beads or buttons;
- painting individual parts of the toy with paint (if provided)
- sweep away the details of clothes.
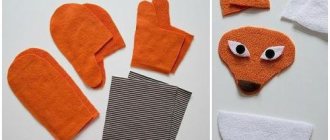
After you start making simple cut toys, you can try to create more complex ones. Their ears, paws and tail will be separate parts. Below is the main pattern, which can be used to create not just one animal, but several.
So, first you can sew the fox. The tail, ears and back are cut out of orange fabric. The chest and tip are made of snow-white fleece, the ears and legs are made of brown. Each item must have a pair.
The first stage of work consists of sewing the fox's back and chest. The white tip is sewn to the tail. The tail is inserted between the halves of the body, and everything is sewn down using one seam; we must not forget about the hole, so that we can then stuff the part.
To sew the ears, brown and orange parts are connected. The ears are sewn to the head with the orange side facing up. Then the legs are sewn and stuffed. The paws are sewn to the body and immediately filled with filler. The nose is embroidered on the muzzle and the eyes are attached. In the same way, dogs are sewn from brown fleece and wolves from gray material.
Dogs are also delighted with toys made from fleece, especially all kinds of ropes and braids. You can weave such toys for dogs yourself rather than buying them in stores.
You will need three multi-colored strips of fleece, 7 cm wide and 25-30 cm long.
Execution of work:
- The cuts are folded together and rewound with fabric in the middle with thread
- On both sides of the connection, the strips are braided into tight braids up to the middle of their length. For ease of weaving, they can be fixed with some heavy object.
- The resulting braid must be folded in half; for convenience, the bend is fixed. Those strips that are free need to be braided by combining two strips into one so that a new braid appears.
- Finally, you need to tighten the tails tightly, as shown in the picture. Your dog will happily chew on this toy.
How to sew baby socks with your own hands
You can sew socks for your child like booties. Options for finished patterns are presented below.
Connect the cut elements by matching the control points marked with the same letters. Sew along the outline, then sew on the cuff. For babies, it is advisable to place the seams on the outside.
Simple socks - booties for a child
How to adjust the pattern to size: measure the length of the baby’s foot, then reduce or increase the sole of the finished pattern. Measure the circumference of the lower leg and compare it with the pattern, make changes if necessary.
This master class shows two-layer booties, so for each leg the parts are cut out in two copies: the lining and the outer part.
- Cut out the top and sole in duplicate.
- Cut the lining in the same way.
- The outer and inner socks are assembled separately. Then they are nested one inside the other. The seams are between the layers of fabric. Connect along the top edges using hand blind or decorative stitches.
- Decorate with bows, eyes or ears. Children will wear such funny booties with special pleasure.
Warm socks for little ones
Little kids love soft, cozy socks. They are comfortable to run, play and sleep warm in. Children find slippers uncomfortable; they are often capricious and do not want to put on their shoes. Thick, warm socks protect a child’s feet no worse than slippers and do not interfere with rapid movement on the carpet or sofa.
A pattern of children's socks made of fleece and bright fabric will help create not only warm, but also very cute socks for babies that children will wear with pleasure.
The principle of operation when sewing products for babies is the same as when sewing adult socks. You can decorate the product with bunny ears, applique, beads, bows, and cute inscriptions.
If a woman does not know how to knit, then you can warm the children’s feet by sewing fleece socks using a pattern with your own hands. It won't be difficult.
How to make a pattern for fleece slippers
To create a pattern for ballet shoes, just place your foot on graph paper and trace it with a pencil, leaving a few centimeters for the seams. You can model the upper part yourself or use a ready-made diagram, which you need to adjust to your parameters. The result should be 2 parts:
- outside;
- upper linings;
- insoles;
- soles;
- insulation (if used).
The pattern for the bottom of the boots is done in the same way as for ballet shoes. Part of the toe and heel is cut out according to the pattern, taking into account that from the toe to the top the length of the boot is the same. Height from heel to boot – 7cm. It is cut out into a rectangle, where the width is 32 cm and the height is 18.
Socks for guests (instead of slippers)
Recently I thought of another purpose for such socks (it’s necessary!!!) - for guests!
As you know, it is not customary for us to wear shoes around the house. And walking barefoot or in tights while visiting is not at all pleasant. Offering your own slippers is not hygienic. So I came up with an idea, why not have a supply of such slippers for guests!? You can even make them personalized! And give it as a final gift.
And on New Year's Eve, if you have time, you can make socks with a festive design. These socks can be given to mothers and grandmothers. The gift is inexpensive, but warm in every sense of the word.
How to make a pattern for sewing fleece socks
You can create a pattern yourself according to the principle described in the article on how to sew fleece boots with your own hands.
Below are ready-made anatomical patterns that can also be used and adjusted to your size.
Step-by-step master class with photos
The sock pattern is made taking into account 5 mm allowances, it is suitable for foot size 36. That is, there is no need to add allowances. In any case, before you start cutting fabric, you should compare your own dimensions and finished patterns, making changes if necessary. For example, by increasing the width of the sole or boot.
- Transfer the outline of the pattern onto the fabric, cut out the details. Compliance with the shared thread is a prerequisite. Otherwise, the product will stretch in length instead of expanding in width.
- Connect the heel areas and stitch them. Anatomically shaped product for left and right legs. Therefore, it is advisable to immediately separate the parts so as not to confuse them during sewing.
- After connecting the heels, spread the seams on different sides and sew with any flat seam or zigzag. This manipulation is not necessary, but it strengthens the seam and makes it invisible. Then trim off any excess seam allowance fabric.
- Place the top of the sock over the sole, connecting the crown and the side protruding corners. The top part will be shorter than the bottom - this is how it should be.
- Gather the long section a little, equalizing the dimensions, pin or sweep. Stitch. This margin is made in order to give freedom of movement, and at the same time, to avoid folds on the back of the foot.
- Sew along the sides.
- Sew the fabric for the cuff into a ring, then fold it in half.
- Place the cuff inside the sock and align the cuts. It is advisable to lay a stitch in a circle using an overlocker, or an elastic machine stitch, or stitch with a zigzag.
- Turn the product inside out and straighten it.
The folds make these socks look very funny. But they straighten out on the leg, and the model itself sits very comfortably on the leg.
Master class: how to sew a fleece pig with your own hands.
To make your own Pillow Pig, you will need:
- Fleece in pink and white. We use white fleece only to decorate the inside of the pig's ears - the pillow.
- Pillow filling – holofiber, cotton wool, or synthetic padding is suitable.
- Pink and black threads.
- To decorate the eyes you will need black beads, and to make the heels beautiful, you can use small pink buttons or highlight it with black threads. You can tie a beautiful bow on the pig, then you need to prepare a ribbon to beautifully decorate the toy.
- A needle for sewing parts, scissors, small pins.
- Printed pattern in the required size. To transfer the details onto the fleece, it is best to use chalk or a small piece of soap.
When the necessary tools are prepared, you can begin to work.
The first stage is working with the pattern: we transfer all the elements of the pig pillow onto paper.
We carefully cut out the finished templates. Next, take a piece of pink fleece, apply the pattern and redraw it with chalk onto the material.
At the first stage, you will get two blanks for the body; snout; tail; eight pieces for legs; two pink fleece pieces and two white fleece pieces for the ears.
Sewing the resulting parts is the second stage in the work.
- First of all, we sew on the small details - ears, legs and tail. The main thing is not to forget to leave room for stuffing the parts with filler.
- Next, we proceed to the pig’s body itself - we sew together the parts, while leaving a small piece of fabric unstitched so that we can turn the pig’s body inside out and stuff it with filler.
- We turn out the finished parts - ears, four legs, stuff them and sew them to the body of the pig.
- Now you need to prepare and sew on the patch. In the photo you can see how to properly sew a pig's snout. Before sewing the finished part to the main part of the pig pillow, it is best to pin it to the stitching site with pins.
- The third stage in making a pig with your own hands is decoration.
- To the finished body of the pig, first sew the beady eyes, then the tail. Using black thread, we embroider the pig’s mouth and carefully decorate the snout.
All that remains is to decorate the pillow pig a little with a beautiful bow, which can be sewn from a satin ribbon. Sew on the bow and that’s it.
How to sew children's boots from fleece yourself
Fleece shoes will come in very handy for kids. This is a soft, delicate and warm material.
The patterns are built according to the same principle as for an adult. But since children’s legs in most cases have a standard shape, you can take a ready-made pattern of a suitable size.
Sewing homemade fleece boots for kids is a pleasure. They are made in various bright colors, in the form of animals with faces and ears.
For very tiny ones, ugg boots are sewn with the seams facing out. For the sole, it is advisable to use anti-slip fabric or suede. Because they provide stability and prevent slipping.
The video will clearly show another way to create a pattern and sew house shoes.
Feet warm
Warm socks are made from used items. This could be an old blanket, sweater, pajamas made of fleece or other soft fabrics. With the right pattern, fleece socks are comfortable, warm and very cozy. It is necessary to decide on the correct dimensions and material.
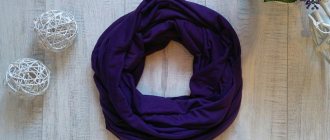
Original items are made from old sweaters, hoodies, and thick pieta. To sew them, you need fleece sleeves and a socks pattern.
Instead of sock cuffs, use elastic from a sweater.
How to sew various fleece toys step by step with your own hands
The required materials are:
- textile;
- needle or sewing machine;
- chalk;
- scissors;
- filler;
- pattern
- various accessories (spouts, eyes, yarn, buttons, etc.)
Each product has its own technology. You also need to sew toys, following certain steps.
- Choose a toy.
- Transfer the pattern to tracing paper or print it. You can reduce or enlarge the pattern if the size does not suit you.
- Transfer the pattern pieces onto cardboard, this will give them rigidity. Then they can be transferred to fabric without any problems.
- Fold the fabric in half, the wrong side should be on top. When folding the fabric, it is necessary to take into account the grain thread.
- Cut out the details of the product. Use a pencil or chalk to mark the outlines of the parts. When cutting, it is advisable to use sufficiently sharp fabrics to prevent the fabric from jamming.
- Sew the parts manually or using a sewing machine along the marking lines from the inside out. Toys that are not large in size are sewn from the outside.
- Turn the toy right side out and stuff evenly. You need to start with the most remote and small details.
- Sew up the hole for stuffing and decorate the toy. Outline the nose and eyes. These details can be embroidered or replaced with beads, buttons, and applique.
- Continue decorating based on your preferences (clothing, hair, etc.)
- The toy is ready.
Fleece toys are great for small children, because this material is synthetic, so there will be no allergies to it. It’s better for kids to sew toys in the shape of animals: dogs, bear cubs and other animals they know. In this case, the material must match the color of the animals so that the child can distinguish them during the game.
First, it is better to learn how to sew simple toys, usually consisting of two identical halves. For example, an elephant or a bunny. On paper, you need to draw the outline of the animal and add 0.5 cm to it. Then, the pattern is transferred to the material, outlined, and two parts are cut out. You can add various parts to the animals, for example, eyes, carrots.
You can also involve your baby in sewing. This will make the toy not only his favorite, but he will also be proud that he made it himself.
Pros of homemade clothing
Before deciding to make their own clothes, many mothers weigh the pros and cons. Creating clothes for babies is not only interesting and simple, but also useful. The advantages of such products are the following factors:
- By choosing the simplest patterns, even a beginner will be able to cope with the work, creating unique items in a single copy. It turns out that the thing is completely designer.
- Only high-quality materials will be used for production.
- You can choose any color scheme and create a unique finish.
- The sizes may be non-standard, since the pattern is made independently.
- In addition to clothes, you can make other items for the baby, which can also additionally decorate the house.
- Thanks to original combinations and experiments, you can create truly universal things.
- This skill can become the basis of a business for a mother on maternity leave, since every item will be non-standard.
Sewing items for newborns yourself is not difficult if you do everything correctly and carefully.
Positives about sewing things yourself
Every year fashion brings new versions of models not only for an adult wardrobe, but also for children. You can bring a lot of things to life yourself - sew things yourself, and not only things. For everything to work out, you need to correctly remove the marks from the newborn and prepare a pattern. The work itself will not take much time, but it will definitely bring a lot of pleasure. Moreover, when designing things, you can show your imagination and choose the materials you like.
Fleece socks are increasingly gaining popularity. They become a bright New Year's decoration, delicate and soft indoor shoes, and also insulate the rubber boots of adults and children. In this case, a cuff should be provided for wrapping over the boot.
This amazing material is able to retain heat even when wet. After washing, it dries very quickly, which allows it to be used in camping conditions.
Snowman pattern
With simple manipulations, such a toy can be made from an ordinary sock or from one piece of material in the shape of a snowdrift.
But still, a snowman doll in the usual colorful design will look much more attractive. With a bucket on his head, an orange carrot nose, black beady eyes, in warm felt boots and a fluffy scarf.
You should start by preparing the cut, taking Tilda’s figure as a basis. If desired, it can be modified to suit your taste.
- Fold the paper whatman in half.
- Outline the outline of the head and torso, giving them a slightly elongated or flattened outline.
- Sketch the shape of a hand.
- Draw the legs in the form of felt boots.
Tools and Templates
When creating felt crafts with your own hands, in addition to the material itself, you are more likely to need:
- Scissors, regular and with a patterned edge;
- Needles of different thicknesses and sizes;
- Colored threads (silk or floss are best);
- Special pencil for marking and creating contours;
- Glue web or adhesive fabric (the first is suitable for securely connecting several parts, the second is for sealing felt);
- PVA glue;
- Ruler;
- Paper for sketching.
You may also need beads of different colors, shapes and sizes, buttons, hooks and buttons, satin ribbons or organza ribbons.
If you don’t know where exactly to start getting acquainted with felt, turn to the Internet. Today on the Internet there is a truly huge collection of various templates and step-by-step diagrams of toys, paintings and compositions made of felt, both flat and three-dimensional and multi-layered.
All you need to do is find a pattern for crafts made from felt, print out all the patterns of the parts in the selected size and, using a special pencil or felt-tip pen, transfer the outlines of the parts onto the pre-prepared felt.
Carefully choose the felt: if the part will not completely adhere to the base of the picture or toy, it must be cut out of dense felt of medium thickness (such felt is poorly translucent and has a uniform density: if you look at it through the light, you should not be able to see the threads and internal pattern of the material).
Sewing and decoration
The sewing process takes several stages.
The basis
- Fold the fabric in half.
- Attach the cut of the main part to the fabric.
- Draw its outline, leaving an allowance of five centimeters at the bottom to form the bottom.
- Pin the material together to avoid shifting when cutting with scissors.
- Lay both pieces out on the table and stitch to the overlap point.
- Sew the bottom at the corners and turn the product right side out.
- Fill with padding polyester and hand stitch the central hole.
Details
It is best to cut it separately, and not from fabric folded in half.
- Sew them along the edge on both sides, it’s more convenient.
- Leave an unstitched section on the inside.
- Turn the resulting rectangle inside out and add stuffing inside.
- Close the hole using a blind stitch.
- For felt boots, terry cloth is suitable, and the sole is better made of fleece or felt.
- Sew the shoes to the body.
- Instead of eyes, sew beads through the hole in the top.
- Decorate your mouth with red thread embroidery, and add blush to your cheeks.
- To create a nose, two options are suitable: a tip from a lace of a suitable color or one sculpted from clay like a carrot. The top is painted with orange acrylic, drawing dark strokes to give a natural look.
Headdress
- headphones, made from terry, and instead of a headband you can use felt tape;
- a hat made from two rectangular blanks according to the measurements of the doll’s head. The decoration will be a fringed pompom, which is easy to build on the top of the hat.
Attach the made hands dressed in mittens. An excellent decoration would be a decorative Christmas tree on the stomach, made of green felt fabric, decorated with lace and beaded embroidery.
Scarf
Thus, we see that anyone can independently cut out and sew this simple hero of New Year’s events. You just have to show a little imagination and your holiday will become truly unforgettable for everyone.
After all, they will not only spend their time usefully, but will also feel your concern for their mood and creating a joyful and cozy environment in the house.