The beanie hat has recently become mega popular among fashionistas! What is she? This is essentially an elongated hat without ties that fits tightly around the head. Translated as “beanie”, “beany” means “bean”, “bean”, hence the name. The material used for its manufacture is only elastic, which is why beanies are mainly made from machine- or hand-knitted knitted fabric.
We talked about how to knit such an accessory in this master class, and today we will try to sew a beanie hat with our own hands, not just one, but two at once. The whole difference is in the patterns and design of the crown. One hat will have 6 darts, the second - 2.
Fleece hat pattern
When sewing various models, a basic fleece hat pattern is used. It is adjusted based on your own measurements.
To determine your size, you need to take two measurements: the first is the circumference of the head, the second is the depth of the hat. How to correctly take head measurements is shown in the photo below.
The main part is one-piece, or is divided into an upper part - the crown and a lower part, which covers the ears.
By the way, there are models with elongated “ears” that turn into ties, and there are others without them at all. In this case, this part of the pattern is simply removed.
Rules for taking measurements
A knitted hat for a child is sewn according to 2 main measurements. This is the circumference of the head and the depth (or height) of the product. For a hat with ties that covers the ears, you also need to know the measurements for the side depth of the hat.
The main measurements and measurement technology are given in the following table:
| Measurement name | How to measure |
| Head volume | Place the measuring tape above the ears at the level of the eyebrows, at the back - along the most convex part of the back of the head. |
| Cap depth | Measure the distance up to the forehead from the crown to the point between the eyebrows, back to the base of the skull and along the sides to the edge of the earlobe. |
| Rear Width | Measure the distance from your earlobe to the posterior center line at the base of the skull. |
To create a hat pattern, take any pattern from a sewing magazine as a basis or print out a ready-made pattern. You can also trace the outline of another baby hat and add seam allowances.
How to sew a fleece hat with elongated ears
This master class will show in detail the steps of sewing a fleece hat.
- Lengthen the “ears”, divide the patterns in half.
- The outer part is cut in separate parts, according to a template, and the lining is one-piece.
- Fold the triangles in pairs and sew one side. Then fold them together and sew the top edge with one line. The result is a hemisphere - the upper part of the headdress.
- Sew the back seam at the bottom part, connect it to the hemisphere - the outer half is ready.
- It is easier to assemble the lining, since it is one-piece - sew the triangles and the back seam with a machine stitch.
- Place the outer and inner parts facing each other and sew, leaving an opening for turning inside out.
- Turn the product inside out, stitch along the bottom edge, and sew on Velcro.
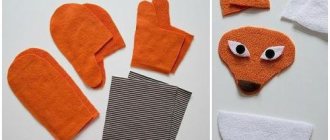
Children's hat with decorative ears and muzzle
It’s not at all difficult to sew a cheerful children’s hat. The most important thing is to make sure that the circumference of the baby’s head and the pattern match. This pattern is suitable for a child with a head circumference of 48 - 50 cm.
Algorithm of actions
- Cut out the necessary parts, adding 1 - 1.5 cm for allowances. If you are planning a double hat, then cut out an additional lining. The lining for a fleece hat can be knitted or made of basic material.
- Cut out the ears; they consist of four parts.
- Make an applique for the muzzle. The nose is sewn on by hand or with a frequent zigzag. Eyes and antennae - embroider with hand stitches.
- Sew the ears, turn them inside out and attach them to the gap marked with the letters AC, approximately in the middle of the segment.
- Connect the darts, first the frontal and occipital, marked with the letters D and G. Next, using a common line, sew the dart with the ears. Assemble the lining in the same way.
- Prepare the ties: cut strips approximately 1 cm wide. Since fleece does not fray, the edges do not need to be processed. Sew them on with a few stitches.
- Assembling the hat. Place the outer and lining halves facing each other and pin together with needles. Go through machine stitching. Leave a hole on the back side, approximately 5–6 cm long, for turning inside out.
- Turn the product inside out and sew the hole inconspicuously by hand.
This fleece hat looks very good when paired with a scarf and mittens. How to sew mittens is described in the article: Fleece mittens - quickly and easily with your own hands.
The hats presented below are made according to the same principle. Only the frontal-occipital dart is closed, and the top is stitched in a straight line.
LiveInternetLiveInternet
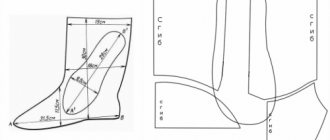
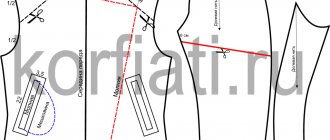
Pattern of a women's classic fur hat
Home » Hats and Caps » Pattern of a women's classic fur hat
Sewing from fur is very simple, and today I propose to create a pattern for a women's fur hat so that you can sew your own fur hat. When creating this pattern, I wanted to have a fox hat like Nadya Sheveleva’s from the famous film “The Irony of Fate or...” But after making the pattern and trying it on, I decided I wanted a rounder shape.
To construct, you need to measure the circumference of the head and the approximate height of the hat. My head size is 54 cm and the height of the hat is 15 cm. If you want a hat with 4 wedges, then divide this size by 8, if there are 6 wedges, then by 12. So in the photo there is a pattern for 4 wedges and for a round-shaped hat, with lining and insulation. But you need your own pattern and therefore in order: glue two sheets of A 4, build a pattern from one edge. For example, a pattern for size 56. Divide 56 by 8 = 7 cm. The base at the bottom is 7 cm, the height of the hat is from 12 to 17 cm for fox fur. Take into account the height of the fur, a hat that is too high will not decorate a petite girl, 15 cm was enough for me. 15 cm for the crown of the hat, 4 cm for the bottom. The curvature of the wedge depends on the shape of the cap, the lower and softer it is, the more rounded the cap, the higher and steeper, the higher the crown of the cap and you will get a sample of Nadya Sheveleva, but this is for 6 more wedges.
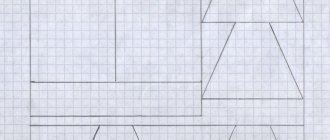
Now fold the pattern like an accordion with 7 cm edges to get the intended number of wedges. Don't rush to cut out the pattern.
Leave these scallops so that you can make a pattern and try it on. Next, connect the pattern into a ring using tape or leaving an overlap.
Try it on a blank or on yourself. Step back a meter and a half, evaluate the height and shape. Make changes to the pattern and try it on again. If you like everything, then it’s time to start making the pattern, taking into account the freedom of fit, otherwise the hat will simply be too small. Cut out one wedge fragment for further construction. Calculation: if you want to have a hat with a batting lining, then to the thickness of the batting, mine is 0.8 cm plus 1.2 cm for the fur hem and plus 0.6 mm for the lining, we multiply all this by 2 and get an increase in the freedom of fit, I got it 5.2. My hat fits on my head like a glove and doesn’t fall off or weigh on me.
Add this increase to the head circumference 56+5.2=61.2 cm. 61.2/8=7.65, round to 7.6. Draw the final pattern on a new sheet of paper. From the bottom border of the sheet, retreat 1.5 and draw a line - this is the hem allowance, from the right edge of the sheet a parallel line with a width of 7.6 cm. And first attach the previously cut wedge fragment to the right side of the sheet, circle halfway
and to the left, also circle to half. Remove the wedge and connect the line of the new wedge. Fold again like an accordion, give a seam allowance to the wedge pattern line of 0.4 cm and cut out the final pattern.
Place marks at the bottom for the hem and 2-3 marks along the wedge pattern line. The pattern for a women's fur hat is ready.
Fur Post Series:
Part 1 - Faux Fur. Recommendations for cutting and sewing. Part 2 - Without a title... Part 12 - The main seam of a furrier for sewing fur (master class) Part 13 - How to sew a hat from fox fur Part 14 - Pattern of a women's classic fur hat Part 15 - Shortening a fur coat Part 16 - Working with leather, suede , fur... Part 24 - FUR HEADWEAR (1). Part 25 - FUR HEADS (2). Part 26 - We sew fur mittens with a gusset at the finger. Pattern + MK
Fleece beret
A warm beret is perfect for both little girls and women. For kids, a model that covers the ears is more desirable.
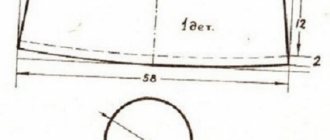
The pattern is constructed as follows:
The lower element is taken from the main template, and the upper one is a circle with a diameter of 35 - 40 cm. The lining is ordinary - one-piece.
Sequencing
- Connect the back seam at the rim.
- Gather the edge of the circle or fold it into folds. They are evenly distributed, bringing the circumference of the circle to the size of the head circumference.
- Sew the circle to the rim.
- Sew the lining and insert it into the upper part. Stitch, turn inside out, and decorate with fabric flowers if desired.
Double sided
A knitted hat for a child (the pattern and cutting diagram are presented later in the article) can be sewn from one piece of material and look exactly the same inside and out. Before sewing, you need to create a pattern.
To do this you need:
- Take a sheet folded in half and set aside from the fold an amount equal to ¼ of the length of the head circumference, and at the top measure the length of the cap and build a rectangle from the resulting points.
- From the top, retreat 2.5 cm from the fold line, and down a distance equal to ¼ of the length of the cap. Connect the resulting points and cut the corner along the line.
- On the other side, smoothly round the corner of the rectangle.
The resulting part is a pattern for half of the hat. When cut from the bottom and left, it will have folds.
To cut and sew a hat, you need to do the following:
- Fold the fabric so that the fold lines on the fabric coincide with the fold lines on the pattern, and cut out 1 solid piece of the hat with undercuts and seam allowances.
- Sew the middle undercuts using a machine.
- Fold the piece in half with the right side inward and sew with a continuous stitch in a circle. For turning inside out, leave an unstitched space of 4-5 cm long.
- Turn the hat inside out through the hole left and sew it with a hidden seam.
In addition, you can sew a simple scarf from the same fabric with a button closure. To do this, sew a rectangle of the desired length (so that it fits freely around the neck) from the inside out around the perimeter using an overlocker. Sew a fabric loop on one narrow side. Next, turn the product inside out through the hole left and sew on a button.
Knitted fleece hat
An ordinary knitted hat may not be warm enough, but this situation can be easily corrected by making a warm lining.
How to sew fleece into a hat
- Draw a chalk outline around the headdress that needs to be insulated. The direction of the grain thread must be observed - the material must stretch in breadth. This is necessary so that the product can be worn freely.
- Make darts at the top of the head, about 10 cm long, and about 3 cm at the base. Sew the edges with a zigzag or overlock.
- Close the darts and finish the bottom edge. But this is optional: since fleece does not fray, it is not necessary to process it.
- Connect the hat with the lining. Hem the bottom using hand stitches.
Pattern of a knitted hat for a boy
These hats are very popular and are usually worn in early autumn or spring. This fabric stretches well and fits your head. The cost of the product is small, and it is very easy to sew.
Pattern of a knitted hat for a boy Pattern of a knitted hat for a boy
Fleece balaclava
The balaclava perfectly protects the face from the cold piercing wind. Another undeniable plus is that it is easy to sew yourself.
The size of the window on the template is adjustable as desired, depending on which part of the face should be open.
- Fold the material in half, trace the pattern, then cut out the elements, not forgetting the allowances.
- To process the window, a piece of fabric is cut out that is larger than the future hole. Pin it to the front side.
- Sew along the outline from the wrong side.
- Cut a hole close to the seam, approximately 2 - 3 mm.
- Turn the square through the hole to the wrong side and pin it together with pins. Sew, retreating 5-7 mm from the edge.
- Further sewing is carried out according to the principle described above.
- Process the bottom cut by folding the edge, then stitch with a zigzag.
Winter fleece hat
In order to get a particularly warm headdress, a layer of insulation is inserted between the outer and inner layers.
Attention: when using insulation, the parts increase additionally on all sides by 1 - 1.5 cm. Otherwise, the hat will turn out to be small.
The ear areas are reinforced with a piece of jacket fabric, this will prevent blowing.
This manipulation is carried out as follows:
- Cut two circles from a piece of raincoat fabric, about 7 cm in diameter.
- Place the circle to the ear area between the layers of the cap and secure them with running stitches.
- Sew in circles.
An interesting video will show you how to sew a men's hat with your own hands.
What kind of fur is best to make a hat from?
When choosing fur, your financial capabilities and, of course, taste come first. When choosing fur for a hat, you should pay attention that the hat is worn with a coat or fur coat, respectively, they must be combined.
Below you can see a photo of a fur hat made by our subscribers.