A military cap is a headdress with a green visor and an emblem in the center. The easiest way for a child to play or for a holiday party in kindergarten or school is to make such a craft from paper. The base is strong and dense, for example, using corrugated packaging cardboard or regular white cardboard from a school set.
The military cap is decorated after assembling the parts together with elements cut out of colored paper, depending on the type of troops. The easiest way to make a sailor's visor is that you don't need to attach a visor. It is enough to glue two thin black strips of paper on the back of the child’s head, which will represent the sailor’s ribbons.
In the article we will look in detail at how to make a military cap out of paper, how to correctly take measurements from a child’s head so that the headdress rests securely on it and does not fall, how to decorate the craft, and we will also describe step-by-step manufacturing instructions.
Components of an officer's cap
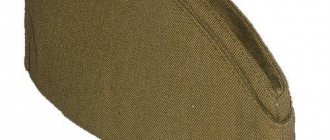
To understand how to make a military cap with your own hands from paper, you need to carefully examine the officer’s headdress. The photo below shows the cap of a Soviet officer. This is a traditional forage hat, which consists of the following parts:
- crown - upper part;
- band - an element that fits the head;
- visor;
- cockade - emblem of the military branch;
- The welt is a thin strip that is the chin strap. In the sample below it is black, but often the welt is made of twisted filigree cord of golden color.
To make a military cap for a child, it is enough to cut out the visor, band and crown from thick cardboard. The emblem can be drawn with markers or a traditional red or gold star can be glued on.
Origami paper cap
The headdress is made from ordinary paper. To create a full-size hat, you will need a large sheet of paper. A4 or A5 material makes a craft for a child or a toy. Manufacturing instructions:
- The left corner of the sheet is folded diagonally and held over the top with your hand to secure it.
- The resulting triangle is folded in half to form the lines of the envelope inside.
- Open the workpiece and turn it over to the other side.
- Half of the left corner is folded in half so that the fold line is at the intersection of the two cross folds.
- Fold the right side up to the top of all structures.
- They open everything up and turn it over again.
- On the working half, take the side triangles and fold them together.
- The side triangles are folded inward, overlapping each other.
- Turn the resulting workpiece over.
- The left side is turned to the right to the middle.
- The same is done with the right side, the elements overlap.
- The upper triangle is folded down.
- Unfold the figure. Form a visor.
The part for the head turns out to be square, the visor has the shape of a rectangle. You can use scissors to give the front part any shape. If desired, the hat can be decorated with felt-tip pens or paints and decorated with stickers. Below is a visual diagram of how to make a cap with a visor with your own hands.
Taking measurements from the head
To draw the pattern for a future craft correctly, measure the circumference of the child’s head with a flexible meter. To do this, pull it from the frontal part of the head above the eyebrows to the convex occipital region.
The tension must be good so that the meter does not sag. To this size you need to cut a narrow strip of the band. Its width depends on the cut of the headdress. In the main photo in the article, the band is cut high, since the crown of the headdress is flat and is simply represented by a circle cut out of cardboard. This is the easiest option for making a military cap with your own hands, which we will consider in more detail later.
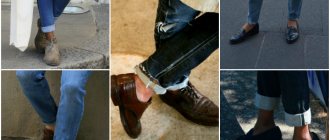
American cop costume
Many boys see themselves in the image of a tough cop. An American policeman's costume is easy to sew with your own hands. The uniform itself will be regular black trousers and a shirt. An American policeman's trousers are most often made of leather, but you can choose an imitation one. High boots or boots will complement the look of a cop. A policeman's cap must be present. For a boy, equipment will also be of great importance: black leather mittens, handcuffs, baton, holster, stripes. The cap can be sewn according to the pattern presented above; it differs only in some elements that can be seen in the photo.
Simple option
Transfer the head circumference measurements onto thick cardboard, adding 1-2 cm to join the ends. They can be glued with hot glue or stapled with 2 paper clips. To prevent a child from being scratched by them, the metal ends should be on the outside of the part. Be sure to try it on to check that the ring is made correctly and only then finally connect the ends of the strip to each other.
The width of the band is 6 cm, but you need to add another 2 cm so that the upper edge can be cut into triangles. This is necessary for gluing the band to the circle of the crown. Its diameter should be 3-4 cm larger than the workpiece made, so that the edges of the circle look out along the entire perimeter beyond the boundaries of the band.
Cap visor
It is better to cut the visor separately. It is drawn with a compass at the rate of 1/3 of the circumference of the head. The visor can be either narrow or wide. However, do not forget to additionally leave a strip on the side of the concave inner part for cutting triangles.
The visor of the headdress, after being cut out according to the drawn template, is attached to the inside of the band in front of the military cap. Each triangle must be coated with PVA glue.
When the craft is put together, start decorating it by covering the outside with colored paper. The visor is made black, and the remaining parts can be covered with green elements.
Top fastening
You need to attach the top of a round cap to the prepared headband. To do this, place the blank on a sheet of cardboard and measure the distance between the opposite sides of the rim. This will be the diameter of the circle. Add another 2 cm to the radius so that the top protrudes beyond the rim, and draw an even circle with a compass. Immediately cover it with green colored paper so as not to do this later, when the craft has a three-dimensional shape.
To attach the rim to the top, you need to cut the 2 cm width left for this purpose into corners. They are bent at an angle of 90 degrees and smeared with PVA glue. Then they carefully glue the top of the cap, pressing the triangles with their fingers from the inside. All that remains is to cut out a star from red colored paper using a stencil and glue it in the center of the strip.
Star for cockade
On the front of the finished cap, stick a cockade in the shape of a three-dimensional star. It is very easy to do by following the step-by-step instructions given in the video below.
You need to make a cockade from a small square sheet of paper so that it fits across the width of the band. It is best to glue it with PVA glue, spreading it on the outer edges of the star. There is no need to press, it should remain voluminous.
You already know how to make a military cap. However, to prevent the headdress from falling off the child’s head while moving, attach a welt or a regular black rubber band to the cap. To secure it, it is enough to make small holes on the sides, sealing the paper in these places with an additional circle of cardboard from the inside.
Cardboard cap
For a cardboard headdress, a simple master class version is suitable. Before you start, you need to print or draw a template. It is then traced on cardboard and cut out. The printable diagram is presented below.
Step-by-step assembly of a cardboard hat:
- Cut out all elements from material of the same color.
- Holes are made at the tops of the teeth and a hole punch is used.
- All elements are fastened with a metal rivet or button.
- The teeth are fixed on the reverse side.
- For the visor, cut out the blank according to the diagram.
- All teeth are coated with glue and connected to the base.
The operating principle is the same with 6 and 8 sectors. From A4 sheet you can make a small toy cap. To create a natural-size product, sheets of A3 and A2 format are used. Below are clear step-by-step instructions.
Cap with regular crown
The next option for making a military cap, the photo of which is above in the article, is a little more complicated, since the crown for it is not represented by a simple circle, but consists of two parts. In the picture below you can see the pattern of such a fodder hat. The red stripe is the band. For this version of the headdress, it is not cut wide. It is enough to draw a pattern 3-4 cm wide. You already know how to measure the required length.
The visor is ordinary, occupies 1/3 of its entire circumference. The crown is a ring made of paper, the front part of which has a slight extension. The top of the crown is round. All parts are attached either with tape to each other, or an additional strip is cut out at the joints, which is first cut into triangles or trapezoids, then spread with PVA glue and the required element of the craft is attached.
To make the cap look voluminous rather than flat, insert cotton wool twisted into a “sausage” into the gap between the ring and the circle of the crown in front of the child’s head. If you are worried that it will fall out, you can first coat the paper with PVA glue. This simple design will lift the crown up and the cockade will be more clearly visible.
How to sew a policeman's cap for a child
Next, we begin the sewing itself. The pattern must be attached to the prepared fabric. The police cap is usually black. Transfer all the details onto the fabric. For drawing on dark material, it is convenient to use tailor's chalk. Cut out all the elements. It is necessary to sew all four prepared parts with a circle. The band is sewn into a ring and reinforced inside with an insert made of plastic, cardboard, elastic band or elastic band. Decorative elements are sewn onto the middle of the band. The policeman's cap, made by hand, is almost ready.
Then you need to sew the parts of the visor with the band. To ensure that the visor fits into place and looks smooth, mark the places for sewing in advance. This part of the work can be called the most responsible. If you sew the visor crookedly, then the whole product will be skewed and will look simply ugly. The final step is to sew the band to the bottom of the cap. The connecting part will be the crown. It is already included in the pattern part. The product must be turned inside out and the band sewn to the inside. The cap is ready. All that remains is to decorate it with intertwined ribbons and attach them in the place of the chin strap. Install the badge.
Welt
The welt for the craft can be made from a thin strip of black cardboard, attaching it to the front of the hat directly above the visor using two buttons. In sewing accessories stores you can easily find a pair of gold-colored metal buttons with embossed stars. They are usually sold with loops at the back and can be easily sewn to the cardboard base using regular thread.
If you want to make your cap more elegant, then buy a piece of yellow twisted cord, as in the photo above. Take one that is not too thick, as you will have to make loops along the edges of the welt to put on the buttons. To do this, you will need a matching nylon thread, which you need to tightly wrap the edges of the cord, bent in half, with many turns.
Military hat for game
If you are in the country or relaxing at a resort, and your children decide to play military, then in a couple of minutes you can fold a hat with a visor using the origami technique from a regular newspaper. Assembly is carried out according to the diagram below.
Actions are performed one by one, following the order of numbers. The newspaper sheet consists of two parts. It is laid on a flat table surface with the fold upward and the first thing is to fold the upper corners until they join in the center. You should end up with two right triangles.
There are extra strips left at the bottom, which are folded in half and lifted up. Turn the workpiece over to the reverse side and wrap the corners sticking out on the sides around the base, carefully ironing the fold of the paper.
Now fold the sides, connecting them in the center, and lift the bottom to the edge of the triangular notch. Fold the corners of the visor inward and hide its edges under the rim. All that remains is to lower the triangle sticking up and push it under the lapel of the cap. Spread the paper inside with your hands and give the cap a round shape. Try the hat on your child's head.
Detailed instructions will help you complete the job faster. Happy endeavors!
How to make a cap from newspaper
There are several schemes for completing the master class. The hats are made using a template or folded using the origami technique.
Required materials and tools
To make a paper toy you will need a number of materials:
- A4 paper;
- newspaper;
- scissors;
- glue;
- templates;
- a simple pencil;
- ruler.
When folding a hat using the origami technique from one sheet, it is not necessary to glue all the elements. The circuit is constructed in such a way that all parts will hold securely.
Newspaper hats last less because the material is thin and wears out quickly.
Step by step assembly
A newspaper cap can be created according to any design. It can be used as a beach hat for protection from the sun, while hiking with friends and even at a construction site. Step by step assembly:
- A standard newspaper sheet is left folded.
- The upper side corners are bent inward towards the center, so that there is a distance of 5-7 cm between them.
- The top sheet from below is bent upward until it stops, and passed along it with your hand.
- The protruding corners are turned back.
- The sidewalls are folded along the line at the level of the width of the bends.
- The lower element is folded upward.
- Unfold the hat.
Below is a detailed diagram for making a protective headgear from newspaper with your own hands.