Today there are many devices that greatly facilitate the life of new parents, and one of them is a cocoon. Many mothers consider this universal mattress with sides the best invention of our time.
After all, in such a “nest” the baby feels truly comfortable, and his loved ones do not have to worry about the safety of the person dearest to his heart. The good news is that it is quite possible to sew a cocoon for newborns with your own hands, which allows you to avoid unnecessary expenses.
Design features of the product
The nest cocoon has a number of beneficial properties for the baby’s health. It has low sides and an oblong shape, thanks to which the baby feels protected from all sides. The position of the baby in this convenient accessory is very similar to the one in which he is in his mother’s tummy. The cocoon creates an enclosed space, calming the baby, and allows the child to better and faster adapt to the world around him. Previously, the item was used for children born prematurely, but due to its beneficial qualities, it began to be used for all children.
The benefit of a cocoon is justified if its design exactly copies the anatomical parameters of a toddler. For this, it is very important to make exclusively individual patterns. The cocoon-nest must be sewn in such a way as to provide elasticity to the side rails and mattress; they should retain their shape well. This is necessary for the convenience and safety of the baby. Also, when cutting fabrics, it is important to make the correct calculation, because the accessory must correspond to the individual parameters of the child.
Oblong shape
Elastic sides
Comfortable mattress and pillow
The nuances of individual production
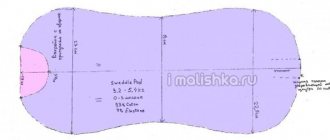
The standard cocoon pattern for newborns can and should be adjusted to individual standards. The unique design will accurately copy the anatomical features of the baby. In this case, the base-bed must be sufficiently elastic and rigid.
The side walls should provide support and maintain their shape. To improve safety for securing the body, the structure is additionally equipped with fastener belts.
Selection of materials
When creating a cocoon for newborns with your own hands, you need to select only environmentally friendly materials. Fabrics must be natural and hypoallergenic. The material must allow air to pass through so that the baby’s skin does not rot. You should also pay attention to the fact that there are no dyes in the fabric composition.
Textile
When selecting a material, its density should be taken into account. Fabric that is too thin can be damaged easily. If you plan to use a cocoon for your second child, it is advisable to give preference to denser options. The best material for creating a nest is 100% cotton; it is highly breathable and can be processed at high temperatures. The material is durable, but takes a long time to dry compared to other fabrics.
You can sew an accessory from flannel, calico, flannel, calico, knitwear, fleece, linen or muslin. Features of some materials:
- Chintz is a thin fabric, often with a multi-colored print. It is inexpensive, lightweight, and breathable. The fabric is easy to wash, dries quickly, and is easy to iron. Cons: chintz is fragile, it can fade and fade under the sun.
- Calico is a dense, wear-resistant cotton fabric. Used for sewing clothes and bed linen. It is easy to wash without losing colors, “breathes” well, and does not cause allergies. Dust and bacteria do not accumulate on the fabric, it does not become electrified. Disadvantages: some rigidity, not so attractive appearance (no gloss or shine), forms pills, wrinkles a lot.
- Flannel is a fairly dense fabric with a smooth, uniform pile. It is a breathable material, soft and warm, and inexpensive. For babies, a printed flannel is used (the pattern is applied on one side so that the children's skin does not have contact with the dye). The fabric does not shrink, can withstand many washes, and absorbs moisture well. The disadvantages are: it takes a long time to dry, wrinkles, and forms pellets.
- Linen is a very durable material. It is hygroscopic and breathable, does not irritate the skin, and does not cause allergies. Keeps you warm, but is comfortable in hot weather. The fabric is very wrinkled and has some rigidity.
An important parameter is color. It is advisable to choose fabrics in muted tones. It is permissible to use fabric of different shades with different prints.
Bright colors of materials can irritate the nervous system, so for a child it is better to choose something from a pastel range.
Filler
A child's cocoon must have a mattress. Rolled and crumbly materials of natural or artificial origin can act as its filler. The former are best suited for arranging a mattress, the latter for the sides.
The cocoon is used for up to 4–6 months, so the filler must be selected according to the time of year.
The following are the crumbly fillers of natural origin:
- mixture of feather and down;
- cotton wool;
- wool;
- bamboo fiber;
- silk.
Among artificial fillers, the most popular ones when sewing a cocoon for a baby are holofiber, polyester microfiber, and synthetic fluff. Rolled fillers used when sewing a baby cocoon are sisal, latex, linen, coconut coir, and memory foam. More inexpensive are artificial options, for example, holofiber, padding polyester and sherstepon.
Natural fillers can cause allergic reactions. Also, the stuffing can wrinkle and lose its shape, so the best option for creating a cocoon for a newborn with your own hands is holofiber. Down and feathers are hygroscopic, maintain comfort during sleep, but can cause allergies and also have a short service life. Wool holds its shape reliably and retains heat, but requires regular cleaning. Bamboo filling is often used to create a cocoon for a baby due to its softness and elasticity. It maintains an optimal microclimate, does not provoke allergic reactions, but loses strength at elevated moisture levels.
Artificial fillers are most often cheaper and are not capable of causing allergic reactions. They restore their original shape well, so a cocoon for children, where the mattress is made of holofiber, padding polyester and sherstepon, is preferable. In addition, artificial materials are much easier to shape, making the mattress in a cocoon as comfortable as possible.
Tools and consumables
To make a nest for newborns, you need to prepare accessories, supplies and tools in advance. To work you will need:
- pieces of cotton fabric;
- sewing threads;
- linen zipper or satin ribbon;
- foam rubber or other filler;
- scissors, needles;
- sewing machine (optional);
- paper and pencil;
- lighter;
- ruler;
- pins;
- tape measure.
The list may vary depending on what fabric was chosen for the cocoon. A sewing machine is not necessary to use as you can easily get by with traditional cotton thread and needle. You should also prepare materials for decorating the accessory in advance, for example, satin ribbon. All fittings should not have sharp edges or be too small.
Main types of infant nests
There are different types of “beds” for babies. You can sew any cocoon with your own hands. The choice of model is carried out individually. The following characteristics are useful:
- Diaper. Elementary option. It is a product cut according to the anatomical position of a baby.
- Pillow. Lightweight model. Suitable from birth. Used when feeding, during games, sleep. Intended for up to 5 months.
- Envelope. Something between a diaper and a pillow. The product provides tight fixation.
- Nest. Similar to a cradle with limited dimensions. The presence of sides is mandatory.
- Mattress. Used for sleep. Usually placed in a crib. It is rarely used to carry a baby.
Each option has its own pros and cons. With the right choice of materials and patterns, making the perfect nest for newborns with your own hands is not difficult.
Measurements and calculations
Most models are available in two sizes: S and M. The first is mainly used in medical institutions for premature babies, that is, for those for whom it was originally designed. This size is designed for newborns up to 2–2.5 kg. The second is suitable for babies born at normal weight (up to 2.8–3 kg). This is the pattern you should choose when making a cocoon for home use. Less often you can find size L, suitable for large babies.
It is important to choose the right size pattern so that the baby’s cocoon nest is comfortable and cozy from the first days, and it does not feel cramped for a long time. To determine the optimal size of the product, it is necessary to take into account the child’s weight and height. The standard size of the item is 30 x 65–67 cm (sleeping area). It is good for babies up to 6 months. If you plan to use a cocoon at 6–12 months of a baby’s life, you need to create a product with a sleeping area of 40 x 80 cm, for larger babies - 45 x 95 cm.
Doctors do not recommend making a cocoon “for growth”; it must be ideal for the child.
When making a cocoon, you should correctly calculate the required amount of fabric and filler. For premature and small babies, an option measuring 50 cm in length and 25–30 cm in width is suitable. For toddlers from 3 to 6 kg, you will need a pattern 65–70 cm long, 30–35 cm wide. The fabric should be taken based on these dimensions, adding a margin of 10–15%. Also, do not forget that there are several parts, so it is better to take a little more material depending on the chosen model.
The length of the bed should correspond to the height of the baby
Taking measurements
The basis is a ready-made cocoon pattern for a newborn. There are options in different sizes. The model marked “S” is suitable for premature babies. Size L is ideal for large babies. The pattern can be adjusted taking into account the height and weight of the baby.
It is not recommended to change the standard parameters taking into account the margin for growth. Cocoons are rarely used for children older than 6 months.
Sequence of work taking into account the cocoon model
Knowing how to sew a cocoon, you also need to choose the right model. Despite the simplicity of the product, there are several varieties of the accessory, each of which has its own manufacturing nuances. The most popular options are a newborn nest, envelope or swaddle.
Nest
If you are making a pattern for the first time, it is advisable to create it on paper and only then transfer it to fabric. Experienced craftsmen do without auxiliary actions. A simple master class consists of just a few steps:
- From two pieces of fabric of different colors measuring 95 x 65 cm, we make two identical patterns. The total width of the product is 62 cm, the space for the mattress is 30 cm. The length of the main part is 78 cm + the “tails” for tying are 14 cm. The width of the last elements is 16 cm.
- Next, we fold both fabrics with the right sides facing each other so that they face inward. We pin the edges and sew along the entire perimeter of the product, leaving only the lower part free.
- In the next step, turn the product inside out and iron it thoroughly with an iron. Stepping back 2 cm from the edge, we make a stitch again. The tape will be inserted into the resulting hole.
- We cut out the middle part for the mattress, and according to its dimensions we create the same part from padding polyester. Then we pin all three layers together and sew them together. The stitching should not reach the bottom edge by about 2-3 cm.
To ensure that the padding polyester is securely fixed, you can make more lines in the middle of the product. They will provide an additional massage effect. Then, using a pin, you need to insert the tape and fill the sides with holofiber. All free spaces need to be stitched, the cocoon for sleeping is ready.
Pattern
Cut out two identical pieces from fabric
Place both fabrics right sides facing each other.
Pin the edges and sew
Sew the top edge, turn it right side out and iron it
We cut out the middle part and create a part from padding polyester according to size.
We insert it inside the cocoon, forming a mattress, and sew it together, leaving 2 cm from the bottom edge
Using a pin, insert the ribbon
We fill the sides with holofiber
We tie a ribbon, tightening the sides - the cocoon-nest is ready
Envelope
The step-by-step instructions for creating an envelope are also not complicated. To work, you will need needles and threads, scissors, a tape measure, Velcro, insulation, cotton fabric for the outer part, fleece or plush for the inner part, and a zipper 70 cm long. The main part is cut out of fabric measuring 85 x 90 cm.
Next we sew a pocket on the legs. If the envelope is demi-season, we leave the dimensions at 50 cm; if it is winter, we increase it by 10–15 cm. It is easier to cut all the details out of three layers (fabric and insulation). We sew all the elements together. If you don’t have an overlocker, you can use tape or make a seam in the form of stripes at the same distance.
We fold the upper part right side out and stitch it from the wrong side. This way the hood is formed. We make the inner part of plush in the same way as the outer part of cotton material. We make small cuts in the corners and sew in a zipper. Where the snake ends, you need to leave a hole so that you can turn the envelope inside out. In the next step, we sew the zipper to the pocket, and then connect both parts (the main one and the pocket) together. At the end we sew on the Velcro fastener.
Pattern of the main part of the envelope
Leg pocket pattern
We sew parts from cotton and insulation
Trim off excess insulation around the edges
We form the hood - fold the top part and sew it on the wrong side
Place the plush pattern on the front side and stitch from the back
Making cuts at the corners
Sew a zipper into the main part of the envelope
Sew a zipper into the leg pocket
Sew the main part and the pocket together
Sew on Velcro fasteners
Cocoon envelope for a newborn is ready
Diaper
Knowing how to sew cocoons for a newborn of this type, it is convenient to make several pieces at once (warm and summer ones). The craftswoman will need scissors, thread, a tape measure, Velcro, pins and a piece of fabric. First, you need to make a pattern from the material; its dimensions are designed for children from birth to 3 months. The shape of the diaper resembles a mushroom with a large hat. The piece of fabric should have dimensions of 50 x 65 cm. Two such parts must be sewn from the wrong side, be sure to leave a gap at the bottom. In the folds and rounded parts, you need to make cuts, turn the product inside out and iron it.
The next step is to make a pocket for the legs. The element must exactly repeat the bottom part of the diaper and be 10 cm higher than it. The pocket is sewn together using the same principle and then attached to the base. All that remains is to cut the Velcro tape (its total length should be 24 cm). The hard side of the element is divided into 3 parts measuring 8 cm each, the soft side is cut into 2 parts (14 and 10 cm). Next, the Velcro is attached to the sleeves, and the product is ready.
It is advisable to use 2 layers of fabric to make the diaper, otherwise you will have to trim the edges with tape.
Envelope pattern
Cut out two parts and sew on the wrong side, leaving a hole at the bottom
Cut the edges at the folds
Turn right side out and iron
Cut out a pocket for the legs
Sew the details
Sew on Velcro
The cocoon diaper is ready
Video with master class lessons
- This video demonstrates in detail how you can sew your own cocoon nest for a newborn. The entire process of making a cocoon is described step by step, from making the pattern and cutting the main parts to the final assembly of the finished product. The following materials were used to sew it: two types of cotton fabric measuring 100 by 100 cm, foam rubber 30 by 55 cm, holofiber, 1 m of tape.
- This video provides detailed instructions on how to easily and simply sew a soft and comfortable cocoon for newborns with your own hands. Here we describe in detail how to make a cocoon pattern, cut and sew the product. The necessary recommendations are given on the required quality and quantity of materials used.
- With the help of this video, an intelligible and brief master class is given on how to easily sew a cocoon-nest for newborns with a very fashionable star print with your own hands. The main step-by-step stages of creating this product and many valuable tips on sewing are given in detail.
A comfortable cocoon-nest for your beloved child will not cost too much money if you carefully study the master class and sew it with your own hands. A cocoon made with love will give the child comfort and warmth, and the parents joy and peace of mind.
Safe decor
Decorating a cocoon made for a baby can be done using various materials. Ribbons and braid are mainly used. It is also permissible to decorate the accessory with lace. Less commonly, tailoring is done using decorative buttons. Regardless of which option is chosen, the decor must meet the following requirements:
- have no sharp corners;
- securely attached to the base;
- be medium or large in size (the child can put small parts in his mouth);
- Do not have long fringes or threads so that the baby does not get entangled in them.
Ribbon is considered the most convenient option because it is easy to tie and untie, it looks cute and cannot harm the little one. Moreover, you can make a cocoon beautiful by using different fabrics, for example, a delicate plain one on top and a contrasting one with a pattern on the inside. Such a tandem, complemented by a ribbon, will look unusual and elegant. Excessive decor only interferes and complicates the process of caring for the product.
Recommendations for sewing a winter envelope
- The pattern must correspond to the purpose of the envelope. For walking in a stroller, you need to add a mattress insert in the back in the form of a pocket;
- It is more rational to sew a transforming envelope from which a blanket is made;
- For warm envelopes for a newborn, only natural fur fabric, cotton, cambric, flannel or calico (inner layer), plush, velvet or flux (outer layer) are suitable;
- For additional insulation, padding polyester, woolen fabric or holofiber are placed in the inner layer of the envelope;
- The standard envelope size is 180x150 cm;
- The zippers on the envelope should not come apart on their own;
- Fur is considered the most environmentally friendly and heat-saving material for winter envelope options.
- For the little ones, it is better to sew a cocoon envelope that can swaddle their hands. This way the child will not unravel and harm himself;
- For children born in the middle of winter, envelope size 62 is suitable, and for autumn newborns - size 68, if parents decide to buy a ready-made option;
- The envelope must match the size of the child, so that there is not much free space inside and the baby is tightly wrapped;
- Warm envelopes for newborns can be crocheted or knitted if the mother has a little needlework skills and patience.
Required Tools
To make the work of sewing an envelope for discharge with your own hands as easy as possible, you need to stock up in advance with all the equipment that you will need during the work. To make summer and winter versions, you need the same tools:
- graph paper;
- sharp scissors;
- several needles;
- pins with colored heads;
- chalk for outlining;
- threads matching the tone of the material;
- sewing machine.
The expectant mother is recommended to print out the patterns in advance, which will be used to sew the product. Working with them is much more convenient than with electronic layouts. In addition to tools, for sewing you will need the material itself, accessories (zippers, buttons, Velcro or ribbons), as well as decor. With minimal experience, you can sew a blanket for discharge in a day. If the simplest option is chosen, the work will only take a few hours.
Special devices
In addition to an improved fastener and a replaceable mattress, the cocoon can be “adjusted” with the help of handles that make it easier to carry the baby. They, like the retainer, are sometimes sewn on top of the fabric, cut out from the belt braid. It is also possible to make handles from the same fabric from which the cocoon itself is made. Then they need to be sewn on at the stage of assembling the product, inserting their tips into the seam of the bottom and top of the nest.
To avoid frequent washing of the cocoon, you can put it in a large pillowcase. It is best to sew it yourself, choosing the optimal size of the “clothes”, as well as a fabric that is pleasant to the touch.
We hope that our tips will help mothers and their babies rest more often and comfortably. Happy crafting and good luck with your creativity!
Use Cases
The most important purpose for which cocoons are used for newborns is to ensure comfortable sleep for the child. At first, this accessory can replace a traditional cradle or crib. It will be even more convenient for those parents who sleep in the same bed with their child, but are worried that they will harm the baby through negligence. The child who is in the cocoon is reliably protected by high sides, so he will feel comfortable on the large parental bed, and mom and dad will be able to rest peacefully without worrying that they will accidentally crush him in their sleep.
But cocoons for newborns are loved by children not only during sleep. Kids don’t mind lying in their nest during the day, looking at the world around them. And when the child grows up, he will be able to develop his physical skills while in the cocoon, for example, turning over on his tummy and lifting himself up on his arms, leaning on the soft sides.
How to correctly determine the parameters of a cocoon for babies
You need to know in advance how to properly place a child in a cocoon. And based on this, choose the parameters of the nest. They come in two sizes:
| Newborns | Nest size, L×W, cm | Child's weight, kg |
| Premature babies | 50×25-30 | Until 3 |
| Full-term babies | 65-70×30-35 | 3-6 |
Advice! When the baby grows out of the nest, it can be used as a mattress to lay the baby on his tummy. The upper block in the form of a roller should be located in the baby’s armpits.
