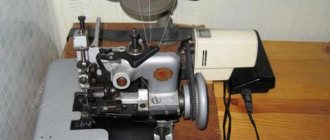
Overlock is an integral part of sewing tools. The purpose of the device is to create a more accurate product. The seams are even, the edges of the fabric do not fray when worn. If just a couple of decades ago such equipment was the property of exclusively sewing studios, today every seamstress can afford to acquire a valuable assistant.
Using the device is not difficult. The main thing is to know how to thread an overlocker correctly. Errors should be excluded here. Otherwise, you won’t get a good seam; gaps will appear on it, the overcast ends will stick out to the sides, and the fabric will bunch up.
Preparing for work
Before starting work, you need to prepare some tools that will facilitate the procedure for threading the overlocker, making adjustments, and promptly eliminating problems that arise.
Required:
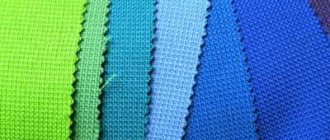
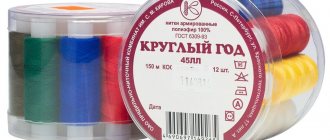
- several multi-colored reels. Multi-colored threads will show which looper threading was done incorrectly and will help adjust the tension;
- set of knives for overlocker. They are used for cutting off protruding ends of threads, hemming the edges of loose fabrics;
- set of needles If you have a spare set, rearranging a broken or bent needle does not take much time and helps you quickly get back to the sewing process. A needle change is also required if there are visible seam defects: frequent skipping, tightening. This may occur due to an incorrectly inserted or blunted needle;
- oil for lubrication. It is better to choose high-quality oil from the manufacturer specified in the equipment instructions. It is rarely required - the machine needs to be lubricated once every six months. So it's not worth saving on it. A standard disposable medical syringe is used for lubrication - it will be able to “reach” the most inaccessible places of the mechanisms;
- tweezers with narrow tips. It helps to pass the tip of the thread through the eye of the left looper. This is difficult to do with bare hands;
- a small piece of material for control. It will help you check the accuracy of threading the overlock threads and adjust the tension.
The subtleties of obtaining a quality stitch
There is an optimal way to set up an overlocker before work. To do this, you will need a piece of test fabric on which to check the quality of the seam. Pass the workpiece through the machine and carefully inspect the resulting stitch.
- The inspection begins with the loop of the left needle. Wrinkled fabric means excessive tension on the needle thread. Loosen it by gradually changing the value on the regulator. After each single change, pass a piece of fabric through the machine, repeat the procedure until the material stops creasing.
- The next stage includes checking the seam for evenness. When the fabric has stopped wrinkling, you can proceed to the next procedure - take the fabric so that the seam is in the middle. Pull the ends in different directions and take a closer look. If instead of tightly fitting halves you see a ladder of threads, you need to increase the thread tension. The procedure, like the previous one, is carried out step by step. Don't rush, setting up a sewing machine is a painstaking task. Pay special attention to the left needle thread, it is what connects the loops to each other. The quality of the stitching depends on the correct tension. Having identified the optimal value for the left thread, set exactly the same for the right one. This rule is relevant for all types of fabrics; the ratio between the right and left threads never changes.
- The final stage is to determine the location of the interlacing of the looper threads - it should be on the outermost section of the piece of fabric.
In this case, the seam is laid in an even line, forming a flat pattern between the stitches. Loops protruding beyond the edge of the fabric indicate weak looper thread tension. Pull them a little and test them on a new piece of material. If the loops of one looper creep over the edge, then only its thread needs to be tightened. Watch this carefully, because if you choose incorrectly, you risk creating excessive tension and causing weave on only one side of the fabric. In this case, you will have to loosen the thread step by step until the buttonhole stitch returns to normal. In some cases, it is necessary to simultaneously tighten one looper and loosen another. Experts recommend starting with weakening. Overlock looper
By setting up the overlocker according to the above diagram, you can avoid many problems. The instructions allow you to adjust the settings to any type of fabric and successfully perform work of any complexity.
Standard overlock threading scheme
Manufacturers produce different models of equipment. Before starting work, it is important to study the instructions and follow the advice given in it on the rules of work and the characteristics of the threads used.
The general scheme for threading an overlocker is the same in all machines:
- take the reel and place it on the holder. Direct the holder axis towards the thread guide;
- insert the tip into the thread guide (looks like a hook or slot);
- find the mechanisms for tensioning the contents of the coils. Different models have two or one (combined). If the machine has two mechanisms, the first one removes the yarn, the second one attracts it. It is important to adhere to the exact order of passing through them;
- Pull the end of the yarn through the eye of the needle. Check: the direction of the needle in the looper must correspond to the direction of movement of the material when sewing;
- Place the tip under the presser foot.
After threading all the threads, you need to test yourself: make a test stitch. To do this, use a small piece of fabric similar to the material of the product to be worked with. If any problems appear on the seam (gaps, material shrinkage), it means that an error was made when threading the overlocker.
Selecting the stitch type
Finishing the edges of fabric with an overlocker looks aesthetically pleasing, reliable and prevents fraying. Using this machine, the following types of stitches are made.
- Narrow 2-thread stitch with overcast stitching. Designed for processing capricious thin materials. To perform such a stitch, an overlocker must be equipped with a special clamp that covers the upper looper.
- Overlock narrow 3-thread stitch for thin fabrics. Performed with 3 threads using the right needle and both loopers.
- Wide 3-thread overlock stitch for medium weight materials. The left needle and both loopers are engaged.
- Overcasting with 4 threads is used when seaming the edges of knitted and thick fabrics. Performed with both needles and loopers.
- Decorative and hemming seams (Flatlock, hem, double-sided).
Types of seams on a Jaguar overlocker
Read more about the types of seams on an overlocker.
How to correctly thread overlock threads into loopers
There is a certain scheme for threading overlock threads inside the loopers. The loopers are located on top and look like hooks. Their task is to pick up the tips from the needles and connect them with the yarn coming from the lower parts. The result is a cross stitch.
First, work with the left looper. This is the most difficult stage of preparing the device for sewing.
It is done like this:
- the thread is passed through the thread guide into the hole in the cover located on the right, then through the slot in the protective cover on the left;
- a circle is made around the thread tensioner, the tip is passed into the hole leading towards the looper;
- the wheel scrolls to the right until the right looper is installed above the needle;
- the tip is wrapped around the lever mechanism of the right looper from behind, hooked onto the hook;
- the wheel rotates until the left looper lowers;
- the tip is pushed inside the left looper, the wheel is rotated until the right mechanism rises, which will pull the left one to the maximum upper position;
- The thread is tucked under the foot and fixed.
Next, the right device is charged:
- the thread is inserted into the slot of the thread tensioner, inserted from above into the hole of the module with a knife;
- the wheel scrolls until the right looper reaches the uppermost position;
- the thread is passed through the eye under the hook;
- the tip passes through the thread tensioner, the hole of the plate, going around the thread tensioner column;
- the tip is secured under the hook and inserted into the needle.
Main reasons for absences
Overlock needles can only have the only correct arrangement along with the loopers. Only in this case will the entire unit provide you with high-quality and productive work. All the numbers described above in millimeters are only indicative figures. In fact, all products may be slightly different from each other, so the numerical parameters will be slightly different. However, in any case, all errors will be insignificant.
Also, the numerical parameters depend on the cam. If you turn it even one or two degrees, the position of both loopers will be slightly changed. However, under no circumstances should you carry out this procedure yourself. This can only be done by a specially trained master.
The most basic and common cause of skipping may be the simultaneous upward displacement of the needle bar along with the sewing needle. Be sure to check this parameter. After all, it very often happens that even by lowering the needle bar a little (by only 0.1-0.2 mm), you can eliminate the cause of the omissions.
By the way, another common reason for skips can be incorrectly selected threads specifically for your overlocker model. Be careful when choosing them and you won't have any problems with skipping stitches.
How to thread a three-thread overlocker
A three-thread machine with one needle on top and two threads coming from below is considered universal. The direction of the thread is indicated by holes located on the body of the device. The threading pattern for a three-thread overlocker is similar to manipulating a conventional sewing machine.
The algorithm has the following stages:
- the thread passes through all the holes sequentially;
- the tip is inserted into the right looper and lowered down;
- the tip is passed through the eye of the needle, passed under the foot and pulled back.
Threading a three-thread overlocker ends with a test stitch on a spare piece of material similar to the one being used. Choosing a similar fabric is required because different materials react differently to thread tension. A test stitch helps adjust the tension.
Jack E4S-6-03/333, 6-thread industrial overlock with silent built-in servomotor
Jack E4-6-03/333. overlock 6 thread. The presented universal model can be used for sewing knitwear and woven materials. The needle system used is DCx27. The interneedle distance is 2 millimeters. The maximum stitch length is 3.8 millimeters. The width of the stitching is 4 millimeters. The maximum sewing speed is 5500 stitches per minute.
An overlock machine of this class can easily be called the most versatile, both in terms of the number of seams performed and the wide range of materials processed. This 6-thread overlocker in one fell swoop removes all the limitations inherent in industrial overcasting machines - “one stitch, one hand”, allowing you to perform various seams within just one model. Obviously, for a small sewing business this will be a really interesting offer. Jack E4-6-03/333 can work as a three-thread, four-thread, five-thread and actually five-thread overlock, and perform the following types of seams: three-thread overlock stitch (used only for edge stitching), four-thread overlock stitch (for sewing knitted fabrics) , five-thread stitching stitch (for sewing woven fabrics), reinforced six-thread stitching stitch (sewing for woven fabrics). To get a particular stitch, the seamstress just needs to thread the appropriate number of needles and loopers. Like other overlockers in this series, this model is equipped with a differential material advance mechanism, with the ability to adjust the feed speed of the conveyor combs relative to each other in order to always get neat seams on any fabric. There is also a presser foot pressure regulator and a tensioner for each thread.
In terms of design, this is also a very interesting overlocker. It has a modern base in which the servomotor, its control unit and the control panel are located in the head. On the one hand, this made it possible to exclude unnecessary transmission components from the transmission of revolutions from the motor to the shaft, and thereby reduce vibration, on the other hand, to achieve greater compactness of the equipment and comfort for the seamstress, since the control panel is now located in front of the operator’s eyes and is convenient to interact with, even while sewing. It should also be noted that the engine is completely silent and consumes a small amount of electricity. To facilitate the work of the seamstress, built-in LED lighting and a soft start function were also provided. To lubricate the mechanisms, a system with an automatic oil pump was implemented. It works autonomously and does not require operator intervention. It is only enough that there is the required amount of oil in the crankcase.
Built-in backlight
This 6-thread overlocker is equipped with local LED illumination of the work area - this is a super practical thing for threading loopers and changing the needle without straining your eyesight. A local lighting source is conveniently located in the needle bar area to illuminate the entire working area. The brightness of the lighting can be adjusted in three positions.
Versatility
This 6-thread industrial overlocker is the most versatile of all. This overcasting machine can perform five types of seams, which allows you to completely cover all possible sewing technologies that require an overlock stitch, and sew almost everything, from knitted underwear to workwear.
Control Panel
A control panel is provided to select functions and settings for overlock sewing parameters. On the panel you can adjust the sewing speed, set the soft start function, needle positioning and activate the backlight. There is also a factory reset function. If an error occurs, it is displayed on the display as a code number for easy identification of the cause of the problem.
Sealed needle bar
The lubricant supplied to the needle bar mechanism can get onto the fabric and leave oil stains. To avoid this, the needle bar mechanism is placed in a closed section of the housing, the tightness of which is achieved through the use of sealing bushings and a special oil seal that removes grease from the needle bar. The lubricant collected in this way is returned to the crankcase through a separate oil pipe for reuse.
How to change the color of overlock threads
Sometimes during work you need to change the color of the threads. Before threading the overlocker, you must carefully trim the spool located on the machine at the level of the thread holder. The tip of the prepared coil is tied to the remaining tip of the old coil.
The following steps are followed:
- the thread is pulled until the knot goes beyond the foot (another option for pulling is to make several stitches);
- lift the foot and carefully pass the knot through the fabric;
- lower the foot;
- continue sewing until the knot approaches the eye of the needle;
- Pull the knot through the eyelet by hand.
The steps must be repeated until the unit no longer interferes with work.
A few words about belts
Typically, a belt for a class 51 overlocker lasts a very long time, up to several decades. However, the period of its use primarily depends on the frequency of use of the sewing machine. You may not have to change it very often, but you need to be able to adjust its tension.
Modern belt models usually have special teeth, so they rarely need to be tightened. But models without them need more frequent tensioning. Most often, on class 51 overlockers you can find the smooth type of belts. However, if you have the opportunity, it is better to replace it with a gear one.
The main differences between man and sewing machine
Nothing lasts forever, and neither does your favorite sewing machine. Over time, you have to change some spare parts for overlockers. Let's look at the main types of breakdowns, as well as the most common problems:
- It is very important to place the needle correctly. Incorrect installation will lead to problems with loop formation, or to breaking of the threads. Before calling a technician, check whether the needle is installed correctly.
- Choose the right threads and fabrics for your machine. After all, the wrong choice can lead to damage to the material and breakdown of your unit.
- If the needle plate is broken, some parts may need to be replaced. It can only be performed by a specially trained specialist.
- Quite rare, but there are still cases when the motor fails. This is a very serious failure that requires a complete replacement of the core.
- If the pedal rheostat is broken, then you will have to replace the entire pedal structure.