There is a saying: how you celebrate the New Year is how you will spend it. So this summer, my orders were opened by a sea green suit, and now a future dress of the same turquoise shade is in the works. It will be made of two fabrics: textured lace and royal satin. Both materials are very beautiful: lace will undoubtedly adorn any woman, and satin, with its noble appearance, will be an excellent companion for him. In this article I will show the main steps of how to sew a lace dress with your own hands and decorate it with a beautiful ruffle.
How to sew a lace dress
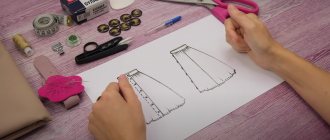
To sew a lace dress with a circle skirt, we will need about 2 hours of free time. By spending it, you will find a versatile and stylish outfit. You can wear such a thing both on a date and for a walk. Everything is decided by the selected material and the length of the model. This above-the-knee length piece made of fine lace in a bright color can be safely worn for an evening walk. So, let's start the master class.
Constructing a pattern
Top
In order to make work on the dress easier and faster, we will not create a pattern for the upper part . And just take a T-shirt/T-shirt, depending on how long you want the sleeve. We apply it to the fabric and circle it with a piece of soap.
REFERENCE! If the fabric from which you are going to sew a product stretches, then we add 10 cm to the pattern of the upper part of the dress (the silhouette of a T-shirt). If the fabric does not stretch, then 15–20 cm.
This dress model does not have a zipper.
Skirt
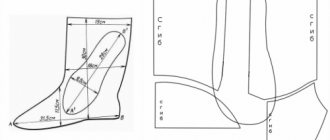
Separately, we create a skirt pattern . Fold the fabric in four, putting 1/4 of the waist circumference in the upper corner of the fabric. We measure the desired length of the skirt, leaving an allowance of 2-3 cm.
The skirt pattern is ready.
Belt
For the belt, we need to cut out a rectangular base with a width of 7 cm and a length equal to: OT+10 cm.
Openwork temptation: DIY lace dress
SIZES 36, 38, 40, 42, 44
LENGTH FROM WAIST 62 CM
YOU WILL NEED:
Lace fabric with double-sided scalloped edge 2.40–2.45–2.50–2.60–2.70 m, width 108 cm; elastic lining fabric 1.45–1.45–1.50–1.50–1.50 m, width 135 cm; interlining G 710; 1 detachable zipper, 65 cm long; color-matched tape 0.60 m, 1 cm wide.
RECOMMENDED FABRICS: LACE FABRICS, LINING FABRICS FOR THE LOWER LAYER.
PAPER PATTERN:
Re-sew the pattern pieces: Note the different direction of the grain thread for the lace pieces and the lining pieces. Place the paper pattern details onto the lace fabric/fabric according to the layout plans and pin. Draw details a and b directly on the lace fabric.
ALLOWANCES:
For seams and cuts - 1.5 cm, for hems - 4 cm. For parts a and b, allowances are already taken into account in the given dimensions.
10 TIPS: HOW TO SEW FROM LACE
LAYOUT PLANS
Fold the lining fabric in half with the right sides facing in. Lay out the lace fabric in one layer, right side up. Cut out the right and left paired parts symmetrically. Draw the frills so that the lower edges of the frills fall on the scalloped edge of the lace fabric, and the middles of the frills lie in the middle of the scallop or between two scallops.
Lace fabric with double-sided scalloped edge, 108 cm wide
OPEN:
FROM LACE FABRIC WITH DOUBLE-SIDED SCALED EDGE:
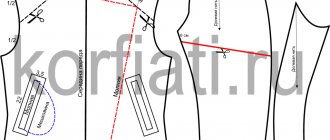
1 Webhead 2x 2x of the back with a bend 1x 3 of the shelf shelves 2x 4 hobby of the back with a bend 1x 5 front panel 2x 6 rear panel of the skirt with a fold 1x 7 wage of the neckline of 2x 8 neck wants with a bend of 1x 9 sleeves 2x a ) waist frill 124–128–132–136–140 cm long and 13 cm wide, including allowances; b) 2 sleeve ruffles, 41–42–43–44–45 cm long and 14 cm wide, including allowances.
STRETCH LINING FABRIC: PIECES 1-8.
IMPORTANT:
cut out the set-in belt of the front (item 3) 4x, cut out the set-in waistband of the back (item 4) 2x with a fold.
PAD:
details on the layout plan are highlighted in gray. Iron the gasket to the wrong side of the lining parts.
When basting and stitching, fold the cut parts with the right side inward. Backtack at the beginning and end of each seam.
Slim fit dress Openwork charm! What you see is not a suit at all, but a tight dress with a zipper. Lace scallops form the bottom edge of the ruffles at the bottom of the sheer sleeves and along the waist. By the way, the frill of the waist dramatizes the peplum and creates feminine proportions.150
BATTEN THE LACE FABRIC DETAILS ONTO THE LINING DETAILS
Place all parts, except sleeves (item 9) and ruffles (a, b), on the corresponding lining parts, wrong side to right side, and pin.
Baste the sections; in addition, place running stitches at a distance of 2 mm from the dart lines. Next, the parts are processed as single-layer. The picture shows the front bodice. In the remaining drawings, the lace fabric is not depicted.
DARTS
Sew chest darts on the front bodices, iron the depths of the darts upwards. On the back bodice and on the panels of the skirt, sew longitudinal darts, iron the depths of the darts to the line of the middle front/back.
SHOULDER AND SIDE SEAMS
Place the front bodices on the back bodice, right side to right side, pin and stitch the shoulder sections, and attach the back shoulder sections. Sew side seams on the bodice of the dress. Sew side seams on the set-in waistband and skirt. Overcast seam allowances and press.
FRILL
Iron the ends of the frill to the wrong side to a width of 1.5 cm, tuck and stitch to the edge. Gather the upper edge of the frill; to do this, machine stitch large stitches at a distance of 1 and 1.5 cm from the edge. Pull the frill along the bottom threads of the gathering stitches to the length of the top edge of the skirt. Tie the ends of the threads of the gathering stitches.
Distribute the mixture evenly.
baste the frill
Baste the frill to the top section of the skirt with the wrong side facing the front side, the allowances along the middle sections of the front panels of the skirt protrude (arrow).
STITCH THE SET-IN BELT
Pin the set-in belt to the top edge of the skirt, right side to right side (control mark 5), aligning the side seams.
Sew the belt, securing the frill. In the same way, sew the set-in belt to the lower edge of the bodice of the dress (control mark 6). Press seam allowances onto the waistband.
ZIPPER
Overcast the allowances along the longitudinal sections of the shelves and iron them to the wrong side. Baste the zipper under the ironed longitudinal sections of the fronts so that the teeth of the zipper are not visible, aligning the ironed folds over the teeth, do not fasten the frill. The top teeth of the zipper lie at the corner of the neckline. The incision remains open at the bottom.
Sew the zipper, interrupting the stitching at the bottom seam of the set-in waistband and without securing the frill. At the same time, use the sewing machine foot to attach zippers and edgings.
METHODS OF PROCESSING THE NECK: MASTER CLASS
Neck/facing
Place the facings of the front necks on the facings of the back neck, right side to right side, stitch the shoulder sections. Press seam allowances. Overcast the outer edge of the facing. Baste the facing to the neckline, right side to right side, aligning the shoulder seams. Unscrew the front ends of the facing, not reaching 3 mm from the edges of the cut, and pin. Stitch the facing.
Cut seam allowances close to the stitching, and notch in several places in the rounded areas. Turn the facing over the neckline and stitch along the seam allowances close to the seam. Turn the facing to the wrong side and sew it by hand to the shoulder seam allowances.
Tuck the ends of the facing and sew to the zipper strips.
SET-IN WAIST IN LINING FABRIC
On the details of the set-in belt made of lining fabric, sew the side sections. Press seam allowances. Iron the allowance along the bottom edge of the set-in waistband to the wrong side.
Place the belt made of lining fabric on the bodice of the dress with the right side to the wrong side and stitch to the top seam allowances, sewing the outer belt close to the seam to the maximum possible length.
Iron the waistband down, turn the edges in and sew by hand to the bottom seam allowances for the outer set-in waistband and to the zipper strips.
RULL SLEEVES
Gather the sleeve frills to the length of the lower edges of the sleeves in the same way as the waist frill (see text and Figure 3).
Sew the frills to the lower edges of the sleeves, right side to right side. Cut seam allowances close to the lines, overcast and press onto sleeves. To secure the gathers, apply pieces of tape to the seam allowances for sewing the sleeve ruffles; stitch the tape to the edge allowances.
PERFECT WORK: SET-IN SLEEVE
SLEEVES
To attach the sleeve edges along the edges, lay 2 machine stitches at a distance of 1 and 1.5 cm from the cuts using large stitches, do not tack, leaving long ends of the stitch threads. Fold each sleeve lengthwise, pin and stitch the sleeve sections to the bottom edge of the frill, aligning the ends of the frill stitching seam. Cut the seam allowances close to the stitching, overcast them together and press to one side.
SET IN THE SLEEVES
Pull the sleeve edges slightly at the bottom threads of the gathering stitches. Pin the sleeves to the armhole sections, right side to right side, aligning the reference marks 9 on the sleeves and fronts, as well as the seams of the sleeves with the side seams. Align the marks on the sleeves with the shoulder seams.
Distribute the fit on the edges so that there are no folds. Sew in the sleeves from the sleeve side and stitch in after fitting. Sew the allowances of each seam together and press onto the sleeve.
HEMISHING THE BOTTOM
Overcast the hem allowance for the bottom of the dress, sweep it to the wrong side, iron it and sew it on by hand using loose stitches.
Step-by-step sewing instructions
- Apply it to the fabric and trace a piece of soap around the T-shirt or T-shirt. And we are creating a pattern for a circle skirt. Cut out the parts along the marked lines.
- Sew the top of the product and trim the edges with bias tape.
- We fold the rectangle that will make up our belt in half and sew it to the skirt.
- Cut the elastic to the length of your waist. We push it inside the belt; you can use a pin for this. And we flash it.
- We sew the bottom to the top, process the armholes and hem.
IMPORTANT! Aligning the hem of a circle skirt is difficult, so it is advisable to do it on a mannequin. This will allow the fabric to sag and make it easy to cut off the excess.
The hem of the skirt is best finished with a zigzag stitch. And another trick is to fold the bottom of the skirt for a very long time. Do this using a special web, and it will only take you five minutes.
You can try on new clothes! We got such a cute dress.