Upgrade ideas
An old and unused wardrobe item does not have to be thrown away.
An unnecessary product is subject to rework, and there may be several of them. By adding or changing a few elements, you can create a new stylish outfit. For example, a long style can be cut by adjusting the length. You can, on the contrary, create an elongated version. For this, lace or material of a different shade will be useful.
In order to radically change the style, you can use several options.
- Complete reshaping is often practiced .
- Many girls use only the top part , creating an original blouse, or the bottom part , thanks to which you can get a bright skirt.
- Accessories lovers should pay special attention to such options. Some people use unnecessary clothes when making their own jewelry, clutches, and home decor items.
- Additional decoration is also suitable for updating . Rhinestones, lacing, belts, stickers or stripes will help transform even a formal outfit, making it more casual or romantic.
Note. Any dress is suitable for work, even a wedding dress. You can make a classic or evening model out of it.
How to convert a dress into a skirt
If there is a stain on the top of the item that cannot be washed off, or you decide that the skirt is more relevant for your wardrobe, altering the dress will not be difficult:
- Using scissors, cut off the top of the outfit.
- Take an elastic band that will be equal to your waist circumference.
- Machine sew the ends of the elastic overlapping.
- Visually divide the elastic band into four equal sections. Do the same manipulation with the skirt, making marks with chalk.
- Connect the skirt and elastic band, securing with pins.
- Using a machine, sew the elastic with a zigzag stitch.
- Fold the elastic over to the wrong side of the skirt and stitch again.
- If desired, sew thin ribbons on the side that will serve as hangers.
Making a new dress
Having ready-made samples greatly simplifies the work process. First of all, you need to decide what exactly needs to be changed . This determines which seams will need to be ripped out during the process.
Advice. If only the length and style of the sleeve changes, the side seams and hem line can be left unchanged.
An important step is the preparation of the product itself. The material must be clean and well ironed .
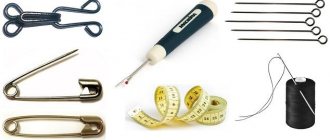
Tools for work
To make a new dress based on an existing one, you will need the following.
- Dress;
- patterns;
- pencil;
- scissors;
- sewing machine.
Completing of the work
After preparation, we begin the technological process. The necessary seams must be opened and the remaining threads carefully removed. The pattern is transferred to the fabric . A small piece of chalk is suitable for marking the outline. When working, it is important to leave seam allowances of about a centimeter. After preparation, each element is carefully cut out.
Advice. When working on a sewing machine, it is first recommended to process the shoulder seams and sleeves.
Many craftswomen treat the neck area with bright trim. Afterwards you can start working on the side seams and finishing the bottom.
Advice . Before you start sewing on a machine, you can overcast the parts and try on the product. This will help to correct any errors in a timely manner.
Ribbon
A voluminous floor-length dress can ruin even the most ideal figure. The maximum length combined with a loose fit flatters all feminine curves. To define the waist, you can use a belt or pin. But to make the look more romantic, use a ribbon.
The tape needs to be secured under the chest. This way you will create an outfit in the Greek style, visually lengthening your legs. The advantage of the Greek silhouette is that all problem areas on the stomach and hips are reliably hidden, and the chest is emphasized.
Of course, the tape does not need to be tied too tightly, creating discomfort for yourself. As for the color palette, it all depends on the outfit and your preferences.
For example, if you want to support the boho aesthetic, then choose the same bright ribbon for an elegant dress. If you want something neutral, opt for ribbons in pastel shades or black and white.
Found a violation? Report content
Rework without a pattern
Altering a product without ready-made patterns is somewhat more difficult. In this case, a T-shirt, shirt or top of the required style may come in handy.
Tools
Prepare the following in advance:
- dress;
- t-shirt;
- scissors;
- pencil or piece of chalk;
- sewing meter;
- threads;
- needle;
- sewing machine.
Description of work
Outline of a new product
- The dress is unraveling at the seams . The sleeves also need to be cut off. Carefully remove all threads.
- Fold the front half in half.
- The T-shirt (or other item) is also folded in half, the sleeve is neatly tucked in. The T-shirt is placed on the dress. The future dress is outlined, the neckline and armhole area are formed.
- The back area is done in a similar way.
Attention! When marking, it is necessary to leave seam allowances.
- The next step is to form the required length. The required length is measured using a sewing meter. A vertical line is laid from the waist area until the desired parameter is obtained .
- If you need to add sleeves to the dress, you should measure your arm circumference and decide on the length.
- Once finished, the finished parts are carefully cut out.
Instructions for doing suturing in different ways with your own hands
You should immediately determine the area of sewing that most dissatisfies the owner. There are several ways to reduce your dress size.
Along the side lines
The simplest method that even inexperienced seamstresses can use is transferring the side seams. In order to use it, you must first try it on. This is done in conjunction with underwear. This procedure allows you to accurately determine the fit of the dress. Excess fabric is pinned along the side seam. You should start from the armpit and move down. At the same time, use a pencil or colored chalk to mark the location of the new seam. Do not forget about the allowances, which leave about 1 cm of fabric.
Before sewing a new seam on a machine, you need to baste it by hand and try on the product again in order to eliminate possible errors.
If the size is adjusted correctly, then the excess material is carefully trimmed, the allowances are folded and sewn. To prevent the fabric from fraying, the edges are finished with a zigzag stitch. Temporary sutures are carefully removed.
See also
Reasons why a washing machine may not fill with water and do-it-yourself repairs
At the waist
You can alter a dress at the waist without much effort or skill using darts. They are available on almost every ready-made dress. To adjust your waist, you should try it on. The excess fabric is cut off with a bobby pin or a pin, the new position of the dart is marked with chalk or a pencil, and manually stitched with a temporary seam. Next, you should try on the dress again and make sure that the preliminary measurements were taken correctly. After this, the excess fabric is trimmed, the seam is sewn on a machine using the minimum pitch width, and the edges are processed.
Breast reduction
The most practical way to reduce the size of a dress in the chest area is to use darts. You should try it on and mark the area where the new seam will be located. Next, baste it by hand and measure the product again. If there are no mistakes and the dress fits well, then carefully cut off the excess fabric and sew the seam on a machine. The edges are processed and ironed.
Hemming the shoulders
Hemming the shoulders is a more complex procedure and requires certain skills and abilities. Additionally, you will need to change the armhole. You need to try on the dress and mark the new width of the armhole with chalk. After this, the product must be removed and folded strictly in half, placing one armhole behind the other. Sections, armholes and necklines are cut off using bobby pins or pins. After this, a new armhole line is drawn and the dress is tried on again.
If you are satisfied with the result, you can trim off the excess fabric and add permanent seams.
If the dress has sleeves, then the armhole line is placed a couple of centimeters below the ruler.
Sleeve adjustment
You can reduce the volume of sleeves by moving stitches and removing excess. You need to try on the dress, pin off the excess material with bobby pins, and use chalk to mark the location of the new seam. First, it is stitched by hand, and then it is re-fitted and the nuances are corrected. In this case, you should raise your arms up and down several times, move them in different directions and make sure that the sleeve is not too narrow and movements are not constrained. If the result is satisfactory, then the excess fabric is carefully trimmed, the sleeve is sewn on a machine and the seam is processed.
See also
The best ways to make a cube out of paper with your own hands
Using Lightning
Another option for resizing your dress is to add a zipper. You should first try it on and determine how many centimeters need to be removed. If there is a seam on the back, then the product is ripped along it. Otherwise, you will have to cut it in half at this part.
On each side, fold half of the amount of fabric that needs to be removed. A zipper of suitable size is basted on both sides. After this, re-fitting is done and it is assessed whether adjustments are required. If the dress fits well, then the zipper is attached by machine and the seams are pressed. You can use either a small hidden zipper or a massive decorative one, which will update the design of the product and serve as an additional decoration.
Button up
Sewing a dress with buttons is not that difficult, it all depends on their location. If they are on the side, it will not be difficult to alter them a few centimeters further, thereby reducing the size of the product. If the buttons are positioned differently, you will need to sew the sides of the dress.
Master class: “Giving new life to an old dress”
Before us is a dress purchased according to the same scenario by my client. Let's see how we managed to change it.
First of all, the client tries on the dress, and we clearly discuss with her what she doesn’t like.
This model increases a woman’s age and makes her fuller (the client is about 50 years old, of average build, a modern woman who takes care of herself).
Problem:
I don't like the creases in the chest area.
Solution: I suggest making darts from the hip line on the side to the center of the chest.
Result:
- Creases on the front disappear
- Waist appears
- Breasts look better
I pin all this with needles on the client. I'm checking. Photo 1.
Problem:
The sleeve is too wide and there are a lot of creases on it.
Exit: I make the sleeve already, pinning it with needles. Unfortunately, the cut of the dress does not allow all the creases to be removed.
Result:
- Hand looks slimmer
- Reduces the number of creases
- The dress looks more neat
Problem:
The length of the dress does not match the woman’s height, making her look older.
Exit: I suggest making the flounce voluminous by bending it in half, thereby giving the dress a modern look and shortening it. I pin it with needles and check it on the client.
Result:
- The woman looks younger and more modern.
The action plan is ready. I’m starting to implement my plans))))
Sides and front dart
- Cleaning my pockets
As you can see (photo 2.), there are pockets in the side seams. The dress is narrow, the pockets will protrude and increase the hips, so we decided to remove them completely.
I rip out the side seam and rip off the burlap pockets. I clarify the center line of the dart along the front (by removing the needles and fixing the points), correct it, and draw it completely. Photo 3.
Please note that at the side seam the dart disappears (the shape of an elongated diamond, like darts at the waist), since it is not provided for by the cut.
- Then, before folding it in half, I pin the side. I sweep the outlined dart with a copy stitch and cut the thread. Photos 4 - 6.
Now the darts are symmetrical on both sides.
- I combine them, pinning them with needles, basting them and sewing them on the machine. I press the dart down. If it is large, I cut it with an overlocker.
Photo 7-8.
- I pin the side seam of the front and back, draw a new line with chalk, baste it and machine stitch it. I process the seam allowances with an overlocker and press the seam with an iron. Photo 9.
Sleeve
- I rip off the bottom of the sleeve.
Having ironed the seam it is more convenient to draw a new sleeve line
- Using the marked points (after trying on, I pull out the needles and fix the points) I draw a new line, baste and stitch it on the machine. Photo 10.
- I process the allowance using an overlocker. I hide the tails from the overlocker with a crochet hook, pulling them into the seam and ironing it with an iron. Photo 11.
- I fold the bottom of the sleeve, then iron it again.
Shuttlecock
- I rip off the hem at the bottom.
- I set the upper thread tension to the maximum, 10.
- I sew at a distance of 1 cm from the edge, without making a backtack either at the beginning or at the end. Photo 12.
Since the top thread tension is set to 10 (the top thread is very tight), this makes our work easier because the material gathers itself.
I distribute the gathering evenly over the entire bottom (loose seam threads allow us to do this). The volume of the bottom of the dress should be equal to the volume of the top gather. Photo 13.
I bend the flounce in half, pin it with needles, baste it to the seam, then sew it on the machine. Photo 14 - 15.
I iron everything out.
Let's see what I came up with. Having altered the dress, its size visually decreased. The woman in it looks slimmer and more modern. My client was satisfied.
Based on this master class, you can change a dress, blouse and even a jacket yourself at home.
How to alter a dress with your own hands and give it a second life
Hello, dear craftswomen!
Today, we’ll talk about how to alter a dress, giving it a second life. I'll start with a situation familiar to us all. We went into the store and saw a dress on a hanger. Hmm... Nothing at all, we tried it on, it seemed to fit well and bought it.
We came home, tried it on, showed it to our friends, something wasn’t right. It’s kind of fat, there are creases everywhere, it seemed okay in the store, but now I don’t like it. Sound familiar? I think yes.)))
Very often clients come asking to change an item that they bought unsuccessfully. They complain that the product is not worn and has become an unnecessary thing in the closet.
You yourself understand that mass-produced products cannot take into account the individual characteristics of each client, we are all too different.
Therefore, if you want the product to fit well on you, you need to adjust it, only then will it emphasize your advantages and hide your shortcomings. Do you agree?
Many of you can remake a dress with your own hands, turning an old item into a fashionable one. And I will try to help you with this.