The trench coat is stylish and at the same time very versatile and practical item in the wardrobe. The main distinguishing characteristics of this raincoat are the large turn-down double-breasted collar, shoulder straps, cuffs and belt. Also, this coat features two rows of buttons on both fronts. To sew a trench coat, as a rule, hard waterproof fabrics are used: cotton twill, gabardine and other fabrics with special impregnation. Made in classic colors (black, white, all shades of beige), the trench coat will look stylish for several seasons, allowing you to create many completely different looks - from elegant to sporty.
In this master class we will sew a trench coat using pattern 113 from Burda 9/2010, and in the electronic catalog on the website you can find all the patterns of raincoats and trench coats from Burda.
Find your perfect trench coat: 20 trench coat patterns
Cape-cloak for mother and daughter
Modern family images are full of photos where adults and children are wearing the same clothes. If you also want such a set, then the easiest way is to sew a cape in the form of a cape.
Using the material folded diagonally, you need to build a semicircle, the diameter of which is equal to the length of your arms, measured from one wrist to the other. The neckline is cut out, a cut is made in the front, and if necessary, a hood is drawn on the remaining flap. Further steps are to sew the headband, sew it in, process the cuts, and perform hems. The girl will be delighted if her mother chooses the fabric to her taste. Whether she likes floral motifs or would like to see cartoon characters, listen to the child’s wishes.
A raincoat is a stylish and fashionable item; it is necessary in any person’s wardrobe. It does not lose its relevance in the off-season, when the jacket is not a suitable option; it can also be worn in the summer in rainy weather when the temperature drops. A child over two years of age must have a raincoat and rubber boots in their clothing set. Then the baby will not be afraid of rain and wind.
Raincoat without pattern: for men, women, children
This wardrobe item can be made in a few hours. The main thing is to calculate the fabric consumption and buy it in the store. An impregnated raincoat is best suited for these purposes; it definitely won’t get wet and will reliably protect you from gusts of wind.
A simple cutting is done like this:
- Fold the fabric in half.
- Place the length of the product down towards the edge.
- Measure the circumference of the hips, divide the value in half, add 8-10 cm for a loose fit, mark the size on the fabric, so you get a rectangle - this is the back of the raincoat.
- Now you need to draw the sleeves. We set the length away from the back, taking into account the increase for the hem.
- Cut out the neck.
- Construct a hood pattern in the form of a rectangle, then round the top corner.
If you are not sure, then it is better to draw the constructions on paper or oilcloth, try them on, and then transfer them to fabric. Stitch the seams, process them, hem them. It remains to determine what to make the fasteners from. These can be ties, buttons, Velcro, buttons, a choice for every taste. A man's raincoat can be left without any additions; a children's raincoat can be decorated with a pattern of rhinestones or ready-made embroidered appliqués; a woman's raincoat can be embroidered with beads or other decorative elements.
A little history of the poncho, popular among fashionistas
Previously, when the fashion for ponchos was just emerging, they used the most primitive patterns. A hole was made for the head from a piece of warm material, the edges were decorated with something, and the cape turned out to be elegant. Europeans liked this Indian item, and it became firmly entrenched in women’s wardrobes.
- Review of fashionable capes for wedding dresses for autumn and winter - how to sew them yourself
Fashion designers have improved it, many new options have appeared: ponchos with hoods, with sleeves, pockets and wonderful accessories.
Choosing a poncho style
Ponchos were invented by Latin Americans , and they were inspired by their special climate: damp and cold at night, and warm during the day. In essence, a poncho is a medium-sized woolen blanket in which savvy Latinos simply made a hole for the head , and especially creative ones added a pocket for all sorts of small things. Your hands remain free, and the entire body is protected from cold and wind - an ideal style for active people. That is why designers have now brought back the fashion for ponchos and similar capes: they are convenient, and even a beginner can handle sewing.
Ponchos can be of different cuts:
- With a straight hem , similar to a circle skirt
- With an asymmetrical hem , cut from a rectangle
- One-piece and multi-piece for better fit
- With front closure or solid fabric
- With dolman sleeves and even without arm protection at all (like shirtfronts)
Choose from all the variety what you like. Nowadays individuality is in fashion, so focus on personal tastes and comfort, do not follow trends blindly.
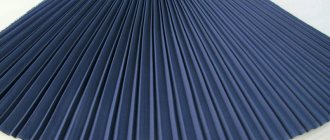
Raincoat fabric
To choose the right fabric for a raincoat, it is important to take into account some nuances - the climatic and seasonal conditions of the region where you live, your body type and model. For classic straight or slightly flared styles, plain raincoat fabrics such as Duspo Milki, artificial or natural leather are suitable. It is better to sew a waterproof insulated raincoat from quilted wool on synthetic padding. Short raincoats for girls and young girls can be made from bright printed materials, for example, from Duspo print or print stretch faux leather.
Sewing
Step 1:
Lay out the fabric for the raincoat on a flat surface. We take something made of non-stretch fabric that fits in size and lay it flat on the fabric.
Note: the item should be fairly loose, made of non-stretch A-line fabric.
The item does not have to be as long as the planned product. We'll add the length later. We put the sleeve inside to re-shoot the sleeve armhole.
Step 2:
Determine the length of the cloak and extend the side line to this length.
We cut the fabric according to the shape of the sample, adding 3 cm on the sides and on top. (1 cm seam allowance and 2 cm for insulation).
Cut out another piece for the front of the cloak.
Step 3:
Fold one of the pieces that was cut out in Step 2 in half lengthwise.
Cut along the fold line.
Step 4:
We have already cut out the neck on the back piece. Now we need to cut out the neckline at the front. Improvise, try on different items of yours and determine which neckline is most comfortable for you. We draw a V-shaped line from the shoulder seam down about 30 cm. We make the transition to the middle cut quite smooth.
We repeat this for the other front part.
Step 5:
Now we cut out the sleeves. Fold a piece of fabric in half. We place the item of clothing chosen as a sample on the folded fabric so that the fold line of the sleeve (the longest fold line) lies on the fold of the fabric.
We trace the line of the sleeve, adding 3 cm around. Cut along the contour.
Step 6:
We cut 4 pieces of fabric of such length that it is enough from the shoulder seam to the hem plus the length of the back of the neck, and each is 12 cm wide.
Step 7:
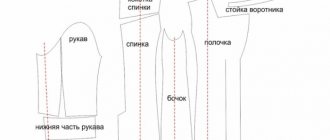
We unfold the insulation on a flat surface and lay out all the parts on it: the back, 2 front parts, 2 front elements and 2 sleeves.
Step 8:
We trace all the details and cut them out as shown in Fig. higher.
Step 9:
Cut out the pieces from the lining fabric. We only need to cut out the back, 2 front pieces and 2 sleeves.
We lay out the insulation for the sleeves, lay the top fabric on top with the right side out. We pin it with pins.
Step 10:
We lay out the back insulation and place the top fabric on top, right side out.
We fasten the sides and shoulder parts with pins.
Pin the sleeves to the armholes and sew everything together.
Step 11:
Lay out the lining of the back piece on a flat surface, right side up. Place the two front pieces on it, right sides down.
We pin the side and shoulder seams. We fasten the sleeves into the armholes and sew the parts together using a machine.
Step 12:
We fold long strips of top fabric two at a time with right sides facing each other and sew them on one of the short sides.
We got two long strips.
We sew the insulation strips together in the same way.
Step 13:
We pin a strip of insulation to one of the top strips, right side out. Now pin this strip (right side to the right side of the main part of the cloak) along the front edge of the cloak, starting from the bottom hem up, around the back of the neck and down to the other hem.
Step 14:
After you have fastened the entire front part with the strip, we sew the fastened parts together.
Step 15:
We fold the second long strip of top fabric with the strip we sewed, right sides together.
Step 16:
We sew the strips, iron them and wrap the last strip inside the cloak.
Step 17:
We fasten the two sewn strips with pins and machine stitch along the fold (see figure above).
Step 18:
Trying on a raincoat. It should lie freely on the body and the floors of the cloak should meet without tension.
If you want to adjust the dimensions a little, you can make the necessary adjustments in this step.
I decided to make the waist narrower and narrow the sleeves a little.
First, use pins to narrow it as much as necessary and try on the raincoat. When everything is corrected and you are happy with the dimensions, sew the fixed lines and cut off the excess fabric.
Note: If the adjustments are minor, then you can move on to the next step. If you decide to make the cape much smaller, make the same adjustments for the lining fabric pieces before continuing.
Step 19:
Lay out the cloak with the front side up. Place the lining on top, right side down.