Share on social media networks:
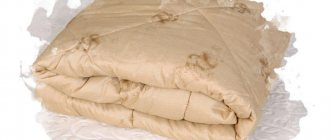
In the cold season, you really want to warm up under a warm blanket, and it’s great if it’s made of sheep’s wool. Unfortunately, there are many bedding items on sale that are stuffed with cotton wool, which is not as practical as fleece. Cotton wool very easily absorbs moisture and various odors, cakes, and blankets made from it are short-lived and heavy. Whether it's a quilted wool blanket or a felt blanket. It is light, elastic, airy and will last for more than one generation. Anyone who has covered himself with such a blanket at least once would not exchange it for anything. Today we will try to remember the traditions of our ancestors, who knew exactly how to make a sheep wool blanket at home. After all, for a long time, our ancestors not only knitted socks and mittens from fleece, but also felted felt boots.
LiveInternetLiveInternet
– Quote book
A small explanation to the post from Tanya, walking.
A small explanation to the post from Tanya, walking. Frame “Here comes summer.”
Caramel honey cake with raspberries, caramel cakes, protein cream, the sweetness of such etc.
Cartoon "Trouble in the Himalayas" online Last weekend I finally found time for...
Watch the light, funny, ironic film “Blame it on Rio.” It turned out to be a wonderful comedy.
–Photo album
–Tags
–Categories
- (0)
- iClone (1)
- Animation Shop (3)
- Catherine Deneuve (8)
- Corel (8)
- GIMP (31)
- Paint (16)
- ProShow Producer (5)
- Roberto Perry (8)
- the motions of my soul (20)
- Word – Excel (1)
- avatars (14)
- actors (45)
- alphabet (37)
- English (38)
- animations (10)
- audiobooks (55)
- famous aphorisms (1)
- banner (13)
- libraries (1)
- sparkles - blings (2)
- action games (49)
- jam (10)
- jams and compotes (6)
- video (84)
- embroidery (16)
- knitting (544)
- fortune telling (10)
- Defne gallery (86)
- gallery from Crys_tal (4)
- generators (137)
- hyphae (5)
- glitters (3)
- horoscope (4)
- Georgian cuisine (26)
- desserts (75)
- design (89)
- motorhome (1)
- animals (90)
- life of wonderful people (1)
- live healthy (9)
- blanks (9)
- snacks (193)
- curtains (4)
- toys (45)
- games (23)
- dough products (80)
- interesting sites (56)
- Art (336)
- border (1)
- Calendars (2)
- pictures (4)
- housing problem (6)
- Ceramic floristry (2)
- cinema (361)
- FS brushes (3)
- clipart (50)
- cliparts (385)
- buttons (18)
- rugs (38)
- collages (28)
- Christmas Collection (1)
- necklace, bracelets (42)
- comments in pictures (1)
- catmatrix (8)
- beauty and health (384)
- creams (12)
- dolls (23)
- chandeliers (1)
- makeup (7)
- manicure (3)
- massage (6)
- Masha and the Bear (2)
- fashion (49)
- my garden (10)
- music (105)
- drinks (71)
- nailart (4)
- wallpaper (8)
- decoration (2)
- Pates (1)
- translators (4)
- baked (425)
- booties (12)
- plugins (15)
- plaid (11)
- players (14)
- gifts (1)
- pillows (13)
- congratulations (1)
- useful for blogs (193)
- useful for computer (218)
- useful tips (22)
- parables (10)
- hairstyles (40)
- programs (430)
- weather forecast (1)
- Works and lessons from Mademoiselle (18)
- dividers (27)
- Frames (212)
- Frames from Falconet (3)
- stories (1)
- Recipes (588)
- Russian (9)
- from the diary Dreaming_Irina (3)
- gardener (14)
- salads (50)
- napkins (68)
- tutorials (1)
- series – Wolf Messing (0)
- tablecloth (31)
- download from the Internet (2)
- dictionaries (2)
- emoticons (3)
- Tips (4)
- sauces (30)
- links (97)
- FS styles (7)
- poems (45)
- bags (6)
- soups (34)
- circuits (236)
- my diagrams (4)
- Cheeses (12)
- slippers (1)
- creativity (505)
- television (22)
- dough (3)
- tests (4)
- stencils (7)
- corners (7)
- horror (2)
- patterns (7)
- decorate the table (0)
- lessons from Tatunechka (7)
- drawing lessons (142)
- cake decorating lessons (2)
- care. (1)
- porcelain (9)
- filters (13)
- Backgrounds (138)
- diary formulas (3)
- photo (86)
- FS (1226)
- flowers (23)
- quotes (6)
- famous quotes (1)
- watch (29)
- drawing templates (5)
- shawls (4)
- sewing (39)
- hats (24)
- fonts (15)
- this is interesting (186)
- this is interesting (120)
- humor (81)
–Applications
- Postcards
Reborn catalog of postcards for all occasions - Online game “Big Farm”
Uncle George left you his farm, but, unfortunately, it is not in very good condition. But thanks to your business acumen and the help of neighbors, friends and family, you are able to turn around a failing business. - I am a photographer
Plugin for publishing photos in the user's diary. Minimum system requirements: Internet Explorer 6, Fire Fox 1.5, Opera 9.5, Safari 3.1.1 with JavaScript enabled. Maybe it will work - TorrNADO – torrent tracker for blogs
TorrNADO – torrent tracker for blogs - always no analogues at hand
^_^ Allows you to insert a panel with an arbitrary Html code into your profile. You can place banners, counters, etc. there
–Links
-Music
–Search by diary
–Subscription by e-mail
–Interests
-Friends
– Regular readers
–Communities
-Statistics
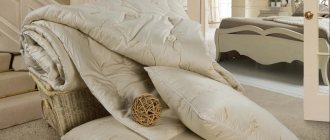
We sew a wool blanket in the Armenian tradition
Wednesday, September 17, 2014 17:25 + to quote book
Blankets made from wool are considered the most useful in the world. I won’t argue about swan’s down blankets, but you can’t get them from us, unless you buy them. And here, in Armenia, we have a lot of lamb wool. My grandmother always sewed them for us. I've gotten used to them since childhood and I really like them. I searched the Internet and couldn't find anything on how to sew it. Thank you
While drying, beat the wool with a stick or fluff it with your hands so that the wool allows air to pass through.
On the floor we put a cover or envelope, as it is also called, made of calico (material), where our wool will be in the blanket: two canvases sewn together at three edges.
We distribute the wool throughout the cover
Then the most interesting thing: we take the unstitched edge of the cover and from the top edge we begin to carefully twist the roller, simultaneously from both edges, twisting the wool inward, the bottom edge creeps below, as necessary, we constantly bend it under the roller
Carefully bring the edges to the end and voilà: the wool ends up inside the blanket. Turn the roller over and roll it carefully back again. The wool is evenly distributed throughout the cover.
Hand sew the edges together
Once again, lightly distribute the wool evenly and begin to sew with large stitches up and down with a large needle (we call it “Makhat”) from the edges parallel to the edges in a square spiral to the center. To prevent the wool from running to the center while sewing, many people place stools (not very heavy, but with enough weight) in the center with their legs up. Then the wool will remain in place and the blanket will be stitched smoothly.
We hand sew a beautiful silk fabric on top of the cover.
and in duvet covers
All. And then we sleep sweetly, sweetly in such blankets.
I created this post for myself and those who know about these types of blankets. Nowadays there are many ready-made, easy-to-wash and beautiful blankets. The choice is large and to each his own)))
About wool and blankets. A brief introduction to the process.
Greetings to all the subscribers of my store and those who happen to look at my Blog!
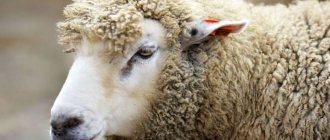
It was high time for me to make this post and introduce you a little to the process of producing the wool products that I offer)). So where does it all begin? Of course from these kids!))
No, we don’t keep sheep, it’s very difficult to combine farming and production, because our family factory for the production of wool for felting and my creative studio take up all our time. These are sheep from a neighboring farm))
The wool from the sheep is washed and comes to us, and we begin processing it. First, the wool is “fluffed up” in a machine with a toothed drum, and then it ends up in a carding machine like this:
This is a German car from the early twentieth century, it is already over 100 years old! It was restored with his own hands by my husband, who had never worked with textile machines before)) 6 years ago, he spent 2 months with the carding machine in a cold, poorly heated room, but the result was worth it! My husband got another new profession and invaluable experience, and the carder got his life!
From wool in the form you see in the photo, I felt various products, but blankets require yarn, so the wool for them continues to be processed into the desired state of yarn for weaving. This natural wool yarn ends up in the weaving machine.
Such a machine cannot work without a person, just as a knitting machine cannot knit a sweater without a master who knits it, or a sewing machine can do without the hands of a seamstress. The yarn is carefully threaded into the machine and the master constantly monitors and regulates the process. After weaving, the edges of some products are processed with an overlocker, while others are hemmed by hand, without a sewing machine.
Under the avatar it is written that I sell only finished works and here I will explain why. The fact is that each product has a so-called map of its own pattern-ornament. The map is an algorithm given to the needles so that they move in a certain direction and produce the pattern we need. It is not easy to change such an algorithm, so we work with certain classic designs that we have specified. In addition, in order to put the machine into full operation, you need to put wool in not one or two blankets, but at least several pieces. A private client orders one or two blankets. This is why custom ordering is not feasible.
I also want to express my gratitude to everyone for your kind reviews and kind words! This is incredibly pleasant and charges us with new strength to achieve our creative goals! In fairness, I must note that it is not me alone who is working for you, but a small team of people, which includes masters, my students and assistants. What our studio does is simply impossible for one master to do! Therefore, I am happy to convey your words of gratitude to my team))!
I wish everyone a good mood, kind people around and warmth in the soul!
Your Ekaterina Sadula, member of the Union of Craftsmen of Bulgaria, specializing in “Artistic Textiles”.
How to make a sheep wool blanket at home?
Share on social media networks:
In the cold season, you really want to warm up under a warm blanket, and it’s great if it’s made of sheep’s wool. Unfortunately, there are many bedding items on sale that are stuffed with cotton wool, which is not as practical as fleece. Cotton wool very easily absorbs moisture and various odors, cakes, and blankets made from it are short-lived and heavy. Whether it's a quilted wool blanket or a felt blanket. It is light, elastic, airy and will last for more than one generation. Anyone who has covered himself with such a blanket at least once would not exchange it for anything. Today we will try to remember the traditions of our ancestors, who knew exactly how to make a sheep wool blanket at home. After all, for a long time, our ancestors not only knitted socks and mittens from fleece, but also felted felt boots.
DIY sheep wool quilt - master class
Sewing a blanket from sheep wool is not so difficult; the main thing in this matter is to stretch it well for further work on it. You can make a simple device that allows you to easily stretch the fabric, something like a hoop. Or you can use an assistant for this process. Well, now let’s learn more about the process of making a sheep blanket.
Choosing a size
First of all, decide on the size of the blanket. All products are divided into 2 main groups:
- One and a half bedding. The size of a one-and-a-half blanket is 145x205 cm. Recently, products measuring 150x205 cm have become very popular on the market.
- Double. Size of a double product: 175x205 cm. Currently, the most widespread blanket size is 200x220 cm, the so-called “European standard”.
Stages of work
The process of making a wool blanket can be divided into several stages:
- Preparing the fleece.
- Interruption of material.
- Making a cover for the trust.
- Placing the fleece in a case.
- Quilting a blanket.
Let's look at all the stages in more detail.
Wool preparation
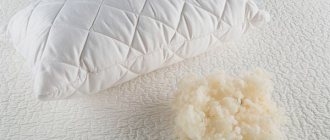
One blanket for an adult will require 2.5 kg of washed sheep fleece. Unwashed wool will need 2 times more. If possible, then immediately purchase washed fleece, although it is much more expensive.
Important! The best wool is that which is sheared from sheep in May.
If you purchased unwashed hair, it must be thoroughly cleaned. This is done like this:
- Soak wool fibers in warm, slightly soapy water.
- Place the fleece on the mesh and rinse under running water.
- Let the water drain.
- Spread the fibers evenly on a horizontal surface to dry. Turn the fleece over from time to time, like hay when drying.
Important! A couple more useful tips will help you do everything faster and easier, and most importantly - without damaging the material:
- Do not use bristle soak powder as this will cause the fibers to become unpleasant to the touch. It is best to simply soak the fleece in warm water and constantly drain the water as it becomes dirty. You can wet your hair for about 2 days. During this time, all the dirt will disappear and the coat will become good and clean.
- Dry the fleece hanging on sticks or spread the fur on a net. It is best to dry the material outside or in a dry, warm and well-ventilated area.
Intercutting material
To make a blanket from sheep's wool at home, clean and dried wool must be sorted, as for spinning.
Important! Some recommend combing out the fibers using brushes and graters so that the fur is loose and fluffy. But combed wool is not suitable for making a blanket, because when combed, the fibers break and turn into dust. Such fleece fibers quickly form clumps, acquire the properties of cotton wool and quickly “fail.”
To properly remove hair, proceed as follows:
- Spread plastic film or any sheet measuring 2x2 m on the floor.
- Place the dried fleece in a heap on the prepared film.
- Spray the wool fibers evenly with warm water to “open” them and become elastic. During treatment with water, turn the fur over and toss it.
- Leave the material for 10-15 minutes.
- Prepare a flexible and smooth rod for cutting wool.
Important! You can make a rod from hazel or other similar shrubs. The length of the rod should be 1.2 m, and the diameter at the narrowed end should be 8-10 mm. Round the ends of the tool and sand them smoothly.
- Put a mitten on your right hand and a damp gauze bandage on your face.
- Take the rod in your right hand and hit the wool fibers with sharp movements from top to bottom.
- As you lift the rod for the next blow, remove pieces of hair from it with your left hand. To do this, pull the rod through the slightly clenched palm of your left hand.
- Restore the wool that has fallen apart during the beating process and move the lower layers to the top.
- Pulse the fleece until it becomes fluffy and has at least doubled in volume.
- Carefully transfer the broken wool to another clean cloth. Make sure that the resulting wool dust remains on the first bedding and does not subsequently fall into the blanket.
Important! The work of beating wool is very dusty and hard, so entrust this process to a man. Carry out cutting in the summer - preferably in the yard or in a dry, warm and well-ventilated shed. Cover your face with a damp gauze bandage to prevent dust from entering your respiratory system.
So, the sheep's hair is broken, and by this time the cover should already be ready.
Making a wool cover:
- According to the size of the blanket, sew a cover from light, dense natural fabric. It can be calico, chintz or satin.
- Leave one (short) side unstitched.
- Turn the cover inside out, as it will be used in this form in the future.
Placing wool in a case:
- Prepare a place to place the blanket stuffing. You can do the work on a clean floor, or you can build a structure from two large tables to make one large one, like a tennis table.
- Place the cover turned inside out on the prepared surface.
- Carefully smooth the cover with your palms.
- Spread the crushed wool evenly over the entire surface of the bedspread.
- Check the evenness of the installation by touch with your palms.
- Invite an assistant and stand with him at the short, sewn side of the bedstead.
- At the same time, carefully and slowly, roll the cover, along with its contents, across the entire width into a roll, moving towards the opposite unstitched side. Always push any fibers protruding from the sides back into the roll. Roll up the “roll” not very tightly.
- After you have rolled the napkin into a roll, with an assistant, grab the bottom unsewn side on both sides.
- At the same time, place the ends of the cover onto the roll.
- Straighten the sides of the napper and slowly turn it in the opposite direction. Hold the rolled out part of the blanket with your hand so that the previously laid out wool does not bunch up.
- As a result of your joint actions, the cover will turn right side out, and the hair will be inside it in an even layer.
- Gently smooth the surface of the napkin with your hands.
- Ask an assistant to hold the sewn end of the cover along the entire length, while you carefully pull up the underside of the napkin with the unsewn edge.
- Make sure there are no kinks or wrinkles in the fabric.
- Sew the open end of the cover over the edge.
Important! If you spread the cover on the floor, then it is convenient to pack the wool while kneeling.
Well, the blanket is almost ready. The most crucial moment comes - the stitch.
Quilting a blanket
The rope is quilted with bobbin thread (preferably cotton) No. 10 (three threads) and a thick needle 7-8 cm long with a wide eye.
Important! For strength, it is advisable to pull the thread through wax (candle) or soap.
Step-by-step instructions on how to make a sheep wool blanket at home:
- Step back 10 cm from the edge of the product (from any angle).
- Without turning or lifting the blanket, make stitches using a needle-forward stitch.
- Run stitches around the perimeter of the entire product. While working, do not tighten the stretched thread too much so that the blanket does not change its shape and size.
- Press down the corners of the unfolded blanket with a load, for example, clean cobblestones. Place smaller weights in the middle of each side of the product.
- Moving in a spiral, quilt the next rows so that the distance between the stitches is the same 10 cm. Tie the next one to the ending thread (no more than 1.5 m) so as not to interrupt the process.
- Continue quilting to the center of the quilt.
Adviсe:
- By piercing the needle through the top side of the quilt and the entire layer of contents underneath, use the end of the needle to slightly move the wool fibers toward the outside of the blanket. Only then pierce the underside of the cover. When making a stitch, bring the end of the needle to the top side of the cover for the next step. This will prevent the fleece fibers from bunching up in the center of the blanket and will ensure that all rows are even. Otherwise, a lump of fur will form in the center.
- For the finished blanket, you can sew an outer decorative cover, but if funds are limited, you can also use the original bedspread.
- After three years, the blanket must be requilted. To do this, open the cover, beat the wool and repeat all the operations again. The napkin can be renewed if it is torn.
- You should not sleep on a quilt, as in this case the hair will cake faster and will require more frequent re-quilting in the future.
- A wool blanket will last for generations; you just need to change the cover over time and add a handful or two of wool.
Important! If you are interested in the question of what can be made from an old wool blanket, then there may be several options. Old blankets can be cut into strips, glued together or sewn into elegant, unique rugs for both the hallway and children's room. They will be very warm, natural and environmentally friendly. Your children will definitely like this rug, because it is good to play on and comfortable to lie on. You can also use wool blankets to make upholstery for garden furniture, a stand for hot dishes, home shoes and many useful things for a country house.
How to sew a blanket from sheep or camel wool?
Is it possible to restore the blanket? Even if the house is thoroughly prepared for winter, it still won’t be cozy without pleasant and practical little things that will help cope with the cold. A warm quilted blanket made of wool, pleasant to the touch and warming with its warmth, can provide us with just such protection from chilly days.
Important! A long time ago, when there were no warm blankets in stores, our grandmothers themselves made simple and beautiful blankets. Any multi-colored scraps left over from sewing were used. They were selected by color and carefully sewn together. The end result was a beautiful patchwork quilt that looked like a meadow with flowers and herbs. The top and bottom sheets of such products had the same dimensions as standard blankets. Mostly animal hair was placed inside the canvases. The miracle blanket served for many years, warming in winter and cooling in summer, thanks to the properties of fur.
Making a blanket
Before you start work, you need to carefully select the materials. You can use different fabrics for the top and bottom parts. The main thing is that it combines with each other.
Features of a baby quilt. If you are making a blanket for newborns, there are some criteria to consider for this type of work:
- Temperature conditions for use. To make warm blankets for the winter, it is recommended to use wool or synthetic fibers. Cotton is suitable for a summer blanket.
- Hypoallergenic. One of the few advantages of synthetic fabric is low allergenicity. Also, according to experts, cotton and bamboo have hypoallergenic qualities, and many products are made from camel wool.
- Tactile qualities. If you are sewing a blanket from synthetic fabric, keep in mind the need to use a duvet cover. But synthetic filler is the best option. This padding makes the blanket almost weightless, and babies feel very comfortable with it.
- Ease of maintenance. The material you choose for the blanket should be hygroscopic and not lose its qualities with frequent washing.
Blanket density
To determine the appropriate density, you first need to find out what kind of blanket you are looking for: winter or very warm, light summer or all-season lightweight. The filling density is often indicated on the blanket's label. If we are talking about most natural fillers: wool, silk, cotton, bamboo, then from it you can easily determine which season the blanket belongs to.
- 150 - 220 g/sq.m is a low density, which indicates the lightness of the blanket. This density is suitable for hot summer or warm spring/autumn.
- 280-300 gsm are blankets that are suitable for all seasons except the hottest summer nights.
- 420 g/sq.m are the warmest blankets for cold winters and people who often freeze.
When choosing a blanket, many people choose medium density: if it gets cold, you can also lay a blanket. And in the heat you can sleep without a blanket. Thus, the all-season blanket is the most versatile.
Let's start sewing
We offer a detailed master class on how to sew a quilt using patchwork technology. The technique is not complicated and is suitable for beginners. After this lesson there will be no questions left about how to make such a bedspread.
Before you start working, it is best to make a sketch of the future blanket. The drawing should be schematic.
For sewing you will need:
- Template for squares (in MK the Lego constructor was used);
- Fabric for the top of the blanket: 32 squares of 4 colors with a side length of 19 cm (in MK these are squares of green, red, blue and orange);
- 7 squares with a side length of 38 cm;
- 4 strips of plain fabric 20 cm wide (2-2.20 m long, and 2-1.4 m long).
Step 1. Decide on the desired dimensions of the blanket. In MK, the blanket is sewn in quite large sizes, so if you want to make a baby blanket, just use all the materials in a shorter length.
Step 2. Decide on the material to work with.
Step 3. From the selected fabric, make blanks of the required sizes.
Step 4: Sew appliques onto the squares (if you chose this quilt design).
Step 5: Now sew the large 4-piece squares together.
Carefully iron the sewn squares:
Step 6. Lay out the finished squares. Take a look at a preliminary version of your future blanket.
Step 7. Sew all parts of the blanket top together.
Step 8. Now let's start assembling the blanket. Place the base fabric right side down.
The blanket is almost ready, all that remains is to sew it.
Step 9. Pin the layers together and stitch along the seam lines.
Step 10. The edges can be finished using braid, or you can simply turn the front and back fabric over and stitch them together. For greater confidence in integrity, leave two lines.
Step 11: Your quilt is ready!
Another blanket using the same technique.
As you can see, making such a blanket is not at all difficult, and the result will delight you for many years. This blanket is a great option for a gift.
Preliminary work
Dimensions
First you need to decide on the dimensions of the finished product so that the blanket fits into standard duvet covers without any problems.
- The size of a single blanket is 160x205 cm;
- one and a half - 145x205 cm;
- double - 175x205 cm;
- European standard - 200x220 cm.
Wool consumption
- A small children's product requires approximately 1.5–2 kg of natural sheep wool;
- one and a half - 2–2.5 kg;
- double and euro - 3–3.5 kg.
Based on the figures given, you need to buy fabric for the cover of the required size + 10 cm for seams, as well as wool, from a sewing store.
What you need
Before you start, you need to prepare everything you need. The list of materials and available tools is presented:
- natural combed sheep wool;
- thin fabric for the cover;
- sewing machine;
- scissors;
- centimeter;
- needles with a wide eye;
- threads that match the color of the fabric;
- special crayons, dry soap;
- with pins.
To make a sheep blanket from natural filling, you need to take teak, thick cotton or linen. The material must be natural. Fulfilling the conditions will help the product become dense, not allow individual hairs to pass through, and breathable - the internal filler is not treated with chemicals and requires a constant supply of oxygen.
How to prepare wool
You can buy six already prepared for work. But if you have untreated fleece, then you need to soak it in a bathtub in warm water for several hours . When dirty, drain the water and add new water.
IMPORTANT! Do not use synthetic detergents for soaking; they can weigh down your hair.
After 1-2 days you need to wash and dry well. The fleece should be hung vertically on ropes. The best time to wash wool is on sunny summer days, so that the wool can dry naturally outside. If this is not possible, then place it in a dry and well-ventilated area.
After this, the fleece must be thoroughly beaten so that it does not lie in lumps . This is very hard and dusty work, so it is better to ask a man for help.
REFERENCE! After washing, the finished material will lose approximately half its weight.
Step-by-step description of production
How to sew a sheep wool blanket with your own hands: professionals recommend performing the steps step by step:
Preliminary preparation
Untreated sheep fleece is soaked in water (30 degrees) in advance, the contaminated liquid is replaced with a new one, and the old one is drained. When cleaning, do not use synthetic detergents: powders are difficult to rinse out and weigh down hairs.
The wool is laid out in an even layer, without empty or overfilled areas, from the edge to the center.
After two days, the material is dried well on ropes and hung vertically. To wash wool, choose sunny, warm weather or send the fleece to a dry, ventilated room. The dry material is whipped evenly, which allows you to get rid of dense lumps. The uniformity check is carried out with your own hands, by feeling each suspicious place. When the procedures are completed, the coat will lose half of its initial weight and needs to be combed.
Making a cover
The fabric is cut according to the pre-selected size, with an additional margin of about 10 cm for seams and stitching. The procedure is performed in stages:
- We attach the free edges of the material with pins or sew them by hand;
- a hole is left on one side for threading wool;
- stitching on a sewing machine.
How to make a blanket
When the cover for our product has already been sewn and the wool is ready, you can proceed directly to sewing. To begin, choose a surface to work on . This could be a clean floor without carpet in a large and spacious room. Or you can move several wide tables together. The main thing is that the blanket fits entirely on the surface and there are no hanging edges.
Filling the case
- Turn the cover inside out and lay it out on the work surface.
- Let's start laying out the wool. Start from the edges, slowly spiraling towards the center .
ADVICE! Distribute the fur evenly so that there are no empty or overcrowded spaces.
- Next we start turning the blanket out. This process requires extreme accuracy, so it is better to resort to the help of a few more pairs of free hands.
- Start rolling the blanket together with the laid out wool into a roll. Work your way from the solid edge towards where you left the hole . The roll should not be too tight. In the process, straighten the displaced wool, tuck in the material sticking out at the edges .
- As soon as the roll is rolled, you need to simultaneously place the ends of the cover over the roll and unwind it, as if putting it on wool . Take your time so that there are no lumps inside and the blanket is evenly filled.
- Lay out the future blanket evenly, without wrinkles or kinks . Carefully hand stitch the opening closed using an inside seam.
- Once again , carefully check the uniform distribution of the wool inside . Correct if necessary. And proceed to the next stage.
Quilting the product
- Place some weights in the center and along the edges of the blanket so that the blanket does not move around inside while working.
- Having retreated 10 centimeters from the edge, begin to sew the seam forward with the needle . Do not lift the product too much above the surface to avoid displacing the contents.
- Lay the seam in a spiral, retreating 10 cm from the edge and the previous seam . Work from the edges to the center. If the thread runs out, tie the next one to it with a double knot. Don't interrupt the stitch.
- Continue quilting to the center of the quilt. Tie a strong knot at the end to prevent the seam from unraveling.
Your handmade wool blanket is ready! You can give it as a gift or tuck it into a beautiful duvet cover and use it yourself.
Making a blanket
Before you start work, you need to carefully select the materials. You can use different fabrics for the top and bottom parts. The main thing is that it combines with each other.
Features of a baby quilt. If you are making a blanket for newborns, there are some criteria to consider for this type of work:
- Temperature conditions for use. To make warm blankets for the winter, it is recommended to use wool or synthetic fibers. Cotton is suitable for a summer blanket.
- Hypoallergenic. One of the few advantages of synthetic fabric is low allergenicity. Also, according to experts, cotton and bamboo have hypoallergenic qualities, and many products are made from camel wool.
- Tactile qualities. If you are sewing a blanket from synthetic fabric, keep in mind the need to use a duvet cover. But synthetic filler is the best option. This padding makes the blanket almost weightless, and babies feel very comfortable with it.
- Ease of maintenance. The material you choose for the blanket should be hygroscopic and not lose its qualities with frequent washing.
Blanket weight
Weight depends on several factors: the type of filler, its density and purpose. The heaviest fillings are cotton, cotton wool and camel hair. Despite the fact that they are warm, blankets made from these materials have a lot of weight. This creates inconvenience when washing and changing bed linen. Fillers such as sheep's wool and bamboo are widely used. They are made from natural materials and are lightweight. At the same time, it is warm and cozy underneath. However, if you are looking for the easiest blanket to use, then you can opt for silk or synthetic. Both materials are lightweight and hypoallergenic. However, silk will cost more, while synthetics are the cheapest filler. Accordingly, thick blankets designed for winter will be heavier than all-season blankets, and summer blankets remain the lightest.
Let's start sewing
We offer a detailed master class on how to sew a quilt using patchwork technology. The technique is not complicated and is suitable for beginners. After this lesson there will be no questions left about how to make such a bedspread.
Before you start working, it is best to make a sketch of the future blanket. The drawing should be schematic.
For sewing you will need:
- Template for squares (in MK the Lego constructor was used);
- Fabric for the top of the blanket: 32 squares of 4 colors with a side length of 19 cm (in MK these are squares of green, red, blue and orange);
- 7 squares with a side length of 38 cm;
- 4 strips of plain fabric 20 cm wide (2-2.20 m long, and 2-1.4 m long).
Step 1. Decide on the desired dimensions of the blanket. In MK, the blanket is sewn in quite large sizes, so if you want to make a baby blanket, just use all the materials in a shorter length.
Step 2. Decide on the material to work with.
Step 3. From the selected fabric, make blanks of the required sizes.
Step 4: Sew appliques onto the squares (if you chose this quilt design).
Step 5: Now sew the large 4-piece squares together.
Carefully iron the sewn squares:
Step 6. Lay out the finished squares. Take a look at a preliminary version of your future blanket.
Step 7. Sew all parts of the blanket top together.
Step 8. Now let's start assembling the blanket. Place the base fabric right side down.
The blanket is almost ready, all that remains is to sew it.
Step 9. Pin the layers together and stitch along the seam lines.
Step 10. The edges can be finished using braid, or you can simply turn the front and back fabric over and stitch them together. For greater confidence in integrity, leave two lines.
Step 11: Your quilt is ready!
Another blanket using the same technique.
As you can see, making such a blanket is not at all difficult, and the result will delight you for many years. This blanket is a great option for a gift.