The most expressive part of the toy is the eyes; they reflect the character of the product. For a doll, they are like a reflection of the soul. Not every craftsman will think about the fact that you can make them yourself and crochet the eyes of a doll. Most people prefer to resort to alternative methods, such as purchasing glass, plastic or plaster accessories. The eyes of a knitted doll should be harmoniously combined with the product and be of the same material as the doll itself. Therefore, this method is relevant for crocheted toys.
Knitted eyes
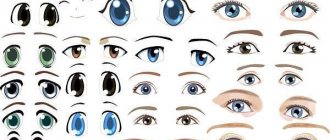
Types and shapes of eyes for dolls
The eyes can be made in any shape as your imagination allows. They can be round or oval. You can also find voluminous and embroidered eyes on the doll itself.
Their appearance depends on the very idea of the toy; the eyelid may be half-closed or completely absent; in rare cases, the doll is made to sleep.
Volumetric embroidery
The color of the iris is also matched to the color of the toy; blue or brown are more often used.
On a note! Particular attention should be paid to knitting; if the toy is made using a hook, then the eyes should be denser. When the doll’s body is made with loose knitting, then the eyes can be made more “openworked”.
Eyes embroidered directly on the face
How to sew eyes on legs and eyelashes to various toys
Of course, this is not news for many, many have their own methods and methods, I will just show you my way of sewing eyes with eyelashes on toys. I do this at the request of friends. I have a lot of photographs - I literally took pictures of every action. The entire process of sewing and decorating the eyes will take 10-15 minutes.
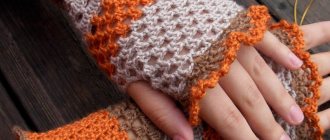
Tools, eyes on the stem (here 4mm), eyelashes, glue.
Step 1. Cut off approximately 8mm from the strip of eyelashes. Divide in half - you get eyelashes for 2 eyes. I glue my eyelashes with Super Moment glue, I apply it to the strip base with a toothpick, literally a small drop at a time. I don’t mark the location of the eyes, but I glue the eyelashes at the same distance from the middle seam! I glue them immediately after applying the glue: first I apply it so that the glue adheres to the plush fur, and then I press it on top with a toothpick (the side without glue).
Step 2: I thread a needle with a thread of the same shade as the body of the toy. In this case, white. I always sew the eyes in one thread. I start working from the back of the toy’s head - I secure a knot anywhere there, and bring the needle itself to the middle seam (see photo).
Step 3: Next, I make a stitch of approximately 2 mm in the middle seam (to additionally secure the thread) and bring the needle to the place where the right eye is attached (you can do the left one), almost right under the eyelashes.
Step 4: I thread an eye on the thread, insert the needle 1-2 mm from the thread, and bring the needle out at the place where the left eye is attached. I tighten the thread, but do not tighten it tightly.
Photo in continuation to Step 4.
Step 5: I thread the left eye through the thread, I also insert the thread 1-2 mm in and bring it out under the stem of the right eye (see photo)
Step 6: Repeat step 4 and step 5 2 more times, i.e. As a result, the eyes will be stitched with triple thread.
Photo for step 6.
Step 7: When the eyes are sewn and stitched 3 times, the thread needs to be tightened, the eyes will fit more tightly (you can see it in this photo). After the third stitching, I bring the needle and thread under the stem of the left eye.
Step 8: Fastening the thread: I insert the needle 1-2 mm from the thread, and again bring it out into the middle seam.
In the middle seam I make a 2mm stitch and bring the needle out near the place on the back of the head where the knot remains.
In this photo you can see 2 threads: a short one with a knot and a long one, which was used to sew on the eyes. I use scissors to cut both close to the body; before doing this, you can tighten both threads a little. After cutting, the ends of the threads will disappear into the body.
This is how my big-eyed bunny turned out. Good luck sewing on the eyes to everyone, I hope that my method will help someone. If you have any questions, write, I will try to answer.
www.livemaster.ru
Necessary materials
First, you need to decide which eyes and which doll should be knitted with them. The number of colors and whether a hook or knitting needles will be used depends on this.
The most basic thing that should be on the master’s table is:
- yarn (white for the protein, black for the pupil, and the chosen color for the color of the iris);
- scissors;
- hook or knitting needles.
Knitting materials
How to crochet a tiger cub
by @vikusivashok
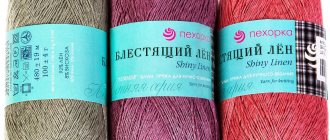
Any yarn of medium thickness is suitable for knitting amigurumi toys; in this case, Alize Cotton Gold threads and a little YarnArt Jeans for the face were used. We select the hook according to their thickness.
And they called this cute creature Toffee.
The stripes can be embroidered or knitted in single crochets under the legs.
We fasten the legs to the body between 9 and 10 rows at a distance of 12 columns from the center.
We seat the toy and sew on the parts so that the tiger cub sits steadily on its four legs.
Between the 12th and 14th rows we glue the eyes, 5 columns to the sides. If desired, you can make tightening.
We fold the parts inside out and knit 18sc in a circle.
We sew the muzzle to the head and make sure that its upper part is in the same row as the lower line of the eyes.
We glue or embroider the nose, make a drawstring to the very bottom of the part. Our toy is ready!
Eye expression
Sometimes it’s hard to imagine how to make eyes for a knitted doll and at the same time give her a special expression. A lot depends not only on the shape of the eye, but also on the knitted highlight inside the iris and the eyebrow above the eye itself.
You might be interested in why slime breaks, how to make it stretchy
A round eye without an upper eyelid will give the toy surprise or fear; if the eyebrows are a house, it will look very cute and naive.
A squinted eyelid with dropped eyebrows towards the nose will show an angry or dissatisfied emotion. Closed eyes with raised eyebrows will give the feeling that the toy is having pleasant dreams. It all depends on the imagination of the master himself.
Doll's emotions
Geometric shapes - crocheted oval. Oval patterns and knitting descriptions
The other day we crocheted a circle, today we will figure out how to crochet an oval... In short, we continue the theme of crocheted geometric shapes...
First, let's think about what a crocheted oval can be used for...
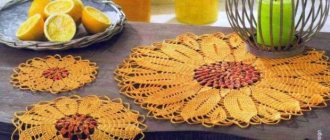
The most common use of ovals in knitting is, of course, shoe soles... be it booties or house slippers
Napkins or rugs can be oval. Also, the bottom of handbags and cosmetic bags may well be oval.
In addition to all of the above, ovals are often found in knitting toys. Dolls have the same soles of their feet. Animal toys have ears. Both types of toys may have oval noses and eyes.
In short, the range of applications of this geometric figure in knitting is quite wide...
Crochet oval
What is an oval?
Yes, essentially this is an elongated circle...
And we already know how to knit a circle.
Theoretically, to understand how to crochet an oval, we just need to divide the circle in half and add a piece of straight knitted fabric in the middle
What we will do...
- divide the circle in half
- and insert a straight sheet in the middle... just for clarity
this is the principle of constructing a pattern for crocheting an oval...
Crochet oval - diagram
Description of crocheting an oval with double crochets
Knit a chain of 15 VP + 3 lifting loops. And then we knit around this chain
1 row - in the fifteenth loop of the chain 3Dc, 13 Dc, in the first loop of the chain 7 Dc, 13 Dc, 3Dc in the last loop, SS in the 3rd lifting loop;
2nd row – 3 VP for lifting, 1 DC in the same place where the lifting loops were knitted, then increase 3 times (two DC from one loop), 13 DC, 7 increases, 13 DC, 3 increases, SS in the 3rd lifting loop;
3rd row - 3 VP for lifting, 1 dc in the same place where the lifting loops were knitted, then 3 times * 1 dc, increase *, 13 dc, * 1 dc, increase * 7 times, 13 dc, 3 times * 1 dc, increase *, in the last loop, dc, ss
Further…
It is quite obvious that you can crochet an oval using any stitches. Be it single crochets, half crochets or double crochets.
What is the difference between knitting ovals when using different types of stitches?
But there is no fundamental difference... there is only a technical one
Each type of column has its own height. Therefore, the number of columns of the first row in a circle of connected RLS, PSB and SSN will differ (fewer single crochets are typed into the initial loop than half-columns or double crochets).
And since an oval is a derivative of a circle, therefore, this rule also applies to an oval.
For example, compare:
Crochet oval pattern with single crochets
There are three single crochets in the outer loops of the chain.
Crochet oval pattern with double crochets
There are five double crochets in the outer loops of the chain.
In general, there are certain recommendations in this regard.
- for double crochets - 6
- for half double crochets - 4
- for single crochets - 3
Of course you can use them.
But do not forget that the number of columns depends not only on the type of columns...
The number of stitches in the outer loops of the chain for rounding also directly depends on the thickness of the yarn you choose - the thinner the yarn, the more stitches you need to make. This is especially true for double crochets...
How to crochet an uneven oval
An uneven oval, for example, for a sole, is obtained by alternating stitches with different heights (double crochet and half crochet or single crochet). The knitting principle is the same - only the type of stitches changes when knitting an oval...
For a diagram of such an oval and a description of knitting for it, see the article Booties
Learn with us!
And don't forget to leave your comment. Your opinion is important to me!
If you liked the article, then share this information with your friends by clicking the social network buttons! Just a huge request! - do not copy the entire material, please use social network buttons or make announcements (reviews) of articles with the obligatory indication of an active link to the source https://tvorlen.ru/ If you have any questions, ask! Do not be shy! I will help with all I can