Knitting bows of different shapes and sizes is quite simple. Any beginning knitter can master these simple patterns.
Knitted bow
Bows are a universal accessory for children and adults.
They are worn as hairpins, ties, or simply as elements of an outfit. And in this master class we will knit a voluminous bow with knitting needles. It knits very quickly and easily. We will tie a beautiful two-color bow. To knit a bow we will need:
- Yellow and lilac yarn;
- Knitting needles;
- Needle.
The bow will be striped.
The main color is lilac, and we also need a little yellow for the stripes. We begin to knit the main element of the bow. And for this we take lilac yarn. We put twenty stitches on the knitting needles and knit our first row. We knit all the loops in it. Then we move on to the second row. And in it we also knit all the loops with facial stitches. That is, we will knit the fabric for the bow using garter stitch. In total, you need to knit twelve rows with lilac yarn. Next, change the thread to yellow. But there is no need to break off the lilac one, since we will still be alternating colors in knitting. We will knit only two rows of yellow yarn. And again we will change the thread to a lilac one. We will also not break the yellow thread. And then we will knit twelve rows again with lilac yarn. Then we knit two rows of yellow. And so we will alternate eight more times. That is, we should have eleven yellow stripes and twelve lilac stripes. We will get a small striped scarf. We fold it in half so that the wrong side is on top and the front side is inside. And we sew it with a needle along the short edge. As if making a snood out of our scarf. You can also sew it not with a needle, but with a single crochet hook. Whichever is more convenient for you. We turn the resulting snood inside out and knit the next piece. It will be completely lilac in color. We cast on ten loops on the knitting needles. And we knit another twenty-eight rows in garter stitch. We need this part to bridge the middle of our main part of the bow. We take our snood and flatten the middle of it a little. You can even walk with a needle and thread. But this is not necessary, since the jumper will hold the middle of the bow well. Cover the middle with a lilac detail. And we sew it at the back. This can also be done with a needle or crochet. The seam will be at the back and therefore will not be visible. Moreover, it will be quite small. This is the bow we made using knitting needles! It can be used as a hairpin if you attach accessories or as a bow tie if you sew on an elastic band. Don't forget to share the link with your friends Tags:
knitted bow bow
Similar knitting and crochet patterns
Add a comment
www.homyak55.ru
Experience of needlewomen
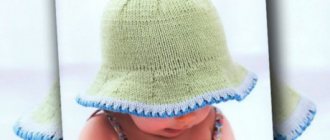
Such bows look good both on the top of a doll’s head and on a living girl - this is a good addition to a knitted hat. I prefer to use plain yarn. It’s easier for me, because I don’t confuse the rows and don’t make mistakes in the number of loops.
Svetlana Tsepaeva
A small bow is not the best choice for a beginner. At first I thought it would be easier if I shortened the diagram proportionally. As it turned out, this was a mistake. If you are not good at knitting, then strictly follow the ready-made master classes and do not make any changes to them.
Valeria Byzova
If you need knitted bows or hats, and you want to make them yourself, then immediately buy all the necessary materials. This is very inconvenient when you have to buy something in the middle of the process.
Anastasia Petrova
I give cute little bows to my little girls. I don’t spend a lot of time on this because they are easy to knit. By the way, using a crochet hook is easier than using knitting needles.
Alexandra Kuznetsova
I prefer crocheting to knitting.
I'm not good at crafts, but this is an easier pattern. But the bows turn out very beautiful. I use them to decorate my dolls. I knit all the clothes for them, so they are beautiful. Victoria Kazantseva
Knitting with beads (knitting needles)
Knitting jewelry with knitting needles is not the most common area of application for this handicraft technique. And knitting with beads is an almost forgotten art. We invite you to revive the tradition of knitting with beads, master this wonderful type of needlework, and at the same time make a simple but cute bow - a brooch for a girl.
The whole highlight of this decoration is in specially selected yarn, thin and fleecy, using thick knitting needles and transparent beads resembling dew drops with a colored line. You don’t need any special skills other than the ability to knit knit and purl stitches on knitting needles to create this decoration.
But having mastered the technique of knitting with beads, you will be able to create amazingly beautiful jewelry, from jewelry to all kinds of phone cases, handbags and clothes.
Returning to our master class, in which we invite you to tie a bow, such an unusual decoration will delight any girl and gracefully decorate her hat, jacket or backpack.
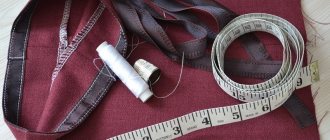
To knit with beads you will need the following materials and tools:
1. Yarn. Since we will use beads, we need thin yarn. We used Nako Mohair Delicate thread, its meter is 500 meters per 100 grams.
2. Knitting needles. Even though the thread is thin, mohair can be knitted with knitting needles whose number is quite large and does not seem to match the thin thread. However, the fabric, knitted from mohair with thick knitting needles, looks voluminous and airy, which is stylistically suitable for our bow. We used knitting needles No. 3.5.
3. Beads. The choice depends on the size of the bead hole. It is necessary that the thread you choose can pass through it freely.
4. Needle. A regular sewing needle will do, provided that the size of the eyelet allows the yarn to pass through it, and the needle itself should pass freely through the hole in the beads.
5. Needle threader. To make it easier to thread our needle.
6. Knitting needle. It is necessary for sewing our bow.
7. Scissors.
Knitting a bow with knitting needles with beads: job description
We cast on 24 loops on the knitting needles.
We knit 25 rows in stockinette stitch
We break the working thread and, using a needle threader, thread its tip into the eye of the sewing needle.
Using a needle, string the beads onto a thread going to a skein of yarn. The amount of beads needed depends on the pattern you plan to knit using beads. For our idea we will need 80 pieces. And it’s okay if you don’t have enough beads strung, you can break the thread again and string more beads. The ends of the thread are hidden at the end of the work.
Now we again attach the thread with beads to our knitting and continue to knit with stockinette stitch, only now, following the intended pattern, we need to knit beads into the fabric. We decided to knit beads every 2 loops.
So, we just knit the first 2 loops with knit stitches without beads. Now we bring one bead to the next loop.
And we also knit it through this loop.
In this case, the bead must be held so that it does not “go” to the wrong side of the product.
We continue to knit further, alternating 2 loops usually, 1 loop with beads, and so on until the end of the row.
In order not to make our bow too heavy, we decided to knit beads infrequently, so we knit the next 3 rows in stockinette stitch without beads. In the next row we knit beads again, but with a shift in one loop, that is, at the beginning of the row we knit not 2, but 3 loops with stockinette stitch, and then we continue alternating through 2 loops until the end of the row.
In this way we knit 5 rows with beads, between which there are 3 rows of stockinette stitch. Our rows of beads form the front side of the bow.
Next we knit 16 rows of stockinette stitch without beads. This will be the central part of our bow.
Then - again 1 row with beads and 3 rows of stockinette stitch (repeat 5 times).
And we finish by knitting again 25 rows of stockinette stitch, which form the back of the bow.
We close all the loops. We cut off the thread, leaving the tip longer, as it will be useful for sewing the accessory.
That's it, the main part of the bow is ready.
Turn it over with the wrong side up and fold it like this.
This is what it looks like from the front.
Thread the remaining tip of the thread into a knitting needle and stitch the needle forward, stitching the bow blank in the center.
This is what our knitted bow looks like from the front side now.
We use this thread to tighten our future bow and wrap it around the seam. Using a needle, firmly fasten the thread from the wrong side. Our bow is almost ready.
All that remains is to design its middle. To do this, knit a strip of 7 loops 7 cm long.
We wrap it around the central part of the bow, sewing the ends on the back side.
The bow is ready.
By varying the number of loops, rows and patterns, you can knit a lot of different things with knitting needles and beads.
Now you should sew a base to the bow - for example, a hair elastic. But we took the basis for the brooch.
Now our bow is removable, and you can fasten it wherever you want. As you can see, knitting with beads is an easy, fun and productive activity.
I wish you creative success!
Marina Vyachkileva (MarinaV) especially for the site Handicraft Master Classes
www.supermasterclass.ru
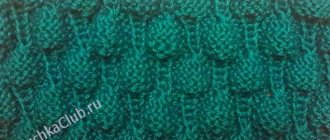
Knitting Basics
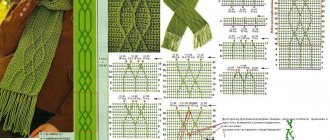
The pattern is knitted with knitting needles and is quite simple; you need to follow the gradual description, and the work will delight you with its result. The number of loops must be a multiple of 10 + 4.
For example, take 24 loops and add 2 edge loops, and continue knitting according to the following pattern.
According to the pattern, we do not knit the first 5 loops of the front row, but simply remove them to another loop. We turn the working thread to the front of the knitting, in front of the removed loops, so we leave it without tightening it.
We knit 9 rows as shown in the diagram. This is what we get.
We knit the 10th row with the wrong side - using the right knitting needle we collect 5 threads and transfer them to the left knitting needle.
Then we knit all the threads together with the purl. loop.
This, in fact, is how “butterflies” are tied.
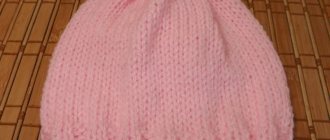
Preliminary information about the dressing
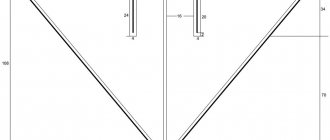
Finished product dimensions
The bandage itself is 46.5 cm long, 15.5 cm wide (i.e., height). The bow is 19 cm long, 15.5 cm wide. Jumper: 11×4 cm.
Brief job description
First we knit the bandage strip, then we sew the two ends together. Then, we will separately knit a strip for the bow and a very small, narrow one for the jumper. Finally, we place a bow on the bandage in the place where the seam is and tie it with a jumper. And we sew it together.
Pros and cons of such bandages
Like any thing, such a bandage has its “+” and “-”.
On the positive side:
Firstly, it is very warm and textured. Secondly, it is easily transformed. Many people like turban headbands. And in this case, that’s exactly what happens if you take out the “bow”. Thirdly, it is universal in size. It looks great on OG 54-57 if you put it on like a cap. That is, garter stitch in this case acts as an “elastic band”, which gives elasticity and allows the product to stretch when put on. Fourth, the stitching area remains under the bow, so you don't have to worry about how the seam will look. Fifthly, it is not difficult to make calculations for such a dressing, especially when there is a ready-made option. Let's say that now I already know how I will calculate for smaller sizes when new orders for such a bandage arrive. If you still find it difficult, ask in the comments, we’ll try to figure it out together.
The disadvantages include that:
- It takes a very long time to dry. I washed the bandage by hand in the evening (around seven o'clock). I dried it in a dryer, in a horizontal position, but did not put any fabric under it. So, the bow dried quickly, and the bandage itself took almost two days. I would like to draw your attention to this immediately. Although it is possible that after machine washing this will happen faster.
- The yarn is slightly dyed. Therefore, if you choose the same one, I recommend washing it separately from light-colored items.
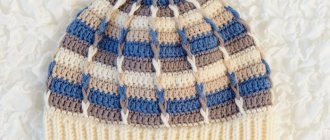
Flat crochet bow with contrasting border
This master class will show how easy it is to knit bright flat decor. They are convenient for decorating absolutely all knitted items.
What we need to prepare:
- leftover yarn of 2 any colors, preferably contrasting ones (for example, light green and lilac);
- hook with the corresponding number;
- needle for sewing knitted items;
- scissors.
Using a light green thread, we cast on a chain of 16 chain stitches, after which, starting from the second loop, we knit 15 single crochets. Next, we make 1 lifting loop, unfold the knitting and perform another 15 single crochets. Thus, you need to knit 8 more rows.
We cut the lime thread and hide the tip. Now we attach the lilac thread and perform the tying with single crochets. It should look like this.
Let's move on to knitting the jumper. We take a lilac thread, cast on 5 air loops and knit with single crochets by analogy with the main fabric. After the 8th row we finish the work. Leave small tails on both sides (beginning and end of knitting).
We tighten the center of the bow with thread to make it easier to attach the jumper
We wrap the middle of the bow with a jumper and, using the left tails, sew it on the back side of the product.
Master class on how to crochet a bow
A simple knitted bow is what needlewomen who are just starting to knit need. Without much time or labor, you can create a cute decor for your favorite clothes with your own hands.
We prepare, traditionally, the remains of yarn and a suitable hook. We make a ring from the thread, and then we collect 6 air loops
We make 6 double crochets into the ring, then knit 5 chain stitches and connect the chain to the ring.
Next, we again cast on 5 air loops, perform 6 stitches with 3 double crochets, after which we finish the work with 5 chain loops with a connecting stitch in a ring.
Scheme of decorative decoration
We cut off the thread, but leave the end longer. Carefully wrap it around the middle and hide the tip inside. The bow is ready.
Master class crochet bow with a flower in the center
A delicate openwork bow that will make any openwork item elegant.
To make it we will need:
- Yam Art Lily cotton yarn in white and pink colors;
- hook No. 1.5
Take a white thread and cast on 80 air loops. We close the chain into a ring and then knit it with arches according to the diagram
We perform the last arch differently - instead of four, there are two chain loops and a double crochet. We continue to knit the second row, as the diagram above shows.
We tie the product with pink thread according to the following diagram
Let's move on to knitting the jumper. To do this, use a white thread to cast on 4 chain stitches and knit with double crochets.
We connect it into a ring and place it in the middle of the canvas so that it turns out to be a bow.
Flower. The middle is done in white. We collect a chain of 5 air loops, close it into a ring, after which we knit 3 double crochets with one vertex, two air loops, etc. according to the diagram drawing
We make the petals with pink thread using this pattern
Sew the finished flower to the middle of the bow.