Lining is not always used when sewing clothes, but for many styles of trousers it is necessary. This is especially true for models made of light, translucent fabrics . Many people accept the need to use a base layer for aesthetic purposes: to reduce the sheerness of the fabric. And yet they consider its use in other options to be unnecessary. Let's figure out why this is not true?
Which trousers are lined?
First of all, let's look at which models require the use of additional fabric and which do not.
- For classic trousers, this is a necessary detail. It is performed either in full or only in the front part.
- Women's summer models made of thin, translucent fabrics . In them, the lower fabric plays a protective aesthetic function.
Important! In women's models, an additional detail sometimes helps to slightly correct the figure and hide imperfections. Especially if the owner has curvaceous figures.
Unlined trousers
- For sweatpants, this element is most often not used.
- An additional layer of fabric is not used when sewing jeans.
Sewing trousers
General recommendations:
- Process all open cuts using an overlocker.
- All sewing operations should be accompanied by wet-heat treatment.
We give a brief sequence of processing trousers. A more detailed description can be easily found in specialized literature or in video master classes.
- After cutting, strengthen the parts of the waistband, back pocket facings and hem with adhesive padding.
- Place a narrow adhesive edge along the opening of the pocket on the front half to prevent stretching during wear.
- Finish the bottom edges of the lining of the front halves of the trousers using an overlocker or a hem stitch.
- Fold the parts of the front halves from the main fabric and the parts of the front halves from the lining back to back and pin together. Process the side and step cuts on the overlocker and then process them as one piece.
- Process the cut-off pockets on the front halves of the trousers.
- Process darts on the back halves of the trousers. Don't forget about wet-heat treatment.
- Finish the welt pockets into a frame on the back halves of the trousers.
- Stitch the side seams of the front and back halves of the trousers.
- Stitch the front and back halves of the trousers.
- Stitch the middle sections of the back halves of the trousers and the front ones until the fastener.
- Process the slope.
- Process the fastener.
- Process the belt loops and secure them, following the reference marks. Secure the rear central belt loop after processing the belt.
- Finish the belt, secure the belt loops and sew the belt loop on the middle seam of the belt.
- Hem the bottom of the trousers.
- Finish the loops and sew buttons on the waistband and back pockets.
The pants are ready!
You can create a pattern for men's trousers according to individual measurements using our step-by-step instructions for creating a pattern. It will take a little more time, but it will be an exact pattern for a specific person.
If you want to be the first to know about new publications, subscribe to our newsletter
Trouser lining options
Now let's figure out what the bottom layer of material on the pants could be.
Fabric requirements
The fabric to create this element must meet several requirements.
- Be smooth enough to glide over the skin with ease: satin, viscose
. - Hygroscopic and hygienic.
- Color matches the main shade.
- Abrasion resistance.
Attention! For summer models, the most suitable material is silk.
Kinds
Depending on its design and location on the trouser leg, the lining is divided into the following types.
- Full - performed on both sides and completely duplicates the upper part.
- On the front half . This option is sewn to strengthen the front of the trouser legs along the entire length.
- Pocket . This type is knee or mid-thigh length. Most often this type is used for female models.
LiveInternetLiveInternet
Master class on sewing trousers that are comfortable to wear in winter, because... Lining on the front and back provides additional protection from the cold. Using this technology, you can process trousers of any shape: classic, straight along the entire length, tapered at the bottom, with pleats at the waist, etc. The main feature is to plan the fastener on the side, like on a skirt.
For trousers, choose a thick fabric, suiting, preferably wool. For lining - any lining fabric. So, you have cut out your trousers (for example, using a pattern from a magazine): you have 2 front halves, 2 back halves and a waistband. Duplicate the belt immediately. Baste and try on the trousers, make changes to the details of the cut, so that later you can wear only ready-made ones. Place cuts (or chalk marks) at knee level on each piece to make it easier to connect them. Then proceed as follows. 1. Photo 01. Fold the front halves exactly in half with the right sides facing inward and iron the arrows. If you decide to make trousers without creases, skip this step. 2. Photo 02. On the back halves, use an iron to pull the seam sections of the seat in the direction from the waist to the corner, and at the same time pull the sections of the internal seams from the corner to knee level. This operation will allow you to get a good fit around the buttocks with finished trousers. Allow the parts to cool. 3. Photo 03. Now cut the lining. Place the front and back halves of the trousers on the lining fabric, carefully observing the direction of the grain thread
.
4. Photo 04. The lining should end at least 20cm below the knee level marks.
5. Photo 05. Carefully trace the details. Since trouser parts are used to cut the lining, seam allowances are not needed. 6. Photo 06. Remove the trouser parts from the lining fabric and cut out the lining. Photo 07. Overcast all parts of the trousers along all sections except the top one. Photo 08. Stitch the darts. Sew the side and inside seams on the right and left legs of the trousers. Photo 09. Iron the darts. Press the seams. Press the hem allowance immediately. Stitch the hem.
Photo 10. Turn the pant leg right side out. Iron the front frog again and immediately iron the back frog (from below to about knee level). If you are making trousers without creases, skip this step. Photo 11. Do the same with the second leg, do not forget that there will be a zipper in the left side seam. Photo 12 and Photo 13. Sew a hidden zipper into the left side seam using a special foot.
Photo 14. Gently iron the sewn-in zipper. Photo 15. Turn one leg right side out, the other leg inside out. Place one leg inside the other, right sides facing in. Photo 16. Pin the middle seam and sew it with a reinforced stitch. If your machine does not do reinforced stitching (three-pass), then simply stitch this seam twice. Press the seam “on the edge” without removing one leg from the other.
Photo 17. Now turn the trousers right side out and press the beginning of the seam at the front and back to a height of approximately 10cm. The rest of the middle seam should remain ironed edgewise. Photo 18. Sew the creases on the front halves of the trousers, placing the stitching directly to the edge. This way you will secure the position of the arrow, and it will not move anywhere during the use of the trousers. Photo 19. Fold the trousers along the creases and press the front creases again. Now you can iron the back arrows above the knee (without bringing them to the waist by 10-15cm). If you are making trousers without creases, skip steps 17-18.
Photo 20. Now let's prepare the lining. Overcast the bottom of the lining with the thinnest and most flexible stitch that your overlocker uses, so that it does not print when ironing. Photo 21: Stitch and overcast the inside seams of the lining legs together. Stitch the darts. It is better to press the side seams. Don't forget that there is a zipper in the left side seam of the trousers. Photo 22. Place one leg of the lining into the other, with the right sides facing in, and sew the middle seam, stitching the edges together. Press the seam.
Photo 23. You have prepared the trousers and lining for joining. Thus, you have the trousers themselves, a lining in the form of cropped trousers, a belt and hangers (any thin braid, 3 pieces of 15-20cm each). Photo 24. Sew one of the sections of the belt to the top section of the trousers, folding the belt and trousers with right sides facing each other. Photo 25. Sew the second section of the belt to the lining, also face to face. Make sure that the middle and side seams of the trousers and the lining match. Hangers need to be sewn into this seam: 2 at the level of the front arrows and 1 at the level of the middle seam at the back. If you are making trousers without creases, then you just need to sew 2 hangers at the level of the side seams.
Photo 26. Overcast the seam of attaching the belt to the lining. Photo 27. Iron the seam of the waistband to the trousers onto the waistband, and the seam of the waistband to the lining onto the lining. Photo 28, Photo 29 and Photo 30. Turn out the ends of the belt that form the clasp cleanly and turn them inside out. Photo 31. Place the lining into the trousers and pin the corresponding waistband seams. In this case, the belt will be folded in half lengthwise. Photo 32. Sew a stitch directly into the fold of the waistband seam, this way you will connect the lining and the trousers. Photo 33 and Photo 34. Iron the waistband. Make a loop and sew on a button.
Photo 35. Sew the lining to the zipper tape by hand. Photo 36. Fold the trousers along the creases, using a long ruler, straighten the lining so that it is located close to the front creases. Photo 37. Gently iron the edges of the lining. If you are doing trousers without creases, skip steps 32-33. Pants with lining in front and back are ready! https://www.damadoma.ru
Why is a lining sewn onto trousers?
In the manufacture of any clothing, the lining performs several functions.
Practical goals
- Protects against translucence of matter.
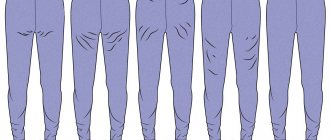
- Prevents tissue from “bubbling” in areas such as knees and buttocks.
- In the abdominal area it prevents the formation of folds .
- Reduces wrinkles.
- Facilitates the sliding of trouser legs during donning.
Reference! If the clothes are made of woolen fabric, then a lining is necessary, since this material is most susceptible to deformation and stretching.
Aesthetic goals
When designing trousers with lining, fashion designers most often pursue aesthetic goals. After all, during wear, the material in some areas is stretched more than in others . Therefore, the fabric can bulge and spoil the overall appearance. The lining relieves excess tension and allows the outer fabric to return to its original shape.
Increased comfort during use
In summer clothes, this element also helps protect the main fabric from natural dirt (sweat) . This is especially true for light-colored clothes. After all, traces of sweat will be most noticeable on it.
It also protects the skin from rubbing . After all, during movement, the fabric slides over the skin and rough seams can injure it.
Looking for matching new pants? When choosing among many models, do not forget to pay attention to the absence or presence of lining! It becomes an additional confirmation of the quality of the products.
Why is it not recommended to throw old clothes on rags?
How to choose polarized glasses?
Cutting the trousers
When cutting, don't forget to allow seam allowances!
For stitched seams, 1-1.5 cm is recommended, for facing seams 0.7-0.8 cm is enough, for hemming the bottom of the product - 4 cm
From the main fabric:
- Front half of trousers 2 parts
- Back half of trousers 2 parts
- Right side of the belt 1 piece
- Left side of the belt 1 piece
- Side of front pocket 2 parts
- Front pocket facing 2 parts
- Facing the fastener (codpiece) 1 piece
- Slope 1 piece
- Back pocket valance 2 parts
- Back welt pocket facing 4 parts
- Belt belts 5 parts (cut in one strip 45x2.5cm)
From lining fabric:
- Slope 1 piece
- Burlap with side front pocket + 2 parts
- Front pocket burlap 2 parts
- Back pocket burlap 2 pieces with fold
- Lining of the front half of the trousers 2 parts (copy from the main part)
Note: trousers can be either lined or unlined. The lining is cut according to the main pattern of the front half of the trousers. The length of the lining should be 20-25 cm shorter than the main pattern