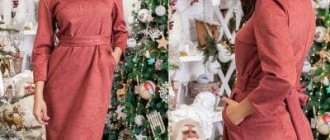
My winter began with worries about my family, or more precisely, about keeping them warm. And this primarily affected clothing—warm things. In the process of getting winter clothes, it turned out that children's winter pants for girls were already too small for us, and on the contrary, my husband's purchase in the previous season was not entirely successful and he simply did not wear his winter men's pants because they were too small for him baggy and uncomfortable.
My decision was clear - I will sew ski pants with synthetic padding for my husband with my own hands, so as not to make a mistake in the size and make the item as comfortable as possible for frosty walks. Based on the result, I can say that sewing them was not difficult, and even a beginner in sewing will be able to master this work. If you have the time and desire, you can check out my master class, and I will also leave links to free patterns for winter pants.
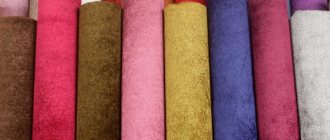
First of all, I went to a fabric store and bought the materials necessary for sewing. I will present them here in the form of a list, as well as the necessary fabric consumption for winter men's pants for a height of 180 cm and a child with a height of 128 cm. I took fabrics in blue and black, it all depends on what top you will combine with, in this In this case, I was guided by the color of winter down jackets.
Women's pajama pants: choosing fabric and preparing for work.
The offered model is made of natural cotton. For winter pajamas, you can take thin flannel; for autumn or spring, chintz is suitable.
When making underwear and sleepwear, use only natural fabric!
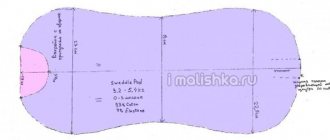
Before purchasing fabric, create a pattern in order to accurately determine the amount of fabric required. Measure the width of the legs of the front and back halves at the widest point, add them together and multiply by 2. Add another 12 cm for allowances. If the resulting figure is less than the width of the fabric, you will need to buy a piece equal to one length of the trousers plus 10 cm for the waistband and allowances, or twice as much if the width of the fabric is smaller.
For the belt you will also need an elastic band 1 cm wide and a length equal to the waist circumference minus 3 cm. To create the pattern you will need sample trousers. These can be either pajama pants or any other trousers and even shorts. The main thing is that they fit in width, and you can change the length as you wish.
When creating a pattern, keep in mind that sleepwear should always be sewn loose. Trace the sample, departing from the edge from 3 to 5 cm, depending on the model chosen for the base. If these are tight-fitting pants, step back more; if you outline pajama pants that fit you, draw an exact outline.
We will be sewing pajama pants using a French double seam, which is sometimes called a "linen" seam. The peculiarity of this seam is that it covers the sections of the fabric and completely prevents it from fraying. The French seam is used primarily on thin or sheer fabrics, but it is great for lingerie or sleepwear. If you plan to sew pajama pants from thick, warm flannel, try this stitch on a piece - it may turn out too tight. Then sew the seams in the usual way and overlock the edges with an overlocker or zigzag.
So let's get to work!
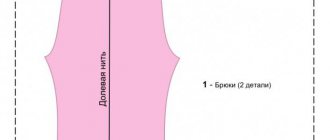
Constructing a pattern
Fold the sample in half, straightening out the crotch and center seams as much as possible. Trace the outline of the front half of the sample on paper: the curved line of the middle seam, the top and the beginning of the side seam.
Turn the trousers over to the other side, place them on another part of the sheet and draw the middle seam again, this time on the back half. It will be longer and cut more heavily inwards as shown in the pattern diagram. Make the waist line on the back part higher towards the middle by 5 cm.
Using a ruler, draw down the step lines of the legs, narrowing them slightly, as shown in the pattern diagram. Measure the required length from the waistline. Check the pattern with a centimeter. The length of the side seams of the front and back halves should match each other, as well as the length of the inseams of the front and back. The total sum of the waist widths of the front and back halves should be approximately 10-20 cm greater than the actual half-waist circumference, for subsequent cinching in the belt.
Uncover
Before cutting, the fabric must be washed and ironed. Seam allowances: 1.5 cm on the middle, side and crotch seams, 1 cm on the top and 2 cm on the bottom edge.
Option 1.
Fold the fabric in half along the grain line (edge) with right sides facing in. Cut out 1 front half and 1 back half.
Option 2.
Lay out the fabric and cut out 1 front half and 1 back half, flip the pattern over and cut out 1 front and 1 back piece again.
If the fabric has a directional pattern, all parts must be cut in the same direction of the pattern. Watch the direction of the grain thread - it should be parallel to the length of the trousers.
Also cut a 2.5cm wide strip across the entire width of the fabric for the tie belt. For the main belt, calculate the sum of the width at the waist of all 4 halves (excluding allowances). Subtract 15 cm and add 2 cm for allowances and cut a strip of this length 5 cm wide. Cut an additional piece 5 cm wide and 17 cm long.
Progress
- trouser details
- rubber
- thread, scissors, pins
Fold the back and front halves in pairs, wrong sides inward. Sew by 5 mm from the edge. Cut the allowance by 2-3 mm. Iron the seam, turn it inside out and iron again.
Sew, retreating from the edge 5-7 mm, closing the open cut of the previous seam.
Iron towards the back half. Topstitch along the right side close to the seam.
Fold each piece in half with the wrong side facing in and sew the crotch seams in the same way as the previous side seams. Don't forget to iron after each step!
Turn one pant leg right side out and insert the pant leg inside out.
Line up the middle seam and pin. Sew at a distance of 5 mm, cut off the seam allowance close to the stitching and cut in the rounded areas. Iron.
Turn the pants inside out so that the right side is now inside. Iron and topstitch 5-7 mm, covering the open edge of the previous seam.
Turn up the bottom of the legs 1 cm and iron. Fold again, iron, pin and stitch close to the fold.
Fold the large piece of the main belt and the piece 17 cm long along the short edge, right sides inward. Sew 5-7 mm, secure the thread. Leave a 1cm open section and stitch further to the end. Sew the second ends of the parts in the same way to make a ring. Don't get confused, the open area in both seams should be closer to the same edge of the waistband.
Press the seam allowances to the sides and stitch close to the seam on both sides. Fold the ring belt in half along its entire length and iron. Iron 1 cm inside the waistband from each edge.
Place the main waistband ring in front of you with the open seams facing up. Insert the top edge of the trousers into the ironed waistband to a depth of 1 cm and baste. The center of the front of the trousers should be between the seams of the waistband with open areas, and these areas themselves should be on the front side of the trousers. Sew the waistband along the bottom edge.
Insert an elastic band into one of the open seam areas in the waistband, for example using a safety pin.
Pin or baste the ends of the elastic and try on the pants to determine the length of the elastic. Sew the ends of the elastic by hand or by machine. Fully straighten the elastic band inside the waistband. Iron the belt-tie part in half along its entire length, bending each edge approximately 7 mm to the middle. Fold it in half again, covering the inside edges, and iron.
Sew along the entire length and iron. Insert the tie belt into one of the open seam sections using the same pin, pull it through the back halves in a circle to the second open section and pull it out. Straighten and tie knots at the ends.
Pajama pants with elastic are ready!
This is interesting: Pattern of pants for a boy 116-158
4) Useful tips
It's no secret that the most important part of creating any costume is the pattern. It is also the most difficult
You won't be happy with a crooked seam, but fixing it is much easier than re-cutting the entire suit if you made a mistake with the calculations.
We have prepared tips for beginners that will help you avoid serious mistakes. Remember them and make this practice automatic.
- Take measurements accurately. Understand the types of male and female figures. Watch video tutorials on how to correctly take measurements for different parts of the body. Then practice on your family members, or even animals.
- Make the pattern according to your measurements. Patterning is a labor-intensive process where you definitely can’t do something “by eye.” Specialized magazines will help a beginner to create a pattern, where there are ready-made patterns and all that remains is to transfer them to the fabric. Before starting work, you should watch video tutorials and start only with simple products.
- Learn the basic terms. You will search for sewing information, watch videos, and study magazines with patterns. Be prepared that you will have to know and use thematic vocabulary and understand the terms in advance. For example, find out how a lobe thread differs from a cross thread and why a cutting pad is needed.
- Practice straight stitching. Take the leftover fabrics and sew them together as your heart desires. Try making your own round potholders (a perfect circle is not that easy!), home textiles, clothes for toys and animals.
- Use thematic resources - get inspired, improve your skills, learn life hacks
- Find a mentor. Most often, people stop learning when the material is unclear and there is no help. Find an idol or mentor whose work you will be inspired by. Choose new ideas, experiment with patterns and outfits for yourself and your family. Don’t be afraid to write to special group blogs or ask questions under videos on topics that interest you.
Modeling
This was the basis:
These are the changes I made.
Taking into account the fact that the raincoat fabric does not stretch in any way and there is insulation, albeit quite thin, I added to the base.
- I lengthened the bottom by 3 cm so that the length reaches the floor.
- It gave a good increase in the knee so that you could bend your legs freely when walking and the pants would not slide down the back of your waist.
- I ignored the darts, the belt will have an elastic band.
- The center of the back was raised a centimeter. With thick insulation, you need to raise the entire waistline.
- My total increase in hips is 6 cm.
The thicker the insulation, the greater the increase. Approximately 6-7 mm from one and a half to a quarter girth for non-stretch raincoat fabric, the rest for insulation.
I didn't take any photos of the sewing. There are pictures of the finished pants.
To take a picture of the figure, I put them on my niece, that’s why they look so loose. She is slim by modern standards, 8 centimeters smaller than me in hip size.
What to wear with pants with elastic (tie)
To further motivate you to sew these trousers, I want to show and tell you what you can combine them with.
The most common option is tops, T-shirts and T-shirts. The main rule is a harmonious combination of fabrics. So, if you decide to sew trousers from chiffon, then it is better to wear them in the future with a chiffon top.
Options made from denser fabrics go well with items made from light knitwear - tops, cardigans. Denim jackets and shirts will also be good company.
It is better to choose low-cut shoes - ballet flats, slippers, moccasins, sneakers, sandals and sandals.
Free winter pants patterns
If you don’t have ready-made patterns, then I’ll show you one of the easy ways to get free life-size patterns. To get patterns for winter pants, I will use the old proven method that I talked about in this article.
For a sample, I took my husband's old jeans. Super precision and calculations are not needed here, I do everything “by eye”, then during the fitting process I make a little adjustment.
For those who don’t want to use grandma’s method, I’ll leave you with ready-made patterns for winter pants. You need to download the free pattern, print it and when cutting, make large seam allowances, approximately 1.5 - 2 cm.
Pattern of men's pants size 46-56 evro
Pattern of pants for girls 5-8 years old
What material is best to make summer trousers from?
Cotton dyed in blue and white stripes is an excellent material for sewing summer women's trousers.
For summer trouser models, a number of their abilities are important:
- let air through
- be light and pleasant to the body
- maintain its shape as much as possible during wear
In general, all types of fabrics can be divided into 2 categories:
- natural
- artificial
For sewing summer trousers from first category fabrics, the following are ideal:
- cotton
- linen
- silk
Along with the properties of moisture absorption and free air circulation, there is a significant “minus” - they wrinkle quickly.
From the second category you will like:
- polyester
- viscose
These fabrics retain the advantages of the previous ones and also have no disadvantages. They hold their shape perfectly and do not wrinkle.
A combined fabric option suitable for trousers for all occasions and seasons is denim.
How to sew pants, winter pants for men and children's winter pants for girls step by step
If you need to see the sewing process step by step, you can watch this master class. I sew one by one: patterns from padding polyester, then from raincoat fabric.
Everything is very simple, I only need to perform two operations on the sewing machine:
1. I connect the pants along the seat cut on the back half of the legs and the bow cut on the front.
2. I connect along a stepwise cut.
At this stage I arranged a fitting for my husband. In terms of width and volume, everything fit him, I only changed the length of the trousers. I cut off the excess along the bottom line and left 4 cm for the hem.
Important (!) I leave an allowance of 4 cm for the hem of the bottom only on the raincoat fabric; on the contrary, I cut the padding polyester 3 cm above the bottom line.
Now I connect pants made of padding polyester and raincoat fabric along the seam of the bottom of the legs. To do this, I lay them on the wrong side in the direction of each other, and each copy (insulation and cover) should lie on one side - the front or back.
3. I take each trouser leg in turn and connect it first with tailor’s pins, then using a sewing machine with a straight stitch, retreating 1 cm from the edge.
4. Then I turn the pants right side out. I fasten both layers on each trouser leg with pins and sew them with a straight stitch on the machine, retreating 1.5 cm from the edge.
Now all that remains is to sew the belt to the almost finished trousers. How I will do this, read on to my master class.
This is interesting: Pattern Fleece-lined pants
Event 2021! The AST publishing house has published a new book by Anastasia Korfiati - “Sewing Knitwear is Easy”
Dear readers! We are excited to share great news with you! The AST publishing house has published a new book by Anastasia Korfiati - a book that all sewing lovers have been waiting for with great impatience - a complete guide to cutting and sewing knitted clothes. The publication was published in two covers - a hard cover called “We sew clothes from knitwear in 2 hours” and a soft cover called “It’s easy to sew knitwear.” Despite all the difficulties and limitations that we had to face when preparing the book for publication, it’s nice to know that creativity cannot be stopped! Read more…
Sewing is an important skill in today's world.
We all want to dress stylishly and beautifully, and keep up with modern fashion trends. However, it is not always possible to buy designer clothes. And it’s not just about its cost, although this is an important factor. For most people, the main reason is that it is quite difficult to choose exclusive clothes that fit your figure. Our goal is to help you learn how to create clothing patterns, design and sew from the highest quality fabrics. If you are the lucky owner of standard shapes, congratulations! But in most cases, life is different from the catwalk. So what should smart, beautiful, confident women who do not meet the so-called “standards” do?
The right decision comes easily and simply - you need to learn how to sew clothes yourself! Firstly, at Anastasia Korfiati’s Sewing School you can do this in an on-line format absolutely free, and secondly, it’s not as difficult as it might seem at first glance! Of course, if you are new to sewing and are at the beginning of your creative journey, you will need to learn a lot of important information - gain basic knowledge and skills, constantly improve your skills and practice regularly. This comprehensive approach to training will allow you to achieve amazing results, and you will learn how to sew clothes at a high professional level
Our Sewing School brings together masters who are truly passionate about their craft, people who constantly strive to improve their skills, generously share their achievements, and inspire novice craftswomen with their example.
The business card of the School of Sewing is the accuracy of fitting patterns to the figure
The teaching methodology, developed by Anastasia Korfiati over many years of practice, is honed to the smallest detail. The hallmark of the School of Sewing has become the system of constructing basic patterns that have a perfect fit and take into account all the features of the figure.
For the impeccable quality of tailoring your products, we have created a unique collection of detailed step-by-step master classes on working with fabrics, cutting and processing technology for a wide variety of clothing models - from simple dresses to products of the highest level of complexity - jackets and coats.
Your experience is very important to us!
Every day we work hard and create new patterns for our readers, shoot video lessons and master classes, prepare lessons to improve professional skills, answer your comments and questions. We do everything in our power to make your learning process interesting and productive.
We constantly receive feedback from our readers, conduct a dialogue with masters who use Anastasia Korfiati’s methodology in their professional activities and promptly respond to requests that arise. The results of such dialogues were the recent creation of new sections: Knitwear patterns and Ready-made patterns for downloading
Modern On-line format: study when it’s convenient for you
And one more undeniable advantage of online distance learning. You can plan your training yourself at any time convenient for you, 24 hours a day, seven days a week! All materials on the site are open around the clock and completely free for everyone. Join the Sewing School and improve your skills with us: learn to create patterns, model any styles and sew clothes from the highest quality fabrics. You will be able to create real designer masterpieces yourself, and your clothes will fit perfectly, because sewing is a very exciting activity, and the result is visible to everyone!
New on the site - in the “Fresh materials” section
Sewing order
- I cut out trouser legs from raincoat fabric, from insulation and from lining fabric. If you are in doubt about the calculations, give larger allowances. In general, all the cuts will be closed, there is no need to overcast, so I give allowances of 1 cm everywhere, 4 cm at the bottom.
- Trying on, adjustments.
- Codpiece clasp.
- Side, crotch and middle seams on the outer trousers made of raincoat fabric.
- I connect identical parts from insulation and lining. Side, crotch and center seams on the inner pants.
- I insert one pair of pants into the other. I sew the lining to the fastener. I turn up the bottoms.
- I measure the length of the top of the pants, cut out a belt of this length plus 2 cm allowances, with a fold along the top, i.e. width 10 cm - 4 cm finished. I determine where the elastic will begin and duplicate the belt part with adhesive material before the elastic.
I iron the lengthwise allowances on the waistband inward. I iron the seam allowance that will be on the wrong side a mm further. The photo below shows the difference.
The seam allowance on the reverse side is ironed to a slightly smaller amount.
I stitch the edges of the belt (the edges that are short vertical, near the fastener).
I sew the elastic to the waistband. I select the length experimentally.
I cut off the belt with the pants and sew it on.
- Button fastening. Elastic at the bottom of the trousers.
I want to say that the sewing order is similar to these pants. Here is a significantly simplified version. But if there is a misunderstanding, you can go to those pants, go down to the sewing and see how to do it. Each stage is discussed in great detail there.
Fleece vest for overalls
Cut out the details of the front and back:
Fleece, if it doesn’t fray, you don’t need to process it with bias tape, I’ll be honest - I just didn’t have time to do it, so I just processed the sections with a zig-zag:
Sew on the Velcro parts:
Sew the parts of the vest along the side seams:
We sew the vest to the top of the trousers - to the raincoat fabric:
And then we sew the lining with padding polyester to the seam of the vest and trouser legs, carefully tucking in the seam allowances. You can baste first and then carefully stitch from the front side.
these wonderful insulated pants for my son in three hours. Perhaps if I had more time, I could also make a zipper in the center of the fleece vest, but that’s for next time! Sew with me, and see you soon on the blog!
Sewing accessories
It is impossible to learn how to sew with your own hands without special sewing tools and devices. Of course, you won’t need all of them right away, but many of them should definitely be in your arsenal. It is very convenient to use special tailor's scissors, in which one ring is larger than the other, and the blades are inclined relative to the handle. With stationery scissors with flat blades, you will not be able to make cuts in the corners of the fabric. When processing a “leaf” pocket, even and precise notches can be made only with these scissors. Tailors often use zigzag scissors to cut thick drape fabrics. Trimmed edges with a zigzag do not require finishing the edge with an overlocker and will facilitate the process of sewing the product.
Sewing needles for handwork. You will also need them for work, since sweeping parts and other operations are carried out only by hand. Different types of hand needles are used and selected depending on the work being performed. Thus, needles with a rounded end are used to join parts made of knitted fabrics with a hand seam. This needle gently pushes the loops apart and slips between them without breaking the thread. Short sewing needles with a round eye are designed for small stitches on thick fabric or lining stitches. Wedge-shaped needles (triangular in cross-section) are used for working on the skin.
Tailor's pins are necessary for pinching parts during the sewing process and make work easier when trying on clothes. Tailor's pins come in different lengths and thicknesses and, depending on this, are used to perform a particular operation.
The thimble protects the tip of your middle finger from needle pricks when sewing by hand. Select the exact size thimble. It should fit freely on your finger without squeezing it, but at the same time not slip off during operation. Learn to use it by pressing the side of the needle, not the bottom. The habit of working with a thimble develops quite quickly; it is enough to put it on and wear it for the whole day, without taking it off when doing any other household work.
A threader is a loop of very thin wire held in a flat plate. It is used to thread the eye of the needle. Using a threader, you can remove thread residues to the wrong side of the product or eliminate thread strands that have appeared on the fabric.
Master Class. Children's insulated trousers: a “lightweight” method
A master class on sewing insulated children's trousers using the “lightweight” method is presented by Svetlana Karpenko from Nizhny Novgorod. Svetlana is one of the winners of our master class competition - 2007.
Svetlana Karpenko:
“Warm trousers, sewn with love by mother’s caring hands, will best protect your main treasure.
What to do if you have almost no time? Sew them together in a “lightweight” way. I sewed my first autumn trousers two years ago - they withstood endless washing and falls of my little daughter, did not tear, did not fray (without processing seams and without blocks). When they became small, I sewed exactly the same ones from the same thin rubberized fabric, so they were not only easy to sew, but also comfortable to wear. My daughter is warm not only from the padding polyester, she is also warmed by the warmth of her mother’s hands. By the way, since children grow quickly, I recommend sewing trousers a couple of sizes larger - the straps and elastic at the waist will prevent them from falling, and the elastic bands at the ankles will not allow the cold wind to pass to the legs and will allow you to adjust the length of the legs.” How quickly and easily such comfortable and practical trousers are sewn, you will see on the following pages, where Svetlana conducts her virtual master class.
11. We put blocks or, if there are none, we make two holes with a burner (if the fabric does not wrinkle, as in this case - it has been tested, the edge treated with a burner can withstand washing and washing for several seasons) on both sides of the outer seam of the drawstring of the outer pants. Fold the bottom. Leave a small area near the inner seam to insert the elastic.
Taking measurements
In order for the product to fit perfectly and not interfere with movements, you need to have the exact dimensions of the child. This means you will have to take measurements.
The boy for whom the pants will be created must stand still during the measurement process..
IMPORTANT. When taking measurements, you need to use a measuring tape correctly: it should not be too tight or sagging.
Here are the measurements that need to be taken from the boy.
- Waist circumference. For those who have a large tummy, you need to take the measurement slightly below the middle of the stomach, so the trousers will not fall down.
- Hip girth.
- Posterior midline. Measured from the waistline to the bottom of the buttocks.
- Anterior midline.
- Leg height (internal).
- The height of the product is from waist to feet.
- Leg circumference. Measure at the widest point of the leg.
Size chart
| Dimensions | Height | Hip girth | Waist circumference | Pants length along the side seam (without belt) |
| 98 | 98 | 57 | 53 | 49,5 |
| 104 | 104 | 58 | 54 | 54,5 |
| 110 | 110 | 59 | 54,5 | 59,5 |
| 116 | 116 | 60 | 55 | 64 |
| 122 | 122 | 62 | 56,5 | 69 |
| 128 | 128 | 64 | 58 | 73,5 |
| 134 | 134 | 66 | 59,5 | 78 |
| 140 | 140 | 68 | 61 | 83 |
| 146 | 146 | 72 | 63 | 87 |
| 152 | 152 | 76 | 65 | 91 |
| 158 | 158 | 80 | 67 | 95 |
| 164 | 164 | 84 | 69 | 99 |
Size chart patterns for sewing children's pants