Knitted embroidery technique
Since we are talking about embroidery on knitted items, it is worth talking a little about the technique, thanks to which, when putting on mittens, you can easily forget about winter snowstorms. Skilled needlewomen most often use the following as the main material for such embroidery: Threads.
It will be necessary to select a special embroidery thread that would match the thickness and texture of the knitted product. There are three types of seams: “through a row”, “solid” and “in a pattern”; Ribbons. They are mainly used to embroider flowers and bouquets.
As a rule, you will have to create all the schemes yourself or look for alternative sources; Beads. Delicate and iridescent beads will look good on a dress or blouse, but they are completely unsuitable for embroidery on mittens. Using each of these materials requires certain skills, since the technique of embroidery on knitted fabric is more complex than embroidery on fabric.
How to calculate the number of loops and rows for a mitten
The next step is to knit a swatch using the yarn you selected for the mittens. The knitting pattern will help you determine the number of loops and rows in one centimeter.
To do this, cast on, for example, 20 loops and knit 15 rows with stockinette stitch. Then wash and dry the sample. Then do the calculations.
Calculation example:
Measure the sample horizontally and vertically with a ruler. For example, you got 12 cm horizontally and 6 vertically. Now you can determine how many loops you have in 1 cm.
To do this, you need to solve a simple proportion:
20 loops = 12 cm X loops = 1 cm
We find X = 1*20/12 = 1.6 loops in 1 cm
Let's determine how many rows you have in 1 cm using a similar proportion, only with different values:
15 rows = 6 cm X rows = 1 cm
We find X = 1*15/6 = 2.5 rows in 1 cm
This is just an example! You must carry out the calculations according to your sample.
“Roses”
You will have to sketch out the diagrams for this work yourself, since the size of the mittens and the thickness of the yarn may differ significantly from those presented. In addition to wool and two needles with a large eye, you will also need a piece of leather or leatherette the size of a mitten. This is necessary so as not to accidentally sew on both sides of the mitten. We place them on the skin and trace them. Then he cuts out what happened.
The embroidery process can be simplified if marks are applied to the front side of the product, by which you can easily determine where the elements will be located and what boundaries cannot be crossed. We begin the work by embroidering the top bud.
In order for the roses to be the same size on both mittens, it is necessary to count the number of turns on the needle and observe these restrictions throughout the entire work. This way you need to embroider all the buds.
Then we move on to roses. The principle of working on them is the same as on buds, the only difference is that you should move clockwise. After the work on the roses is completed, the thread should be cut and secured. Now you can move on to the second mitten.
When both mittens are ready, change the threads from pink to green. We attach it to three rosebuds and embroider greenery. We surround the open roses on all sides with leaves and distribute them evenly over all surfaces of the product. It is not necessary to use one shade of green; you can add lighter tones to the composition.
We will do exactly the same work with the second mitten. Please note that the patterns played virtually no role in the embroidery process. As a result, our old mittens were radically transformed.
In the same miraculous way, they will influence our mood in bad weather and change it for the better. The same technique can be used to embroider snowflakes, flower bouquets, etc.
How to embroider mittens with ribbons: master class - Master classes on BurdaStyle.ru
latest comments
How to decorate ordinary mittens and make them an original accessory? From our step-by-step master class you will learn how to embroider stunningly beautiful roses on mittens with satin ribbons.
Author of the master class
OlgaSobyanina
✽ 1 pair of mittens ✽ Red satin ribbon 6 mm wide: 5-8 m ✽ Thin brown or green yarn ✽ Felt in the color of the yarn ✽ Beads ✽ Scissors ✽ Lighter ✽ Threads to match the ribbon and yarn ✽ 2 needles
Cut out leaves from felt.
Place the leaves on the mittens and secure them with pins.
Sew the leaves to the mittens using two or three stitches, using a seam “over the edge.”
Using double ply yarn, embroider leaves on top of felt. A straight stitch is sewn diagonally in alternating directions. The stitches should be uniform and fit snugly together. Using a thread of 2-3 additions, embroider five “rays” - the shape for the future rose. Embroider a spider web rose with a satin ribbon. Having secured the knot of tape, pass it alternately ABOVE and UNDER the rays (do not pierce the product!). When creating a rose, the ribbon should be slightly twisted. Singe the end of the ribbon and fix it under the rose on the front side. If desired, embroider the leaves and center of the rose with beads. Repeat all steps with the second mitten. Your mittens are ready! Olga has been successfully engaged in ribbon embroidery since 2012. Conducts offline master classes and records educational videos on ribbon embroidery. I am happy to share my experience, secrets and life hacks that make the life of any creative person easier and easier.
You can get acquainted with Olga’s creativity and her works on YouTube and on the blog about ribbon embroidery.
Author of the master class, photos and videos: Olga Sobyanina Material prepared by Yulia Dekanova
Source: https://burdastyle.ru/master-klassy/vyshivka/kak-vyshit-varezhki-lentami-master-klass_13078/
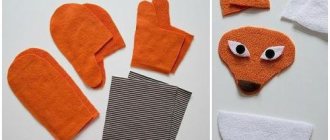
"Owl"
More complex works require more space for their implementation. Since this space is limited on mittens, it is worth using simpler embroidery patterns. Such schemes can be found in specialized literature or on the Internet.
You can embroider popular cartoon characters, forest animals, snowflakes, butterflies, etc. on children's mittens. The execution technique can be very diverse: rococo, crocheting, beading and even the use of voluminous embroidery. In this case, we use the image of an owl. The threads should be dense and match the color.
First, let's embroider dark brown wings and toy horns. Then you can move on to the rest of the feathers: work on them, and then on the salad-colored scarf. Finally, all that remains is to embroider the eyes. For the second mitten, you can use the same picture or find a diagram of another bird.
How to determine the size of a mitten:
To begin, take a simple sheet of paper and a pencil. (Yes, this may surprise you, but these are the items you will need.) Place your hand on a piece of paper, slightly move your thumb to the side, and trace it, so you will get a pattern for your future mitten
Then you need to make markings. To do this, mark auxiliary lines in the figure. Line A is the end of the cuff and the beginning of knitting the main body of the mitten, Line B is the beginning of separating the thumb from the main body, Line B is the tip of the little finger and the beginning of decreases to form the toe, Line D is the beginning of the thumb Line D is the beginning of decreases for the thumb
And measure the distance between them and the length of line B with a ruler.
“Rabbit and the Frog Princess”
Who in childhood did not love fairy tales with kings, evil wizards, robbers and beautiful princesses? Everyone loved them. You can use old fairy tales as the main theme for embroidering children's mittens. Almost all schemes can be adjusted.
The dimensions of the image can be reduced a little, but the resulting picture must be proportional. First you should embroider a hare of a light carrot color. Gray shadows, which definitely need to be worked out, will give the embroidery the desired depth.
The bunny holds a frog in its paws, and only by the small crown can we guess that in front of us now is a royal person, but a complex amphibian animal. The main background of the picture will be the same color as the mittens. The grass cannot be ignored, as it plays a unique unifying role in the composition.
This image can be embroidered on both mittens or you can choose different designs. A real needlewoman can turn a blouse, scarf or jeans bought in a store into a real work of art, thanks to which the clothing becomes not only a decoration, but also acquires a certain value. No one will have a second copy.
Patterns for cross-stitching on mittens
In the cold season, we all put on sweaters, pull on hats and mittens. Plain things are practical, but quickly get boring. Let's decorate ordinary sweaters, mittens and hats by doing embroidery on knitted clothes. This is not at all difficult, but it looks impressive, allowing you to create unique things for adults and children.
Schemes depicting bullfinches and snowflakes
This pattern, which depicts red-breasted bullfinches, is embroidered not only on canvas, but also on winter accessories, on mittens, a scarf and a hat. To work, you will need only five bright shades of floss.
Threads of red, orange, gray-blue, white and black will be required. You can embroider not only with wool threads, but also with floss in several folds. The figure shows the center with a black arrow. To somehow diversify the image of the bird, you can add several snowflakes of simple shape.
Snowflakes are perhaps the simplest thing that can be embroidered using the cross stitch technique. Nevertheless, this festive and winter image is one of the most popular among needlewomen who have not yet achieved great heights in such skill.
You only need one color to work. It can be white or blue, that is, classic for snowflakes. This design will not take up much space, since it measures thirty-two crosses vertically and the same amount horizontally. The design can be embroidered both in the center of the product and on the sides in a chaotic movement. If such a design seems a little boring and monotonous to you, you can safely decorate it with sequins and iridescent beads.
Knitted mittens - interesting models from the Internet
Knitted mittens “Princess” from Pusi
Knitting pattern for the pattern:
How to knit “Princess” mittens with knitting needles, see the link
Knitted mittens “Cranberry” from Tatyana Nosova
Mittens knitting patterns:
Master's shop link
Knitted mittens from Azhurchik from Osinka
Merino yarn 50% merino wool, 50% acrylic, 200m/100g, consumption less than 100g, knitting needles No. 2.5
Mittens knitting patterns:
Mittens knitted Magic Mirror (designer Kristel Nyberg)
Translation by Annaper from Osinka.
Transformable mittens using Vasama knitting needles
A fashionable model of women's mittens with a free description of knitting with beautiful patterns. But that’s not all, they can easily be transformed into mitten gloves to open your fingers and easily send SMS from a mobile phone, which is convenient for young people, and not only for young people.
Knitting mittens patterns and descriptions
A selection of patterns and descriptions for knitting children's mittens
Warm children's mittens will help protect your child's hands from the cold even on the coldest days. Today in the store you can purchase options for every taste. But things made with love and with your own hands are always better. A
Read more…
Beautiful knitted mittens with a jacquard pattern
Designer: Adrian Bizilia
The mittens are knitted from the bottom up. First, the outer part is knitted, then loops are raised along the inside of the dur-cord and the lining is made.
Both mittens are the same, that is, there is no left and right, which means they can be worn longer.
Mittens knitting patterns
Mittens knitted with a braid
Mittens knitting patterns
Knitted mittens with jacquard
Knitted mittens with jacquard pattern Okolitsa
We present a description of the new mittens from irena-handmade. To make them I used very warm yarn. This is Okolitsa sheep wool from the Russian factory Kamtex (Podolsk). The weight of the finished product is almost 80 grams. The degree of difficulty is average. This model uses a straight cut
Read more…
How to knit mittens with knitting needles using an Indian wedge
Today I would like to share my experience in knitting mittens with an “Indian” wedge for the thumb. The back part is decorated with an original “braid” pattern. This model is also attractive with its interesting decor: the beginning is a hoop, cozy pom-poms and a light gradient. Well-deserved praise
Read more…
Christmas trees and deer for embroidery on knitted items
And of course, how can one not remember the New Year’s classic, that is, a drawing depicting a Christmas tree and a deer. Such pictures will turn even the most boring and monotonous mittens into simply festive accessories. To embroider a spruce tree you will only need green thread.
And in order to properly decorate New Year’s decorations on it, you will again need bright beads for these purposes, which should be embroidered along the edges of the branches. The advantage of this work is that you will not spend a lot of time and effort; everything can be done in just a few hours.
For children's mittens, an image with a cute deer is most suitable. It is also not large in size, only twenty-nine by thirty-eight crosses. If the mittens are knitted from dark yarn, then use light-colored floss, and of course, this principle also applies vice versa. The picture with a deer can also be diversified with small snowflakes, which will also be relevant.
After everything described above, we invite you to consider another selection of patterns with designs suitable for embroidery and study the current video lesson.
Christmas tree schemes
Such small Christmas trees will amuse even the most “boring” mittens. You can embroider them the same on two mittens or even different ones, it will be more fun. In addition, this is a good opportunity to recycle the remnants of multi-colored threads, as well as metallized remnants, which would be a shame to throw away and will no longer be useful for large projects. Also, beads or small bright beads for decoration are perfect for such scenes. To embroider the top left and bottom left Christmas tree, you need to use three shades of green, yellow, red, orange, blue and purple. The work is done with a cross. For the top right Christmas tree, the number of green colors is reduced to two, and in the bottom right tree, only one green shade is used for embroidery.
Mittens with embroidery
You will need: 100 g of brown wool yarn (300m/100g). hook No. 2, 5, colored threads for embroidery.
Chain of 4 air. p. close into a ring 8 st.b/n. Make increases as in a circle, but in each row not 6 times, but 4 times, i.e. perform not a circle, but a cone. Increase until the total number of stitches is 36, i.e. approximately 19 cm.
Switch to knitting without increases and knit 8 cm (14-6=8). Then make a hole for the thumb, i.e. leave 8 loops undone and cast on 8 chain stitches. After this, knit another 6 cm in a straight double crochet stitch, and then perform a 1 x 1 rib stitch, i.e. alternate convex and concave stitches, double crochet to any height (4-6 cm).
After this, proceed to knitting the thumb - knit 8 treble stitches + 1 (side) + 8 chain stitches. + 1 (on the side), i.e. 18 loops and knit dc 5 cm high, then knit 2 stitches together until 3-4 stitches remain. Pull the loops.
Embroider the finished mittens using the “rococo” technique for the centers, and the “smooth” technique for the petals and leaves.
Embroidery
Some types of seams that are often used for embroidering knitted fabric.
Loop stitch: repeats the shape of a knitted loop. Therefore, it is often used instead of labor-intensive knitting of an ornament. The embroidered stitches can match the knit stitches or be 1, 2, or 3 knit stitches wide and 1, 2, or 3 rows high, spaced apart, or tightly fitted to cover the background.
"Rococo". Wrap the end of the needle with thread three or more times (depending on the size of the pattern), pull the needle through the turns, holding them with your finger, and inject it into the fabric near the point where the needle exits. Used for embroidering roses and small bouquets.
Double-sided stitch. Stitches need to be placed frequently, tightening them evenly and directing them as required by the design. With this embroidery technique, the stitches are the same on both sides of the fabric.
Typically used for embroidering floral patterns of flowers and leaves. To obtain a more embossed pattern, the flooring is first made, and the satin stitches are embroidered across the flooring.
MK on an embroidered mitten with lining / cross stticched mitten tutorial
Here is my tutorial on assembling a cross stitched mitten as a real one