A skirt never goes out of fashion—its style, length, and cut change, but the product itself remains a necessary item in a woman’s wardrobe. A variety of models are designed to emphasize the advantages of the figure, making it graceful and attractive. Sometimes women find it difficult to choose the right style. In this case, you should pay attention to the bell skirt - a universal model that fits almost any type of female figure.
What it is
The name “bell” was assigned to the product because of its conical shape: the skirt widens slightly from the waist to the hem line.
Sometimes the style is confused with the “semi-sun”. The styles are similar only in appearance, but differ in width. The bell skirt is slightly narrower - it occupies 1/5-1/7 of the circumference, while the “half sun” accounts for 0.5 of the circumference. The first variety lies flat, and the second - freely.
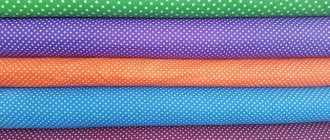
Huge color palette
The length of the model is arbitrary: mini, midi, maxi - it all depends on the preferences of the owner of the product, and the thickness parameters of the bottom are based on the structural features of the body.
Sewing the product is easy. The sewing process will not take much time. In patterns published on the Internet, DI is not taken into account, since drawing a line to the desired mark is not difficult, the main thing is to correctly calculate the waist and hips.
Handmade product
The skirt looks good on a figure of ideal proportion, without flaws. When cutting out bell skirts and patterns with your own hands step by step, the emphasis is on the hips and waist. This skirt is made in different variations: mini, midi, maxi. In any case, the product will look perfect on a proportionate female figure. A DIY bias skirt pattern step by step is not difficult to make; such a product can be cut by a novice seamstress. The most important thing is to perform an accurate calculation of the fabric, take measurements, and determine in advance the width of the future product. In terms of width, such products are:
- Slight odor;
- Average;
- Wide.
Slight smell
To ensure that the product looks perfect on your figure, you should match the length of your waist to your hips:
- If the difference between the waist and hips is insignificant, it is preferable to choose a narrow option;
- If it’s big, it’s on a wide bell.
To help those who want to sew a product, instructions.
The appearance of the bell cut
The fashion of the past for full skirts, which made the waist narrower and the hips rounder, became an inspiration for famous fashion designers. A revolution in the bell cut occurred in the mid-twentieth century, when Christian Dior proposed the “New Look” collection - a tight-fitting top, a narrow belt at the waist, voluminous folds of midi-length fabric.
Mary Quant shortened her full bell skirt to mid-thigh, which created a real sensation among fashionistas. A classic modern model has appeared - the waistline is emphasized by a narrow belt, and a flat hem that widens downwards.
Modern design has brought variety to the canonical style - “bow” pleats have been added, making the skirt even fuller. The cut of the belt has changed, it has become wider, and decorative items have appeared on it.
- The bell version on the yoke implies that the woman’s waist or hip line moves slightly relative to her own. This trick helps correct possible figure flaws.
- The elastic waistband is suitable for summer skirts made of thin and flowing fabrics.
Fabric selection
For beginner seamstresses, the best choice is a plain material. The fabric should not be loose - satin, linen, denim, leather.
You might be interested in How to make a fabric needle bed with your own hands using a pattern
Note! Experienced needlewomen prefer silk or chiffon, knitwear. If you need your skirt to be warm, you can opt for a soft wool blend and sew a thin lining fabric to it.
Plain fabric
When sewing a product, it is better to choose plain fabrics, although the presence of checks and small patterns will not affect the appearance of the product.
When choosing a material, do not forget that cotton shrinks when washed; before sewing, you need to wet, dry and iron the material.
Satin bell skirt
Fit style
The ideal version of the “bell” requires selection based on the occasion, silhouette and length. Parameters worth paying attention to:
- Body type. The model is suitable for ladies who need to add volume to their hips, and those who need to hide curvy figures. In this case, the length of the skirt should stop exactly at the middle of the knee. If the task is to define or highlight the waist, you should choose a style with a thin belt. Products with pockets and a decorated yoke are suitable for those with an hourglass figure type.
Length. For petite ladies, a short bell skirt with numerous pleats is suitable. A long skirt is relevant for ladies who would like to hide excess volume, and simply for mysterious people. For women who don’t want to hide anything, a mid-length model will help them remain elegant.- Occasion. The season is an important criterion in choosing the fabric from which the model is made. In summer - natural fabrics with prints or made in monochrome. In the cold season and demi-season options - dense material with a classic pattern or plain. Of no small importance is the occasion for which a bell skirt is worn, and the style of its owner. The floor-length length integrates with many styles and is suitable for the evening. Mini is a street look for a girl.
- Color. An option for all occasions is a plain high-waisted bell skirt. Light models, as well as with bright patterns - a summer wardrobe. The off-season allows you to wear rich colors - blue, green, red. During the cold season, various fabrics with fantasy and animal prints are relevant.
The versatility of the “bell” makes it possible to create many looks for daytime outings, as well as evening events. It is better to combine this model with a tight-fitting or maximally loose (airy) top. A shirt in the style of a men's shirt and a jacket with a silhouette will make an excellent business outfit with a bell skirt.
Constructing a pattern
Draw a 90 degree angle on paper with point A at the vertex. Find the value of K.
K - characterizes the curvature of the upper section of the skirt at the waist. Depending on the expansion of the product along the lower boundary, K is:
- 0.8 - large bell;
- 0.9 - average;
- 1 - small.
Choose the middle bell. The K value is 0.9.
Pattern No. 1
How much fabric will you need?
- Calculate the radius of the construction using the formula: K x (OT/2 + 1 cm). For example: 0.9 x (78/2 + 1) = 0.9 x (39 + 1) = 0.9x40 = 36 cm.
- Lay A to the right, the resulting value and put the designation T. A rounded line is drawn down from T. The value of OT/2+ cm for fit is plotted along the line. For a specific example - 78 cm/2 + 1 cm = 39 + 1 = 40 cm.
- Point T1 is placed. From point A through T1 there is a downward line. CI is measured from T and T1. In this case - 70 cm.
- The designations H and H1 are indicated.
- Check the hip line. For items T and T1, put the skirts down 18 cm, set the designations B and B1, draw the main line, measure it. The line length is no more than 52 cm in a particular case.
- Draw a bottom line from point H to point H1.
- Raises the waist and bottom.
Draw the center line of the pattern, setting aside the distance upward, depending on the type of bell:
- Large - waist - 1.5 cm, bottom - 3 cm;
- Average - 1.25 and 2.5 cm;
- Small - 1 and 2 cm, respectively.
When cutting, you should pay attention to cutting the product obliquely.
Bell skirt pattern
How to cut a sleeveless dress with your own hands using a ready-made pattern
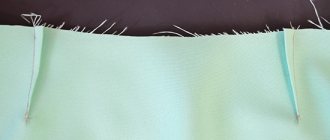
For cutting, the fabric is folded in half, and the edges are aligned and positioned parallel to the edge of the cutting table (Figure 2).
The front and back patterns are placed on the fabric with the middle seams towards the fold and edges. In this case, the allowances for the middle, side and shoulder seams will be 1 cm. The armholes, sprout and neckline are cut out beyond the outline line of the patterns. And the allowance at the bottom should be added based on the method of processing you have chosen, plus 1 - 2 cm to equalize the length.
By the way, leveling the length is a necessary operation when sewing flared dresses and circle skirts.
And this need arises due to the different directions of the threads along the seams of the product. In this dress, the middle seams are located along the grain, and the side seams are located along the bias and, therefore, will stretch under their own weight.
You've probably often seen the pattern in similar dresses and flared skirts or even coats sewn in factories - the side seams in these products sag, and the back and front look short.
In order to “balance” the product to some extent, I made deflections along the middle seams of the back and shelf.
Returning to cutting, I will add that the “top” and “cover” (lining) of the dress are cut out the same way. In this case, the “cover” can be shorter or longer than the “top”. Same length is also possible.
How to sew
The product can be sewn with one seam - if the size chart allows, with 2 or 4 seams. The product will fit perfectly on a belt with a zipper and an elastic band.
You might be interested in this. Examples of beautiful patterns for bodysuits and slips for newborn babies
What is required for sewing?
- Material;
- Lightning;
- Button;
- Threads to match the fabric;
- Scissors;
- Special machine needles.
Bell skirt pattern
Work progress:
- Sew the side seam, sew in the zipper;
- Sew on a belt;
- Process the bottom of the product. An overlocker must be used to finish the seam.
Important. To avoid damaging the fabric, you need to make sure that the pattern is laid out correctly - the cut is folded along the grain (the weft thread is located along the edge).
How to cut?
- Patterns are applied to the cut, folded in half, so that one of the sides coincides with the fold of the material;
- Outline the pattern with chalk;
- Make seam allowances - cm;
- Cut out the panel;
Sewing in 2 seams
Sewing differs slightly: instead of a fold line on the fabric there is a cut line, to which, when cutting the product, a slight seam allowance is made. Operating procedure:
- Cut out the product;
- Cut out the canvases: front and back.
- Markings are made on the left cut under the zipper;
- Stitching the seam to the marking;
- Ironing, overcasting;
- Marking and attaching the zipper, stitching is done carefully.
Important! Before sewing the belt, the product is tried on - if the waist is loose, the fabric is stitched together with coarse stitching.
Pleated skirt
In order for others to appreciate the beauty of the figure - the waist and hips, you can sew the product with folds. The folds can diverge from the waist, or they can diverge from the hips; most often, they make counter folds.
Pleated skirt for girls
If there are several folds, you need to sew carefully so that their quantitative ratio in front and back is the same.
The basis for creating a pattern for a product with pleats is the classic version of the pattern, but it should be taken into account that it will take more fabric to sew a skirt with pleats.
Skirt cut with one pleat at the front
The basting is removed from the fold and ironed.
Model with several folds, cut in a similar way. The cut is based on a basic pattern.
Product with one counter pleat at the front
Skirt pattern with several folds
The finished pattern is cut into pieces according to the number of folds. At an equal distance along the line of the arc of the waist, bottom, mark the points and places of their connection.
- Cut along the formed lines.
- The wedges are laid out on the material in such a way that the distance between them is the same, identical in the depth of the fold, and the cut lines are parallel to each other.
- Trace with chalk, leave allowances.
- Cut and baste folds;
- Stitching side seams, inserting a zipper, sewing on a waistband, finishing the bottom.
- The final touch is ironing the folds and removing the basting.
You might be interested in this: Simple patterns and methods for sewing nightgowns
Bodice and hem finishing
If the calculations are carried out correctly, the hem line needs to be double-checked, the product tried on and trimmed if necessary. All this is not done at once: the skirt is wetted, dried, ironed, the bottom is leveled, and the protruding fabric is trimmed.
The design of the bottom can be done using an overlocker (when sewing from knitwear), and the machine can be hemmed manually using a “blind” stitch (hem parameters - 5mm). If desired, stitching of the bottom, edging with cord, sewing on a frill or lace material can be done.
How to sew a belt
To prepare a belt, draw a rectangle with the appropriate parameters (the belt part takes up 0.5 of the product). Patterns are placed on it, secured with pins, outlined with chalk and cut out.
The resulting part (strip) is folded along the inside out, in half, and the short sides are sewn together.
Important. To make the corners neat, some of the allowances are cut off from the part.
The part is turned inside out, ironed, and the seam allowances are ironed inward along the long side.
Insert the skirt along the waist line into the belt and baste it.
Stitching the waistband using an edge stitch.
Cut and sew over a buttonhole.
Sewing on a belt
Basic model
You can start cutting directly on the fabric. The length of the fabric should be equal to the width or two-thirds of it.
Construction and cut of the skirt
Before you start working, wet-heat treat the fabric (steam with an iron). This procedure will help avoid unwanted stretching of the fabric in the product. Bell skirt pattern for beginners - option of two panels:
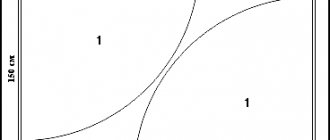
- Fold the fabric in half. In this case, the canvas should turn out to be a square, the sides of which are equal (150 × 150 cm). Material consumption - 2 meters.
- Each square should be cut out and folded diagonally.
- Place the patterns on a flat surface so that the right angle of both parts is at the bottom left, the sharp ones turn to the right - down, and to the left - up. You should get a triangle.
- Up to the sharp corner from the folded straight line, set aside the desired length of the future product. Cut this place in a semicircle - there will be a waist. Attach a measuring tape to the resulting belt line and draw a semicircle for the length of the skirt along the entire workpiece. Add 1 cm per seam to each line. Cut along the resulting contour. The bell skirt pattern is ready.
- Connect the back and front panels. Sew by machine, but do not sew 15-20 cm on the left.
- Sew in a zipper.
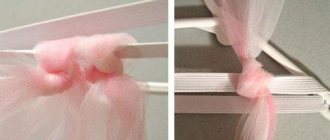
- Cut a strip of fabric according to your waist measurement, add 3-4 cm for overlap - there will be a button and a loop. Attach the front side of the belt to the wrong side of the fabric and sew on a machine. Fold the waistband in half, turn the edge under and stitch to the front of the skirt. Make a loop at one end of the waistband, don’t forget to stitch it. Sew on a button. The belt can be reinforced with adhesive tape.
- Hang the finished skirt on a hanger and leave it overnight. The central part will stretch. Hem by machine or by hand using a blind stitch.
Modeling options
The basic model allows you to build a product based on creative ideas, and will also become a detail of the bell dress pattern. Feel free to change the configuration, make folds in the fabric, adjust the length of the product. The hem can be made asymmetrical by shortening one panel to the desired amount. The width of the belt also varies from 4 to 10 cm. The side seams of the model, if the figure allows, are perfect for set-in pockets. The pattern of a bell skirt with pleats in construction does not differ from the universal model.
Do not use fabrics that are too soft when sewing for the first time. They do not hold their shape well and are very inconvenient to work with, just like flowing materials.
Denim, leather, and linen with a small content of artificial threads serve their purpose perfectly.
This is interesting: Pattern for women's midi skirt (p 34-44 European / 40-50 Russian)
How to wear
This product is a real find for a fashionista. The skirt is perfect for creating different looks: frivolous, elegant, for going to work - it all depends on the material chosen for sewing the product.
Advantages: emphasizing the strengths of the figure, hiding flaws with the correct cut in length. For example, knee-length models lengthen the legs and hide the width of the hips. Pleated skirts emphasize the waist and give the missing volume to thin hips.
Top options:
- Blouses;
- Mikey;
- Jumper;
- Turtleneck with a classic cut.
Note! In order for the product to look perfect, the top of the composition should be devoid of volume, since the skirt is flared downwards.
It is for this reason that the top should be simple.
By color scheme
Colored items go well with plain ones, and a white blouse and a plain skirt are a great option for the office.
Historical excursion
Men and women of Ancient Egypt, according to archaeologists, wore fabric on their hips, secured with a rope belt - petticoats, on top of which they wore an apron. Persian warriors, who had this voluminous item of clothing, intercepted it between their legs for convenience when riding.
In sixteenth-century Europe, the skirt became a separate item, and its wearing became the prerogative of women. Yupa was a piece of underwear worn by Russian residents until the 18th century. The modern name appeared here only in 1701, with the light hand of Peter the Great.
Fashion, as you know, is very fickle. The length and shape of clothing changed , for example, European noble ladies of the 15th century wore trains, the length of which depended on the lady’s position in society. The Renaissance added splendor not only to architecture, but also to women's wardrobe. Multi-tiered skirts appear, the basis of which is a frame made of horsehair or metal. Eighteenth-century French women had difficulty getting through doors due to the new-fangled trend of oval crinolines.
The role of women in the twentieth century has changed significantly, and as a result, fashion has also changed. Clothes have become simpler and more comfortable.
This is interesting: Pattern for women's flared skirt (r 8-20 UK/42-54 Russian)